Onboard SOAP API
Overview
The Yappes SOAP API onboarding allows you to integrate and manage SOAP-based web
services within the Yappes Enterprise API Manager platform, enabling you to
achieve seamless API governance and deployment across your organization.
This powerful feature transforms traditional SOAP services into managed APIs that can be monitored, secured, and scaled through the Yappes platform's comprehensive API management capabilities.
By leveraging the SOAP API onboarding feature, you can quickly configure legacy SOAP services, add custom operations, define headers and response schemas, and deploy APIs with enterprise-grade reliability.
The streamlined onboarding process eliminates the complexity traditionally associated with SOAP service integration, allowing you to focus on delivering business value rather than wrestling with technical configurations. Whether you're modernizing legacy systems or integrating with partner services that still rely on SOAP protocols, this feature provides a bridge between traditional web services and modern API management practices.
Prerequisites
Before beginning the SOAP API onboarding process, ensure you have:
Active Yappes Enterprise Account: Valid credentials for the Yappes Enterprise API Manager platformRequired Permissions: API management and deployment privileges within your organizationAt least one Upstream: Create a backend target underGateway Control → Upstreambefore onboarding. See Upstream.SOAP Service Details:Service nameand operation detailsSOAP version(1.1 or 1.2) being used- Any required
headersorauthentication parameters Publishing Path: A unique gateway-facing path prefix (e.g./public) for the APIAPI Classification(required — multiselect; choose one or more ofPublic,Internal,Partner; defaults toInternal. Locked after the first save.)Base Path: Required for SOAP (for example/sample.wsdl)API Logo(jpeg or png only). Optional but recommended.Marketplace Tags. (Create one if not already.)
Step-by-Step Implementation
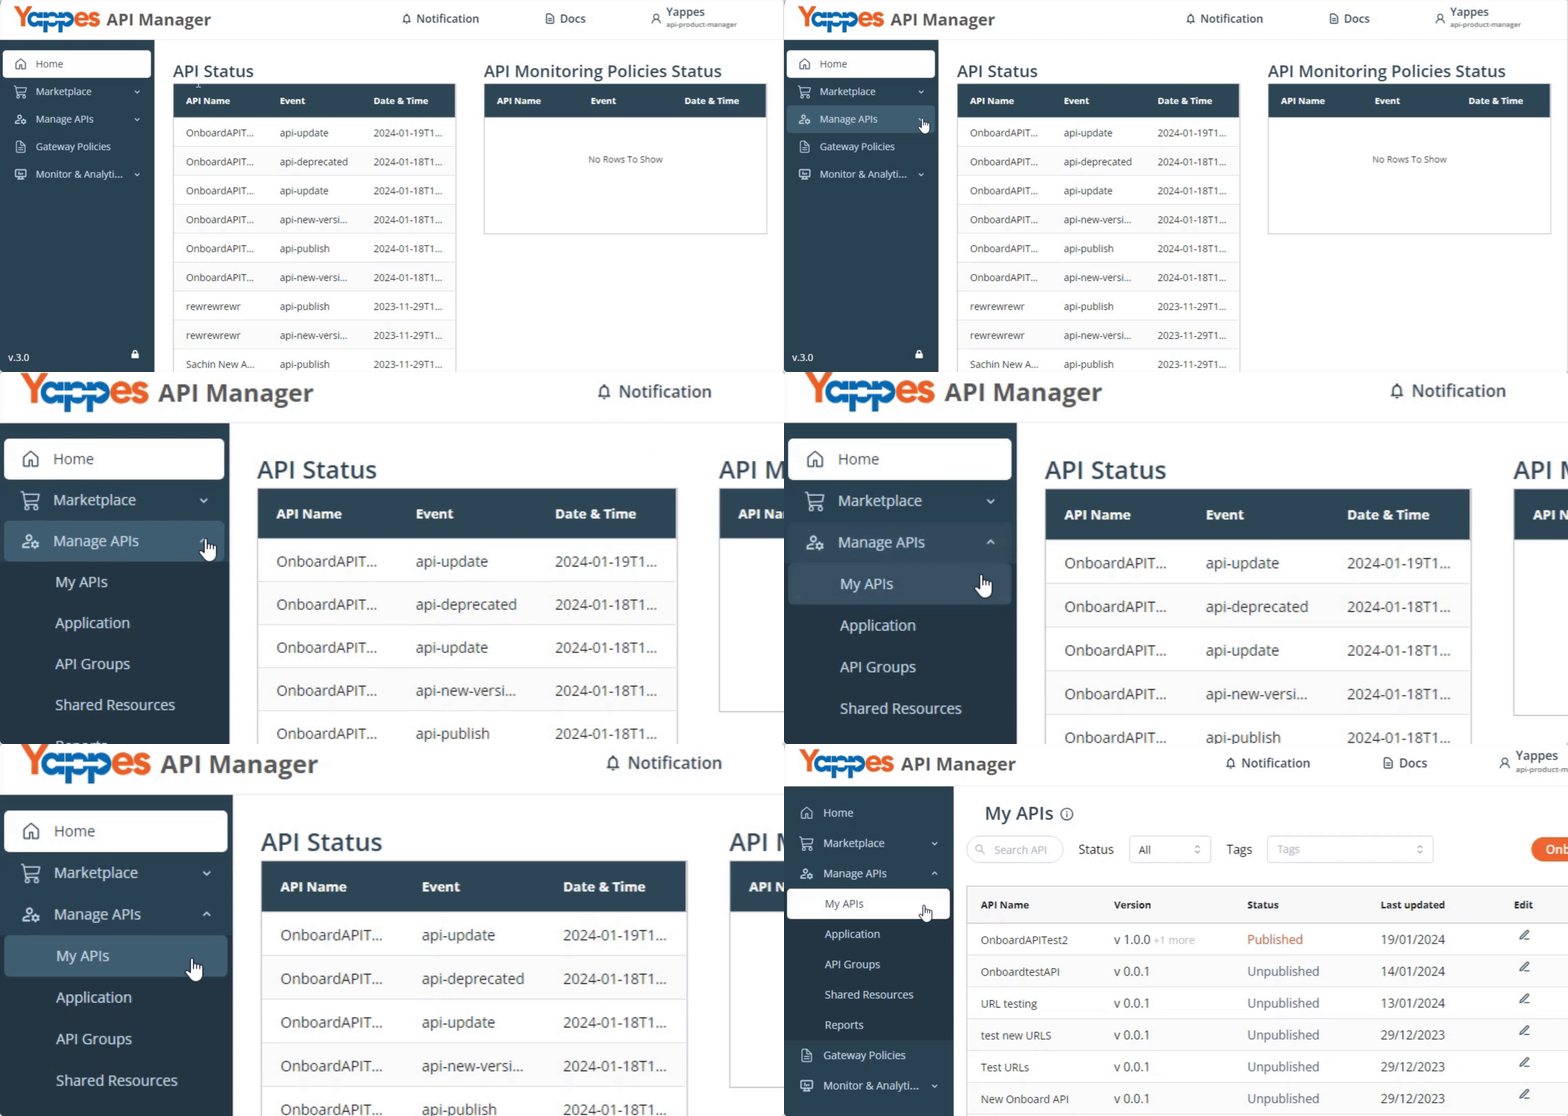
Step 1: Navigate to My APIs
- Locate
Manage APIs → My APIsin the main navigation menu - The system will display your existing APIs (if any)
Step 2: Initiate API Onboarding
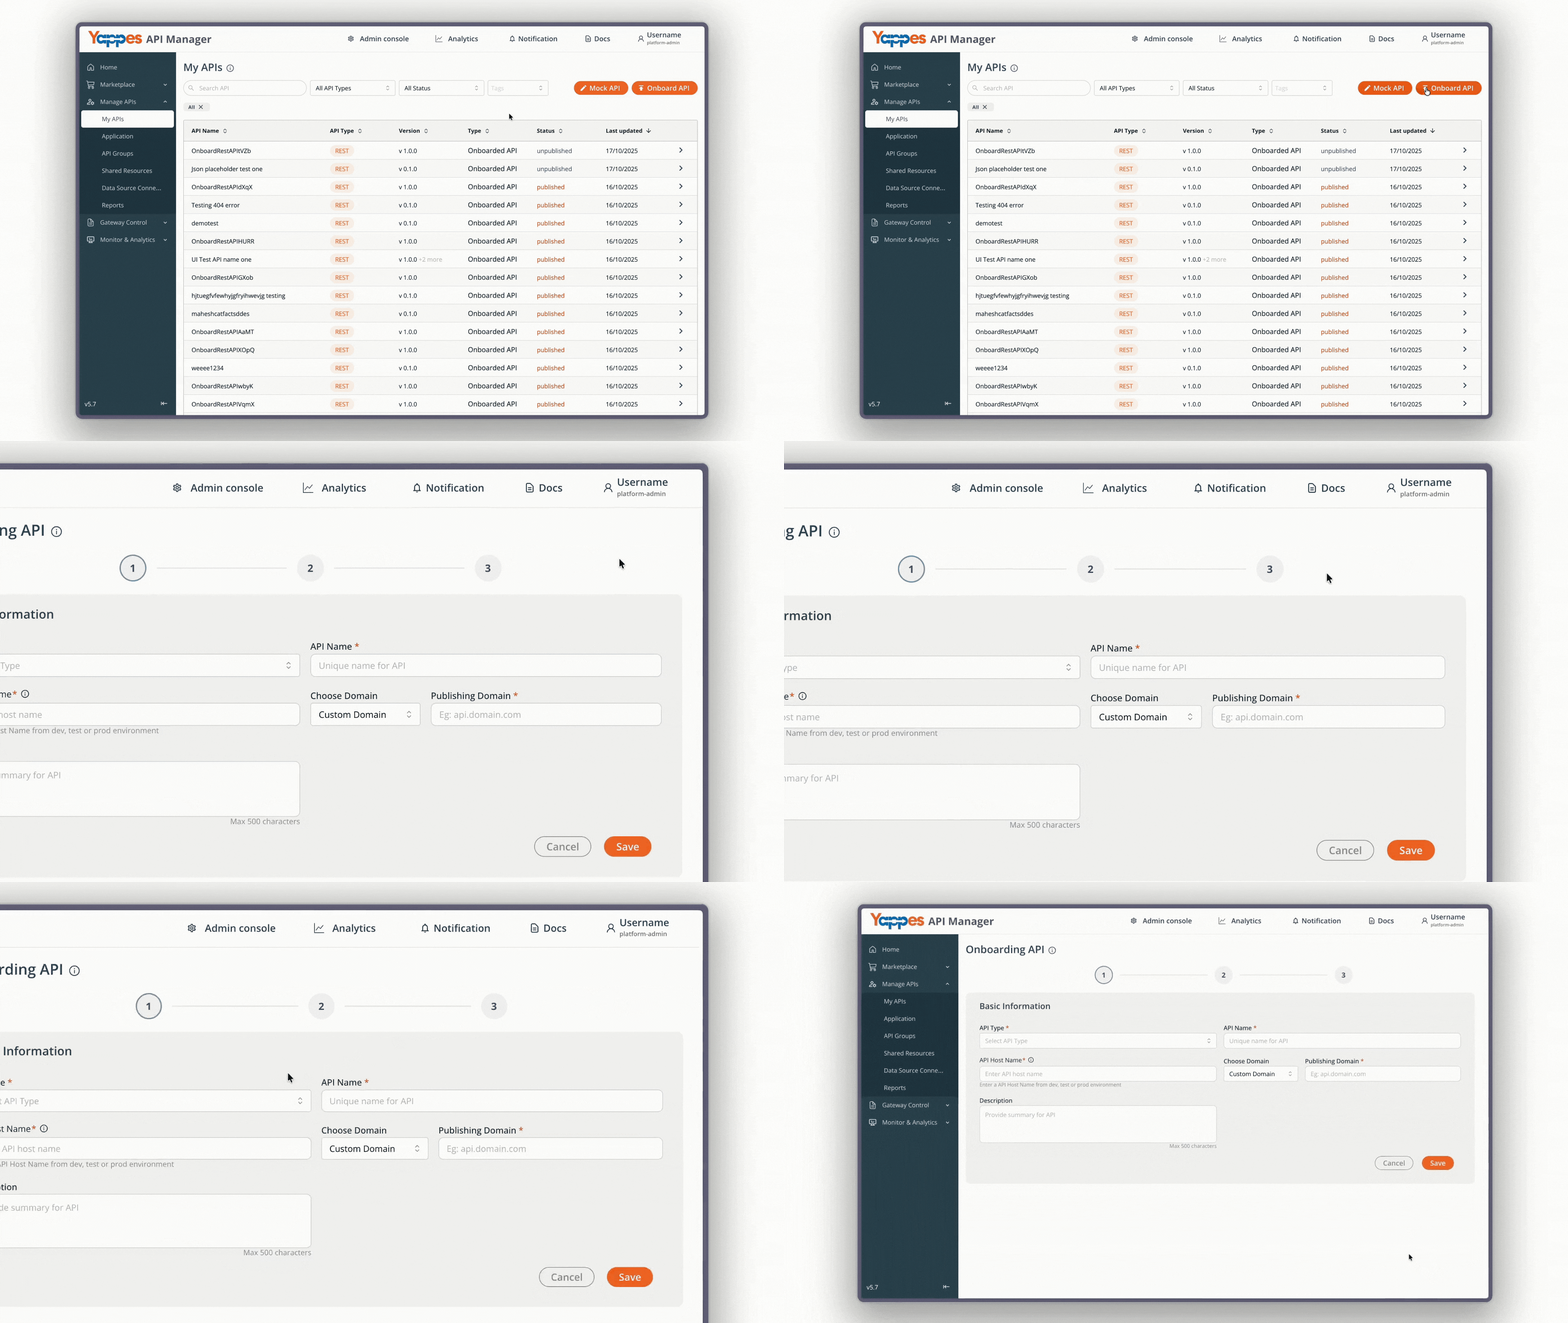
- Click the
Onboard APIbutton to start the onboarding process - The API onboarding interface will open, presenting you with API type options
Step 3: Select SOAP as API Type
- In the
API Type*dropdown field, click to see available options - Select
SOAPfrom the list of API types - The form will update to show SOAP-specific configuration fields
Step 4: Configure Basic API Information
- In the
API Name*field, enter a descriptive name for your API - In the
API Classification*field, choose one or more ofPublic,Internal,Partner(defaults toInternal; locked after the first save) - In the
Base Path*field, enter the base path (for example/sample.wsdl) - In the
Publishing Path*field, enter the gateway-facing path prefix (e.g./public); it must be unique across all platform APIs - Optionally enter a
Description
Step 5: Save Initial Configuration
- Review all entered information for accuracy
- Click the
Savebutton to store your API configuration - A confirmation message should appear indicating a successful save
Step 6: Configure Upstream Servers, Logo, and Tags
After saving, additional sections appear for upstream servers, logo, and tags.
Configure Upstream Servers
- Go to
Configure Upstream Servers. - In the
Upstreamfield, select an upstream (placeholder:Select Upstream here). - Click
Update.
Info
If you see No upstream created for this API type, create an upstream under Gateway Control → Upstream with the matching API Type (including TLS on the Upstream form if needed), then return and select it.
Configure TLS on the Upstream target when the backend requires it. See Upstream.
The same Configure Upstream Servers control is available when you reopen the API from Manage APIs → My APIs (API Details).
API Logo and Marketplace Tags
- Go to
API Logoand clickUploadto add a logo (jpeg, jpg, or png; less than 1MB). - Go to
Marketplace Tags, search, and select tags for discoverability.
Info
If no marketplace tags exist, create one in Marketplace Tags.
- Click
Nextto proceed to operations.
Step 7: Add SOAP Operations
You can add SOAP operations in two ways:
-
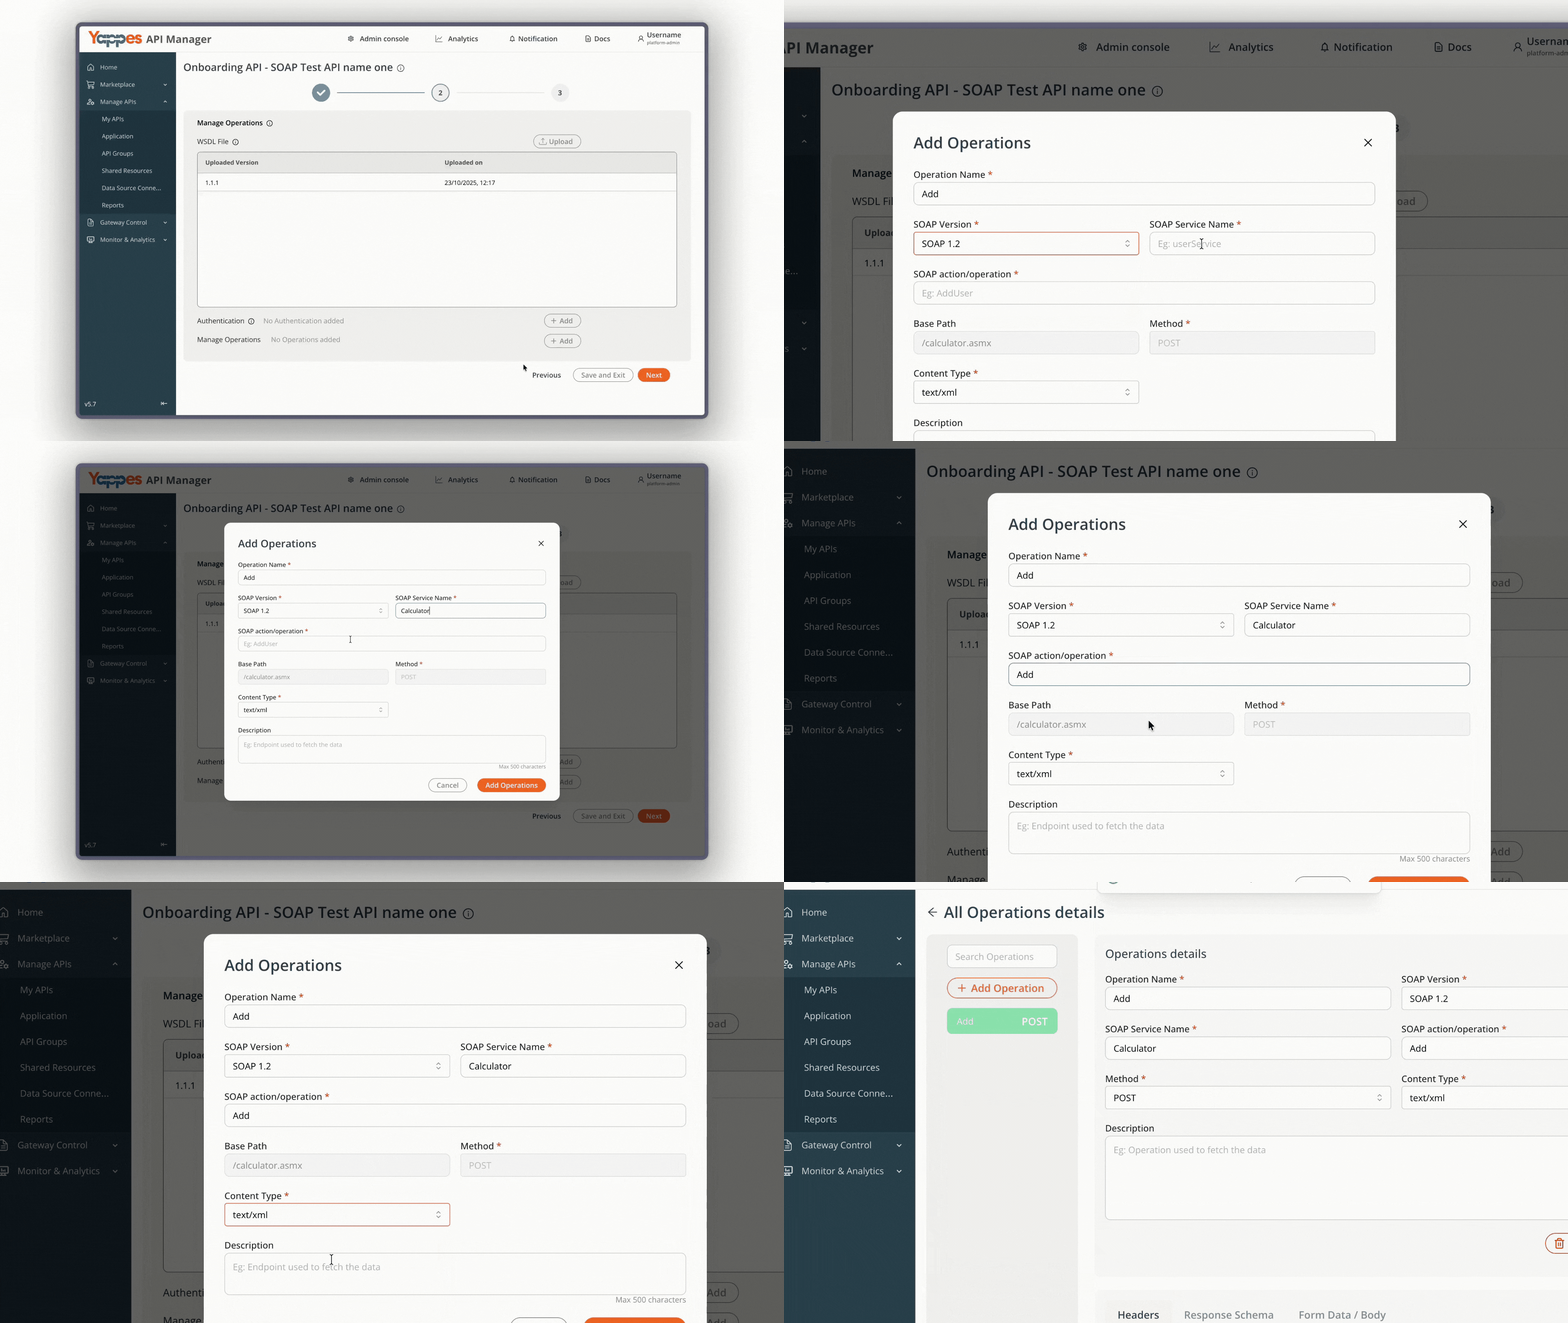
Option 1: Manual Operation Entry- Click the
Addbutton to begin adding operations - In the
Operation Name*field, enter a descriptive name for the operation - This name will be used to identify the specific SOAP operation
- In the
SOAP Version*dropdown, select the appropriate version (typicallySOAP 1.1orSOAP 1.2) - In the
SOAP Service Name*field, enter the exact service name from your WSDL - In the
SOAP Action/Operation*field, enter the specific action or operation name - Click
Add Operationsto save this operation configuration
- Click the
-
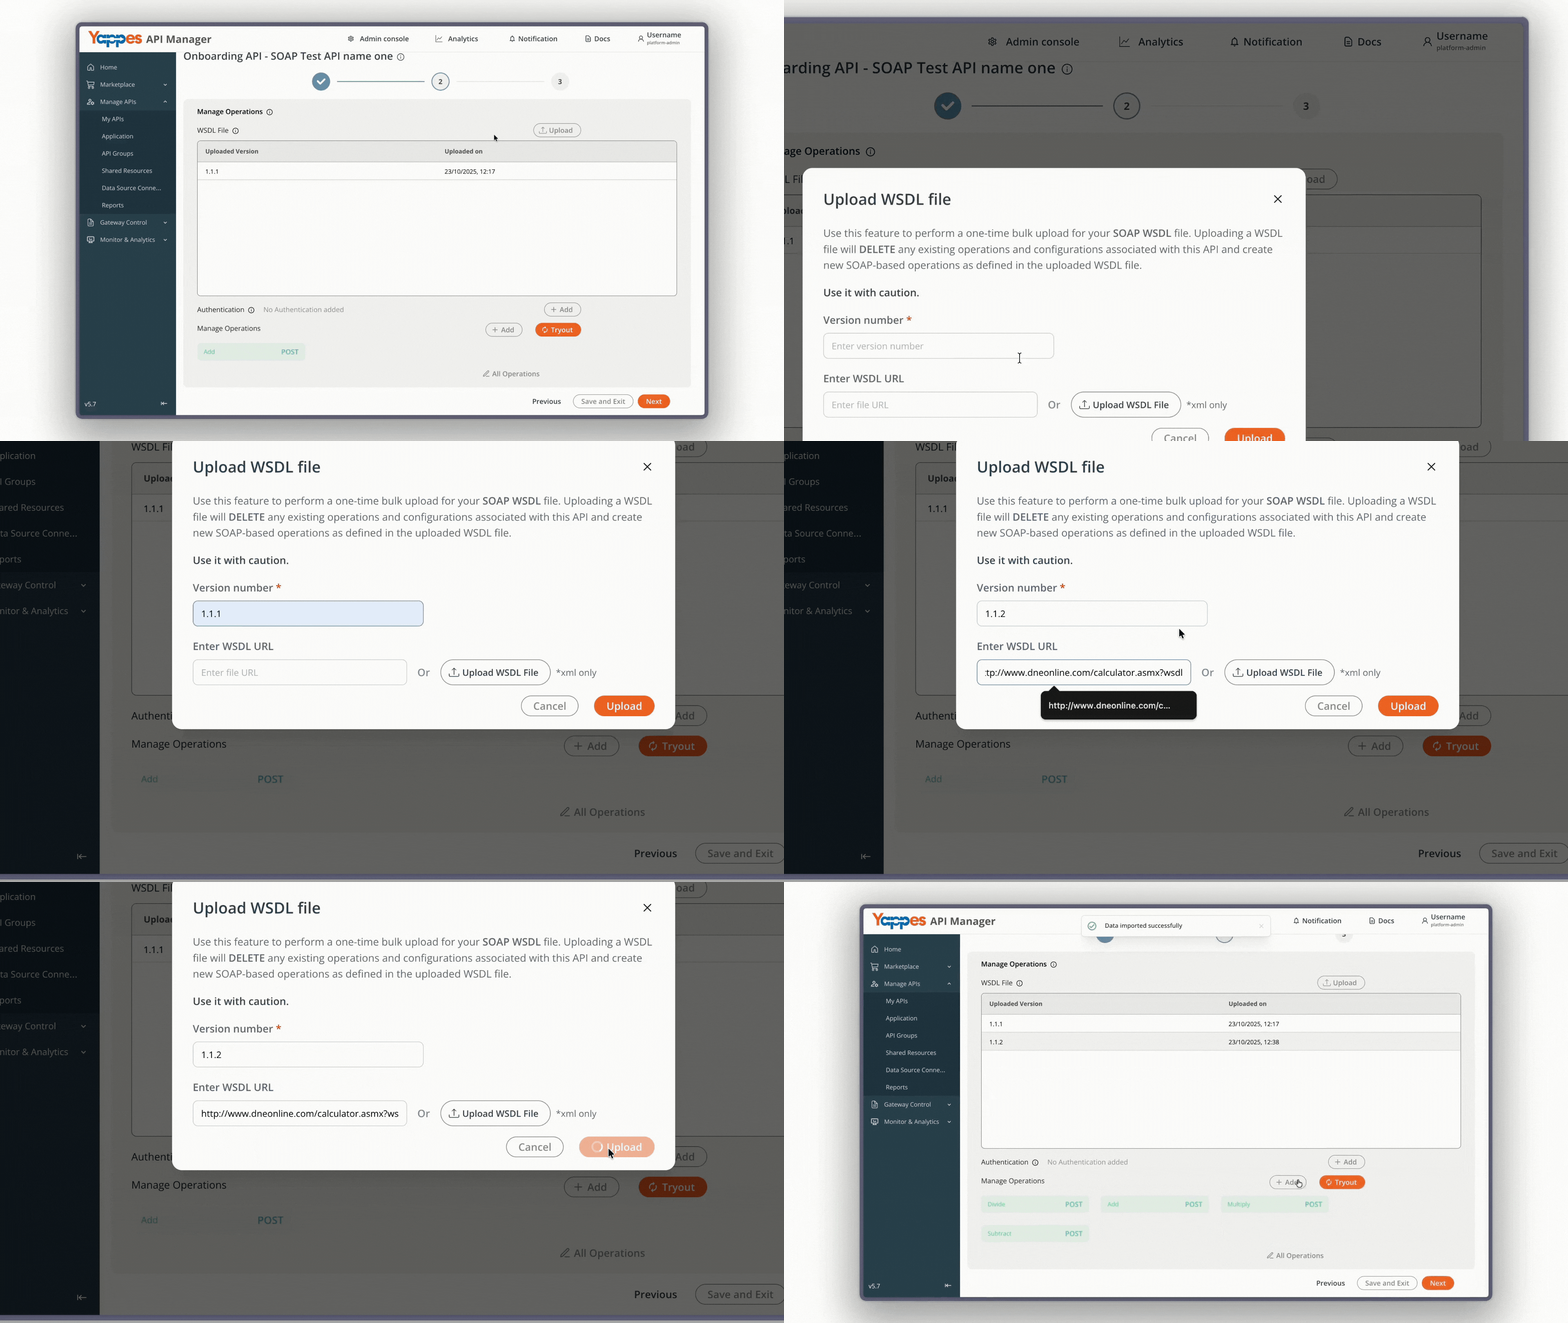
Option 2: WSDL Upload- Click the
Uploadbutton to open a dialog - Enter the
version - Provide either the
WSDL file URLorupload the WSDL filedirectly
- Click the
Step 8: Configure Operation Details
After adding a SOAP operation, click on that operation to open its configuration interface.
From here, you can add headers, define form data, define response schemas, and even edit SOAP operation details if needed.
-
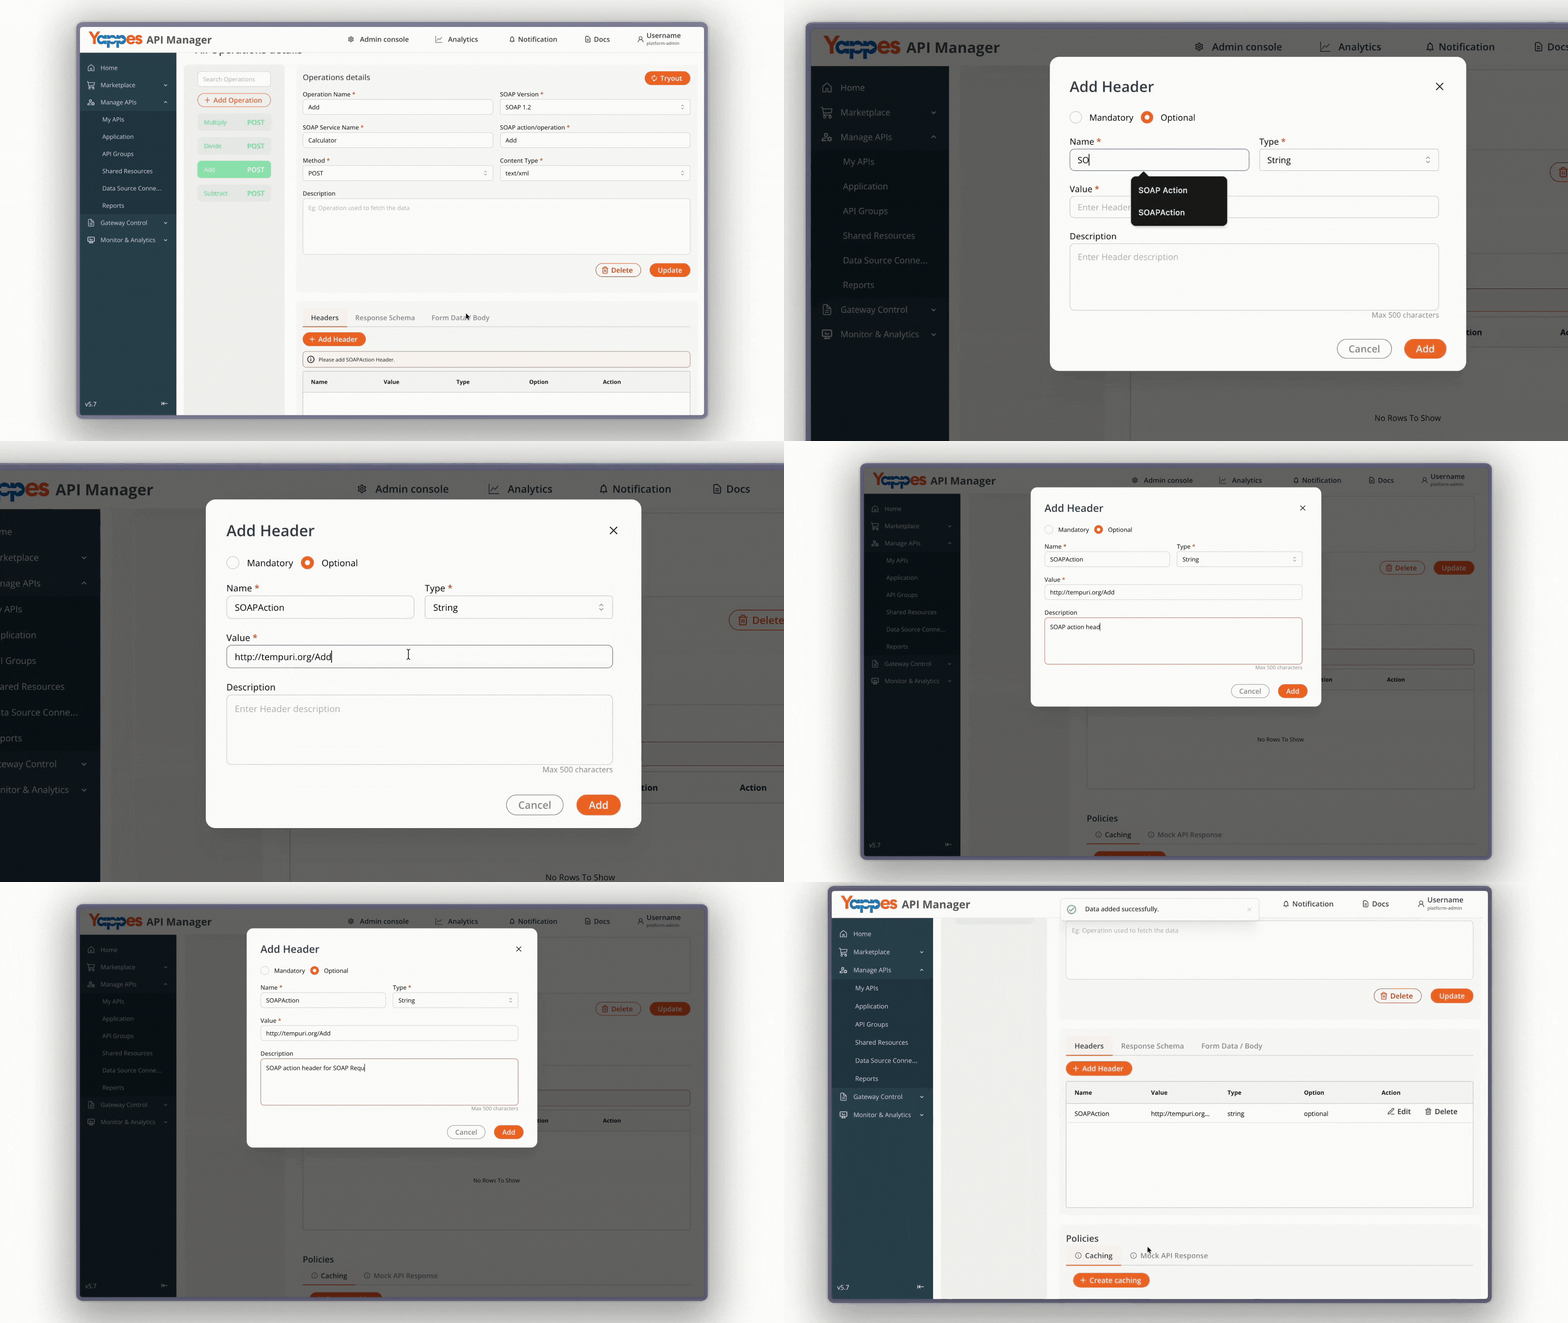
Add Required Headers- If your SOAP service requires custom headers, click
Add Header - In the
Mandatoryfield, specify whether the header is required - Enter the
Header Name*in the designated field - Select the
Type: choose fromstring,number, orboolean - Enter the
Header Value*in the corresponding field - Enter a
Description(optional) to document the header purpose - Click
Addto save the header configuration
- If your SOAP service requires custom headers, click
-
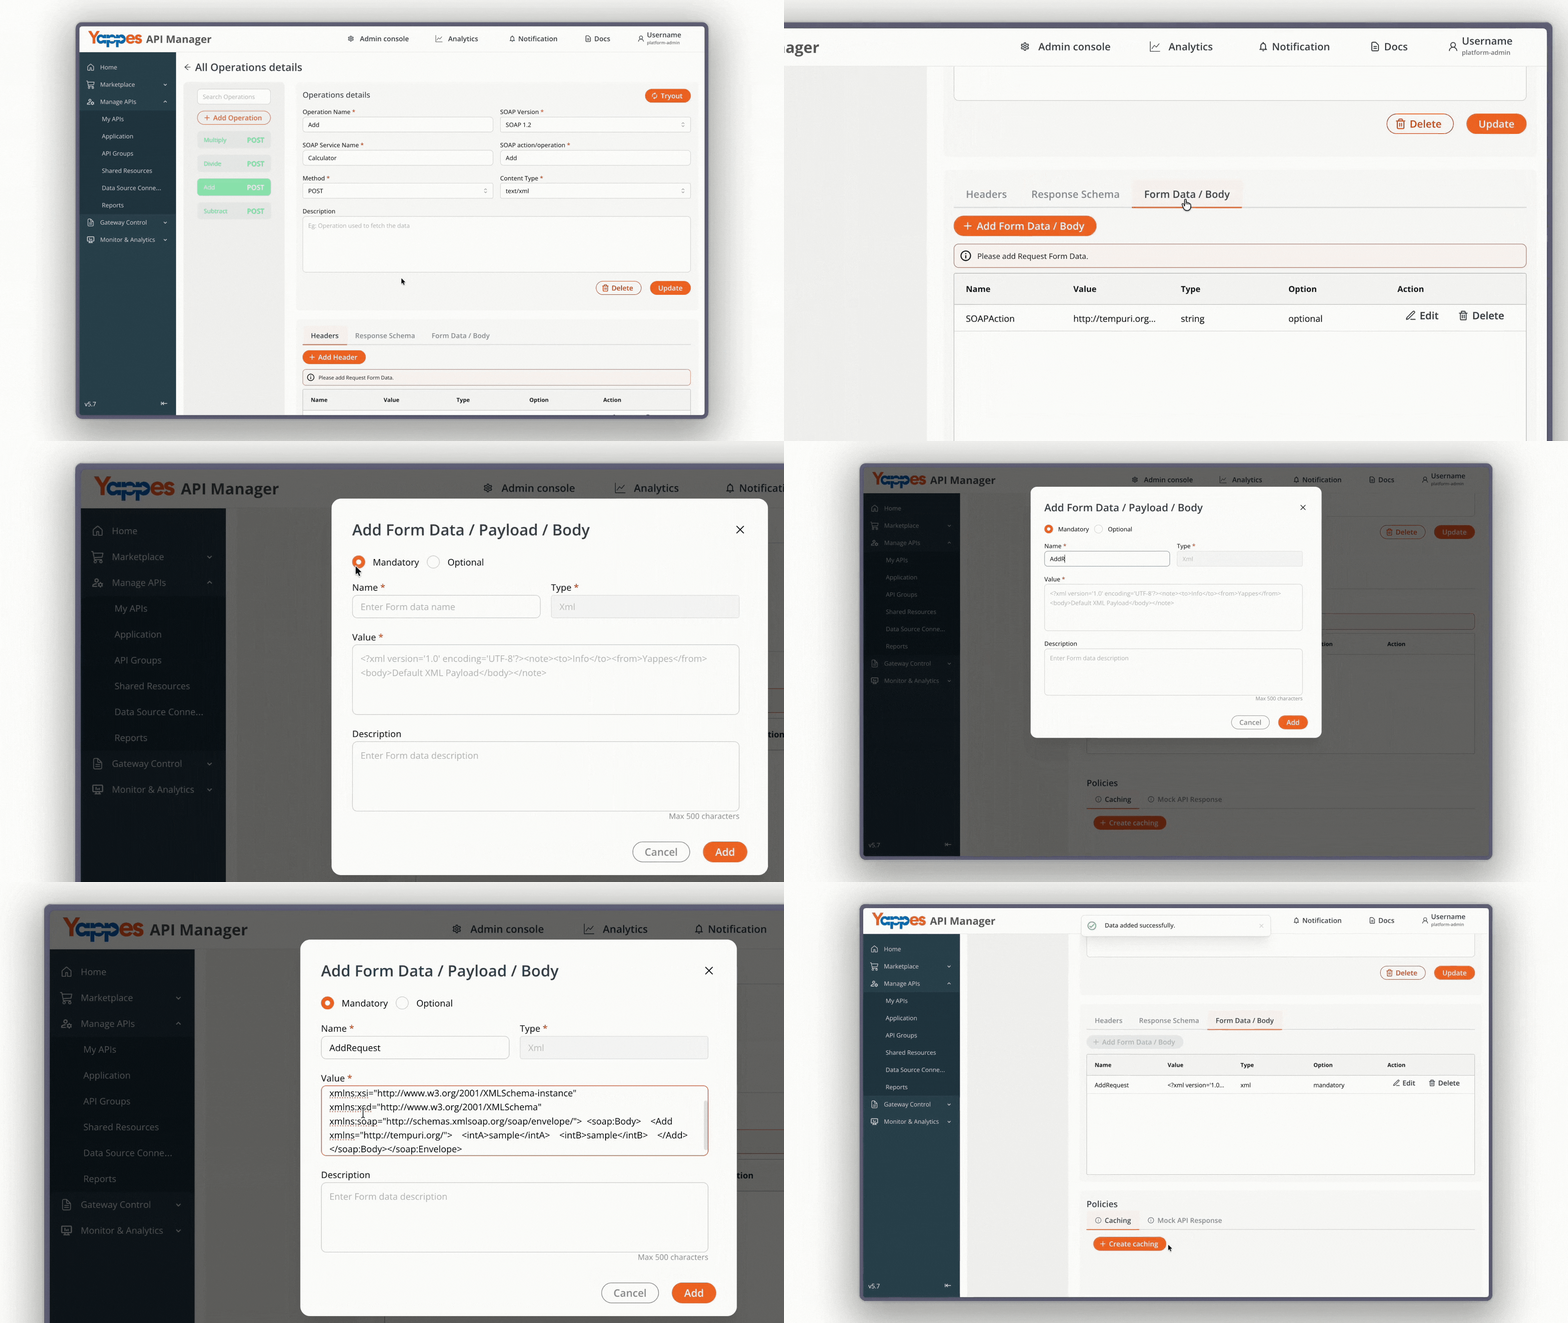
Define Form Data- Click on the
Form Datatab to open the form configuration section -
Click
Add Form Datato define input fields for the SOAP request -
Configure the form fields as follows:
Name*: The parameter name (mandatory)Type*: Disabled; fixed asXMLValue*: Must always be entered inXML formatDescription: Optional field for documenting the parameter
-
Save the form data entry
- Click on the
-
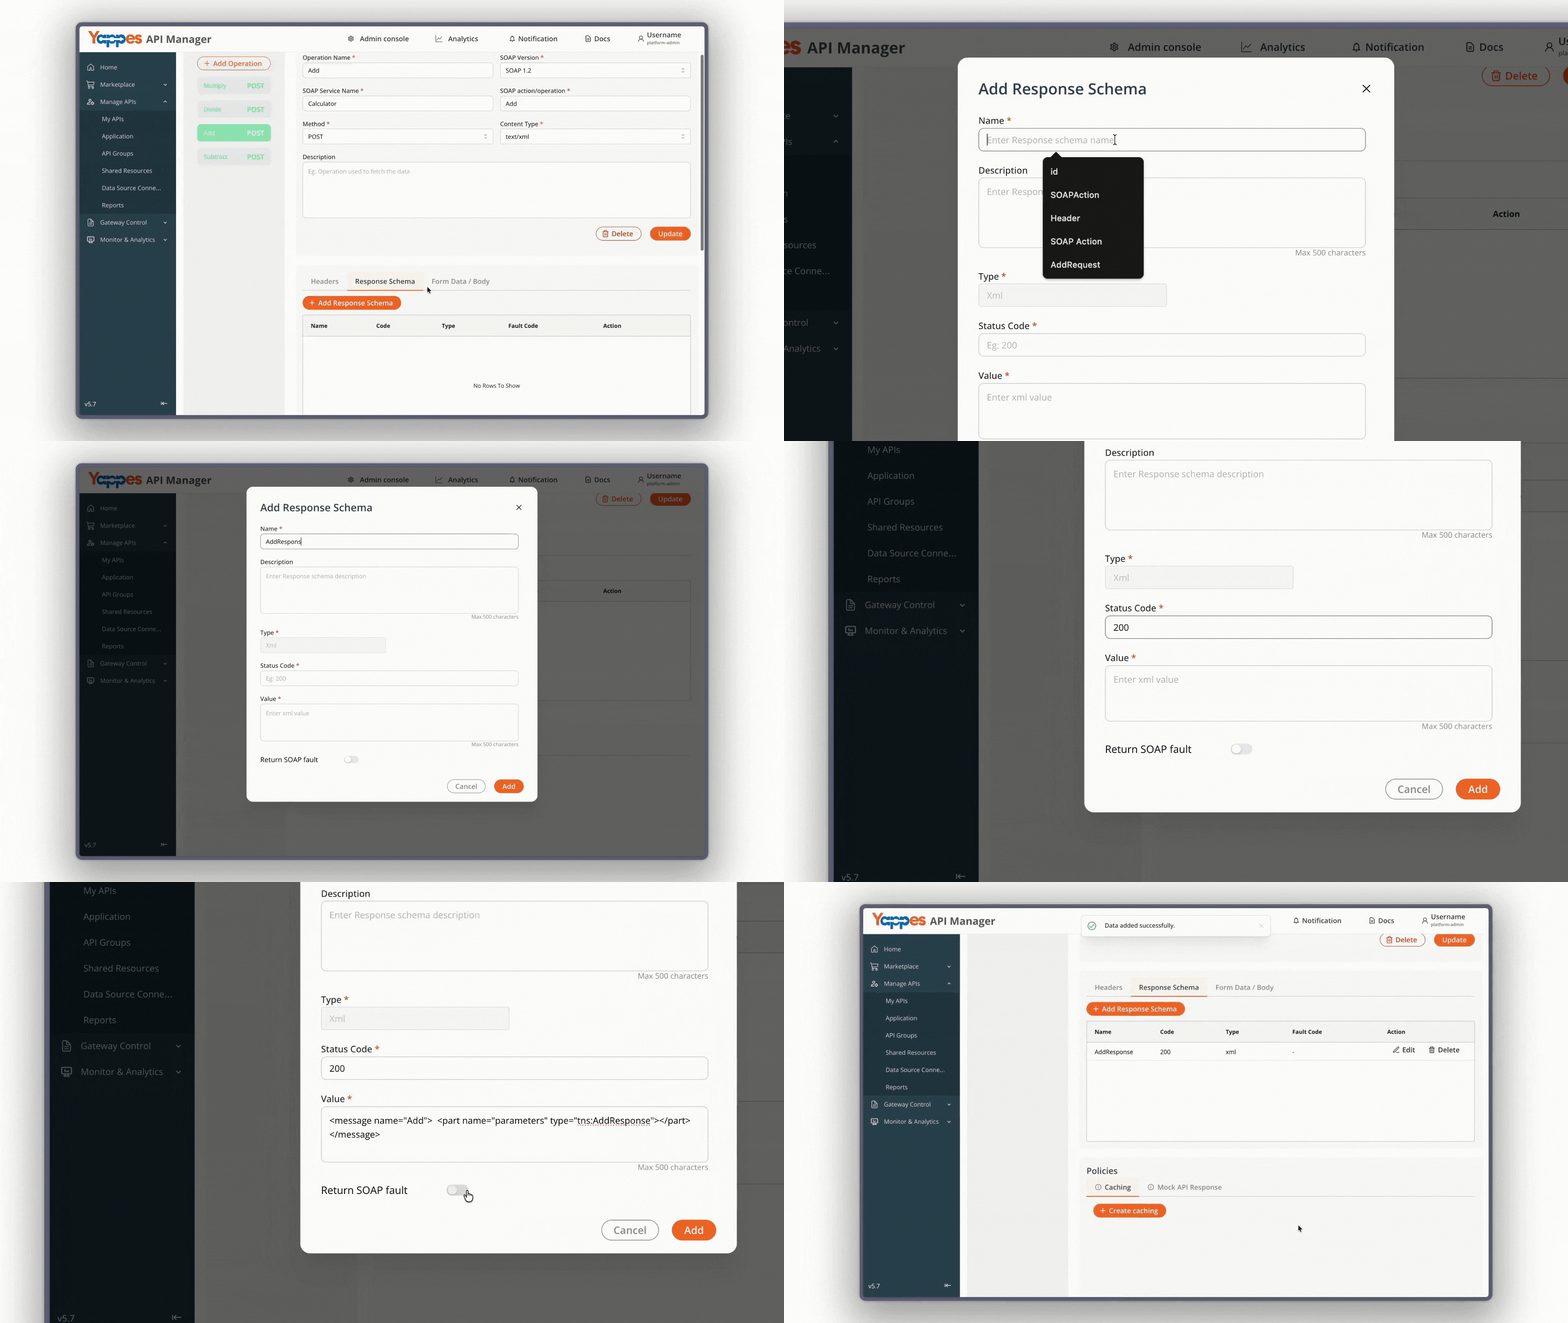
Define Response Schema- Click on the
Response Schematab to open the response configuration section - Click
Add Response Schemato define expected responses - In the
Name*field, enter a name for the response schema - Define the status code (typically
200for successful responses) - Enter or paste the response schema structure as needed
-
Use the
Return SOAP Faultswitch button if your API needs to handle faults. -
If enabled (
True), you must also provide:Fault Code: Identifier for the SOAP faultFault String: Descriptive message for the SOAP fault
- Click on the
Step 9: Complete Optional Configurations
-
After completing your operation details, click the
Backbutton, then clickNext -
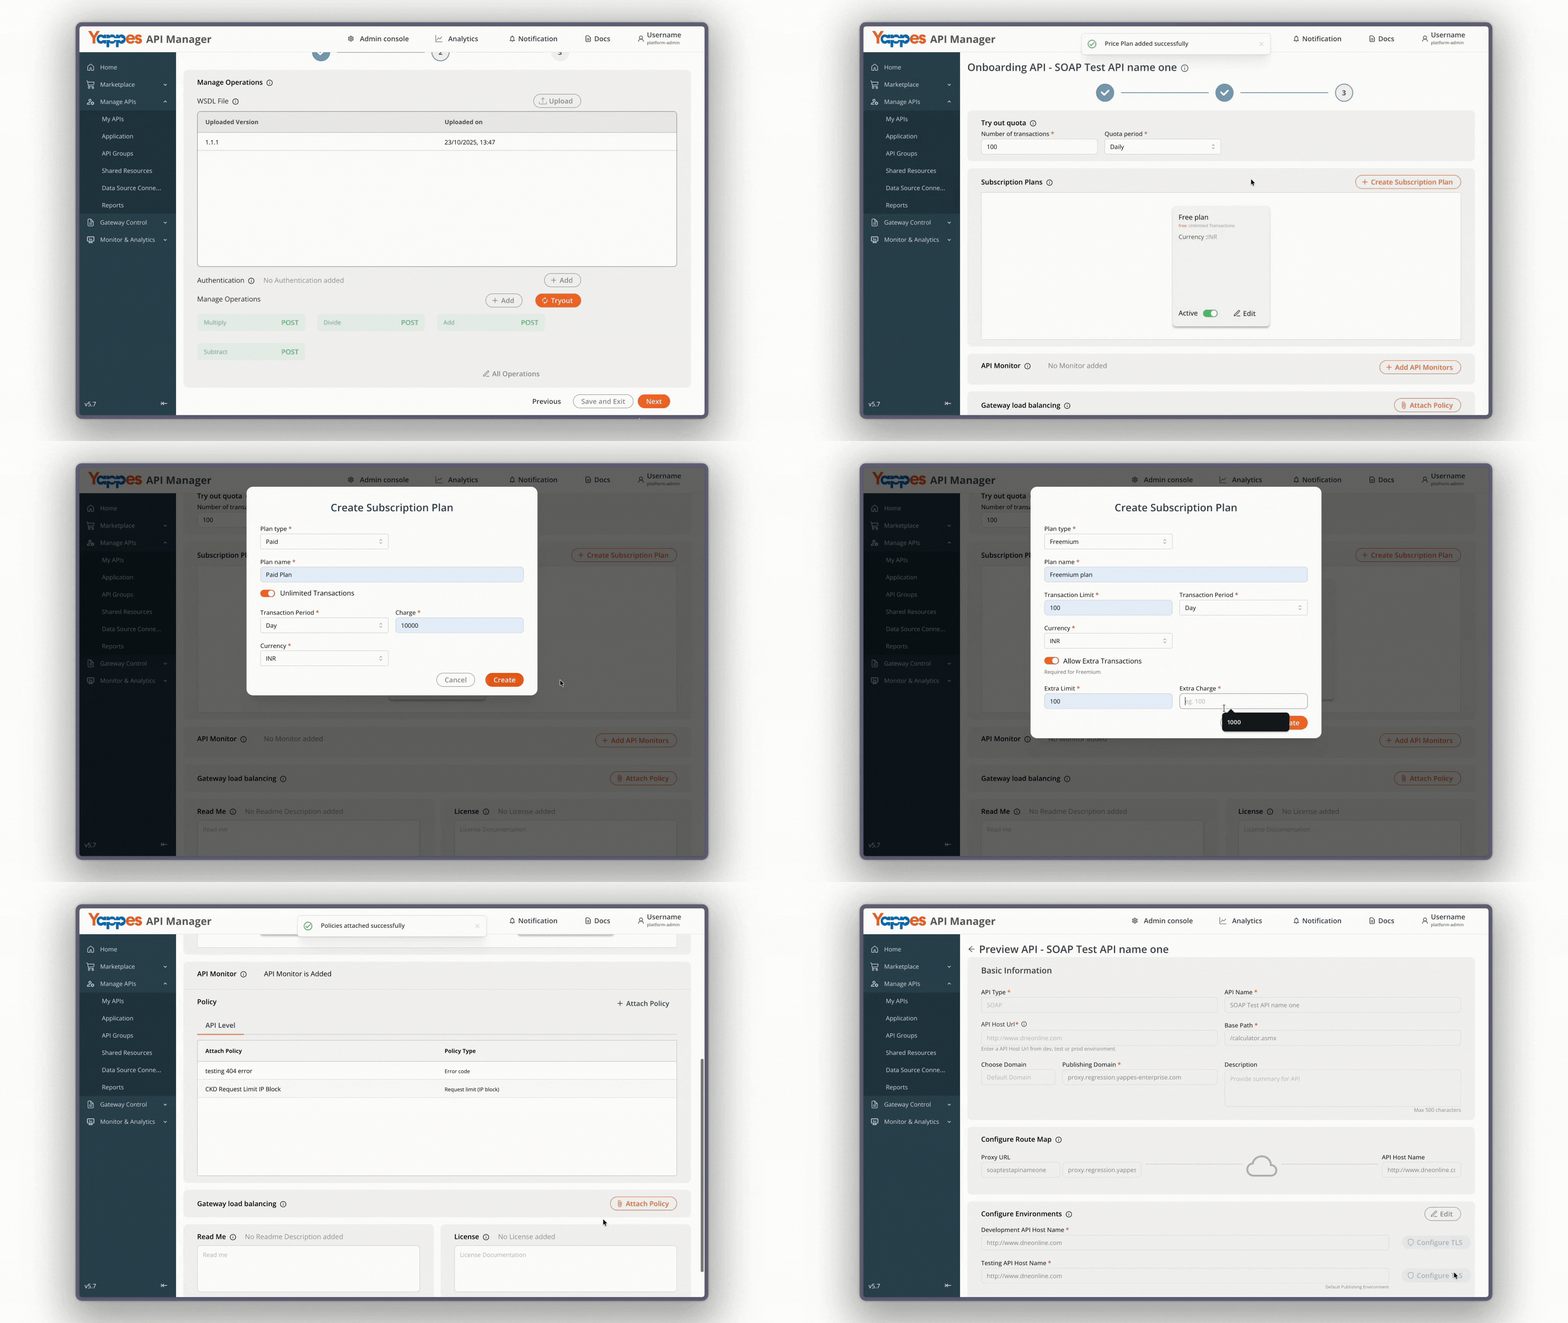
You will be presented with several optional configuration steps:
README: Add API description or documentationLicense: Attach license information for your APIRate Plans: Attach or create rate plans for the API during Step 3 onboarding.Tryout Quota: Define the number of times an API consumer can use the tryout optionMonitor: Enable monitoring for API performance and errorsGateway Load Balancing: Configure load balancing across backend servers for better scalability
-
These steps are optional and can be configured during onboarding or updated later after deployment.
Step 10: Publish or Submit for Approval
After completing all configurations, publish or submit the API depending on your role and whether an approval workflow is attached:
Direct publish — If no approval workflow is required, platform-admin or api-product-manager users can click Finish and Publish or Publish from My APIs.
Submit for approval — If an approval Workflow is attached:
- Click
Submit for approvalfrom the API details page or onboarding step three. - In the modal, select the change type:
Major,Minor, orPatch. - Click
Submit for approval.
After submission, the button changes to Submitted & approval pending and the My APIs grid shows Approval pending. Approvers act in Pending Approvals. The API remains unpublished until approved.
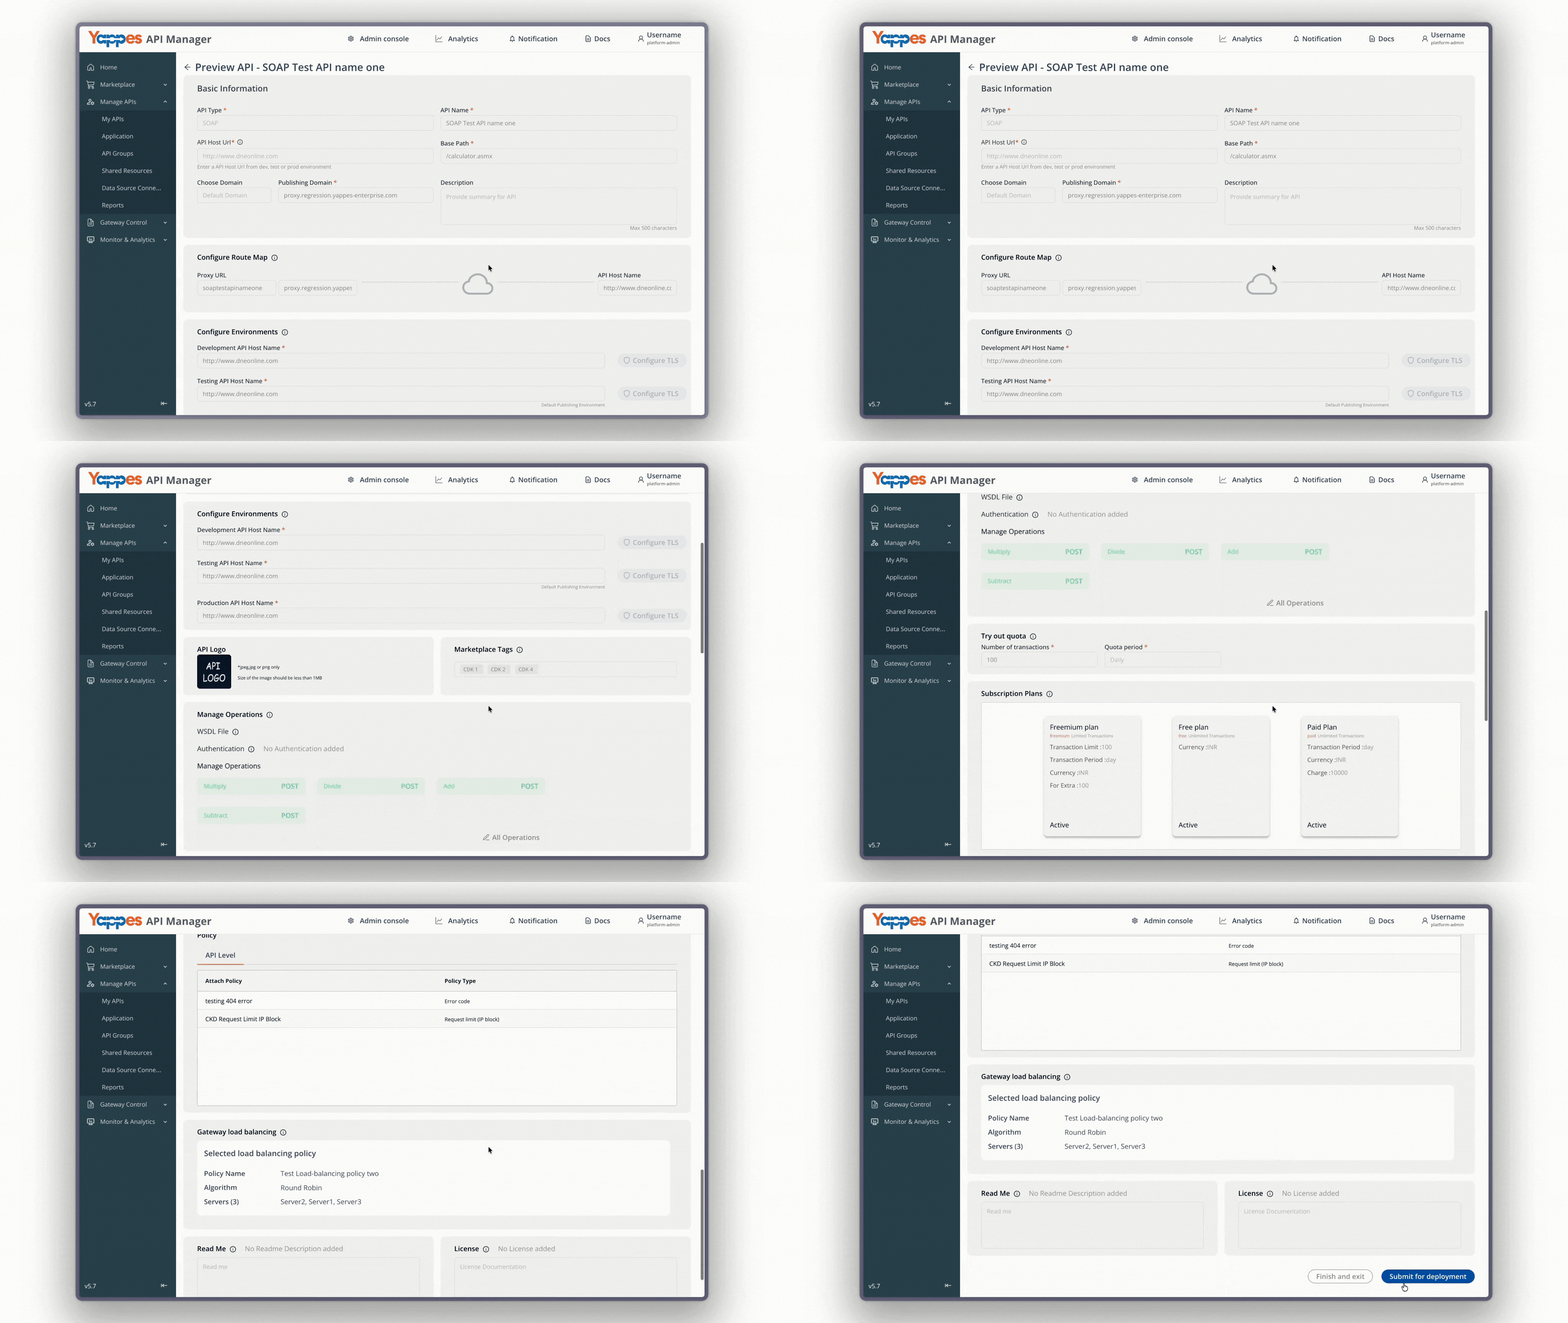
Save without publishing — Click Finish and Exit to save progress and continue later.
Step 11: Manage Your API
- Navigate back to
My APIsto view your API - Select the API to view details or make modifications
- You can monitor, update, publish, or manage the API as needed
Configuration and Settings
Required Configuration Fields
Field |
Description |
Example |
|---|---|---|
API Name |
Unique identifier for your API | CustomerService_SOAP |
API Host URL |
Complete URL to your SOAP service | https://api.example.com |
Base Path |
Upstream path segment (required) | /services/v1 |
Publishing Path |
Gateway-facing path prefix (required, unique) | /public |
SOAP Version |
Version of SOAP protocol | SOAP 1.1 or SOAP 1.2 |
Service Name |
Exact service name from WSDL | CustomerServiceSoap |
SOAP Action/Operation |
Specific operation to expose | GetCustomerDetails |
Optional Configuration Fields
Headers Configuration
- Add authentication headers for secured services
- Include custom headers required by your SOAP implementation
- Mark headers as
mandatoryoroptionalbased on requirements
Response Schema Options
- Define multiple response schemas for different status codes
- Support both success (
2xx) and error (4xx,5xx) responses - Use JSON or XML schema definitions as appropriate
Basic Functionality Testing
Test Checklist
- API responds to SOAP requests at the configured endpoint
- All configured operations are accessible
- Headers are properly passed through to the backend service
- Response schemas match actual service responses
- Error handling returns appropriate SOAP faults
Troubleshooting
Common Issues and Solutions
-
Invalid Publishing PathIssue:"The publishing path must be unique across all platform APIs"errorSolution: Choose a different Publishing Path value that is not already in use
-
Operations Not AppearingIssue: Added operations don't show in the listSolution: Ensure all mandatory fields are filled before clickingAdd OperationsVerify: SOAP version matches your service specification
-
Approval Pending IndefinitelyIssue: API remains inApproval pendingstatusSolution: Check if approvers have processed the request in Pending ApprovalsAction: Contact your platform administrator or approver group
-
Response Schema Validation ErrorsIssue:"Invalid schema"error when adding response schemaSolution: Ensure the schema format matches the expected type (JSON/XML)Tip: Use copy-paste method for complex schemas to avoid formatting issues
Error Messages Reference
Error Message |
Cause |
Resolution |
|---|---|---|
"API Name already exists" |
Duplicate API name | Choose a unique name |
"Invalid Host URL" |
Malformed URL | Check URL format and protocol |
"SOAP Version mismatch" |
Wrong SOAP version selected | Verify with WSDL specification |
"Authorization failed" |
Missing or incorrect headers | Add required authentication headers |
Pro Tip
Consider creating a test version of your SOAP API first to validate all configurations before deploying to production. This allows you to experiment with different settings without affecting live services.