API Transformation
Overview
The Yappes API Transformation allows you to dynamically modify API requests and responses at the gateway level so you can seamlessly integrate APIs without changing backend code or requiring client-side modifications.
This powerful feature enables you to add, modify, or remove headers and query parameters in real-time, ensuring compatibility between different systems and maintaining consistent data formatting across your API ecosystem .
The API Transformation feature serves as a critical middleware layer in your API management strategy, providing flexibility to adapt APIs for different consumers, enforce organizational standards, and handle version compatibility issues. Whether you're standardizing authentication headers across multiple APIs, injecting tracking parameters for analytics, or transforming legacy API formats to meet modern requirements, Yappes API Transformation streamlines these operations through an intuitive policy-based approach
This guide will walk you through two methods of creating transformation policies: during the API onboarding process for new APIs, and through the gateway policy page for existing APIs. You'll learn how to configure both header and query parameter transformations, attach policies to specific APIs, and manage transformations at scale.
Prerequisites
Before implementing API Transformation policies, ensure you have:
-
Access Requirements
-
Valid Yappes platform account with
API Manager access. - Permissions to
create and manage gateway policies. -
Rights to
attach policiesat API or subscription level. -
Preliminary Setup
-
At least one API registered in the
My APIssection. -
Endpoint details configured during onboarding.
-
Dependencies
- Modern web browser (Chrome, Firefox, Safari, Edge).
- Knowledge of API request/response structure.
Custom error and message
For error scenarios, you can override the default HTTP status code, error code, and message. See Custom Error and Message.
Step-by-Step Implementation
Method 1: Creating Transformation During API Onboarding
Step 1: Navigate to API Manager
- Click on
Manage APIsin the main dashboard. - Select
My APIsfrom the submenu.
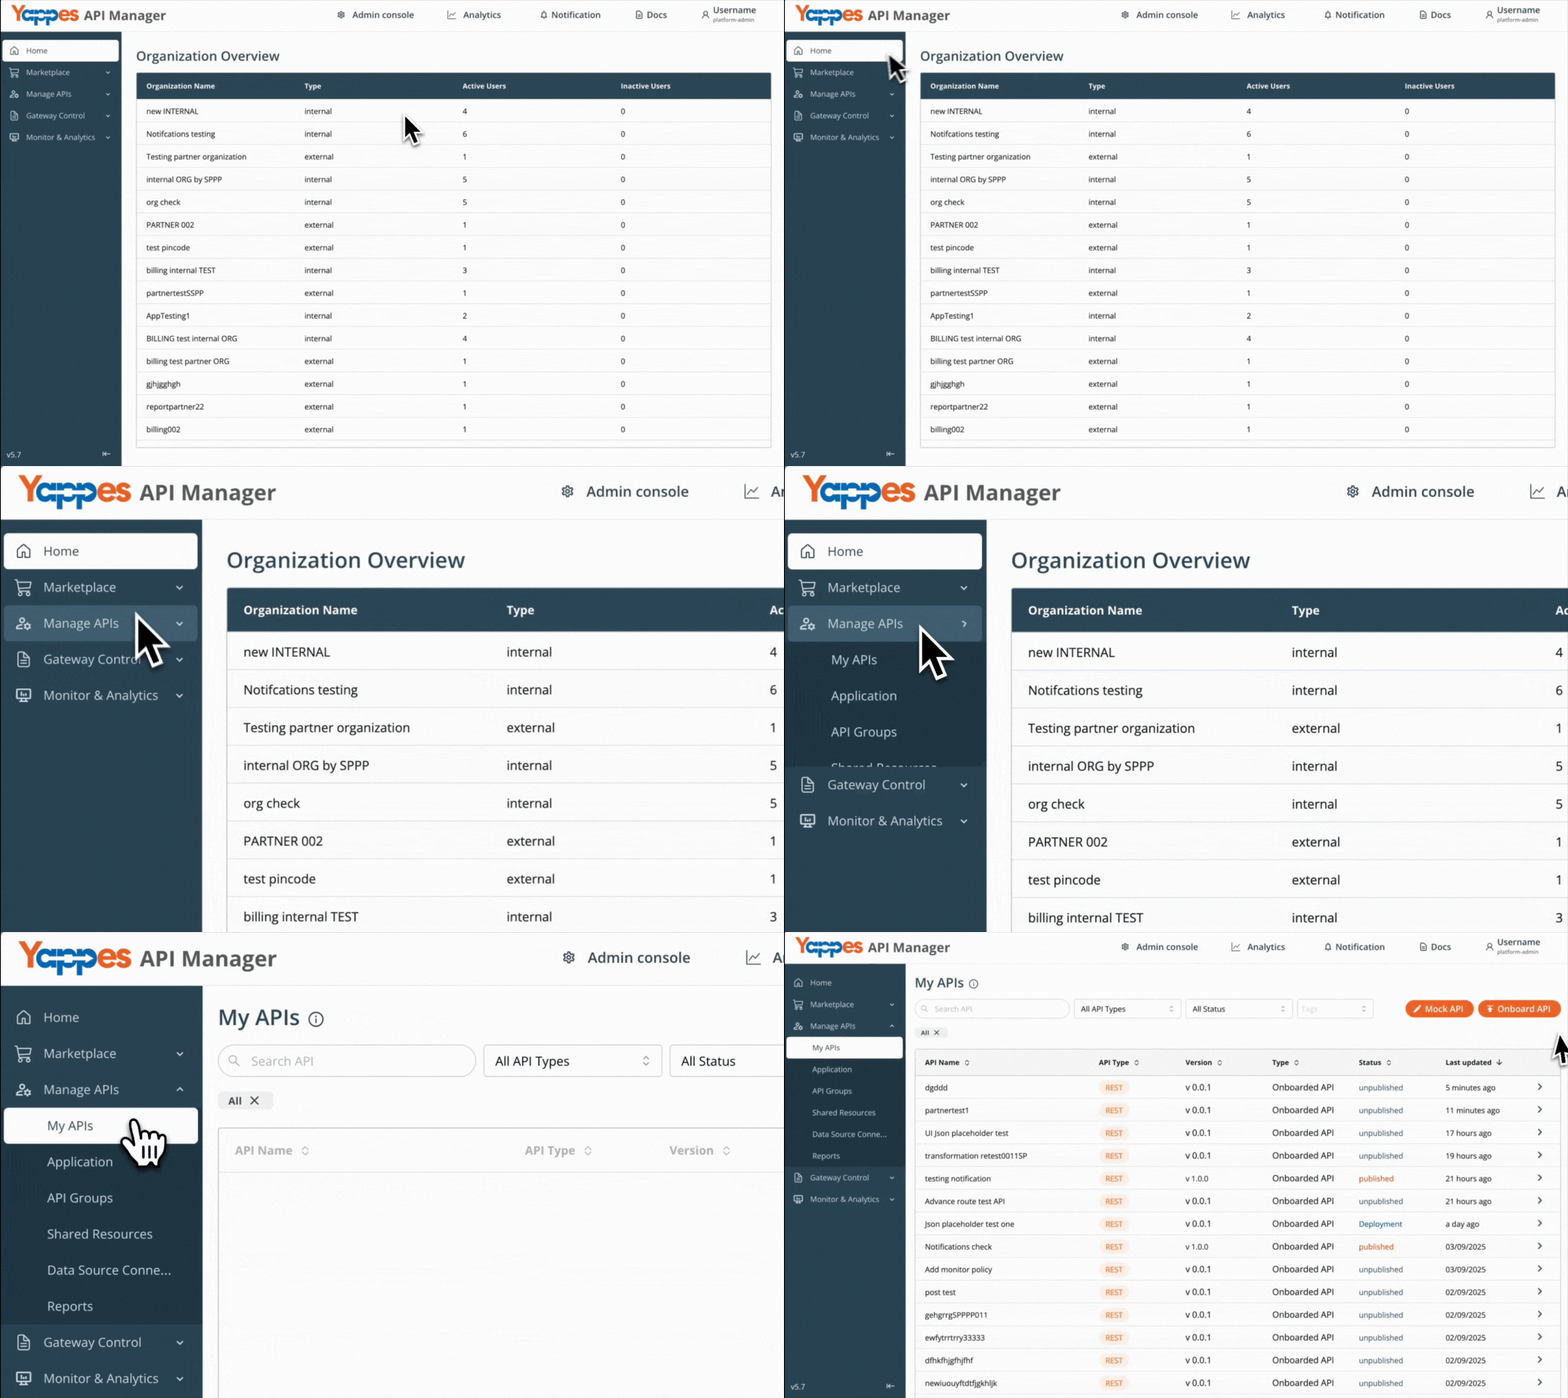
Step 2: Initiate API Onboarding
- Onboard from My APIs using the guide for your API type.
Step 3: Select Endpoint for Transformation
- Click on your newly created endpoint (e.g.,
GetUserData). - The endpoint details panel will open.
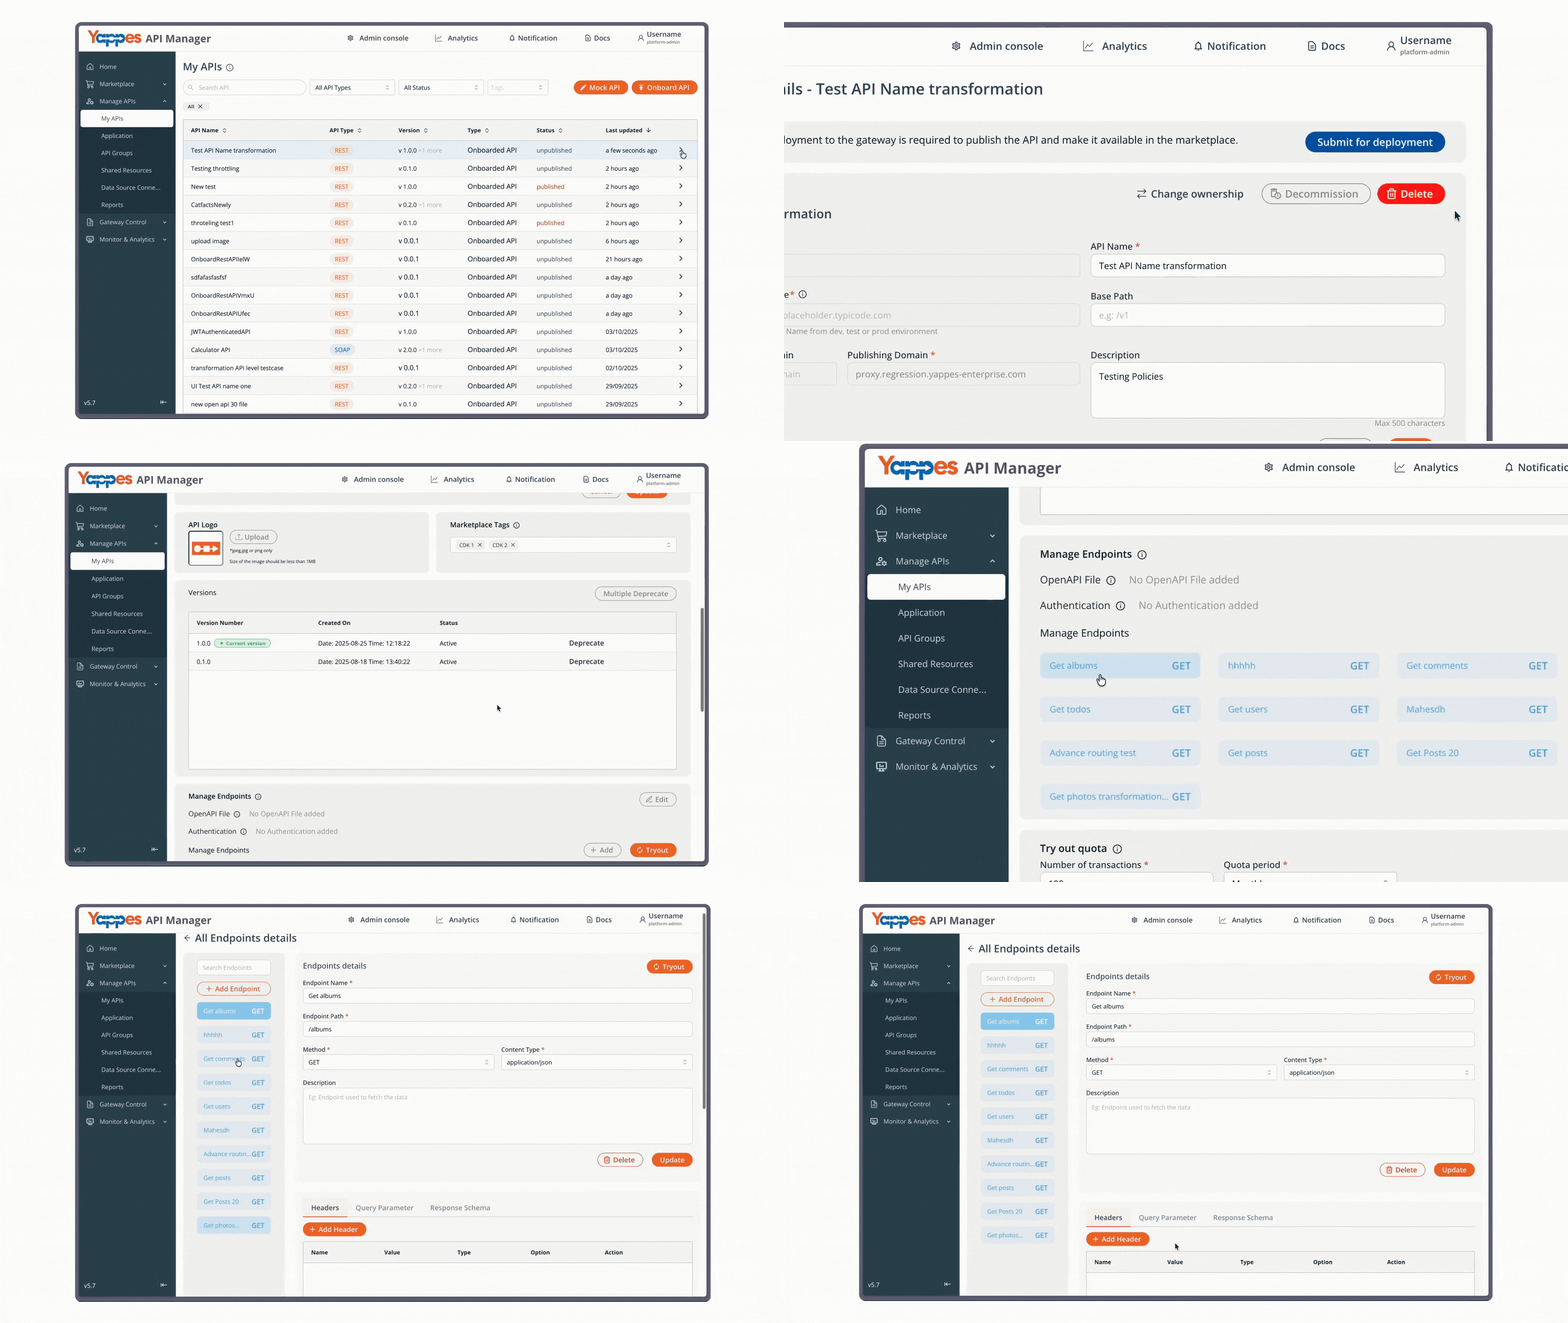
Step 4: Access Transformation Configuration
- Locate and click the
Transformationtab. - Click
Attach Policyto open the configuration panel. - The Attach Transformation page will appearShape
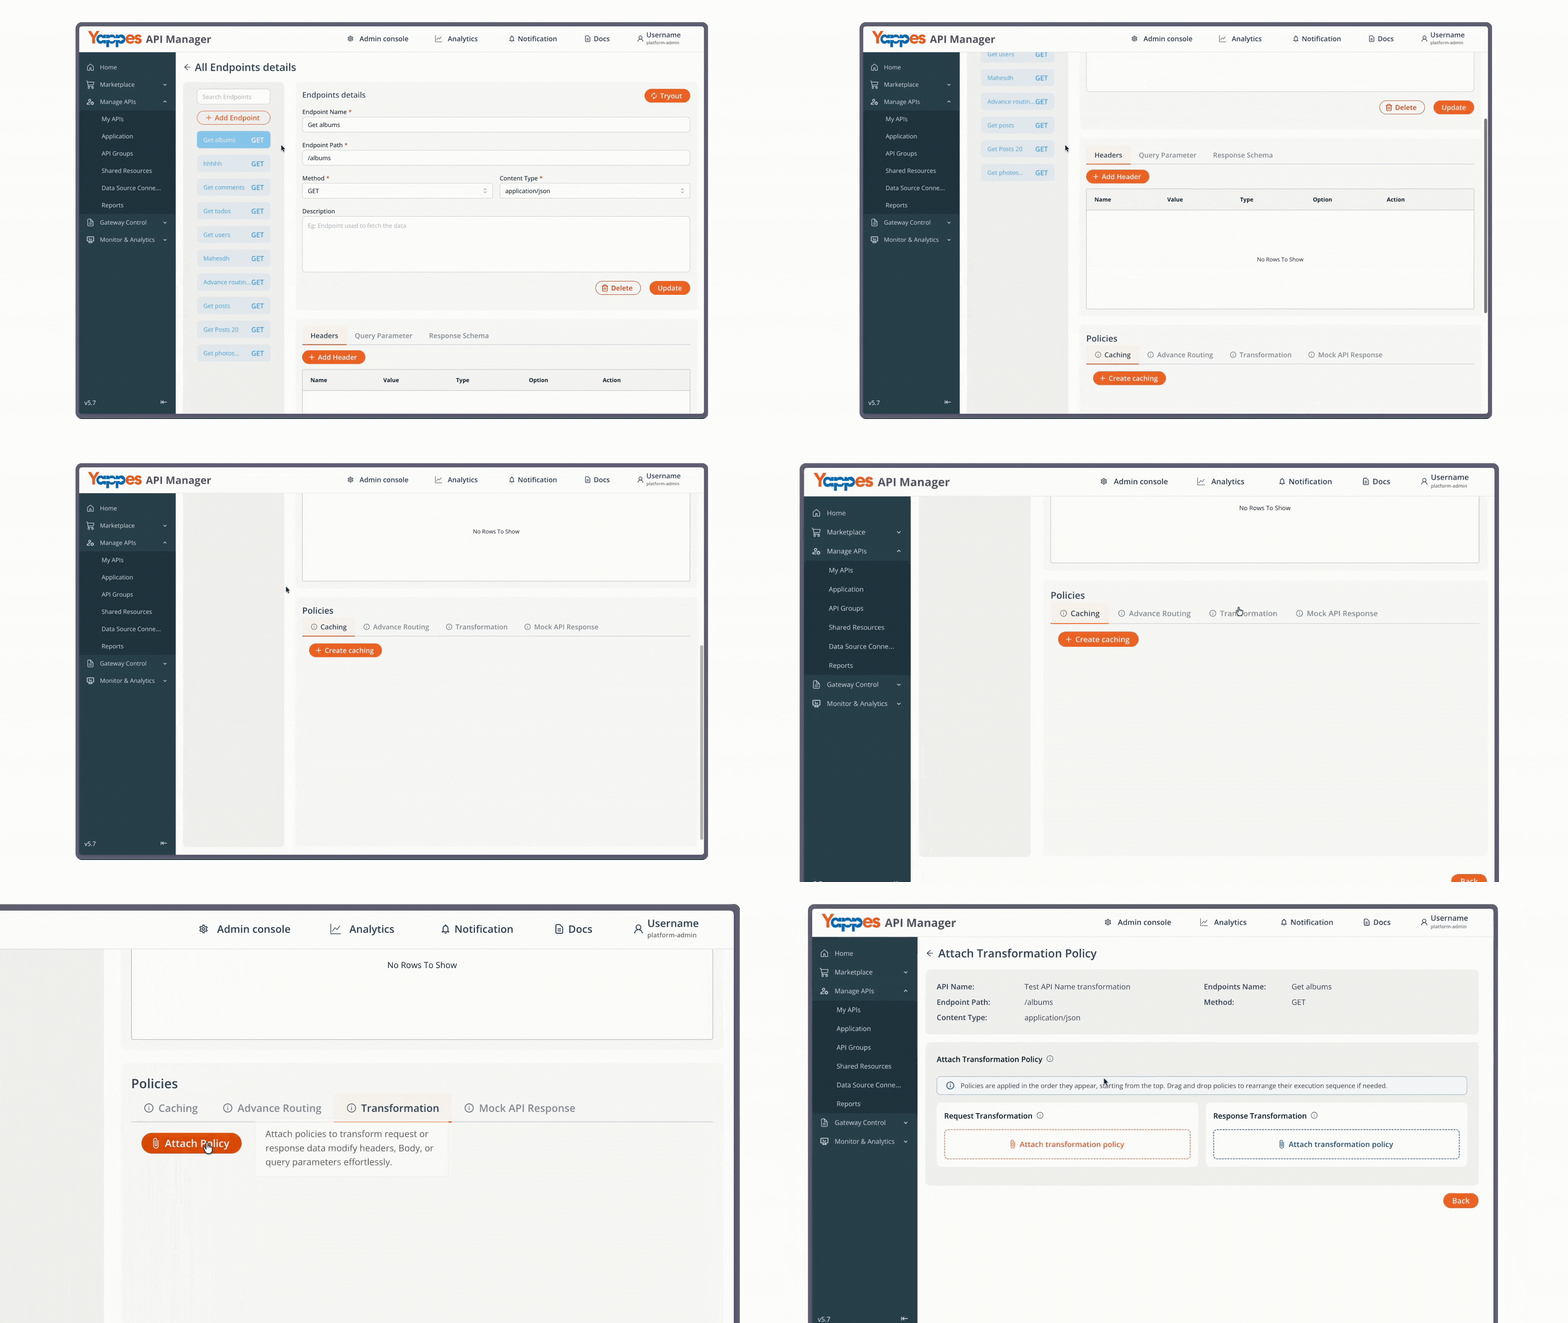
Step 5: Create the Transformation Policy
- In the policy page, you can attach both request & response transformation policy
- Click
Attach transformation policyto attach new policy - The detailed policy configuration form will be opened.
- All required fields will be marked with asterisks (*)
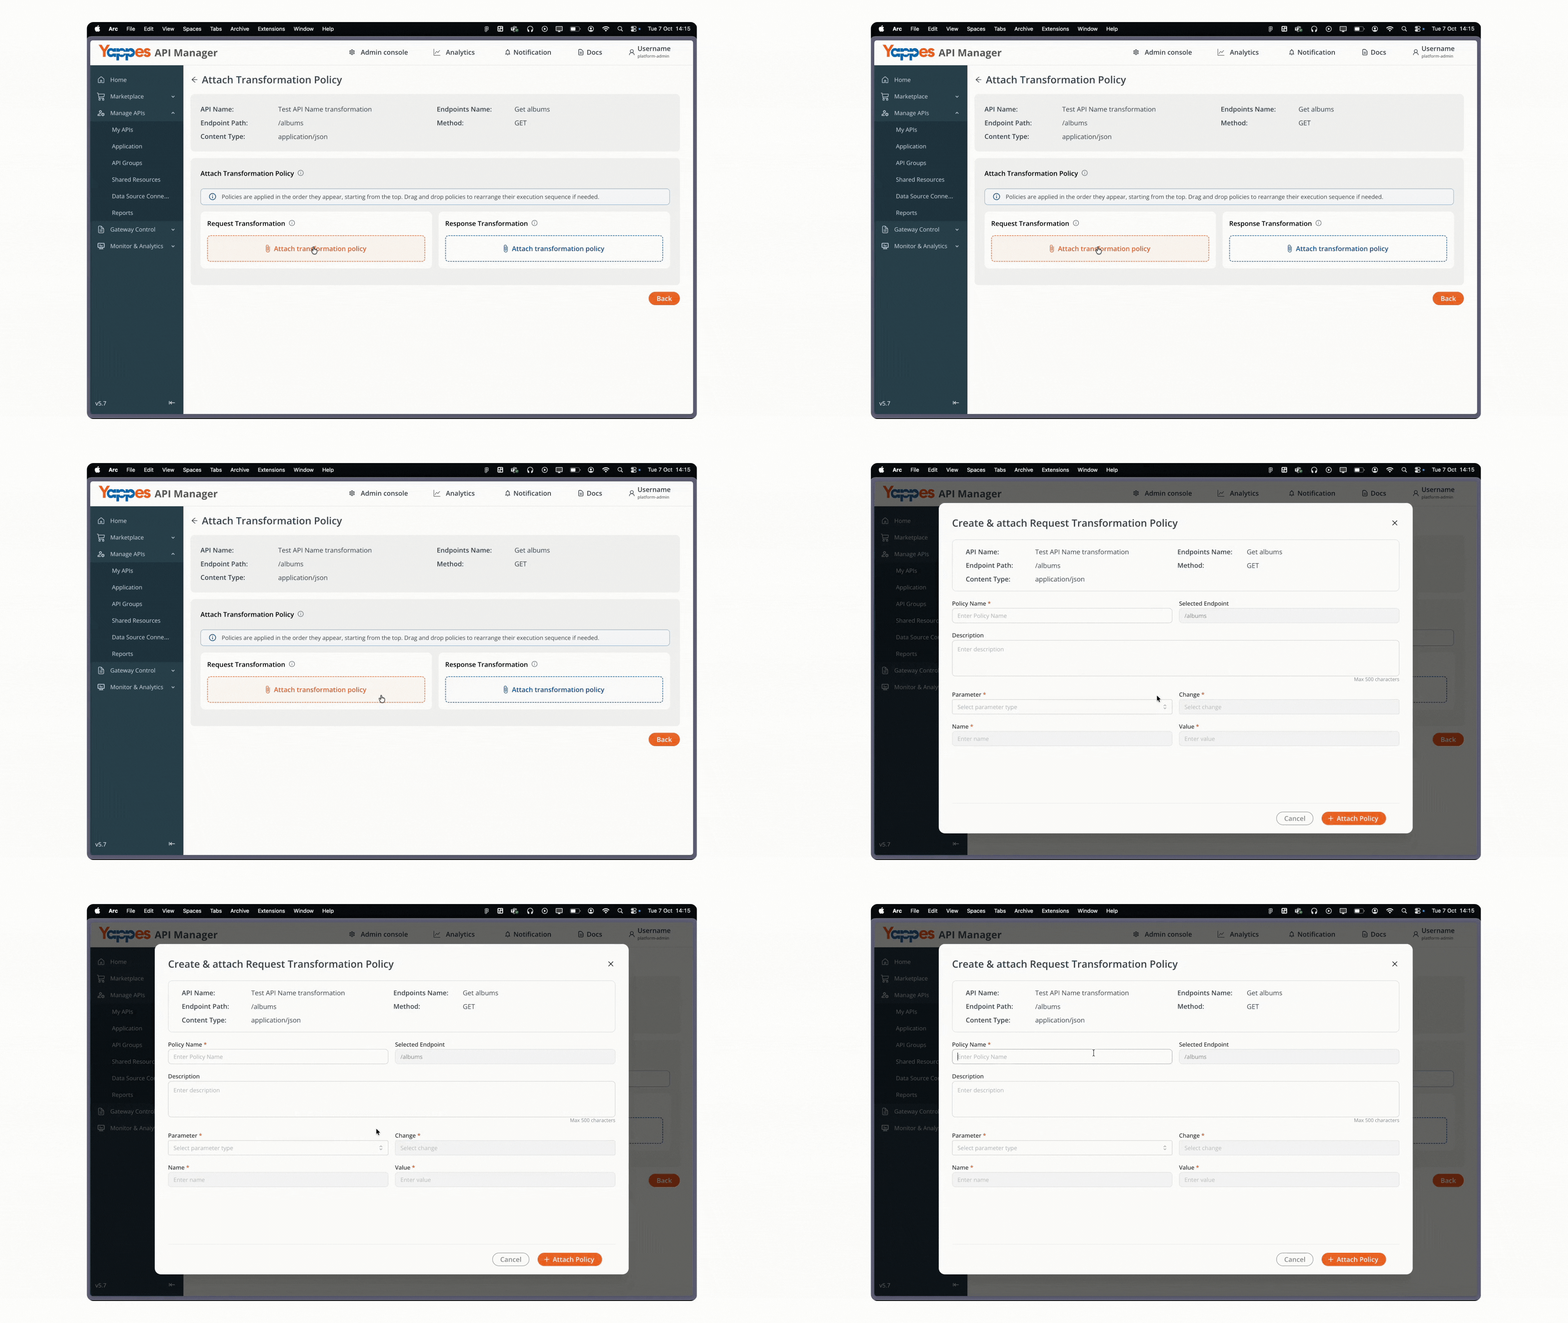
Step 6: Configure Transformation Policy
- Enter a descriptive name in the
Policy Name*field (e.g.,Transform-Auth-Header). - Add a detailed description in the description field.
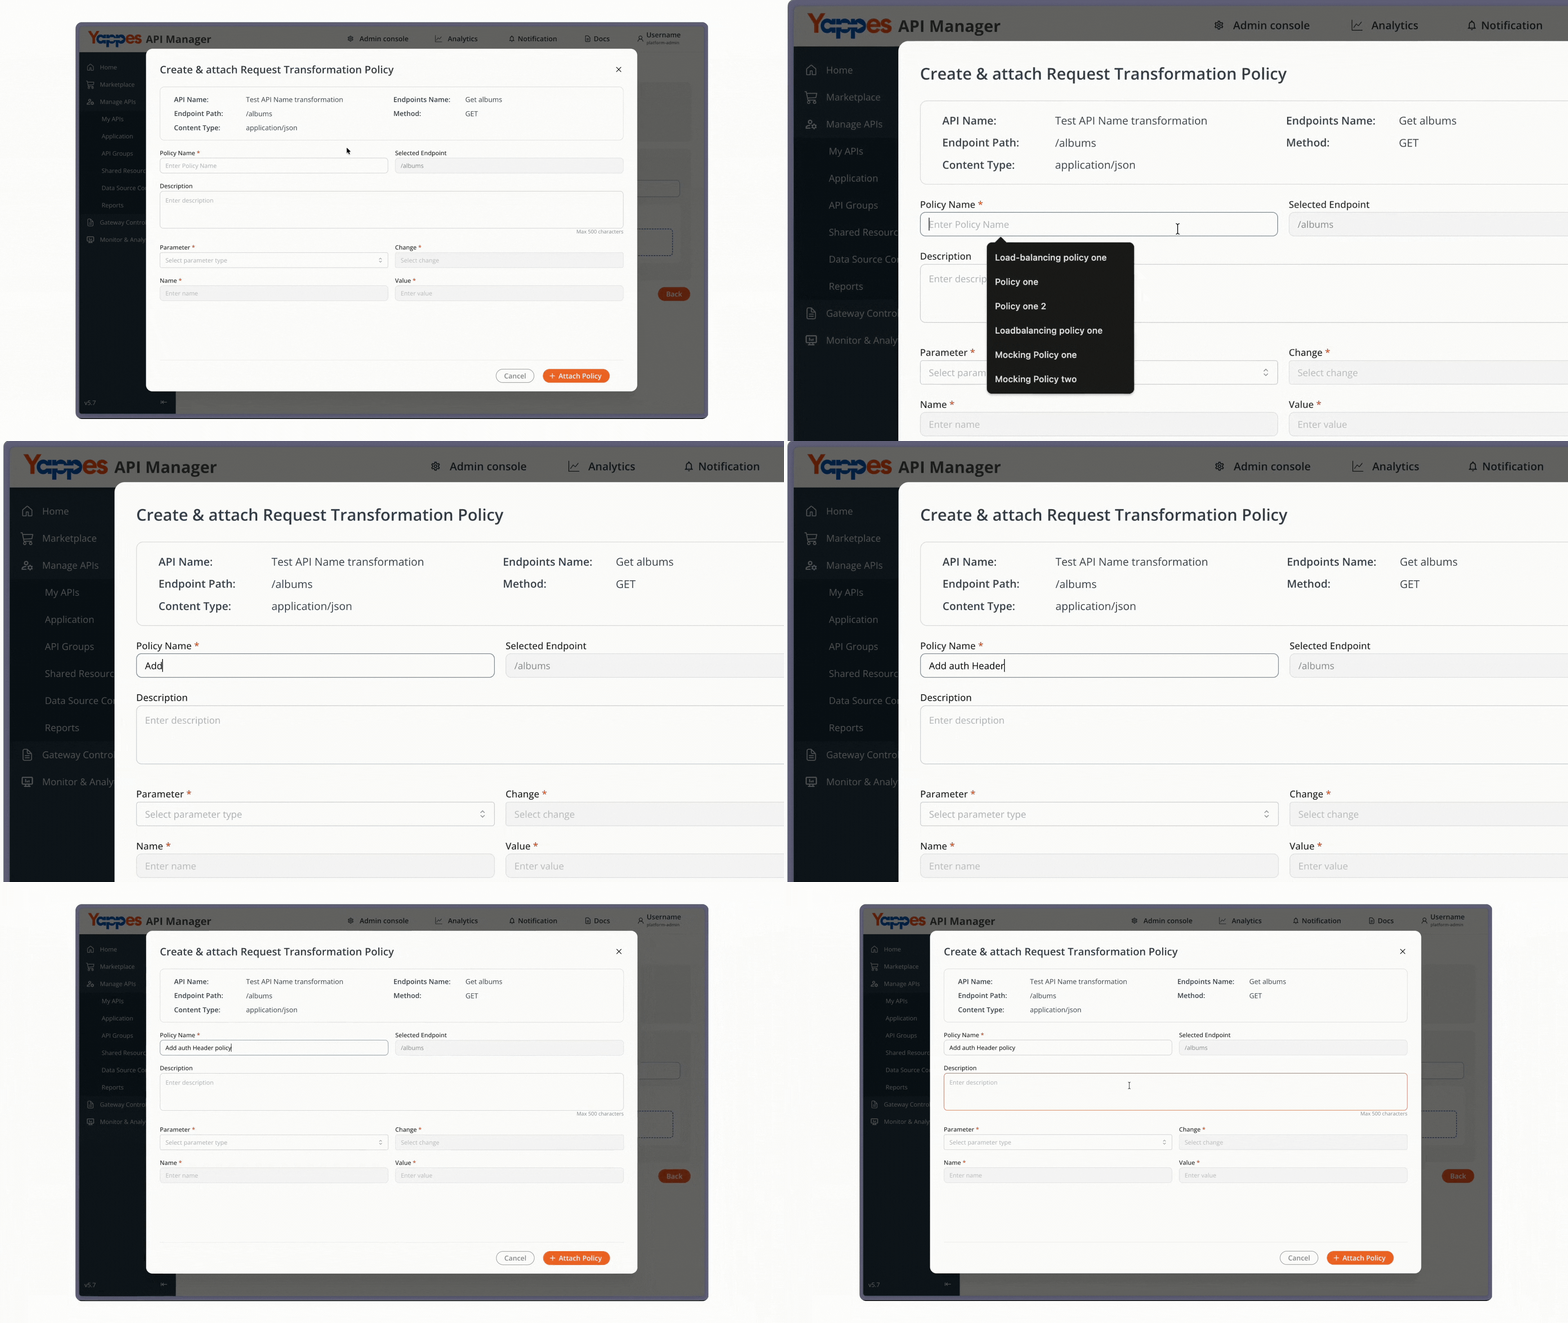
Step 7: Configure Parameter Type and Action
- Click the
Parameter*dropdown field - Select
HeaderorQuery Parameterfrom the available options - This configures the policy to modify
HTTP headers/ URL parameter
Info
Query Parameter is only applicable to Request Transformation Policy.
Step 8: Define Parameter Action
- In the
Change*dropdown, selectAdd,Update, orRemove.
Step 9: Configure Header or Query Parameter Details
- Enter name of the header/Query parameter to modify(e.g., browser)
- Enter the
valueto be modified (e.g., firefox) - Review all entered information for accuracy
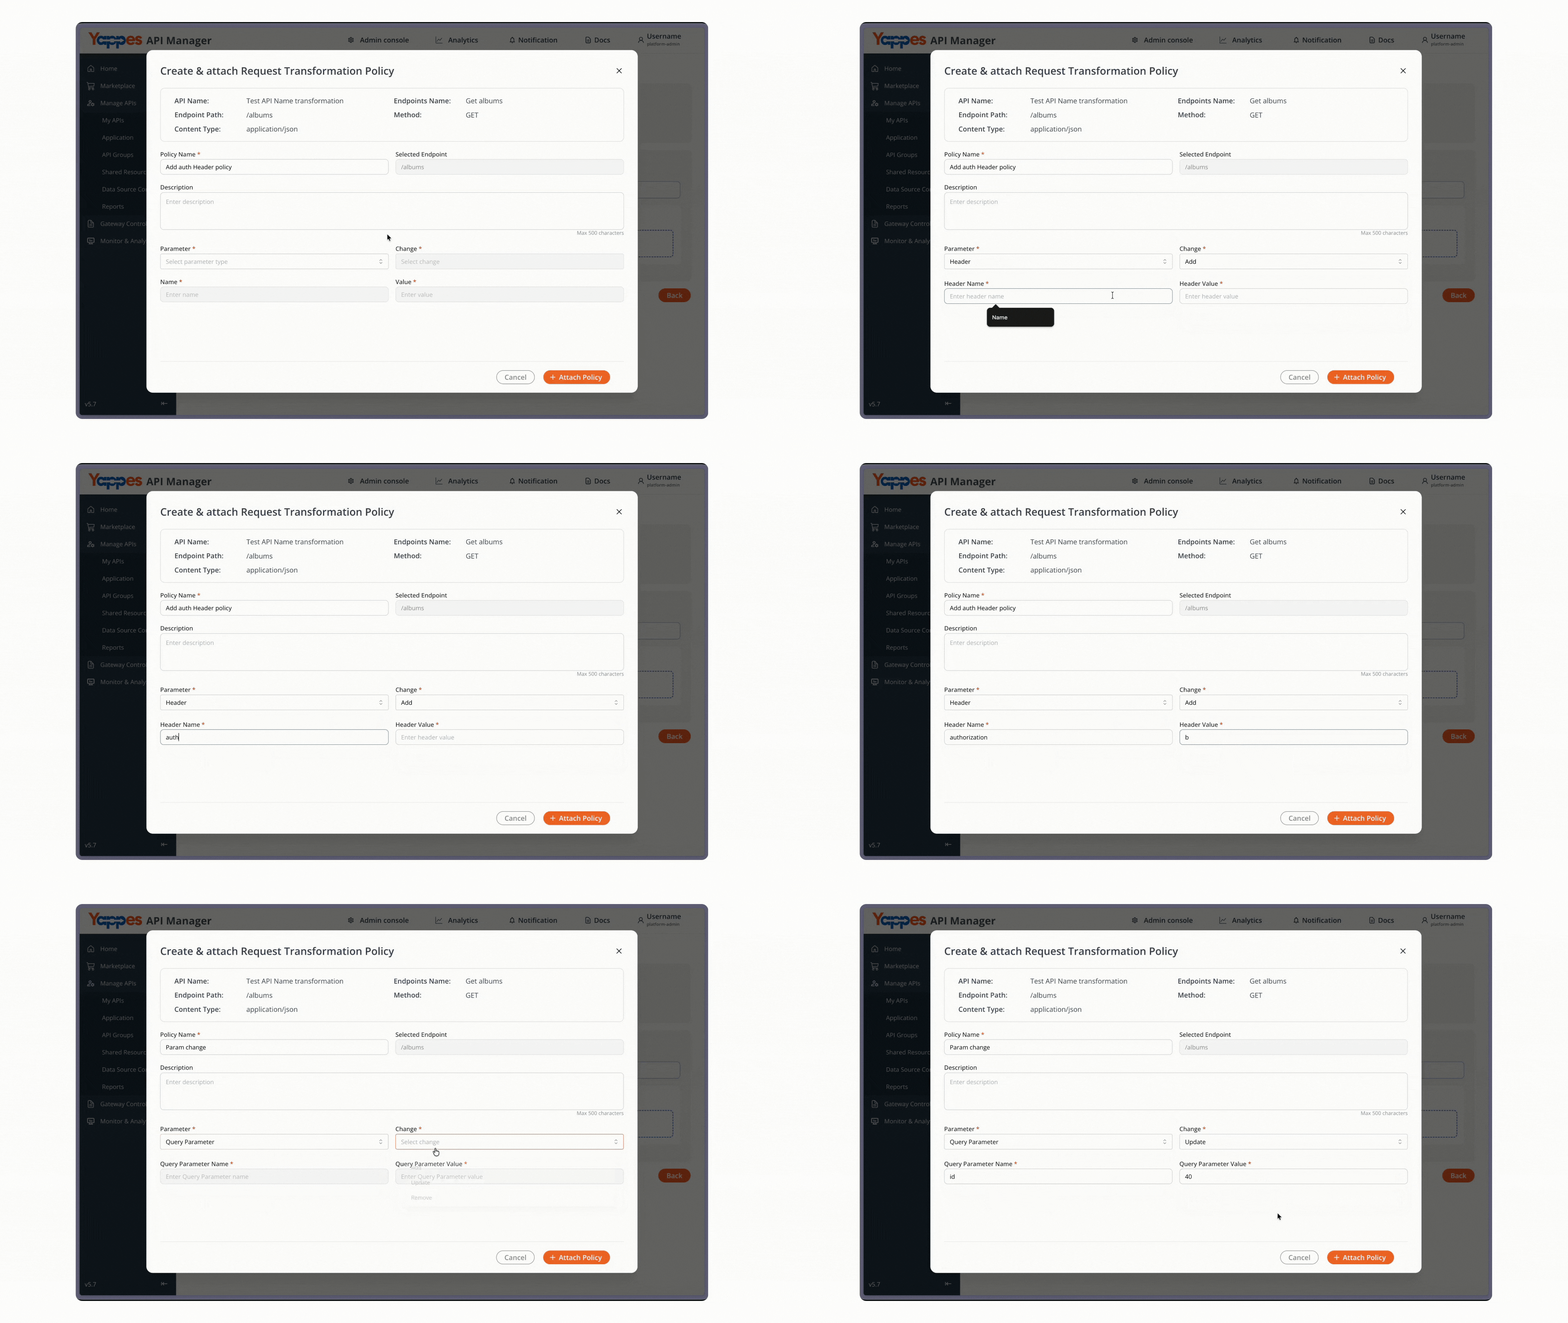
Step 10: Save and Attach the Policy
- Review configuration settings.
- Click
Attach Policy. - Confirmation message will appear.
Step11: Rearrange execution order
- Click and hold the policy card
- Drag to rearrange the policy card for execution order change
Info
To check transformation policy is working at endpointShape, Do Tryout of the endpoint.
Method 2: Creating Transformation from Gateway Policy Page
Step 1: Navigate to Gateway Policies
- Locate
Gateway Control → Gateway Policiesin the main navigation menu. - The policies management interface will display.
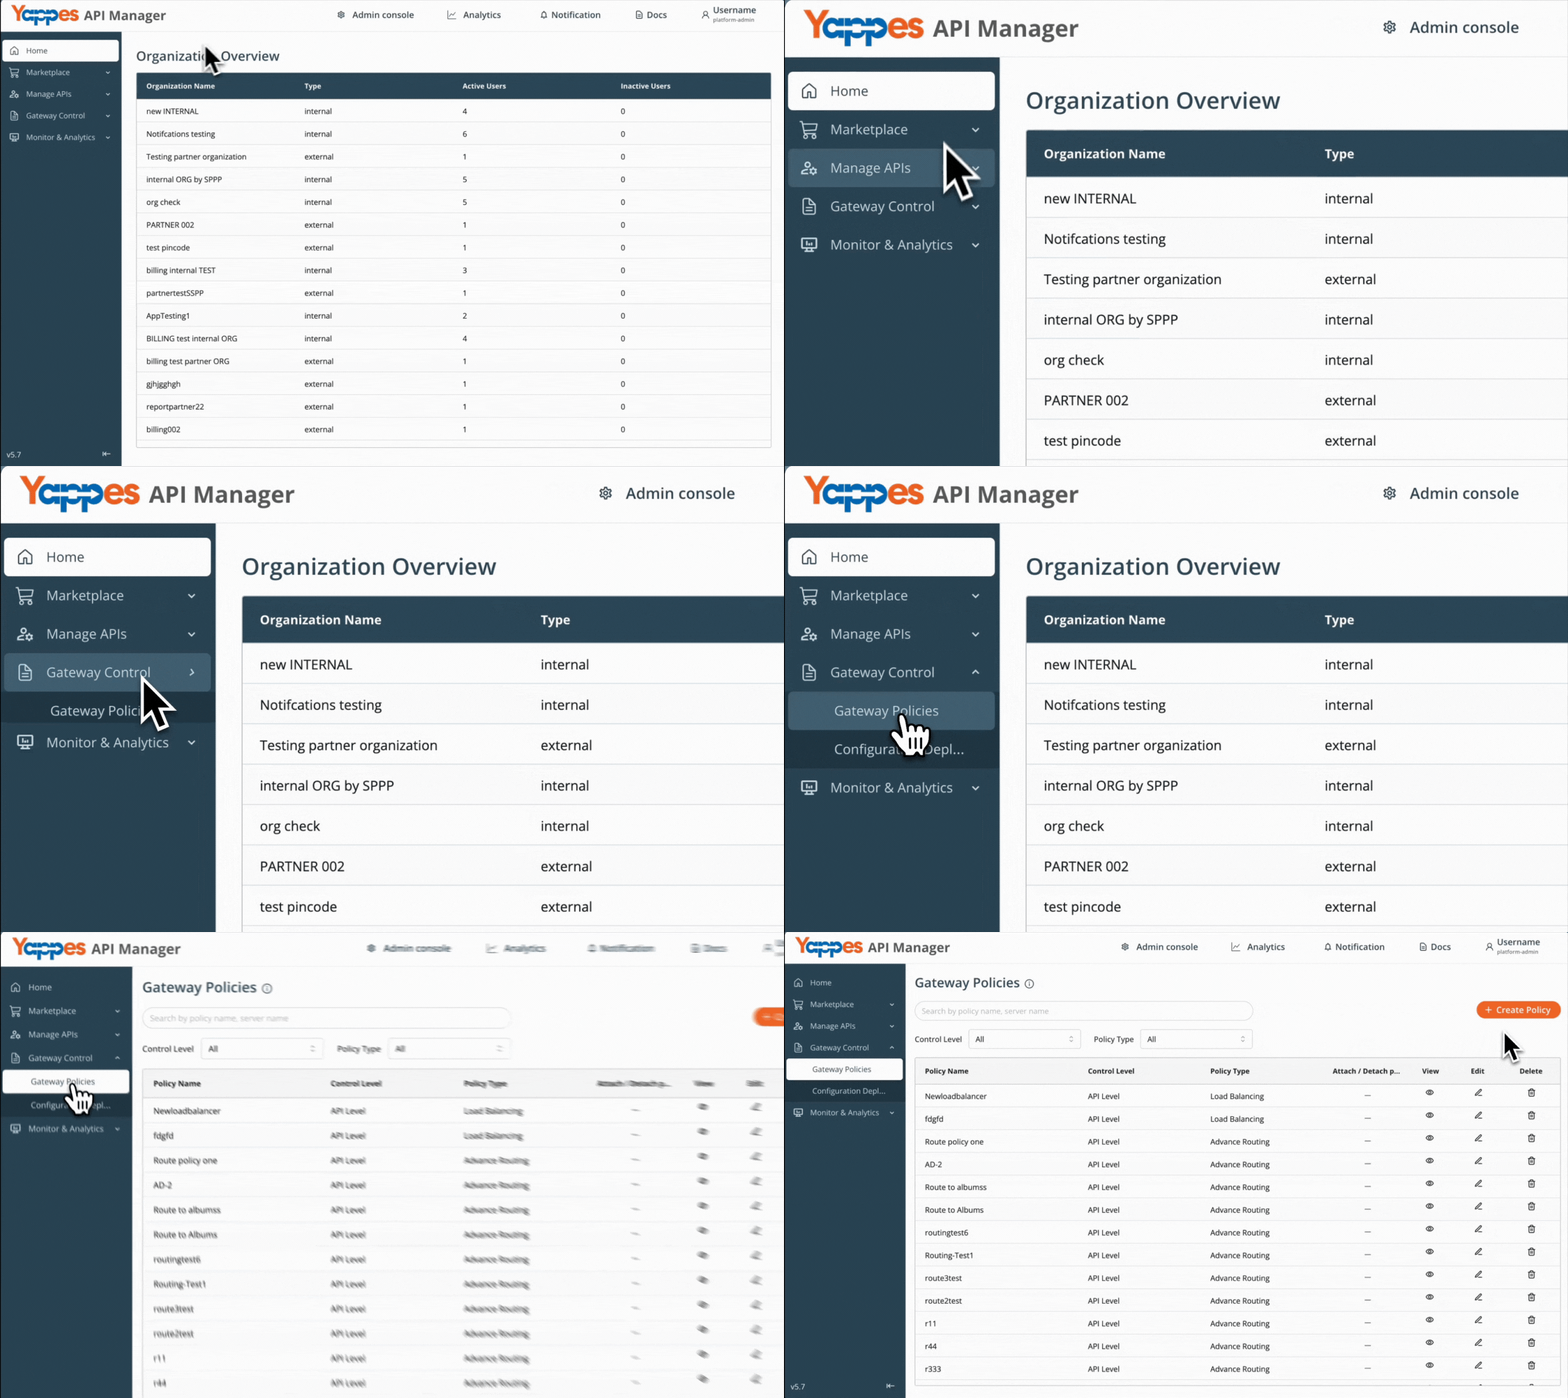
Step 2: Initialize New Policy Creation
- Click
+ Create Policybutton. - The policy creation modal will open.
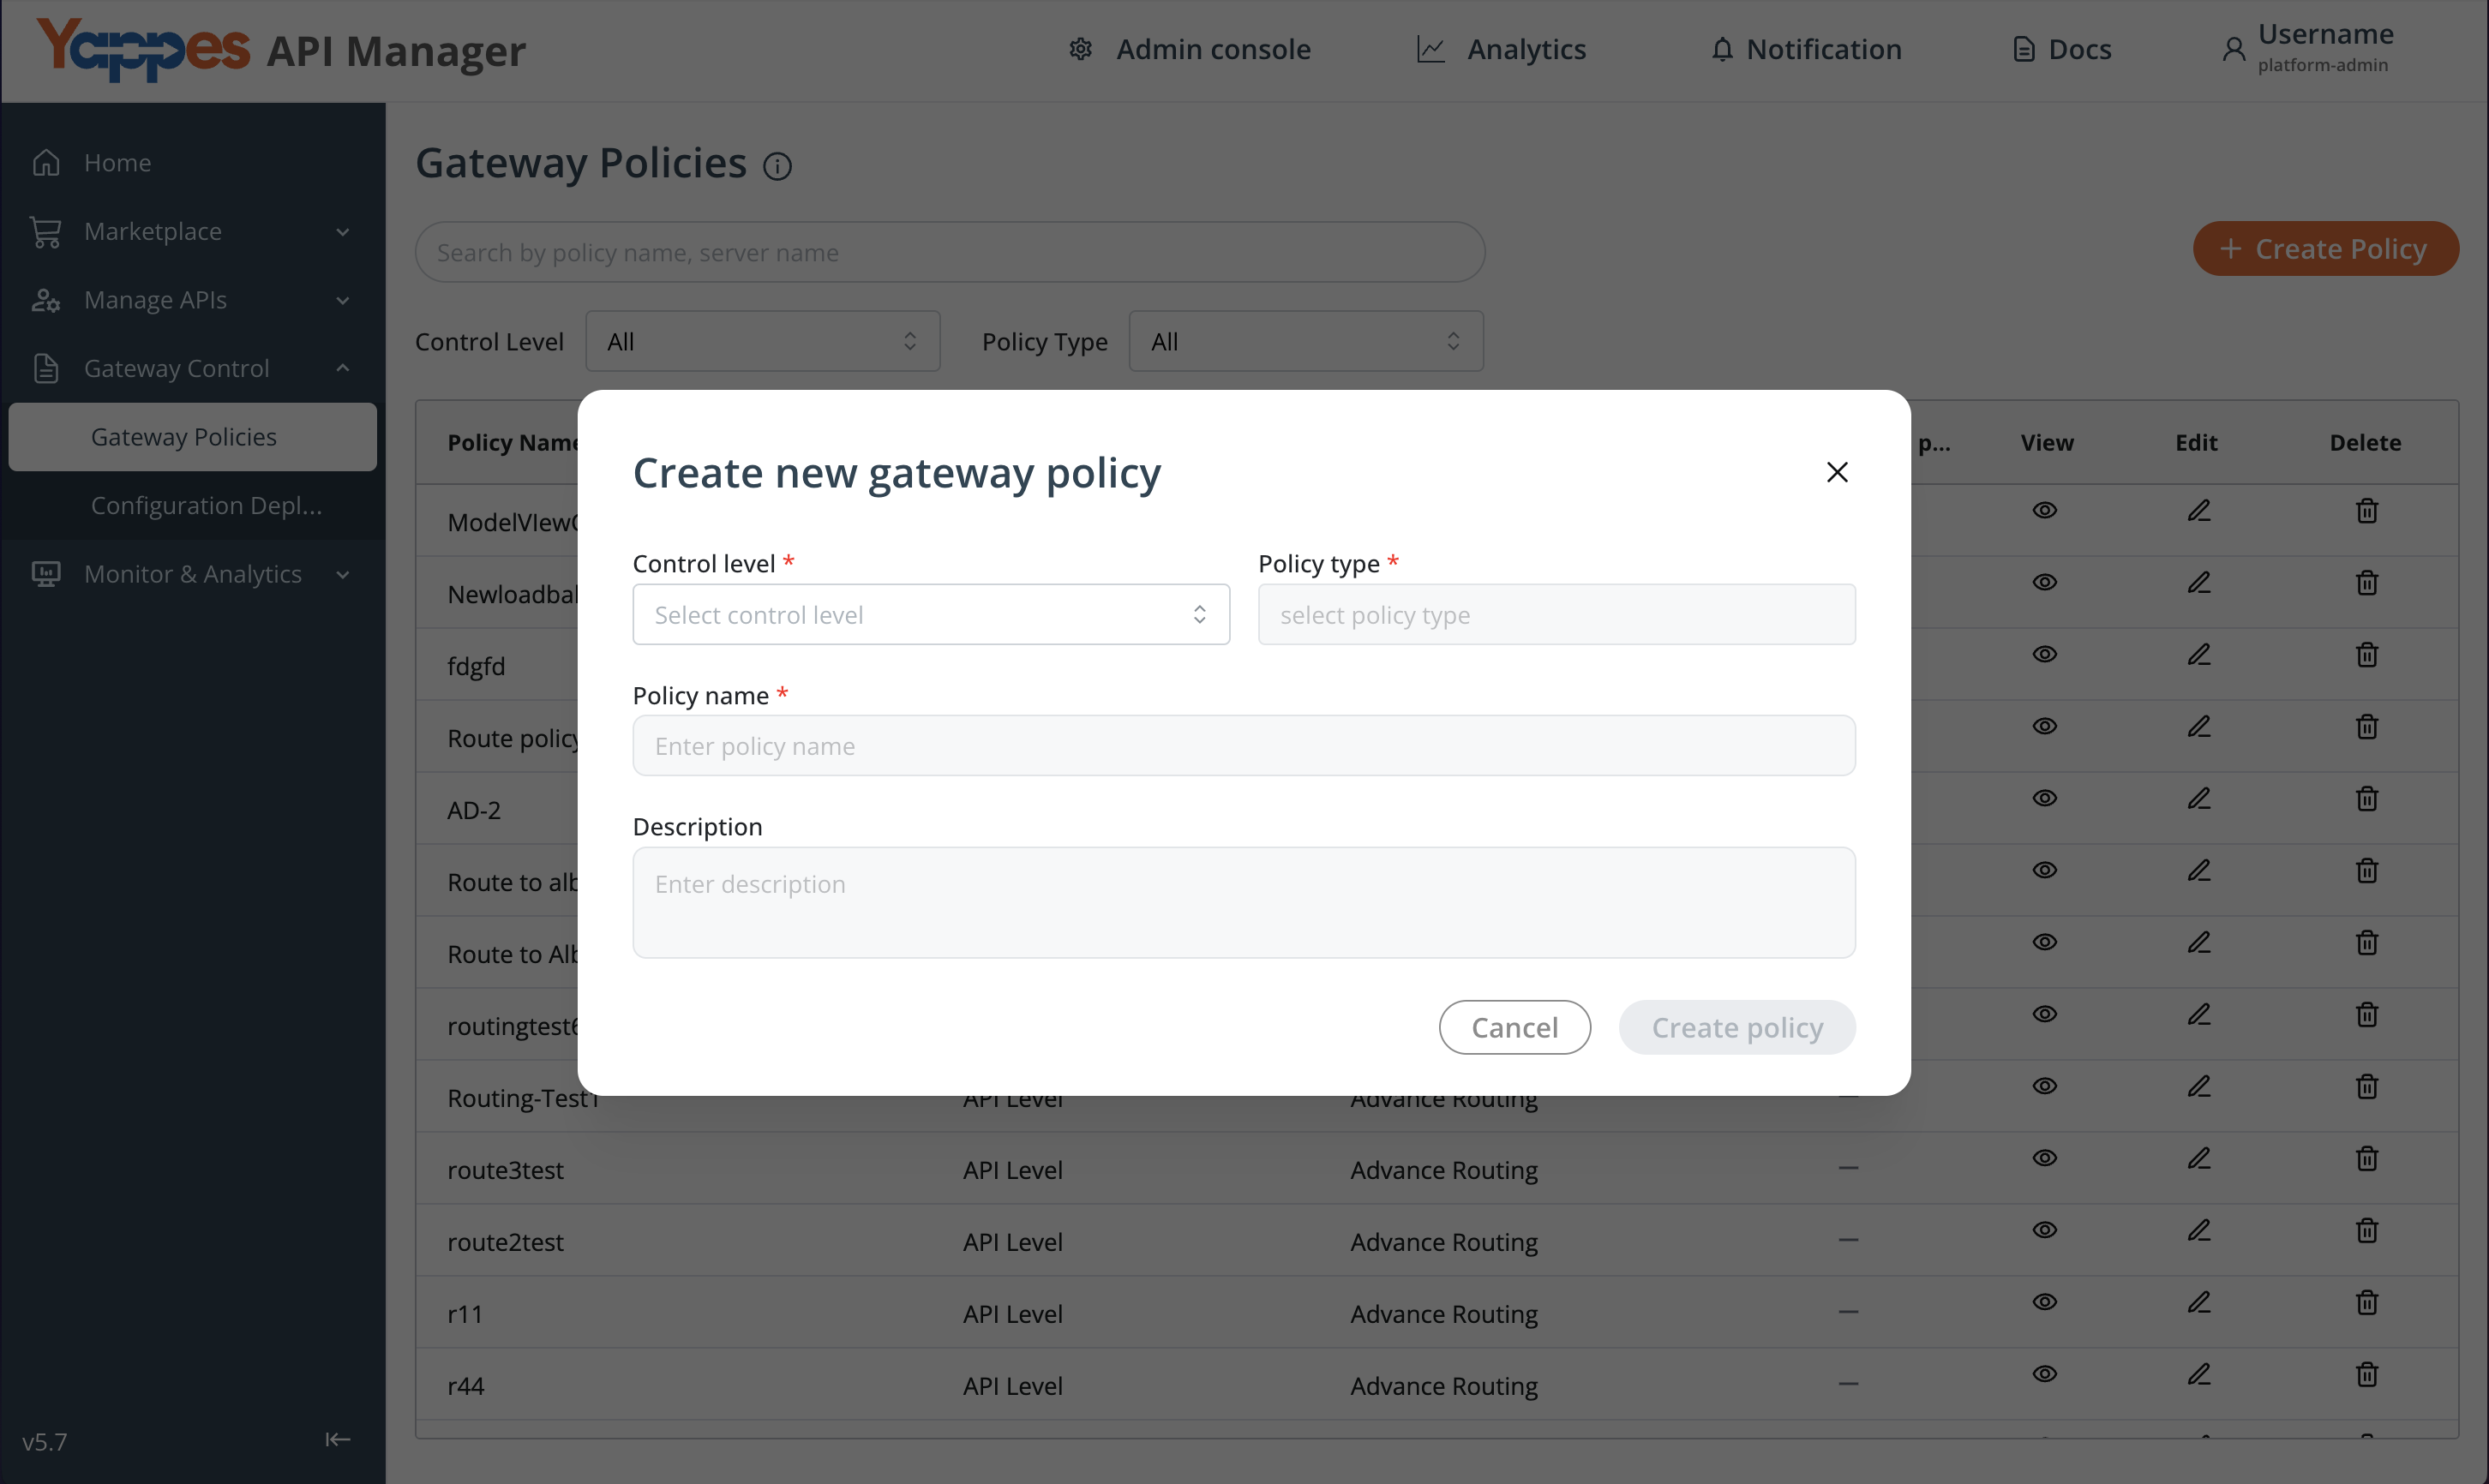
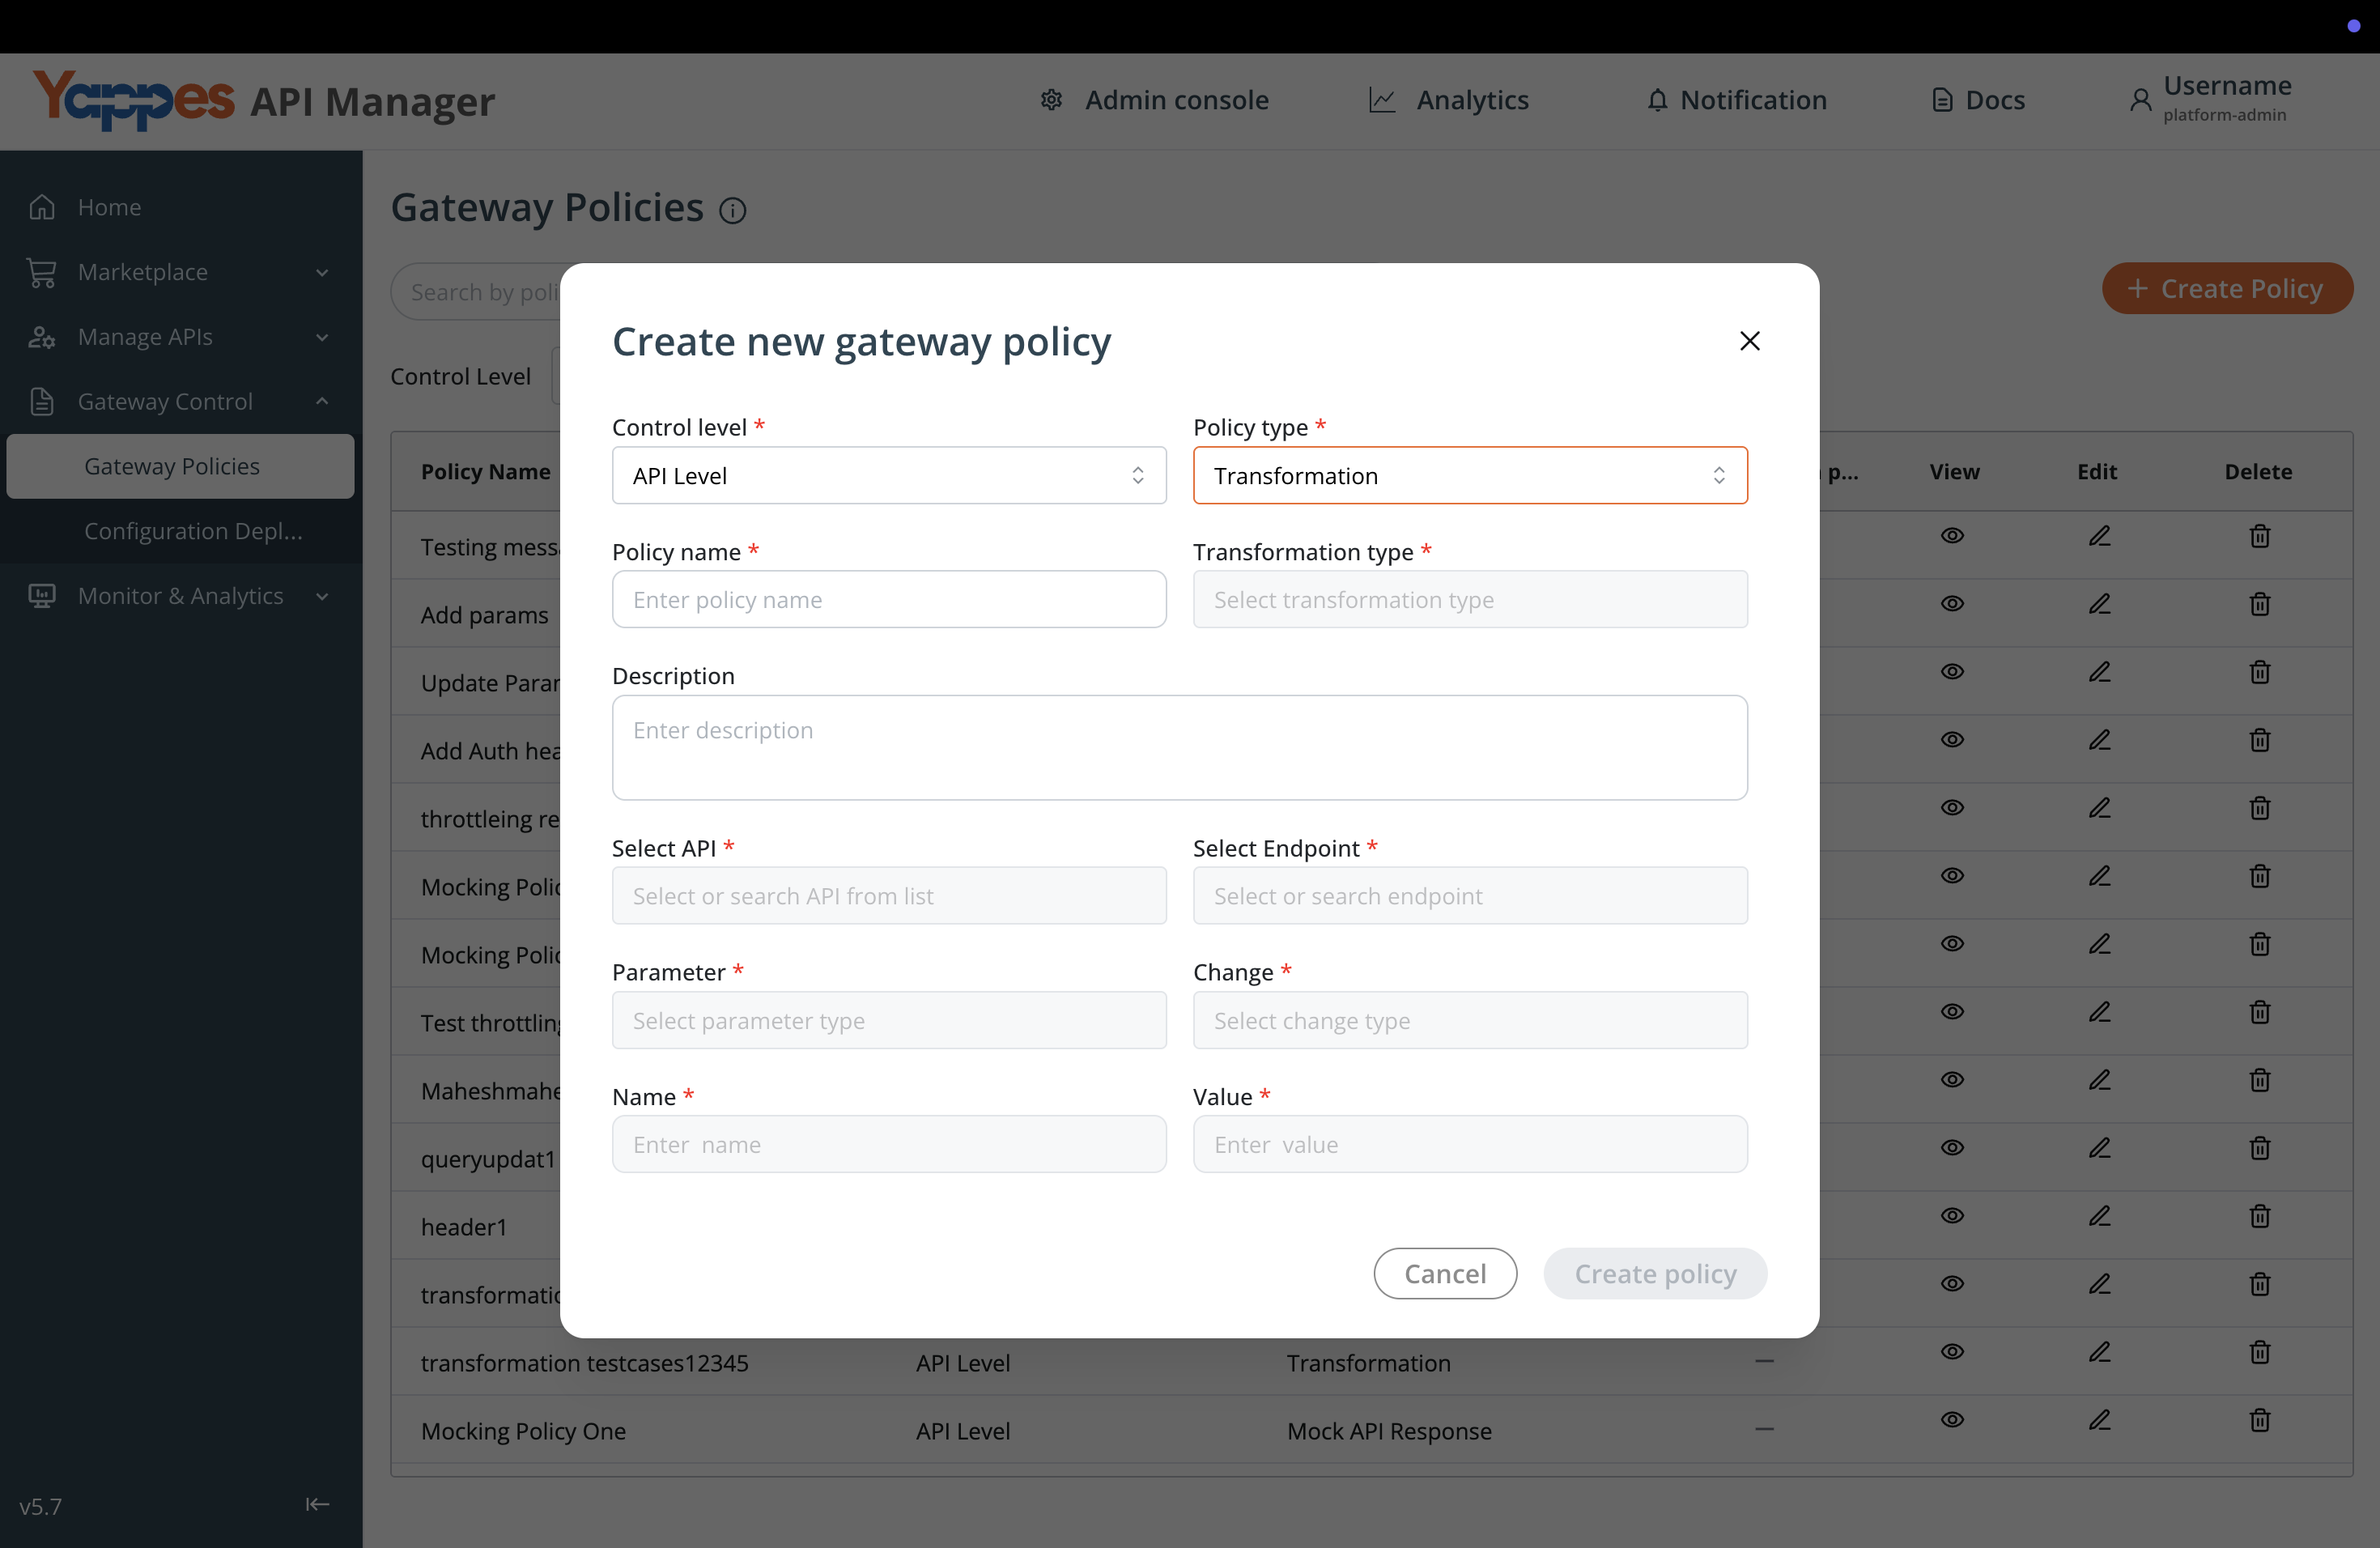
Step 3: Configure Policy Settings
-
Set the
Control LeveltoAPI Level. -
In the
Policy Typedropdown, selectTransformation. -
These settings determine the policy scope and functionality.
Step 4: Define Policy Details
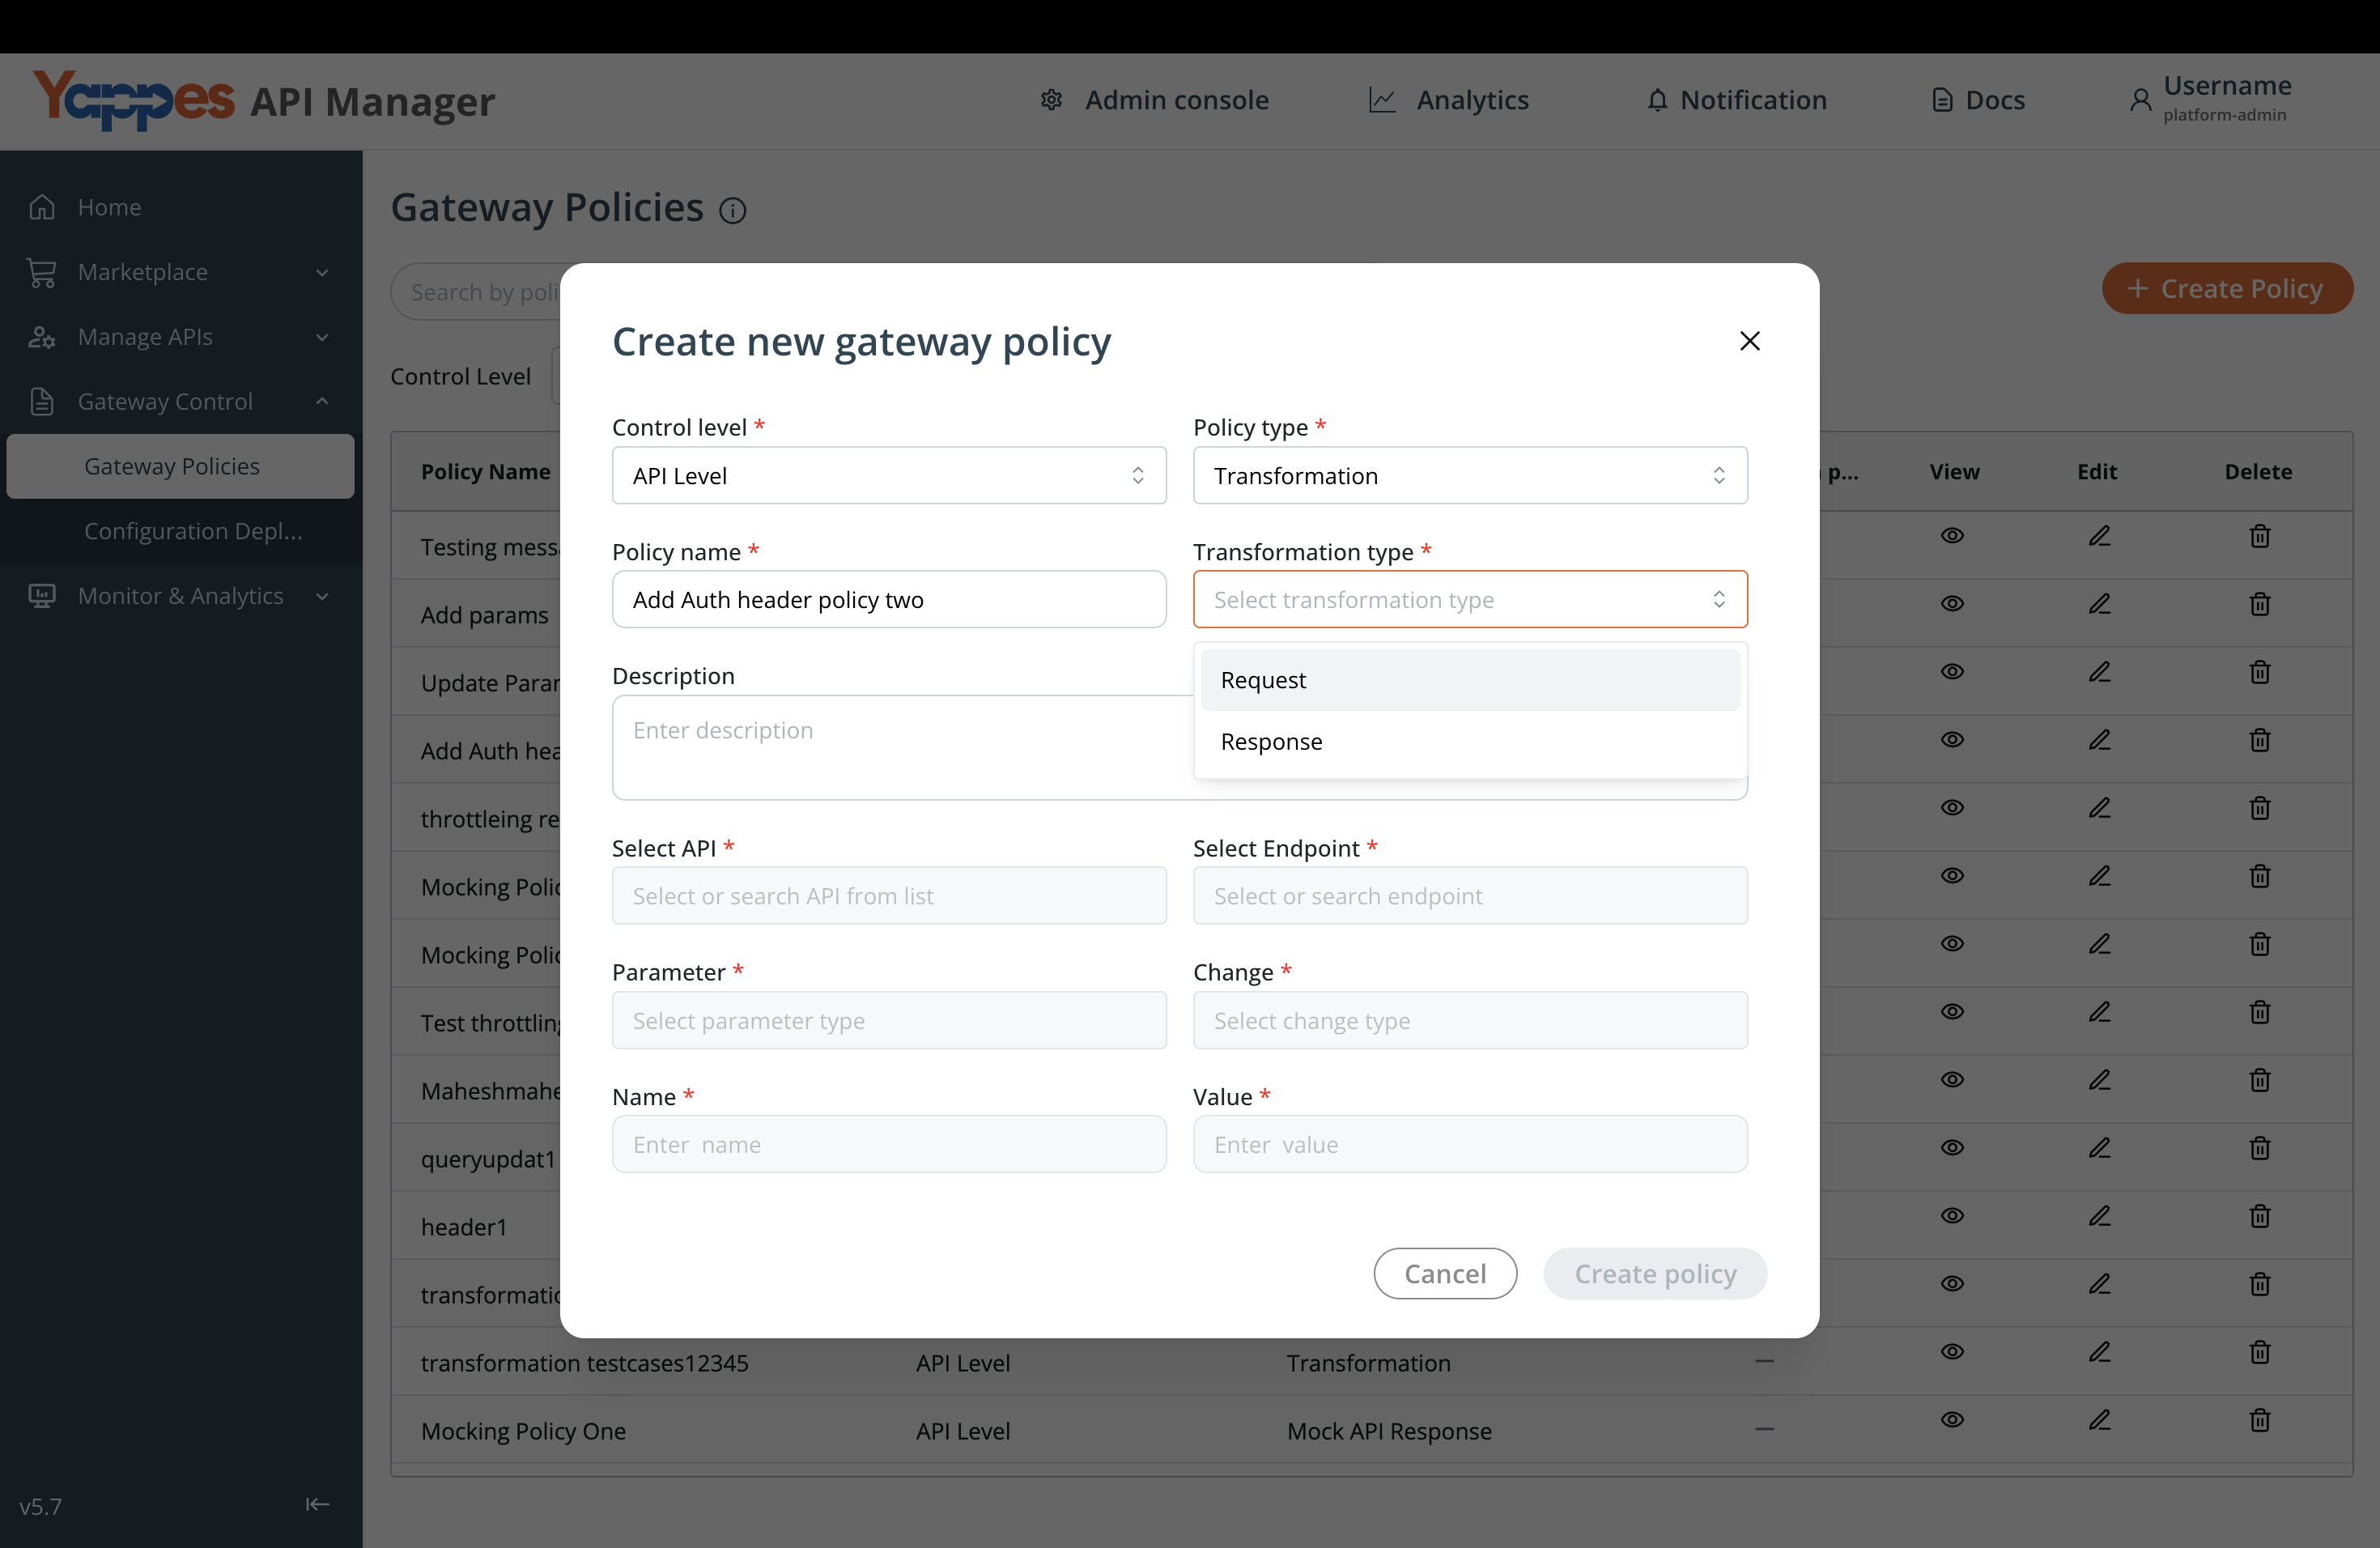
-
Enter a unique
Policy Namefor identification. -
Select the transformation type — either
RequestorResponse. -
Add a detailed description in the text area field to document the policy purpose
Step 5: Select Target API
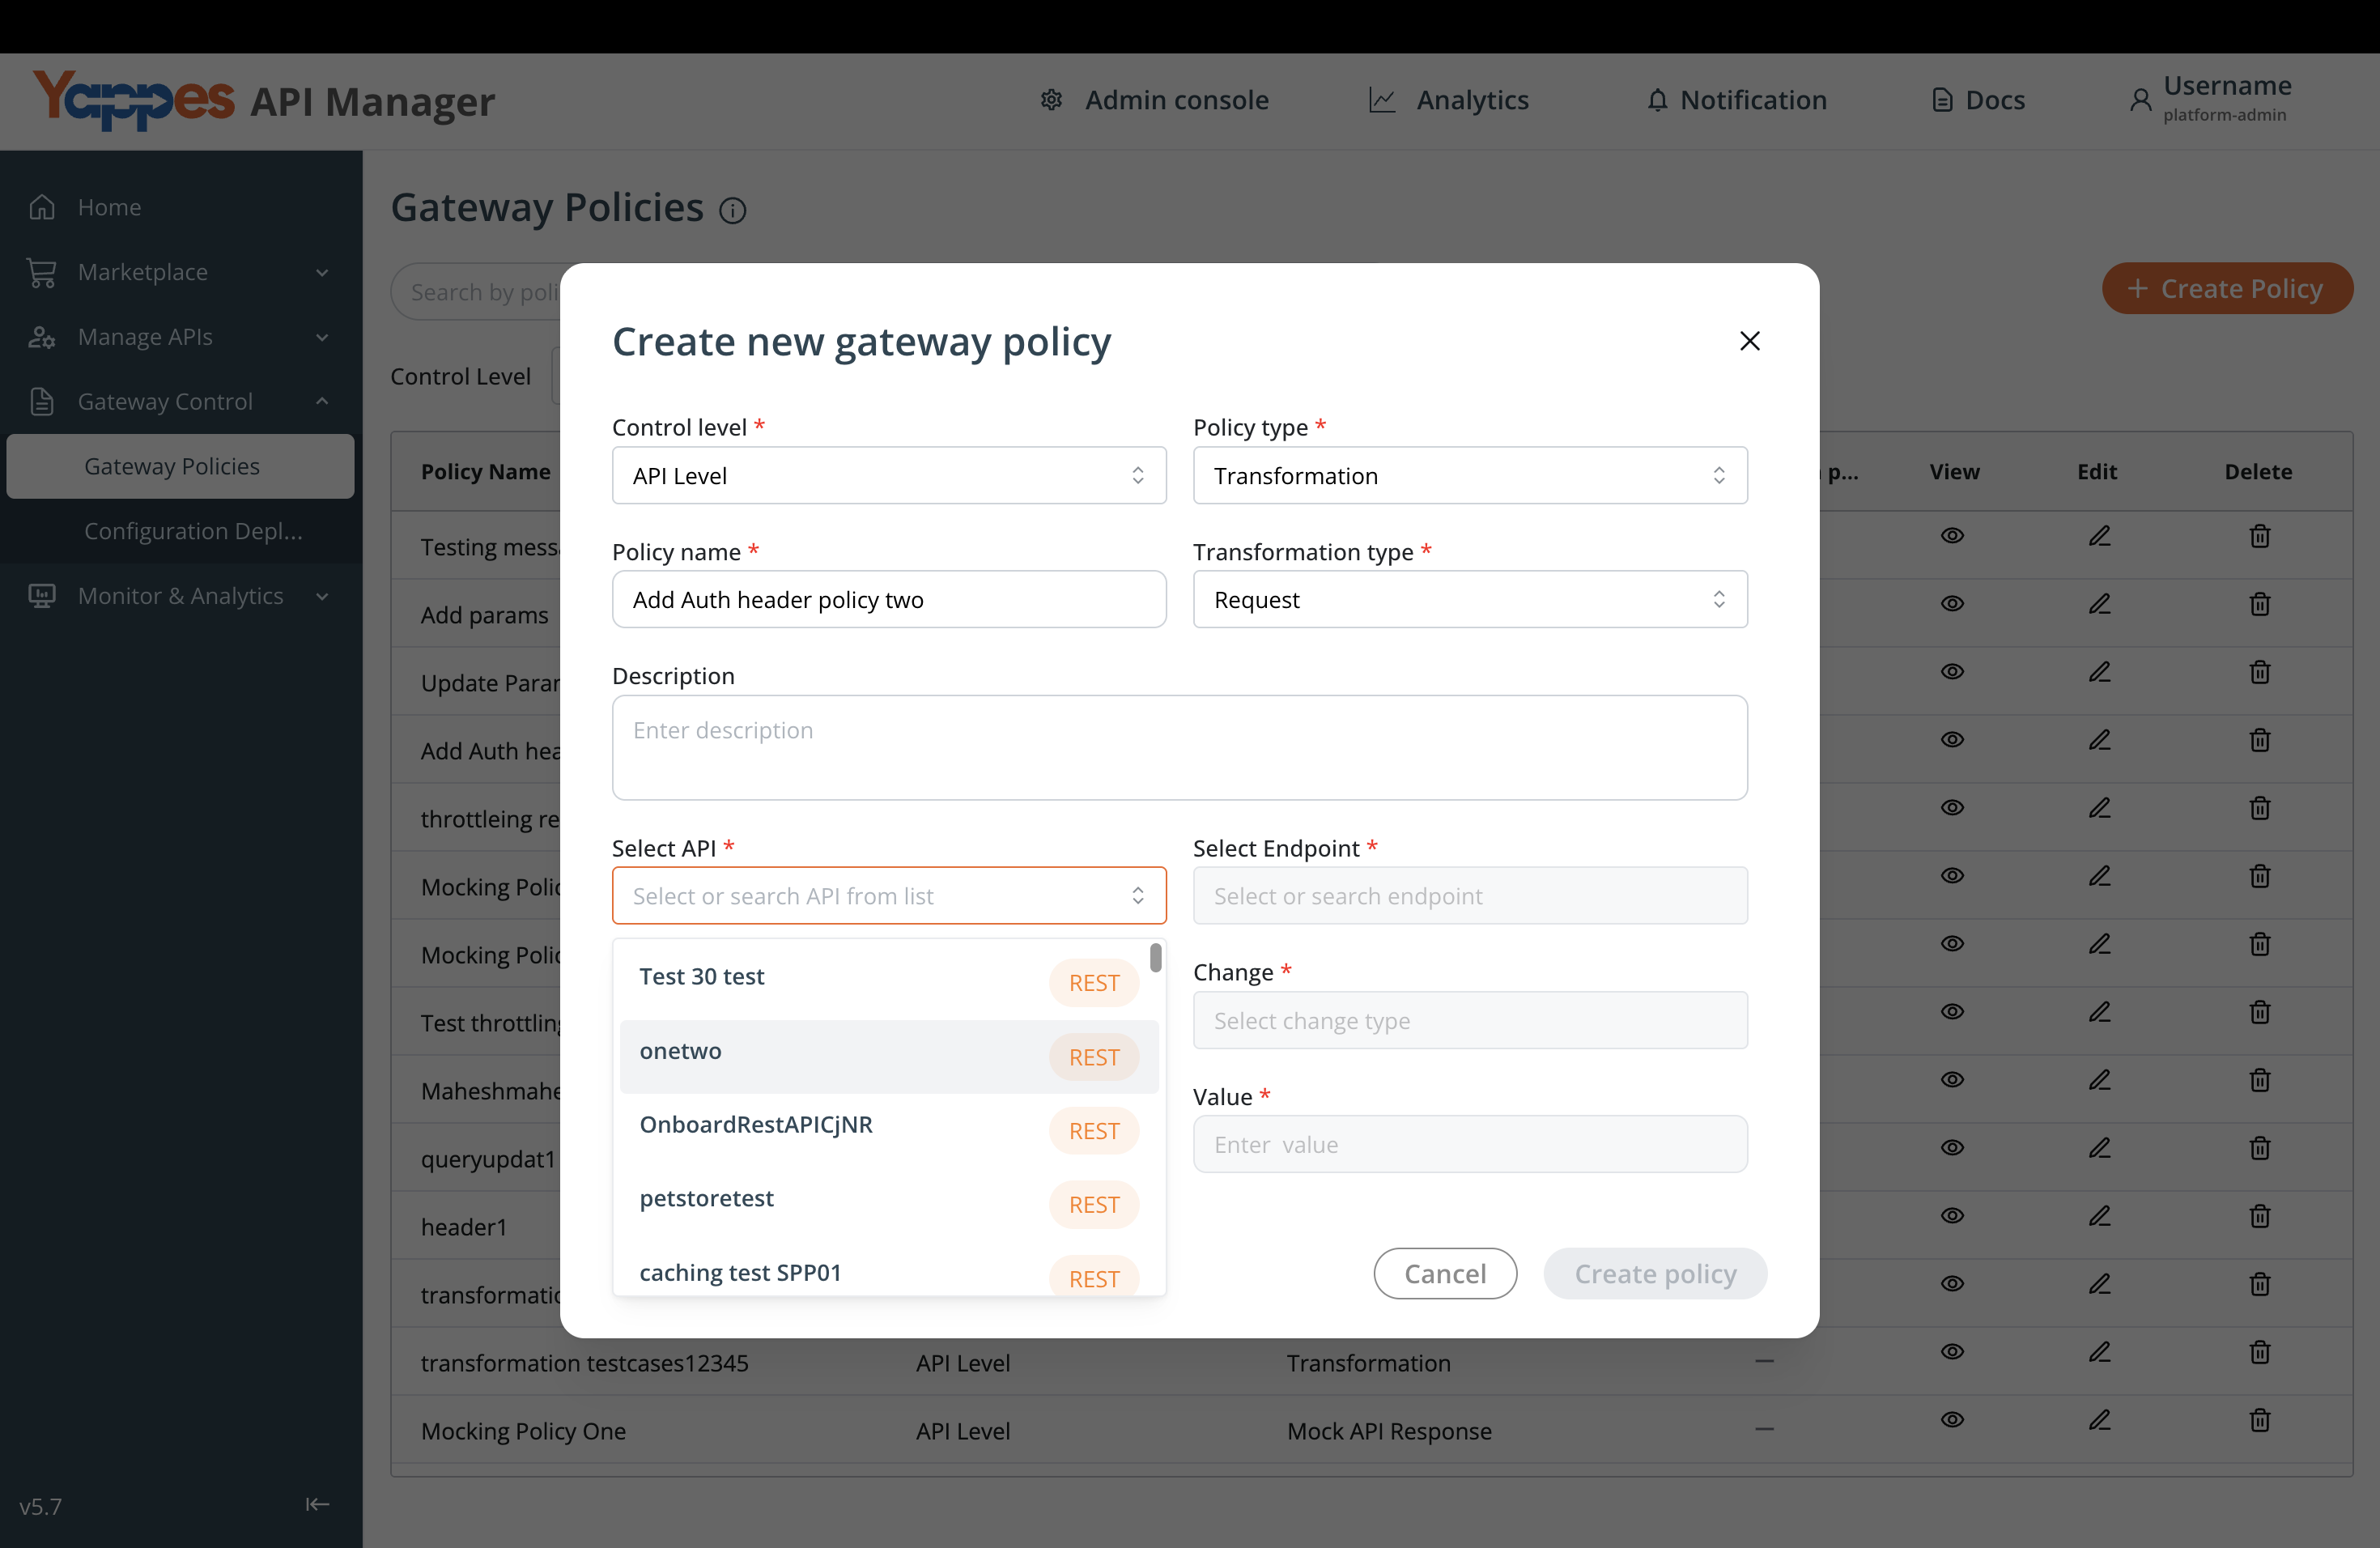
- From the available APIs list, select the
API & Endpointto attach the policy.
Step 6: Configure parameter type
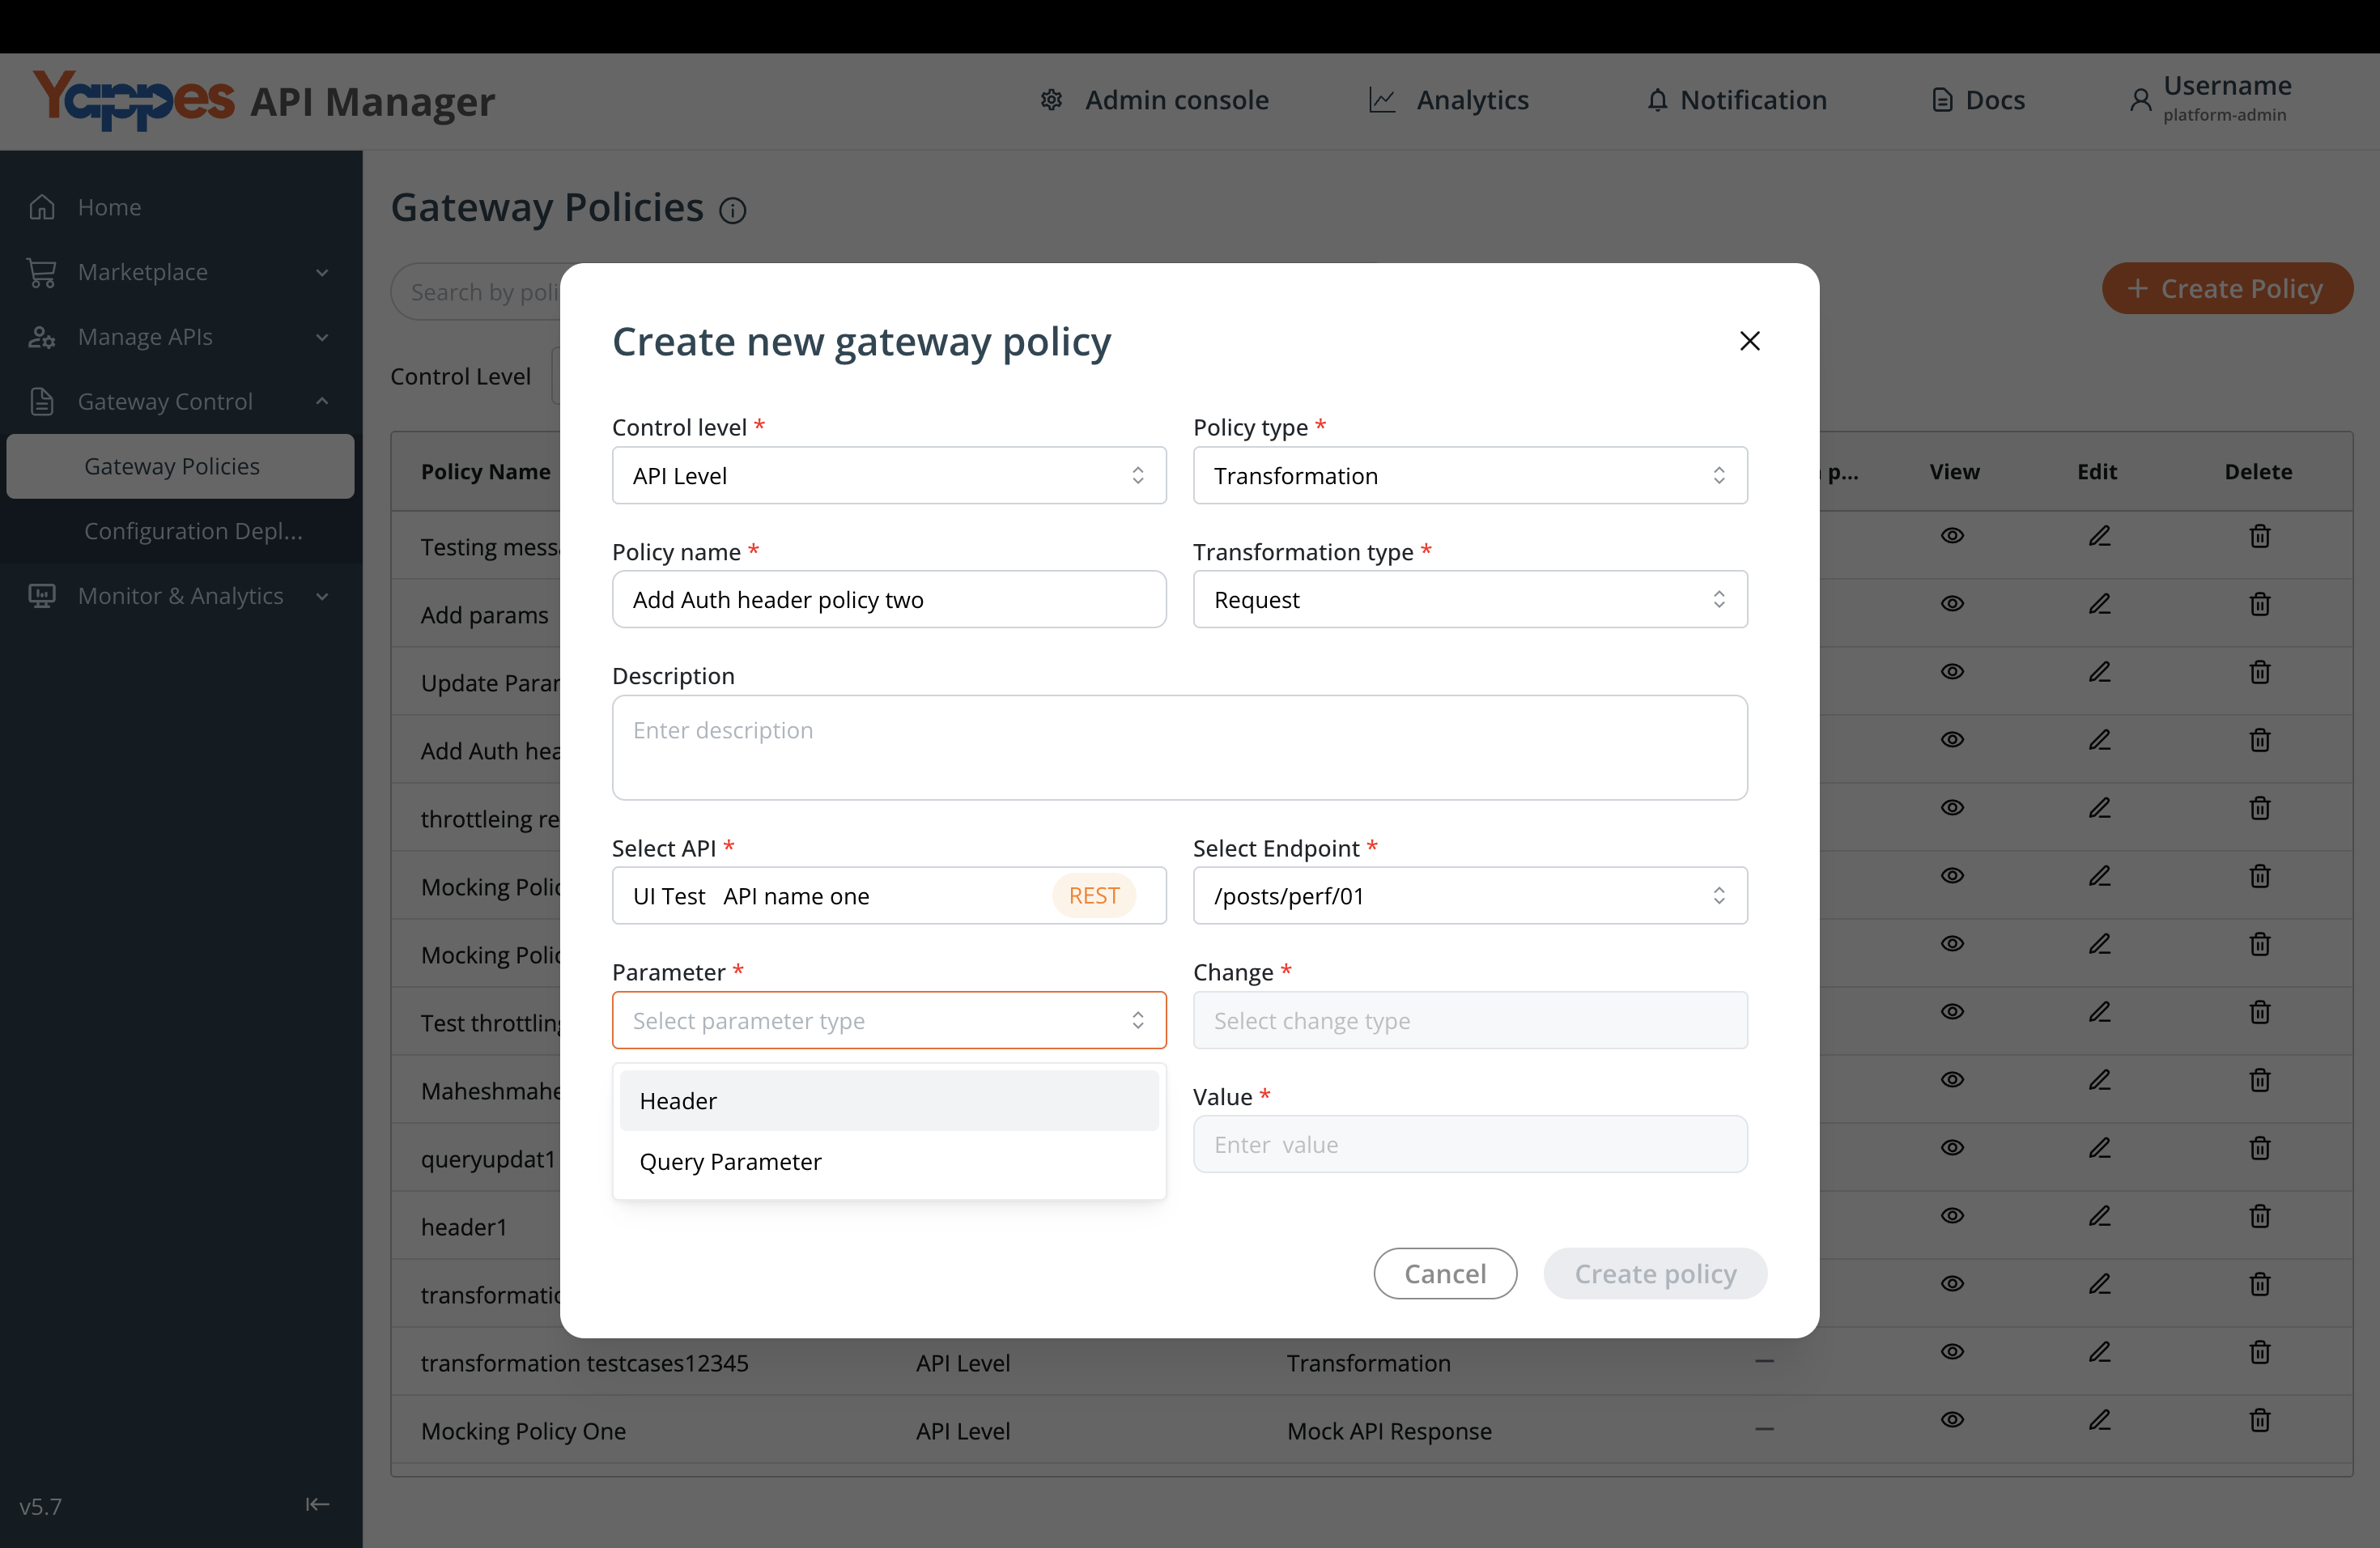
- Click the
Parameterdropdown field - Select
Headeror Query parameter` from the available options - This configures the policy to modify
HTTP headers/ URL parameter
Info
Query Parameter is only applicable to Request Transformation Policy
Step 7: Define Parameter Action
- Click Parameter
Changedropdown field - Select
Add,UpdateorRemoveoptions form the dropdown.
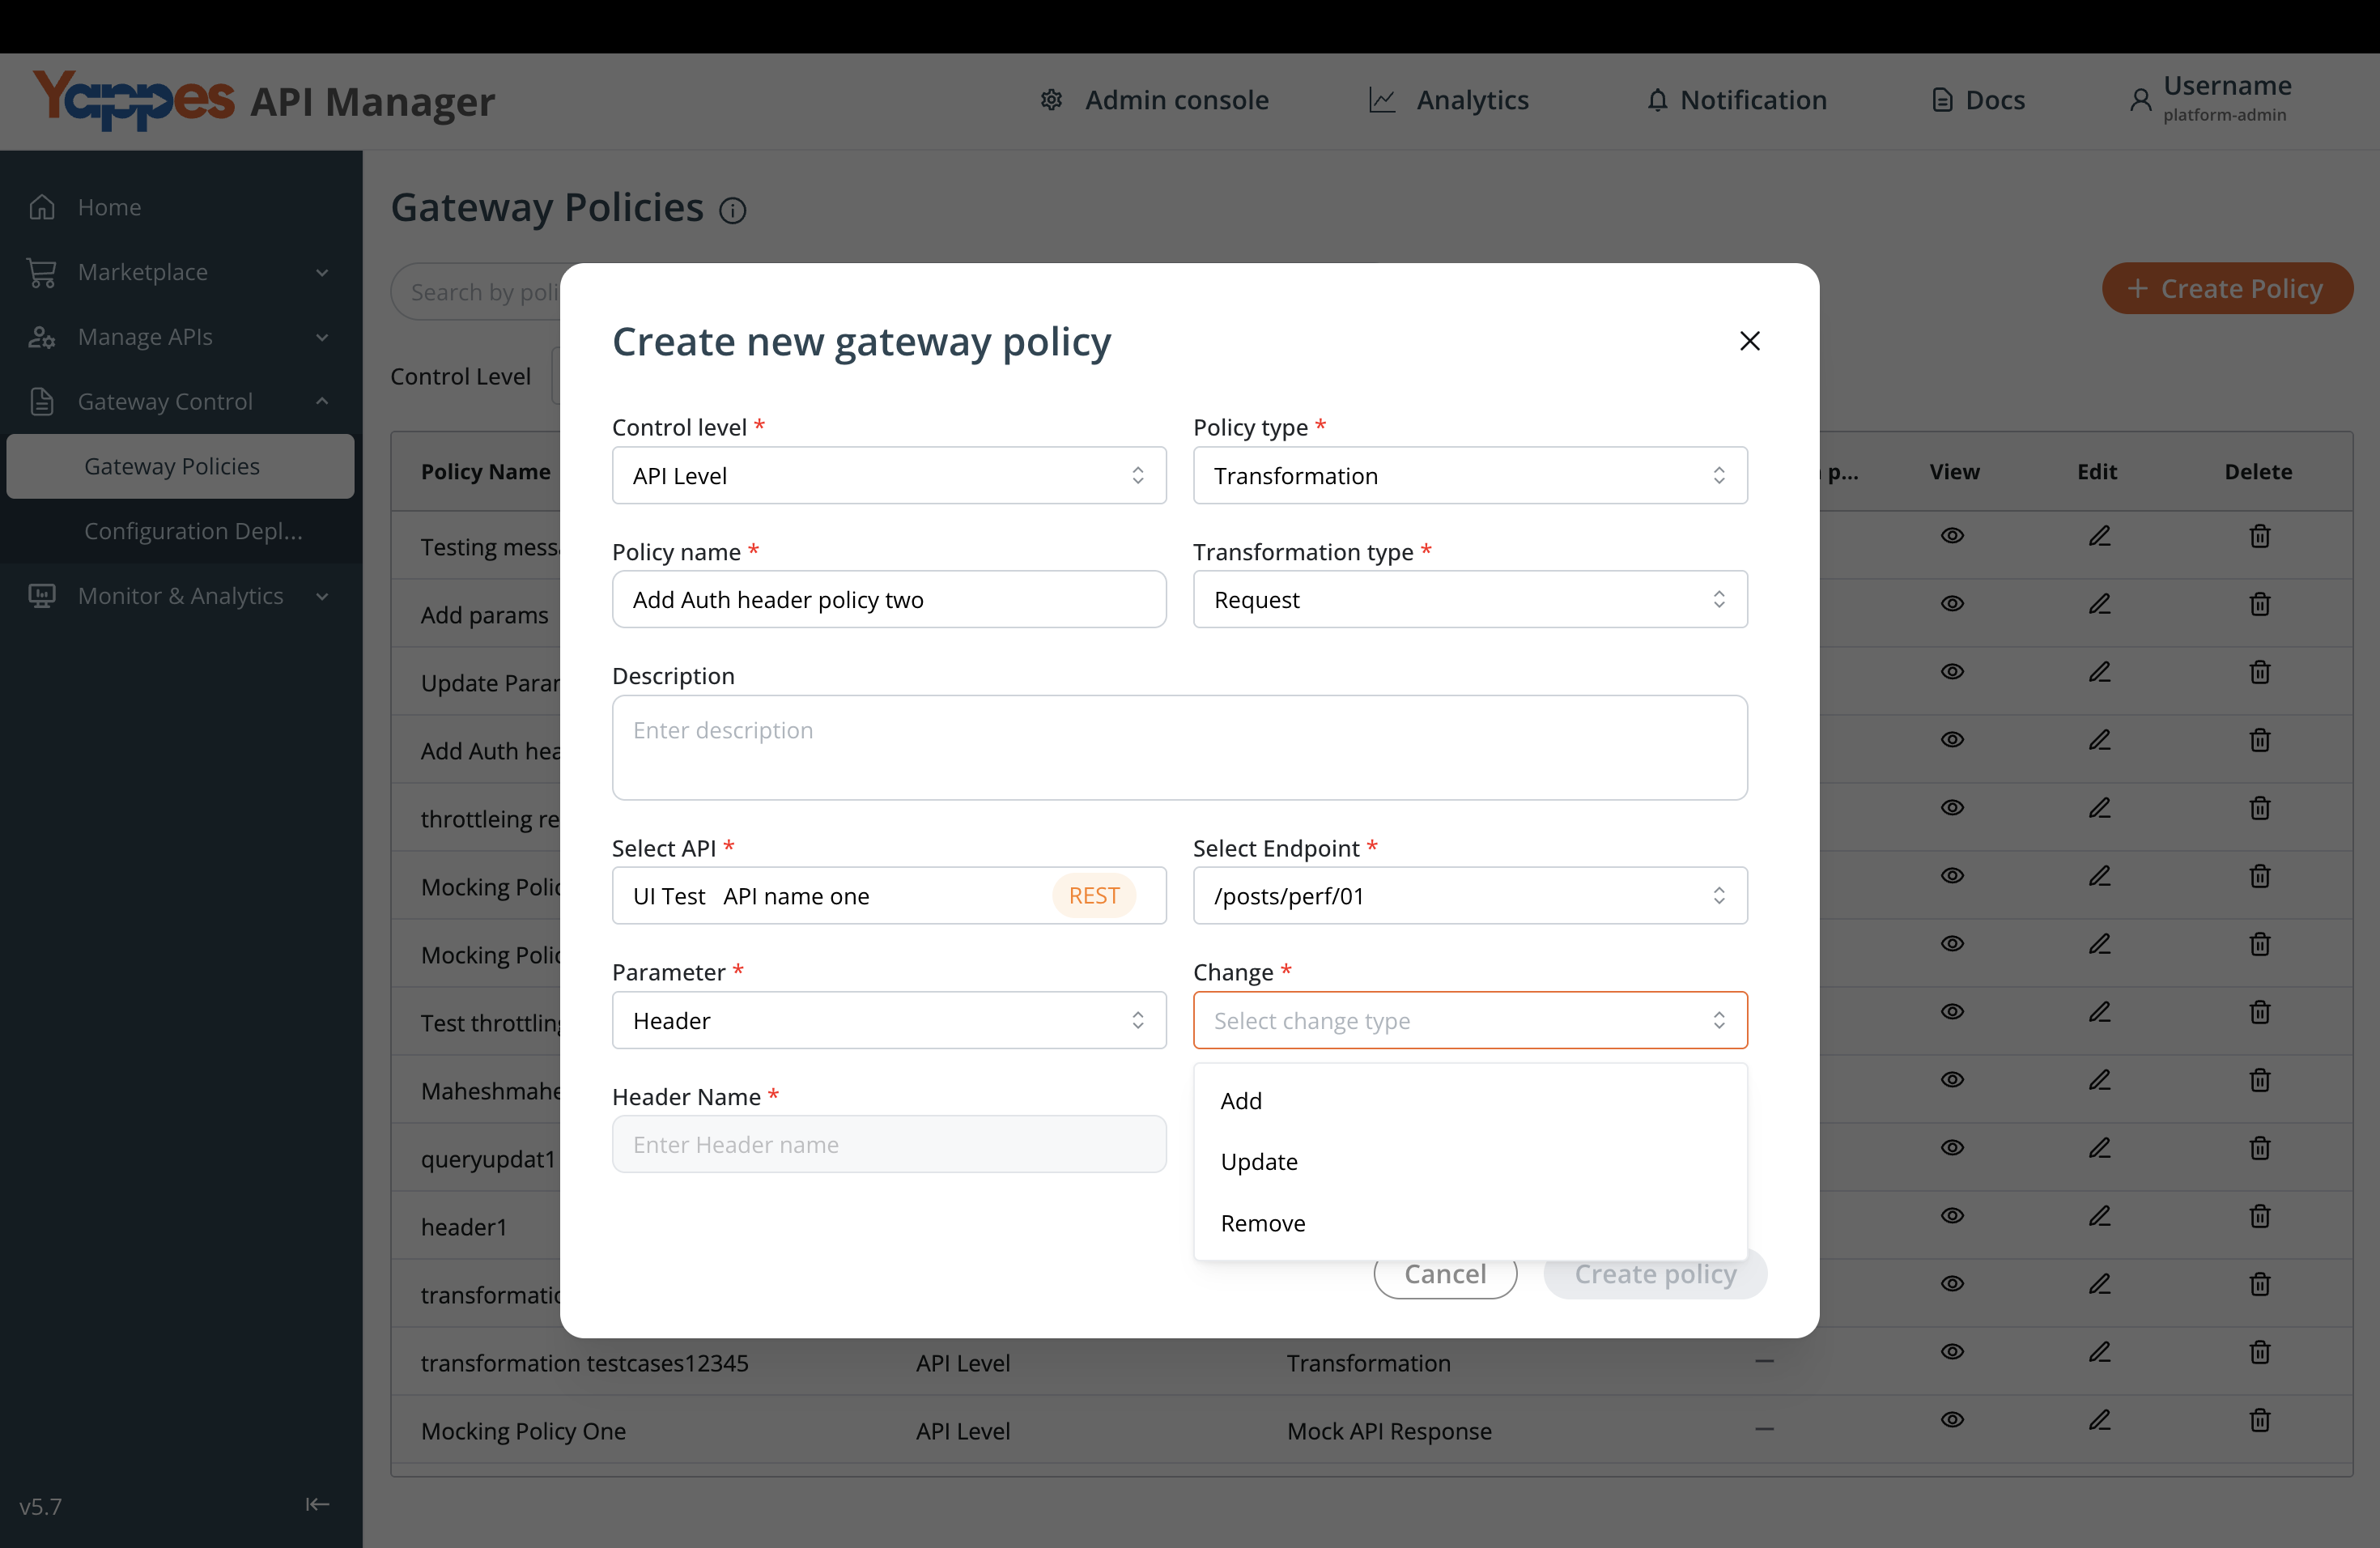
Step 8: Configure Header or Query Parameter Details
- Enter name of the
header/Query parameterto modify(e.g., browser) - Enter the
valueto be modified (e.g., firefox) - Review all entered information for accuracy
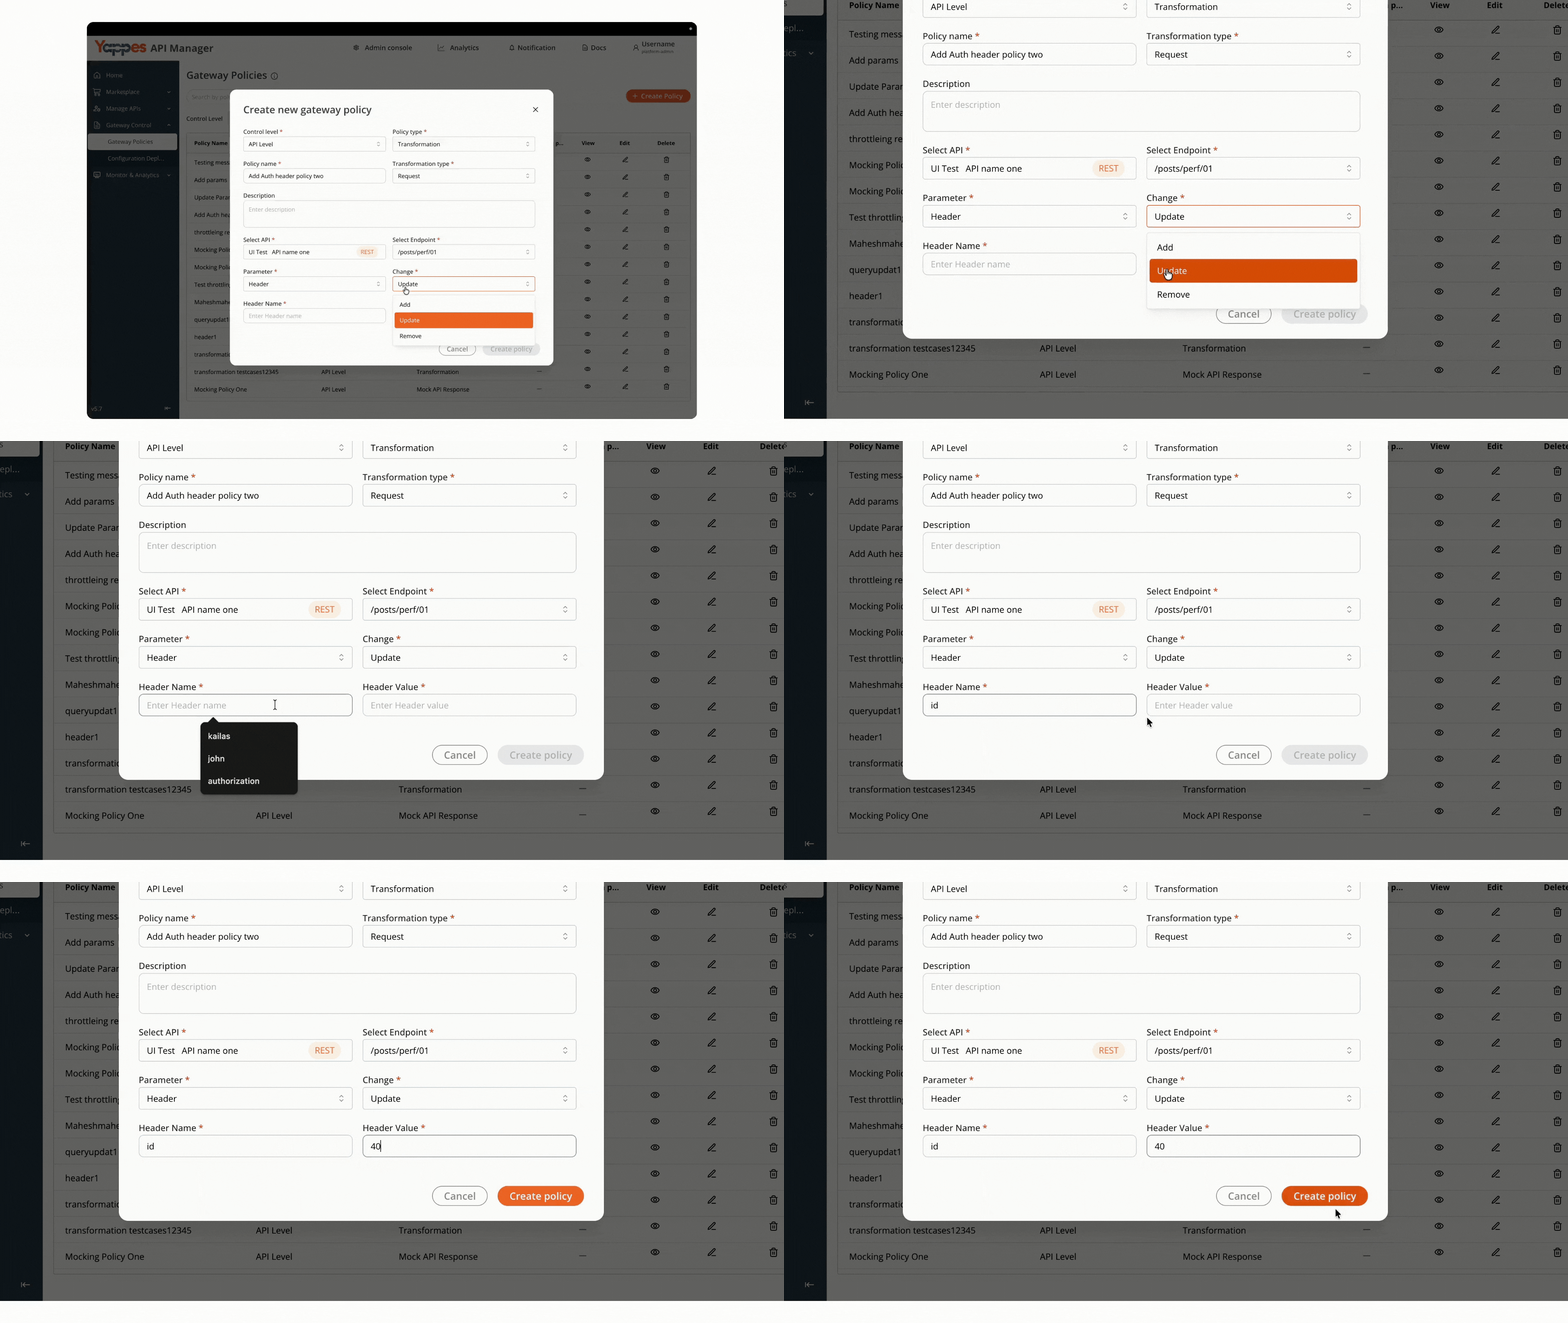
Step 9: Save and Attach the Policy
- Review all policy settings for correctness
- Click
Create Policyto save the configuration - You’ll receive confirmation of transformation policy created and attached to the API endpoint.
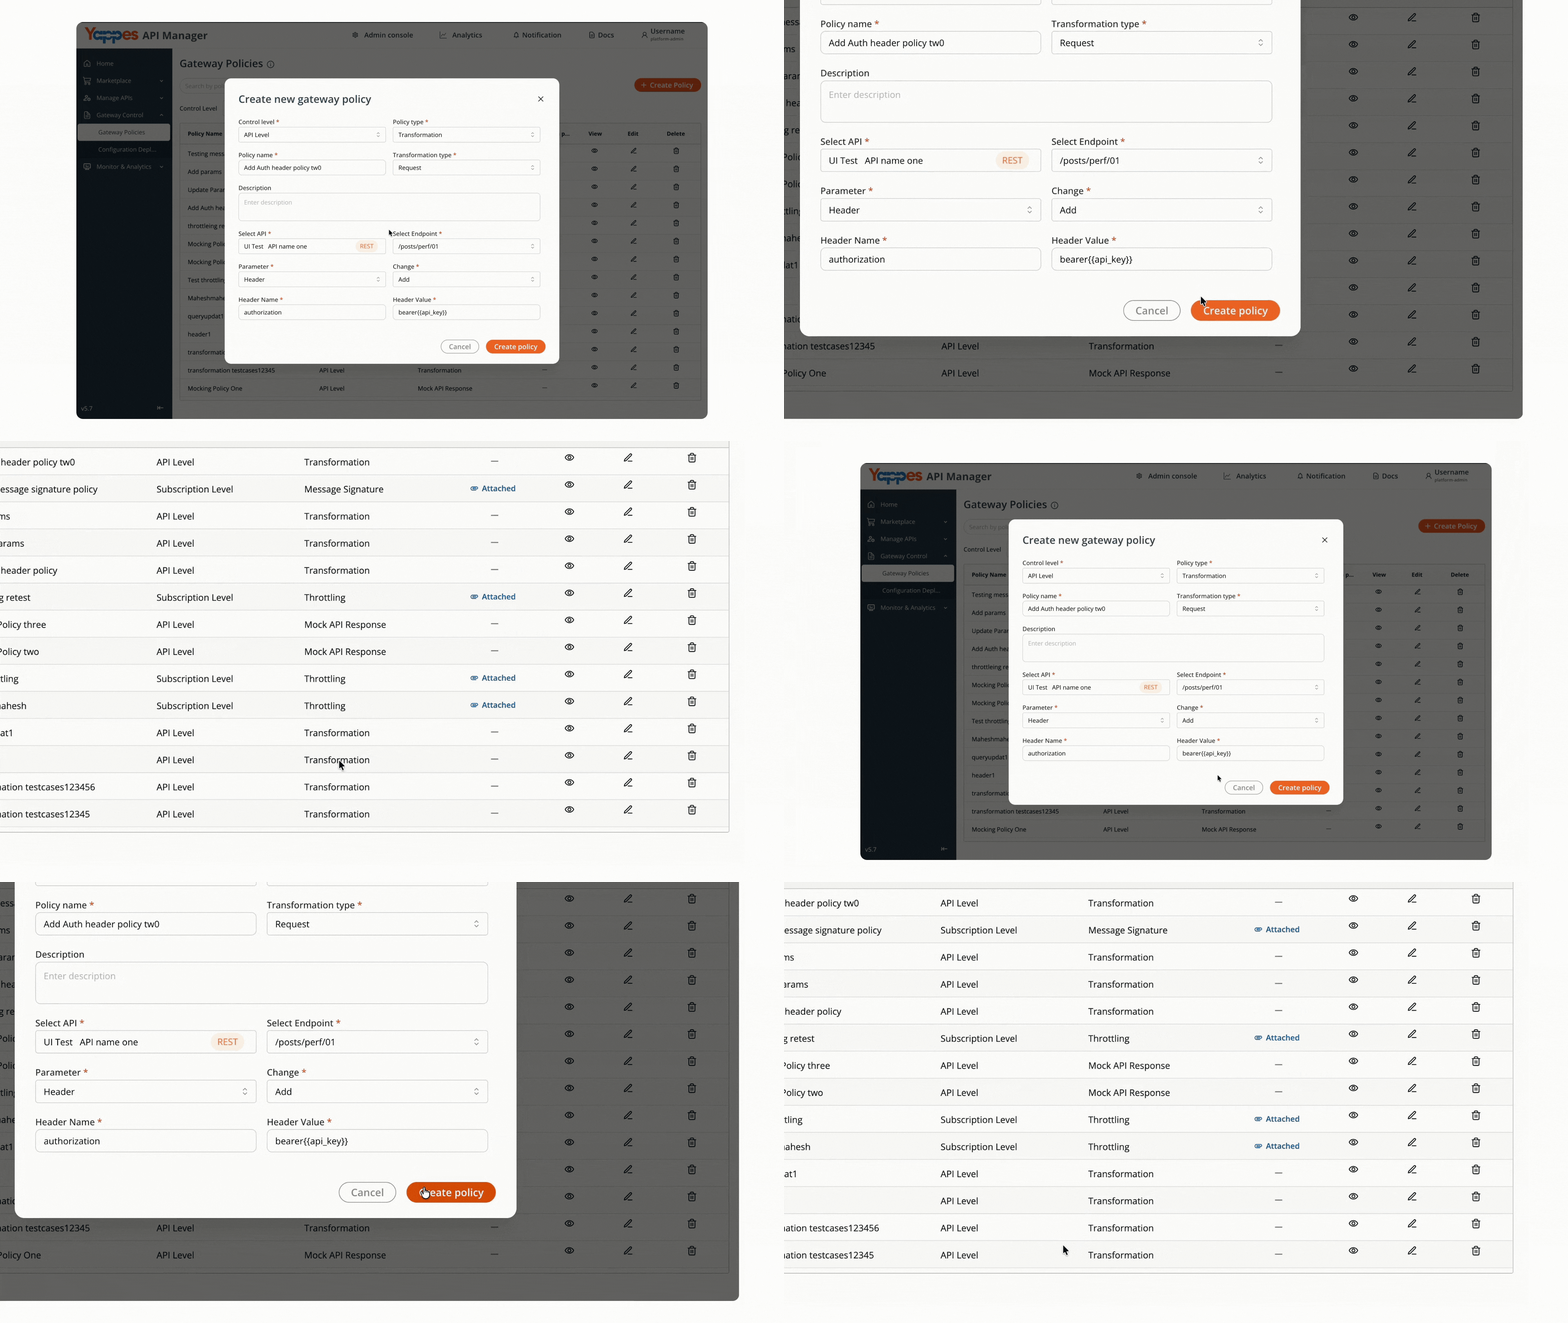
Method 3: Creating Transformation at Subscription Level
Step 1: Navigate to Manage Subscriptions
- Go to
Marketplace → Manage Subscriptionin the main navigation menu. . - Active subscriptions will display in the manage subscription interface.
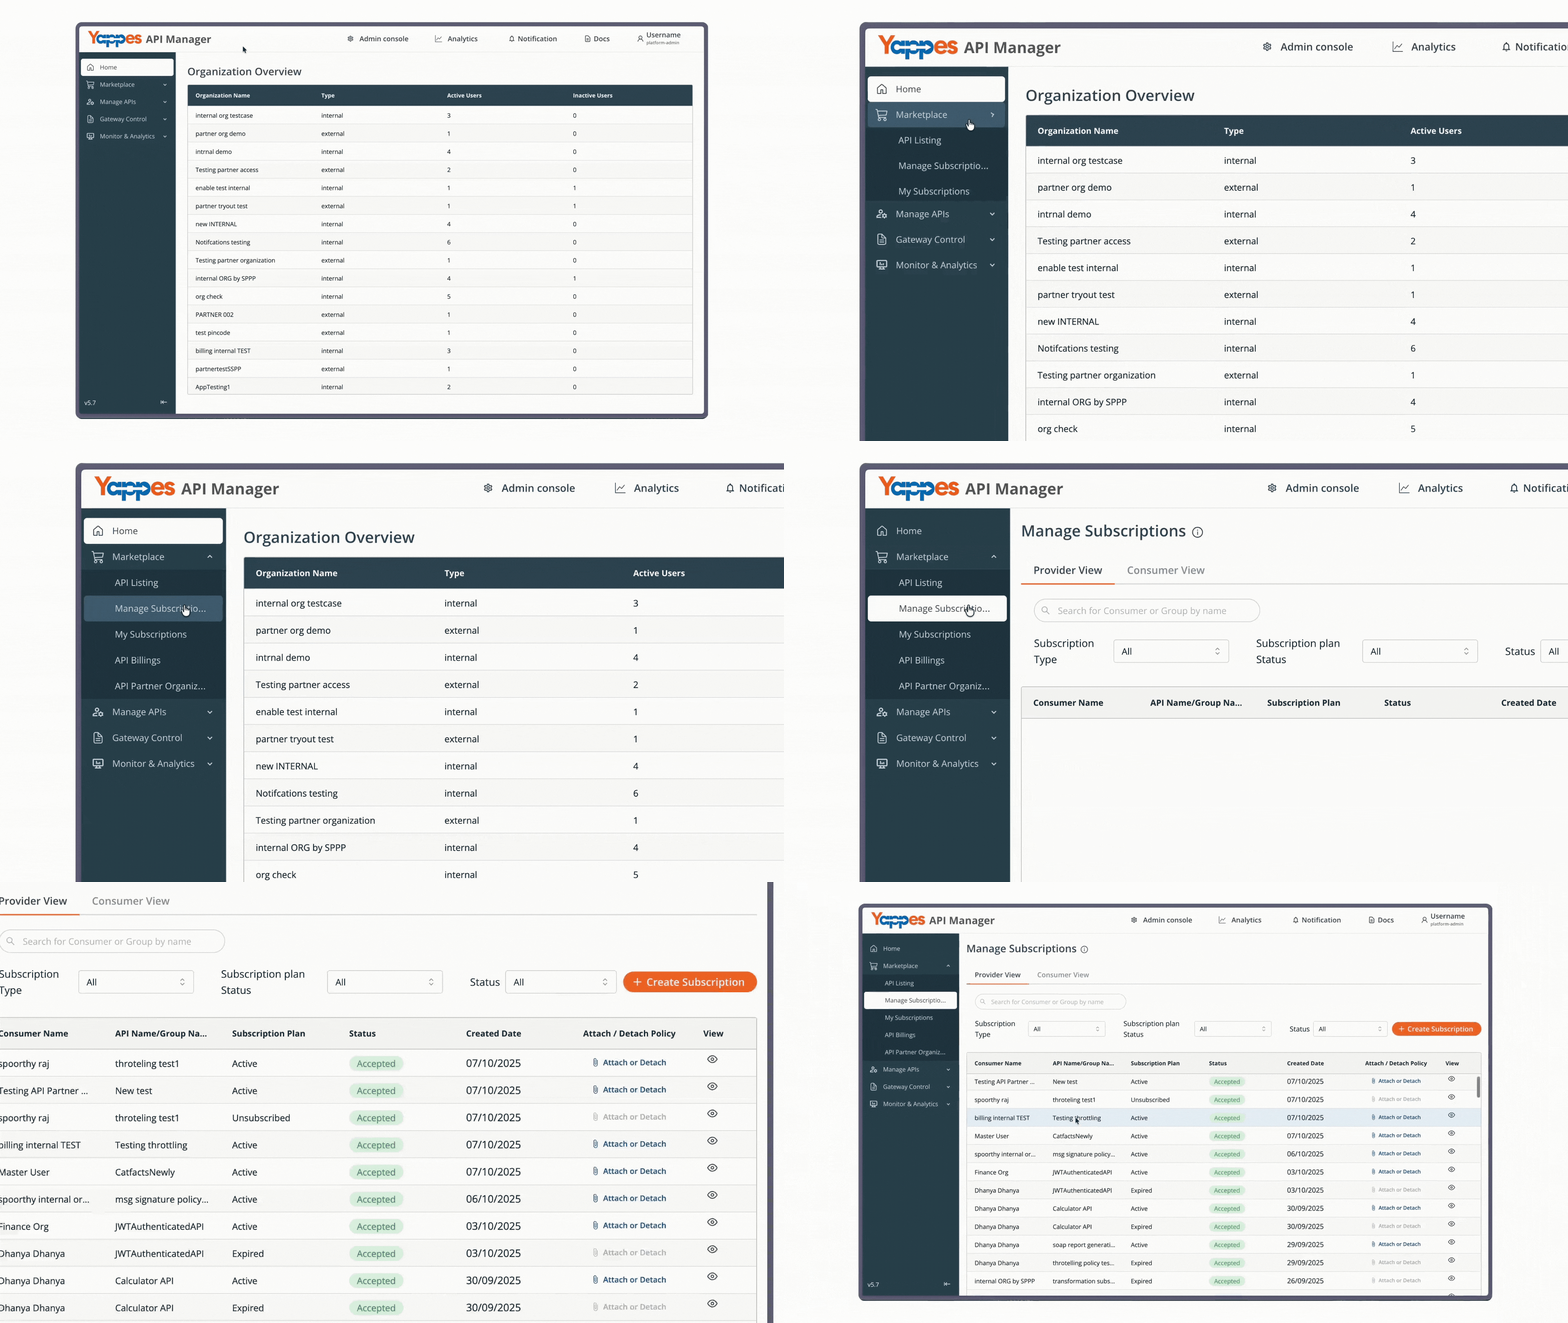
Info
For every active and accepted subscription (Only Individual API level Subscription) created for consumer in provider view you can attach or detach policies.
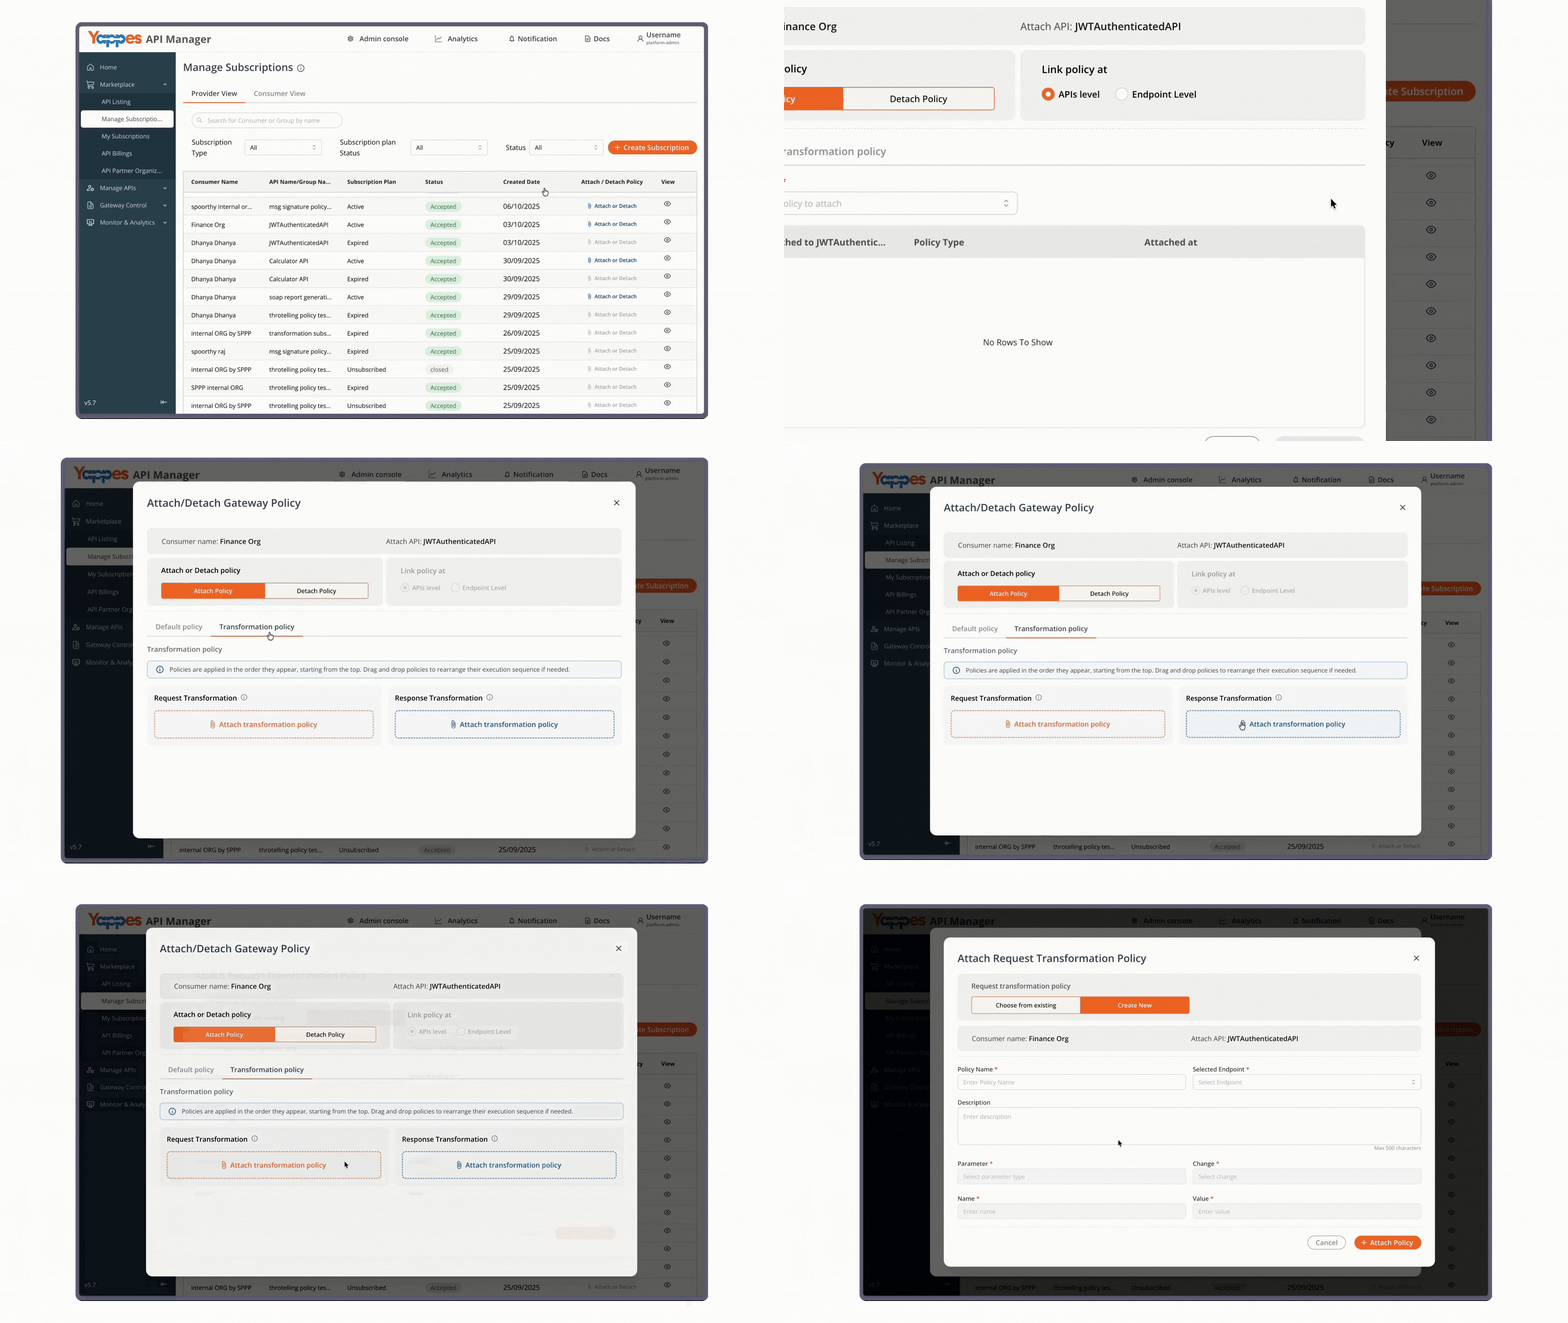
Step 2: Select Transformation policy to attach to subscription
- Select
Attach or Detachfrom subscription list. - A
Attach/Detach Gateway Policydialog will appear - Click the
Transformation Policytab to attach or detach.
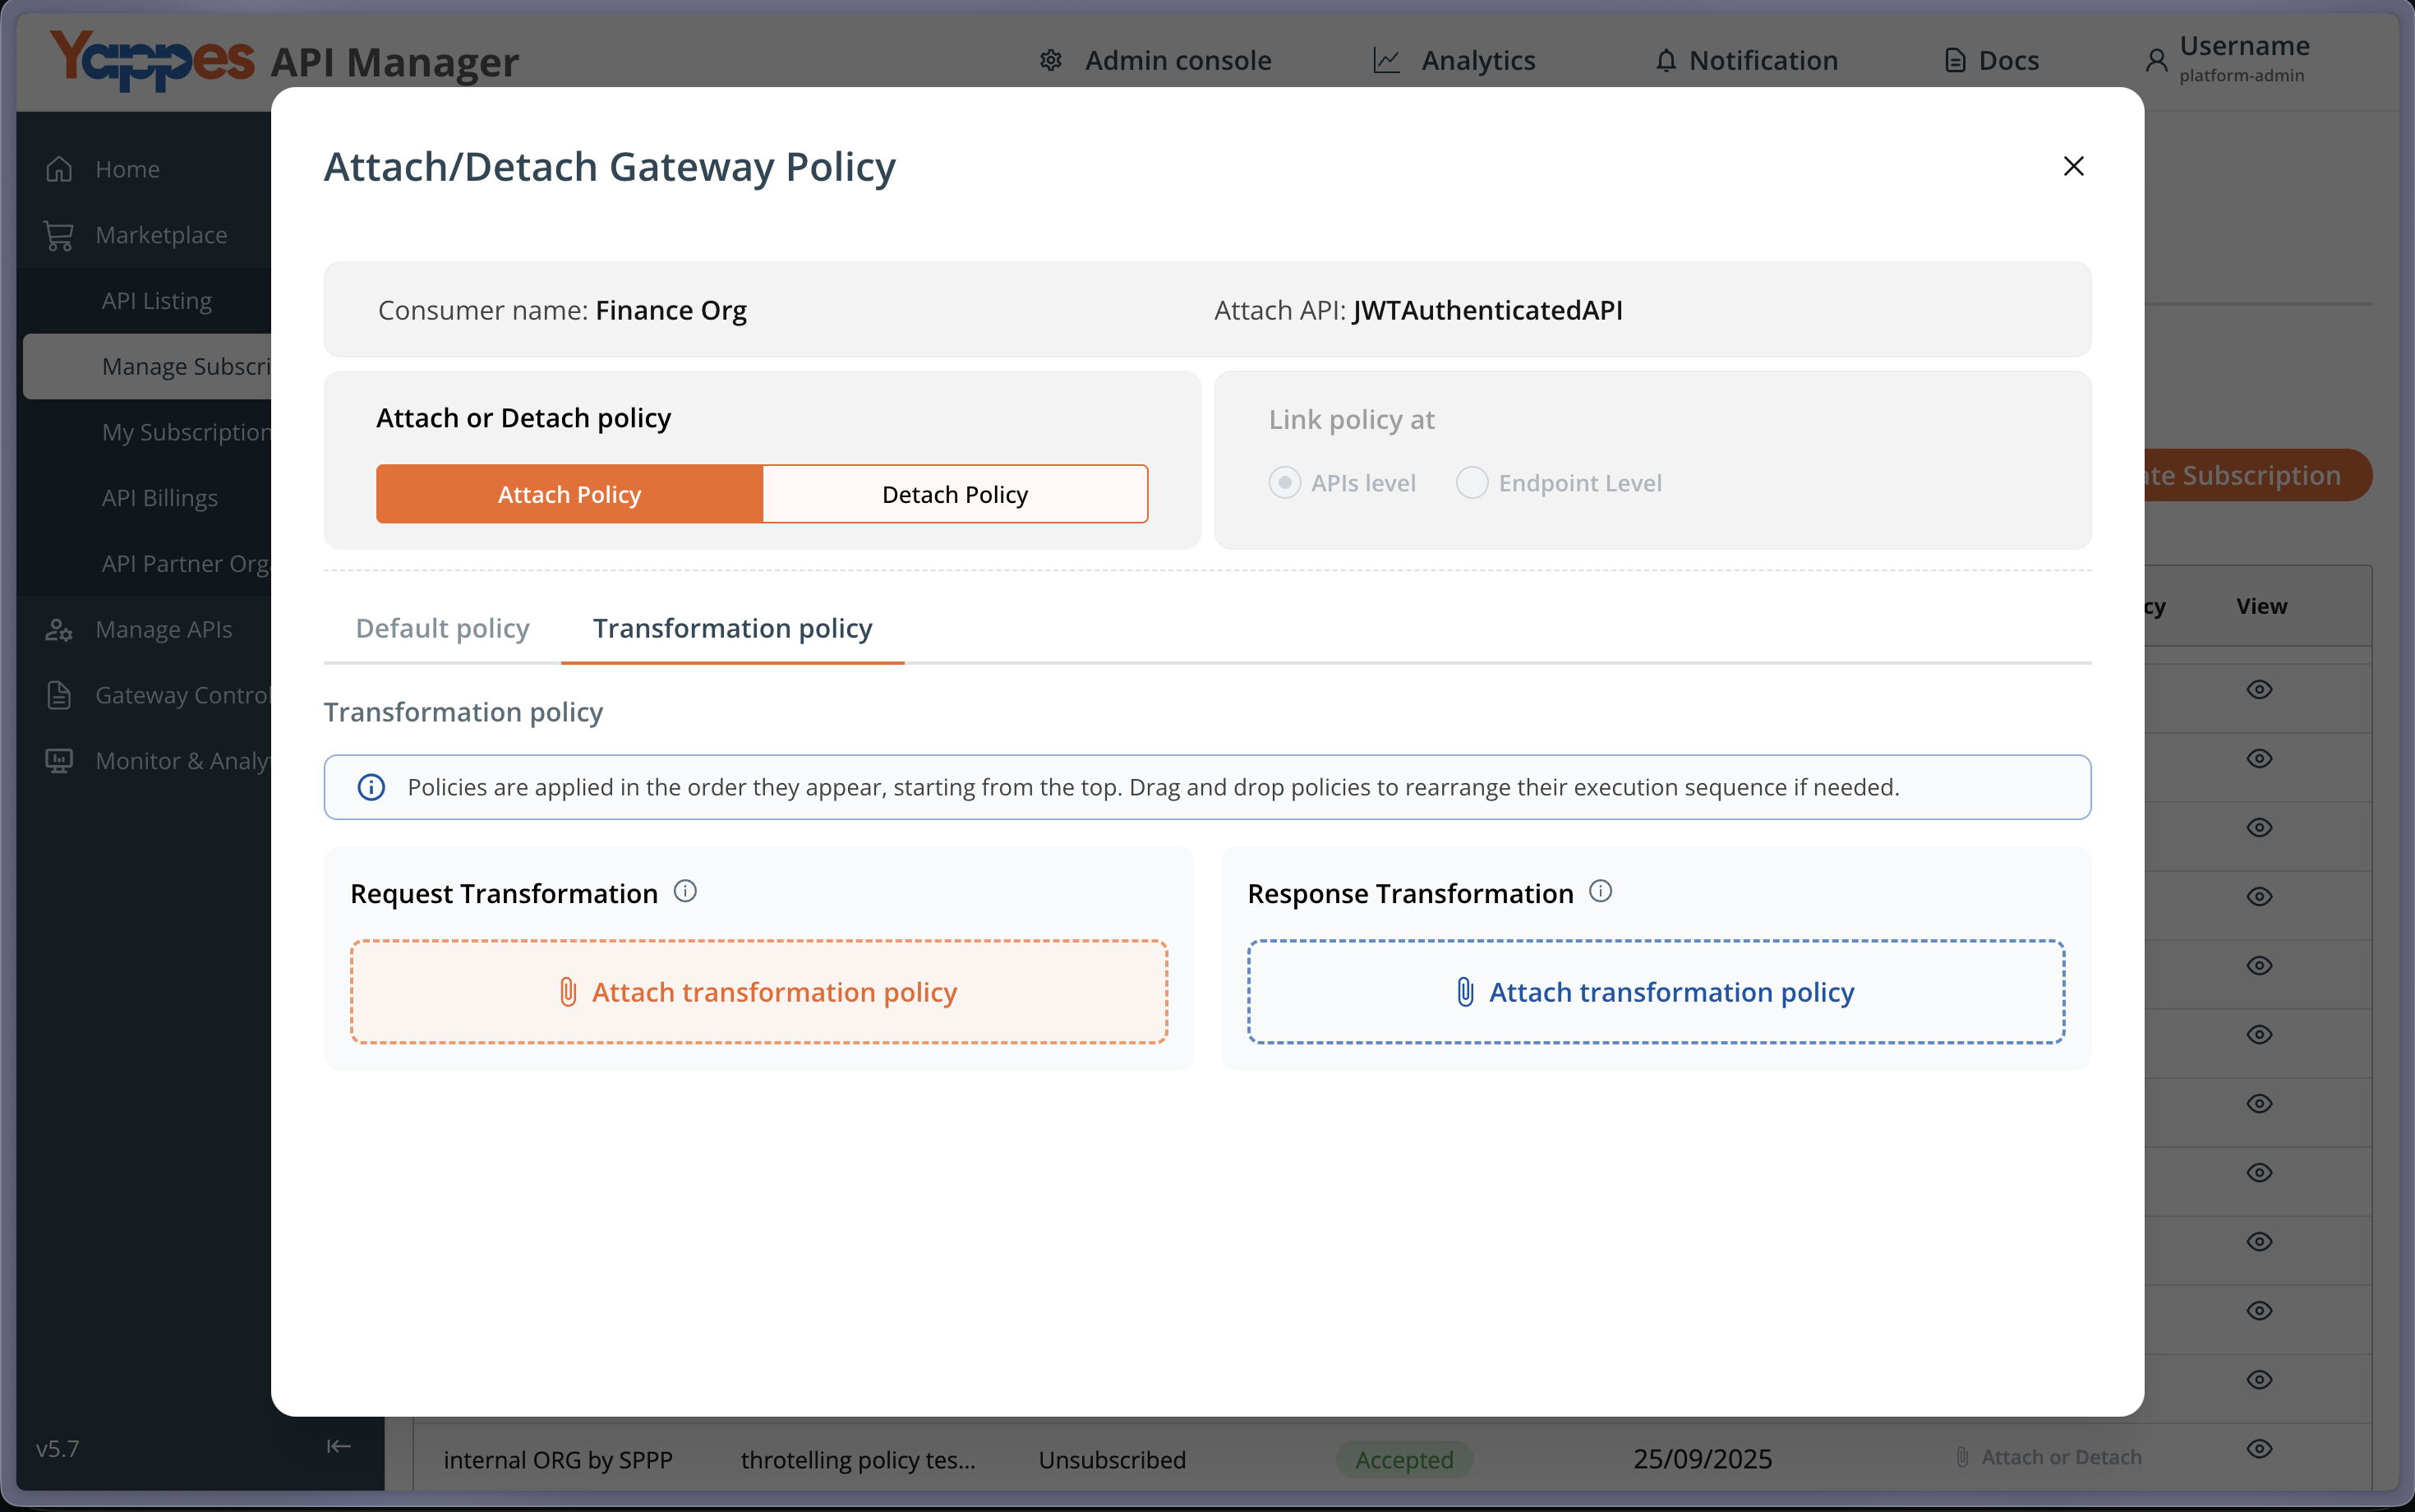
Step 3: Attach Transformation policy to subscription
- In the policy page, you can attach both request & response transformation policy
- Click
Attach Transformation Policyto create new policy. - You can either attach an existing policy or create a new one for the subscription.
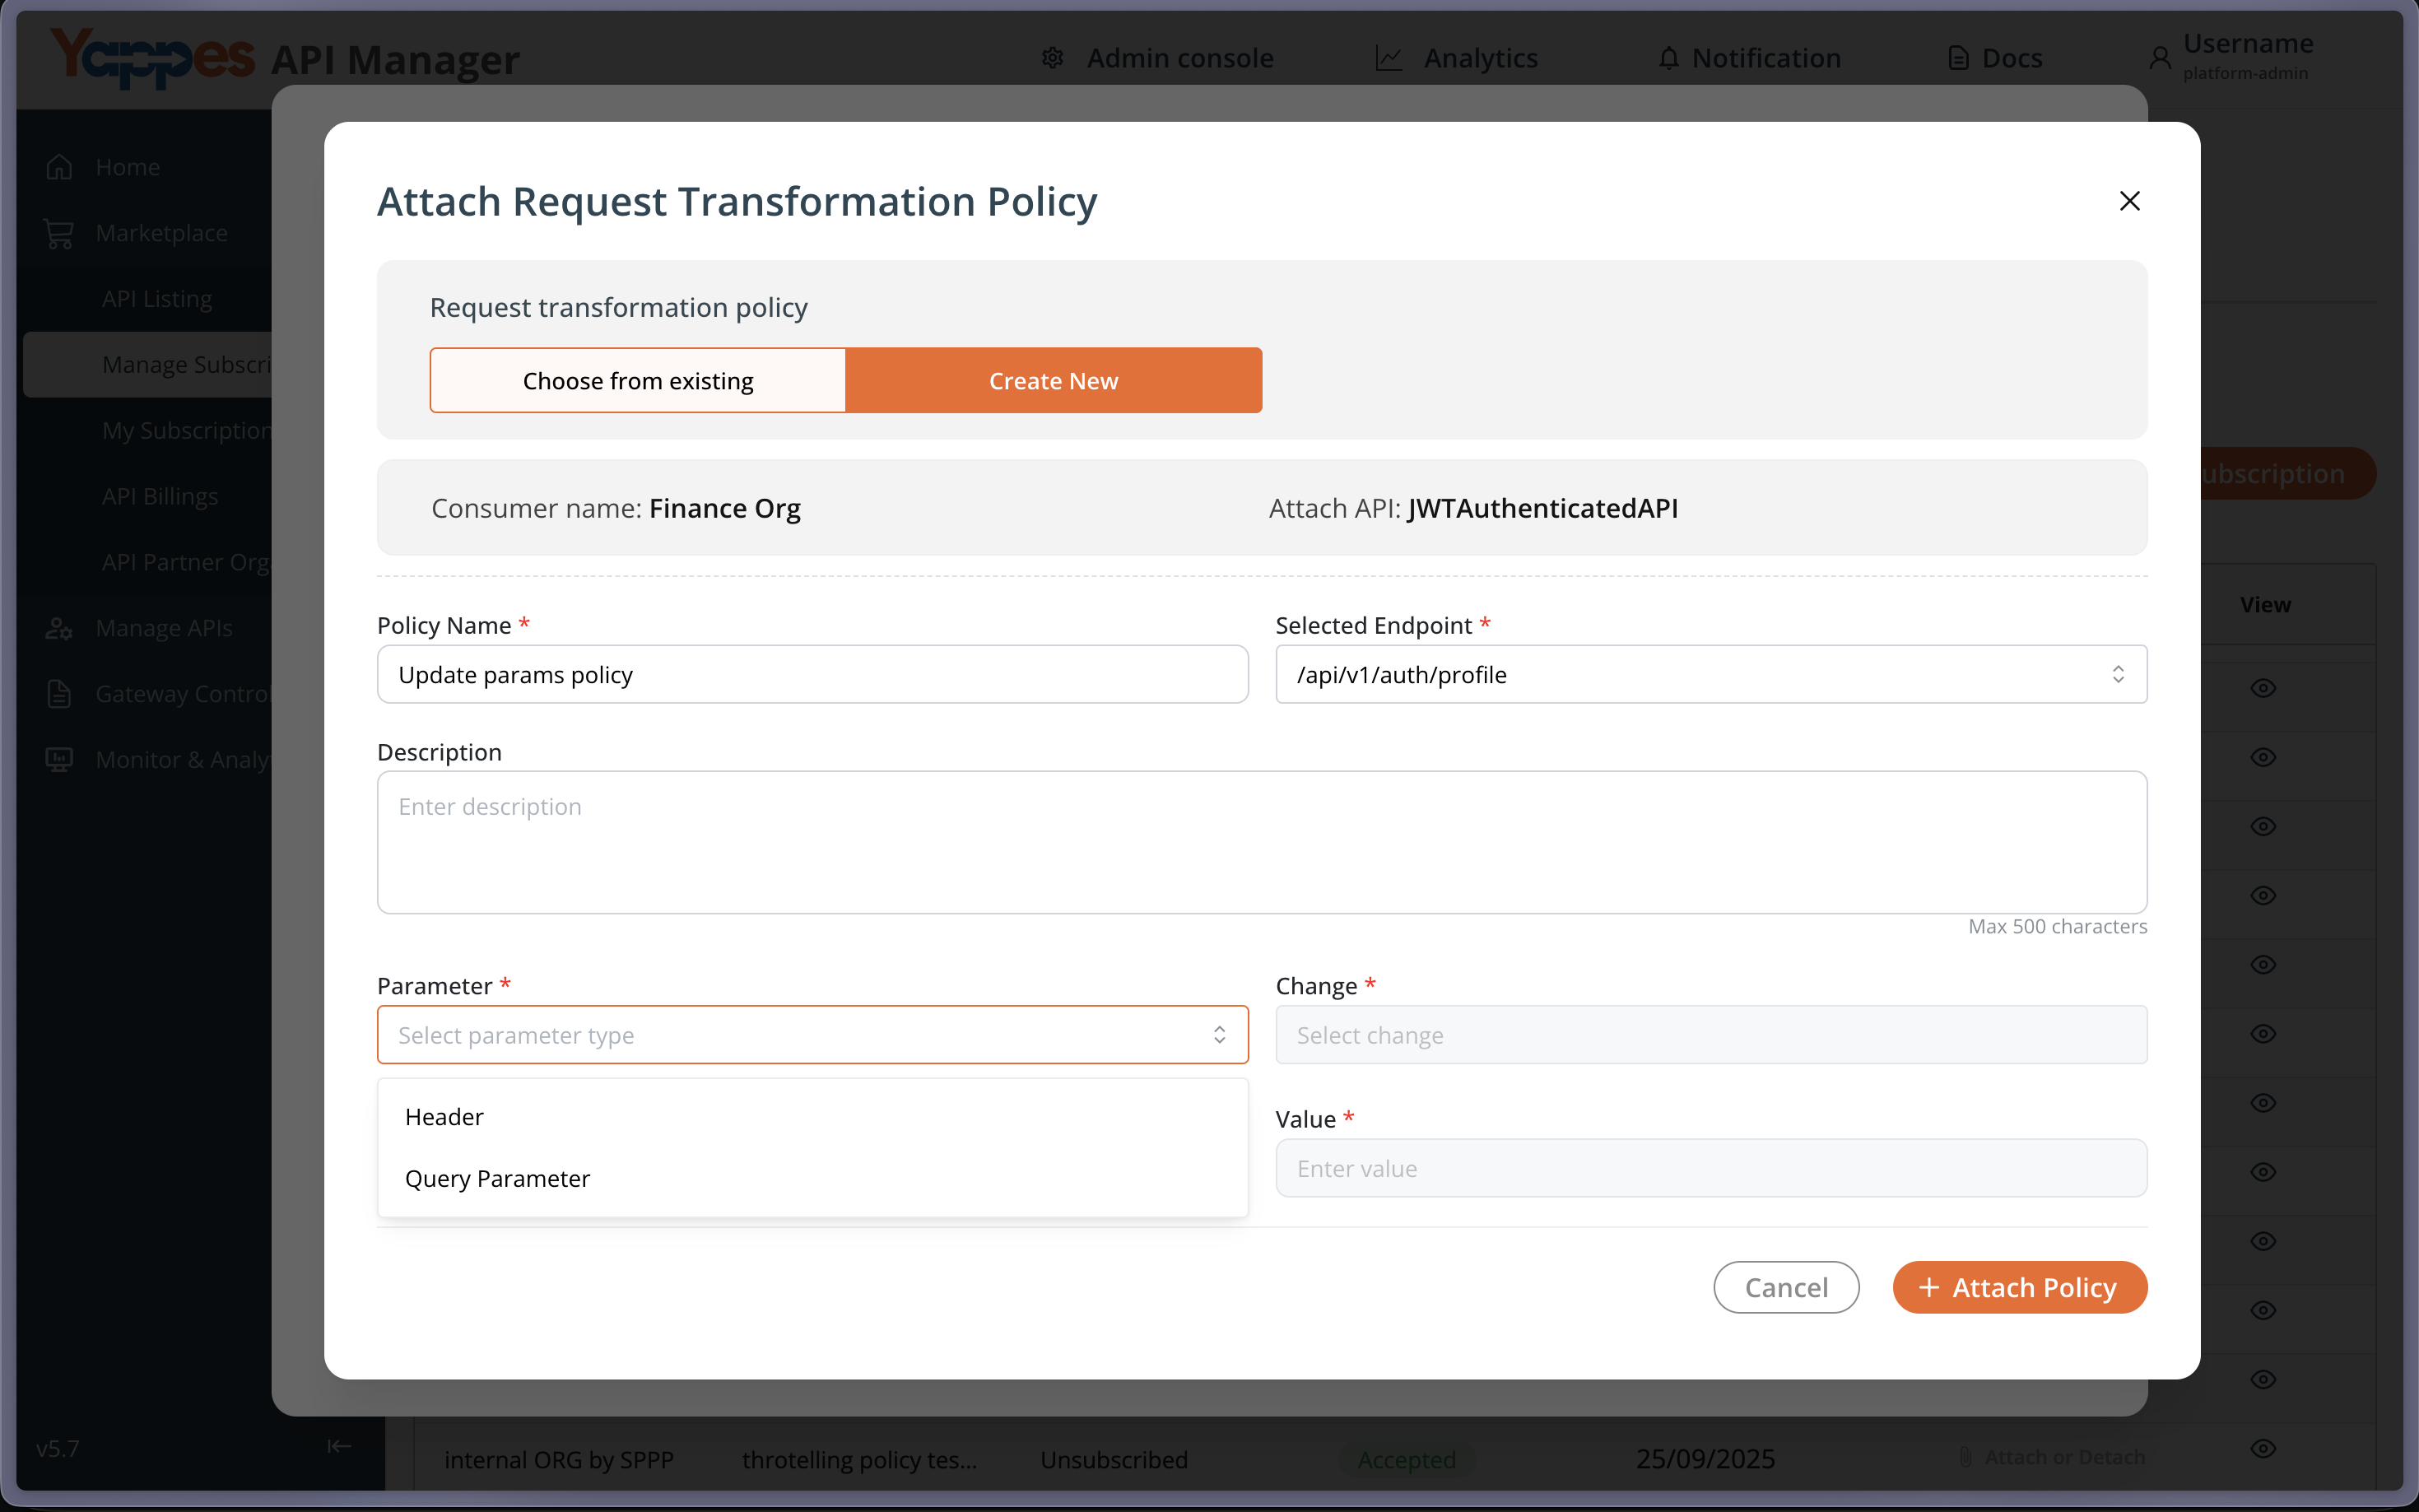
Step 4: Configure Transformation
- Enter a descriptive name in the
Policy Name*field (e.g. Transformation1). - Select endpoint from the dropdown to attach policy.
- Add a detailed description in the text area field to document the policy purpose.
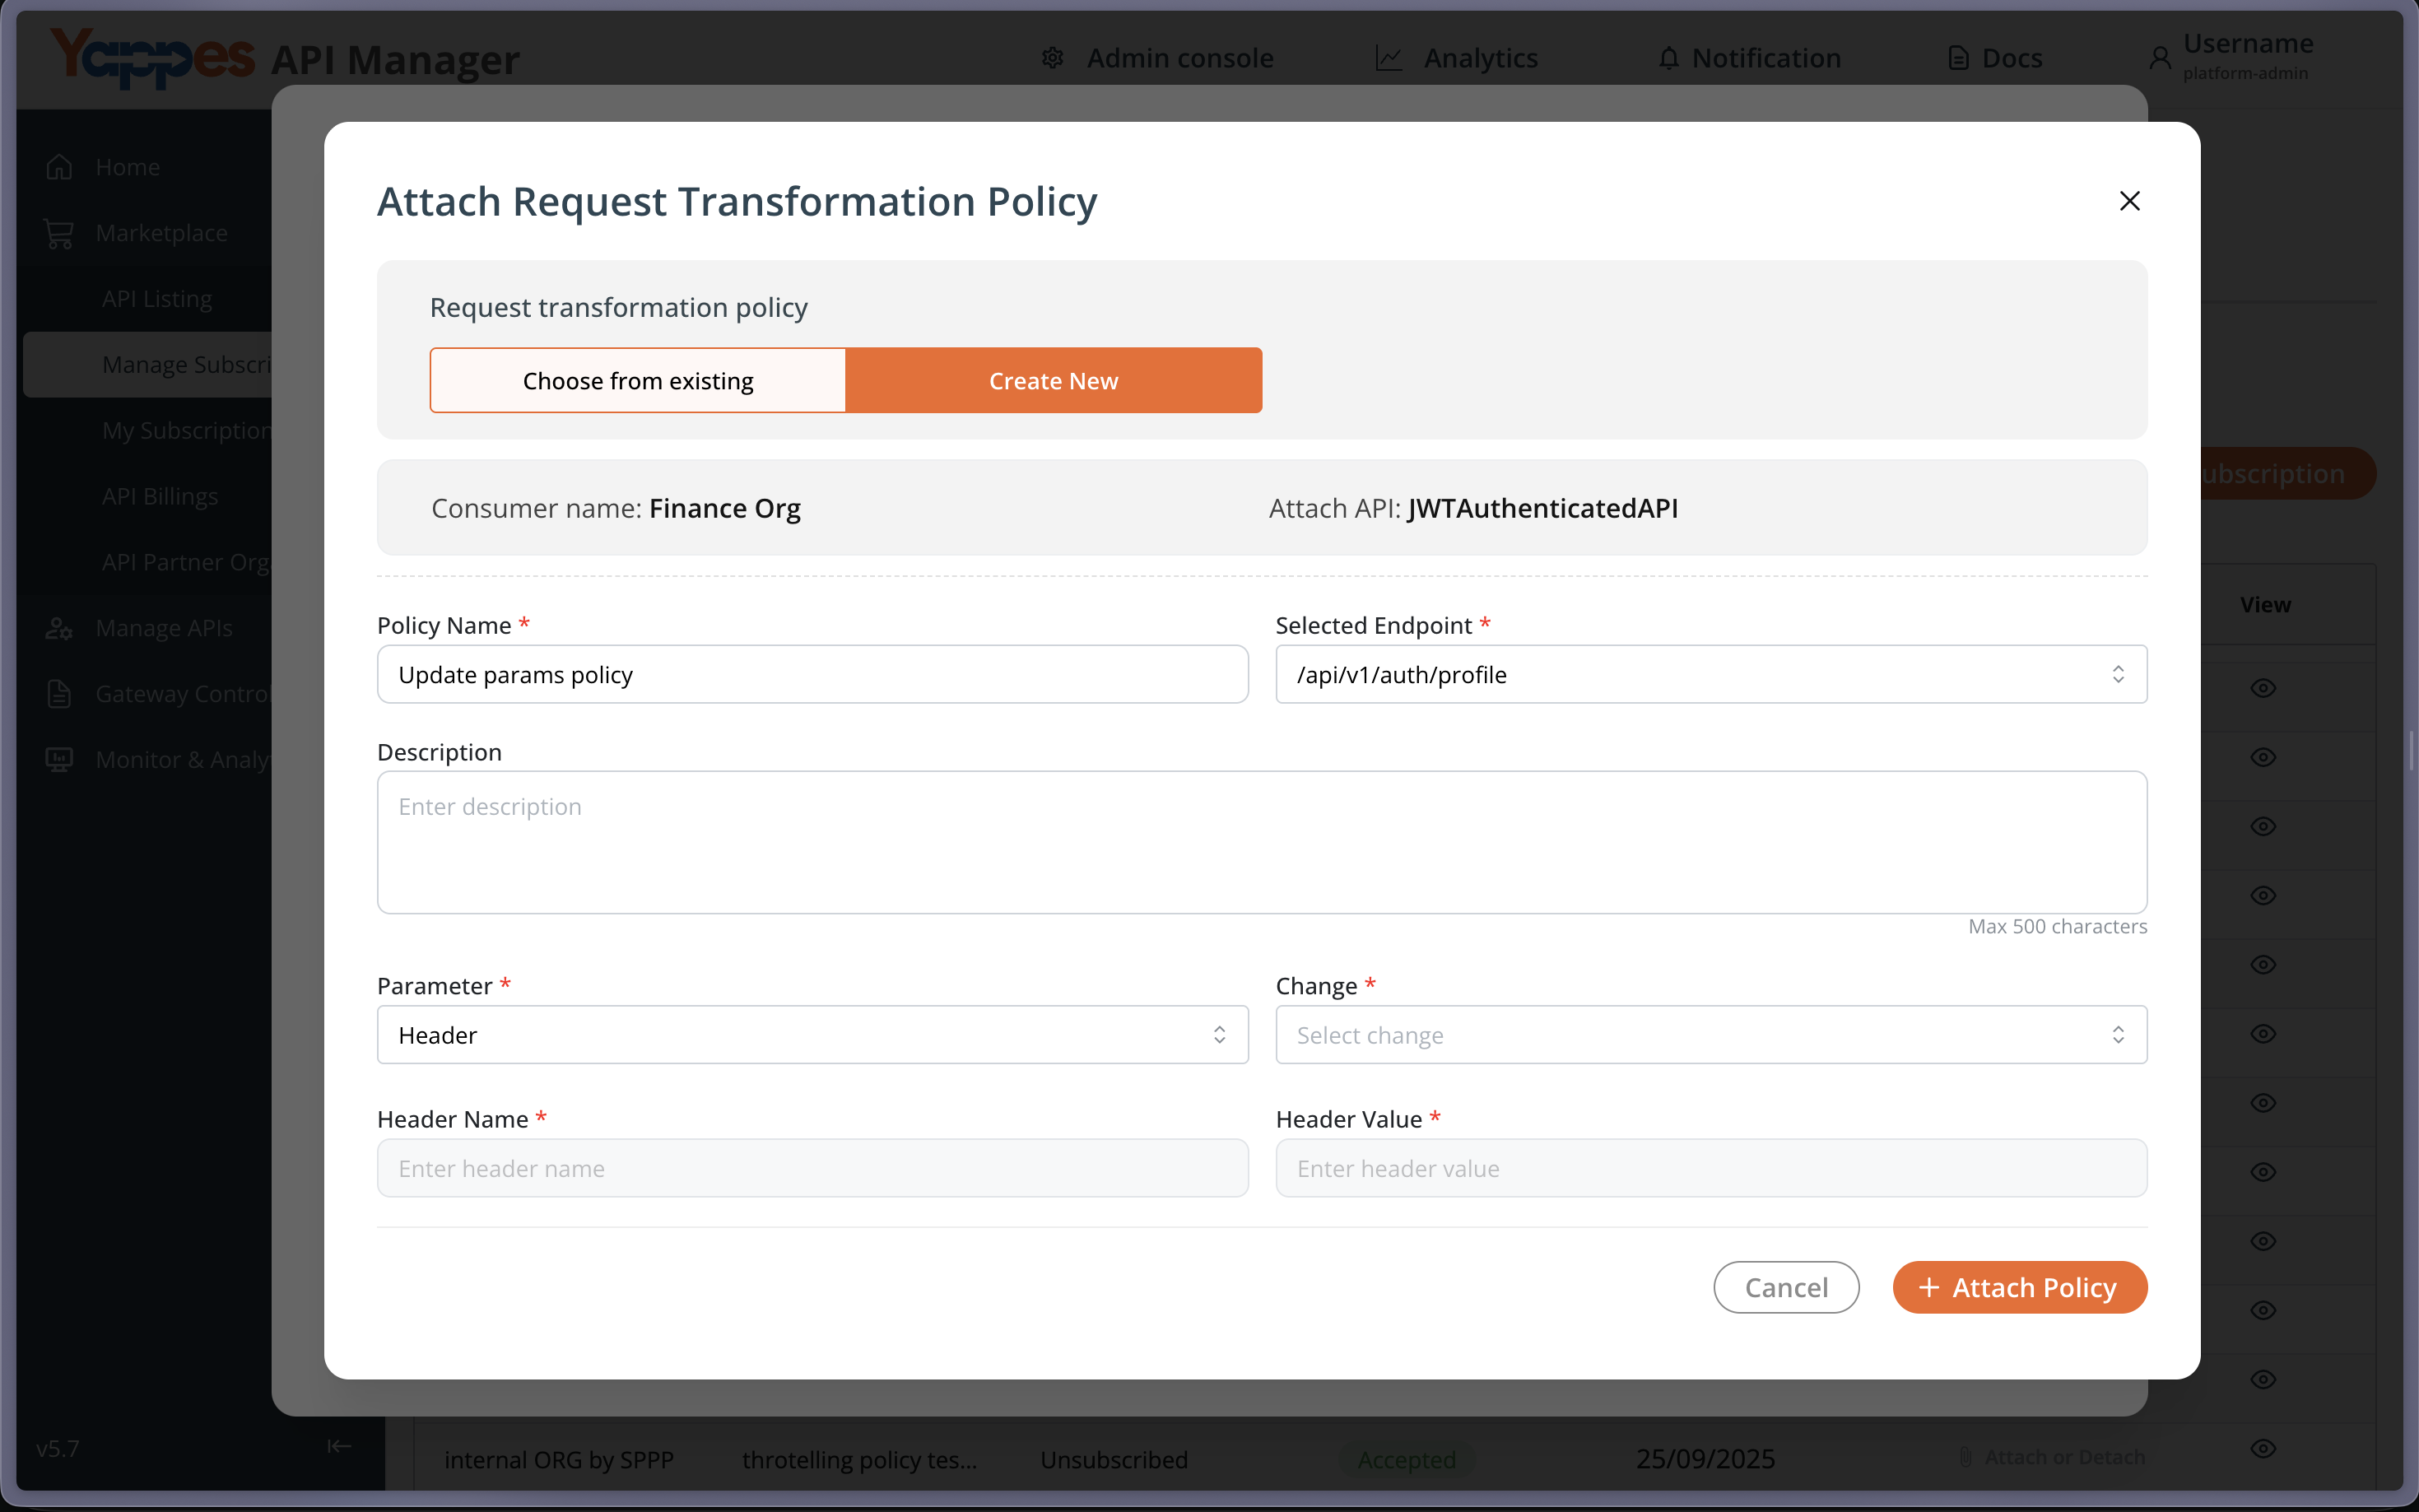
Step 5: Configure parameter type
- Click the
Parameterdropdown field - Select
HeaderorQuery parameterfrom the available options - This configures the policy to modify
HTTP headers/ URL parameter
Info
Query Parameter is only applicable to Request Transformation Policy
Step 6: Define Parameter Action
- Click the
Changedropdown field - Select
Add,UpdateorRemoveoptions form the dropdown.
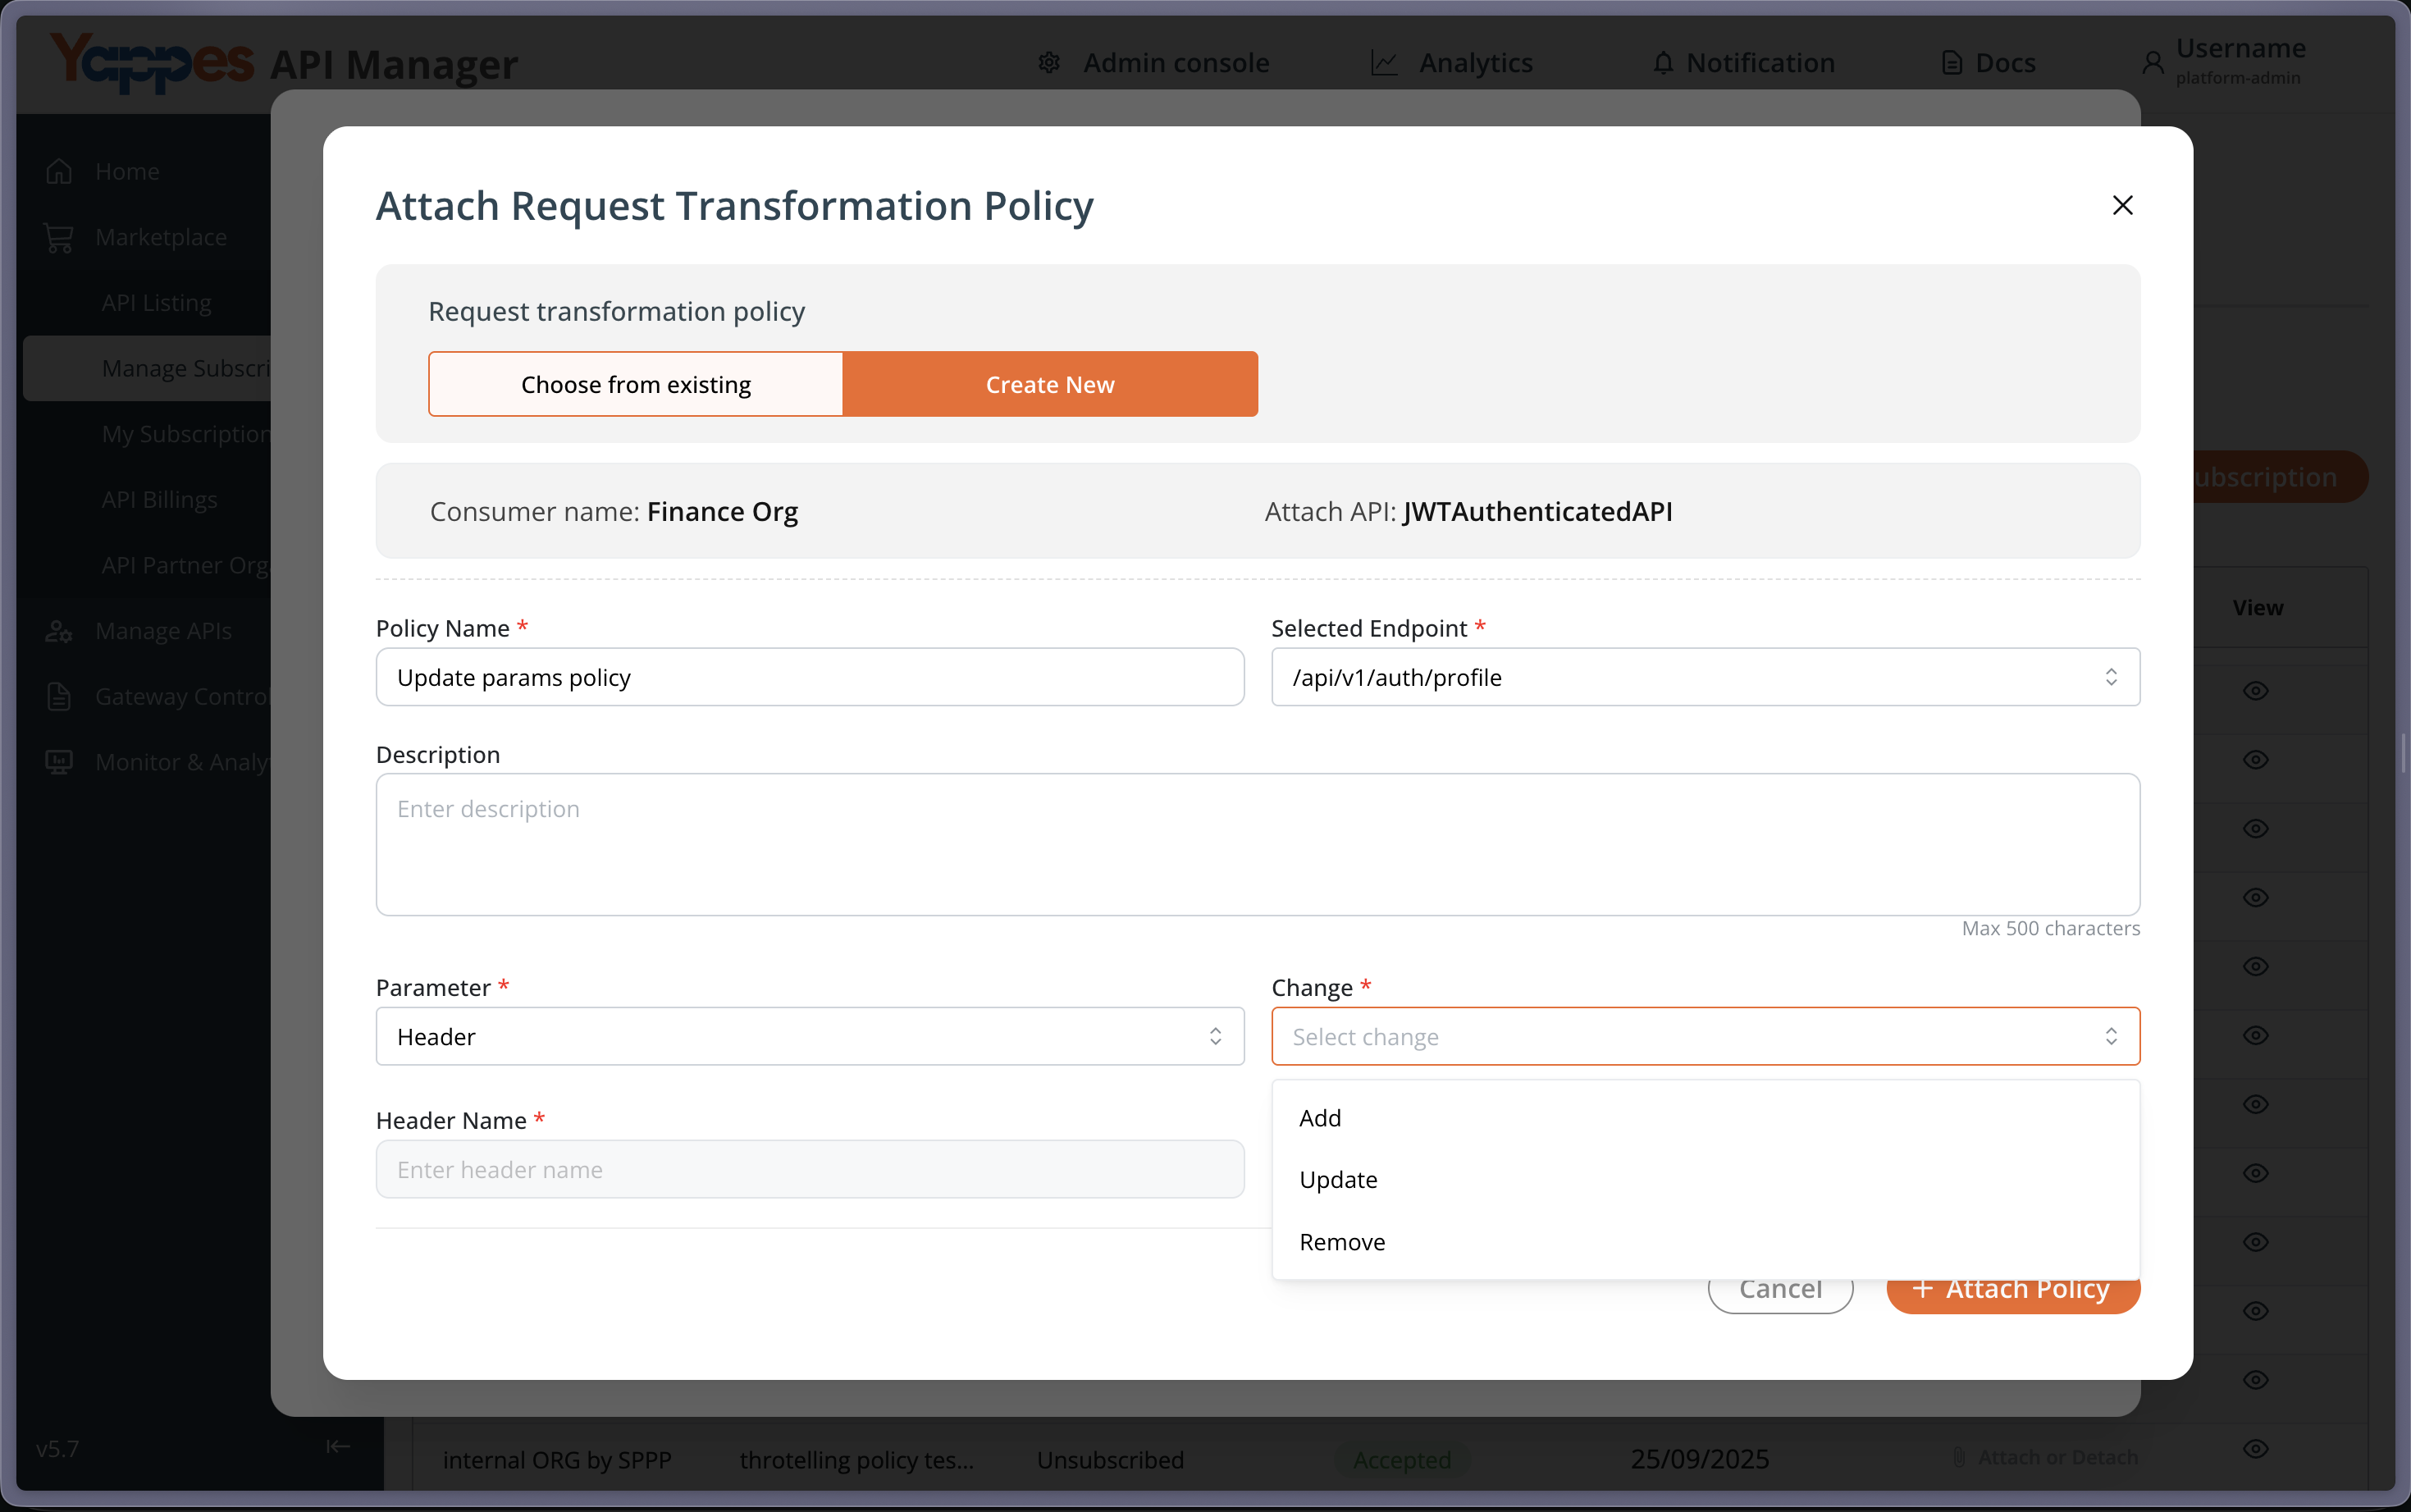
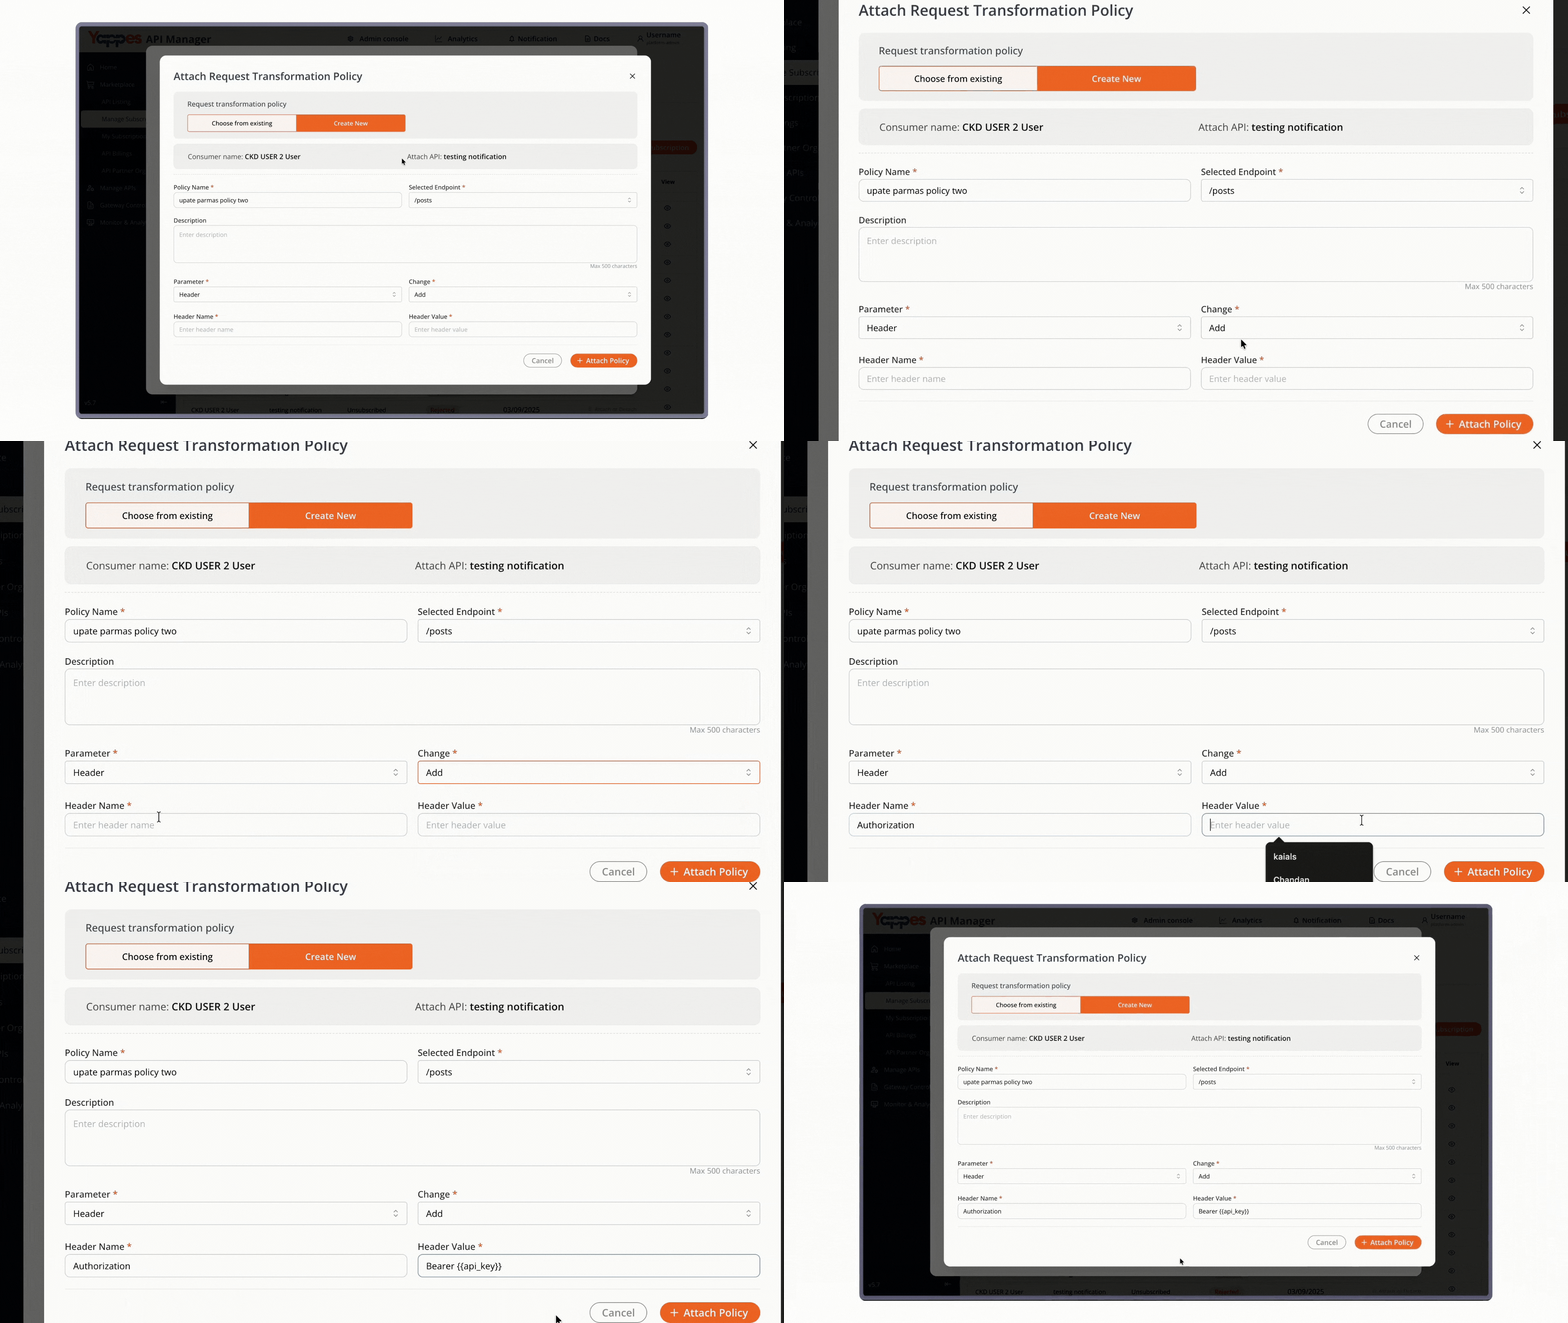
Step 7: Configure Header or Query Parameter Details
- Enter
Nameof the header/Query parameter to modify(e.g., browser) - Enter the
Valueto be modified (e.g., firefox) - Review all entered information for accuracy
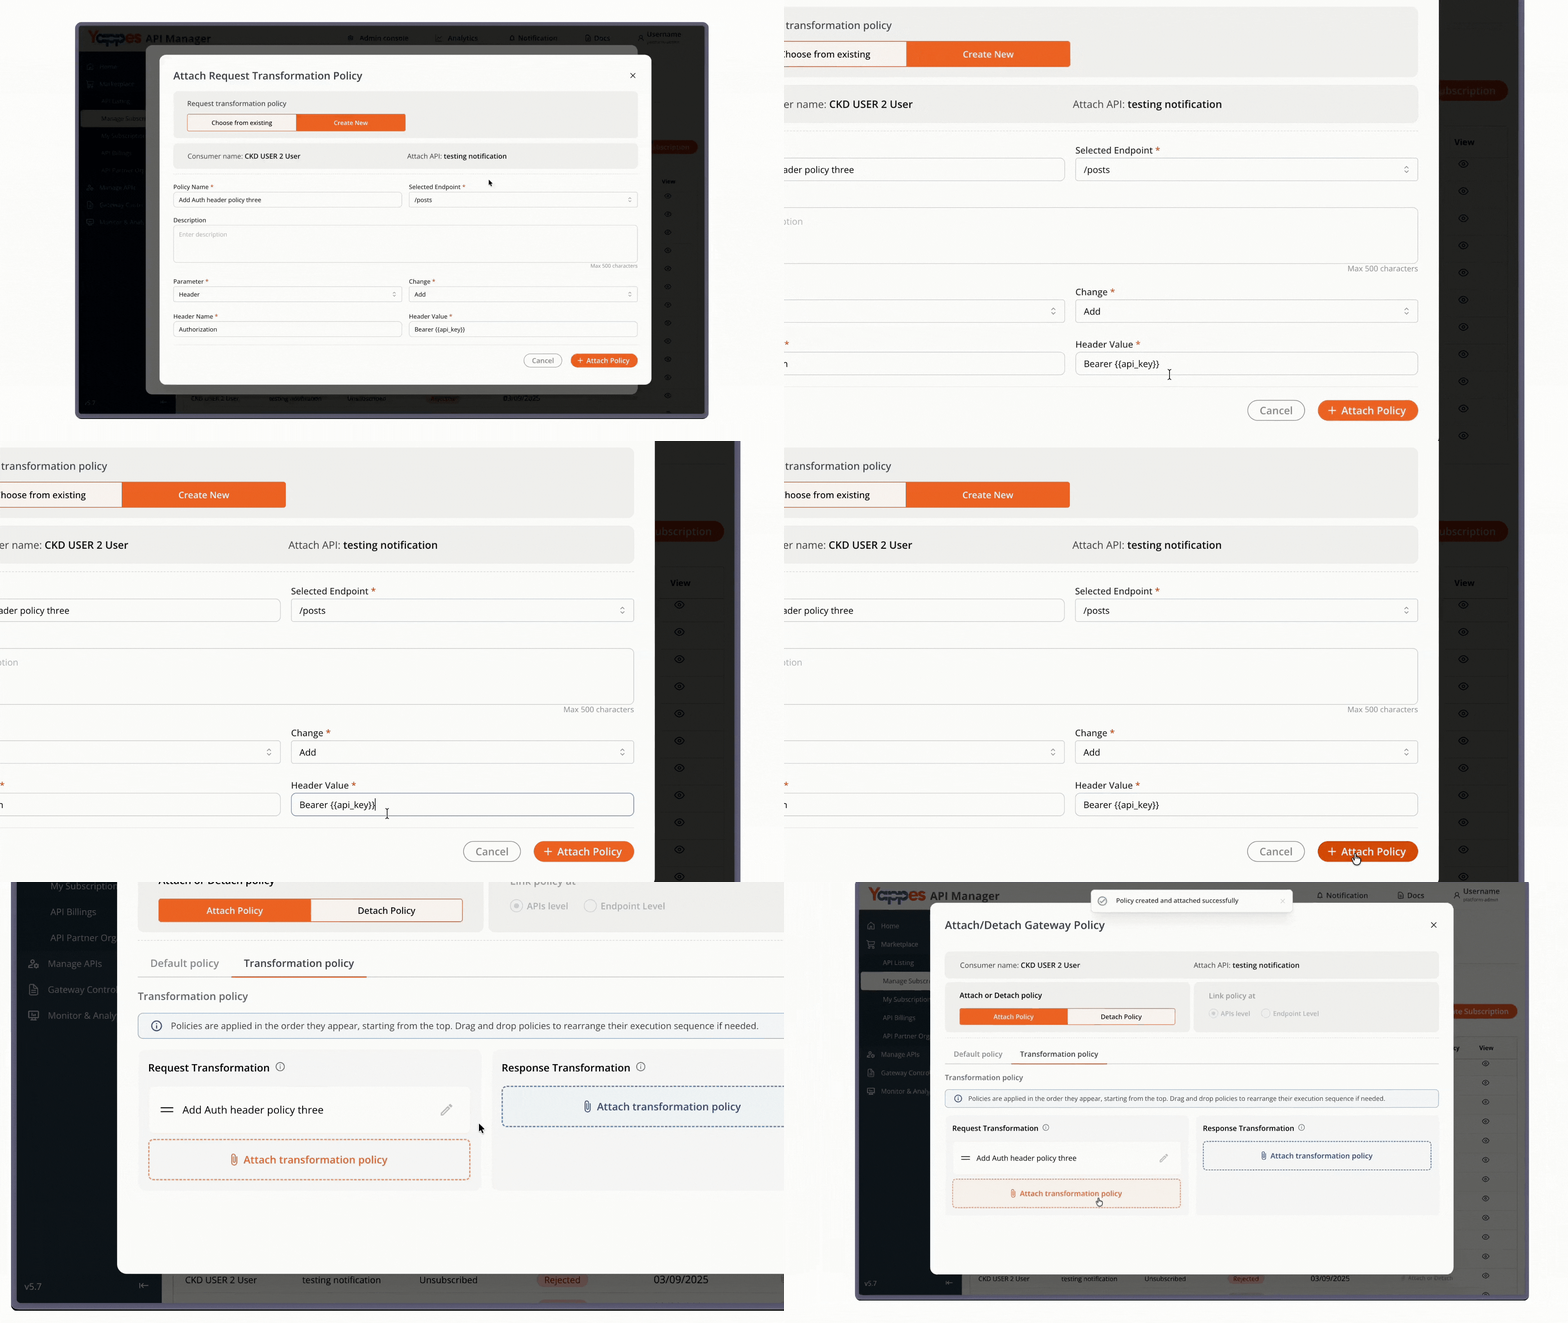
Step 8: Save and Attach the Policy
- Click
Attach Policyto save the configuration - Wait for confirmation message
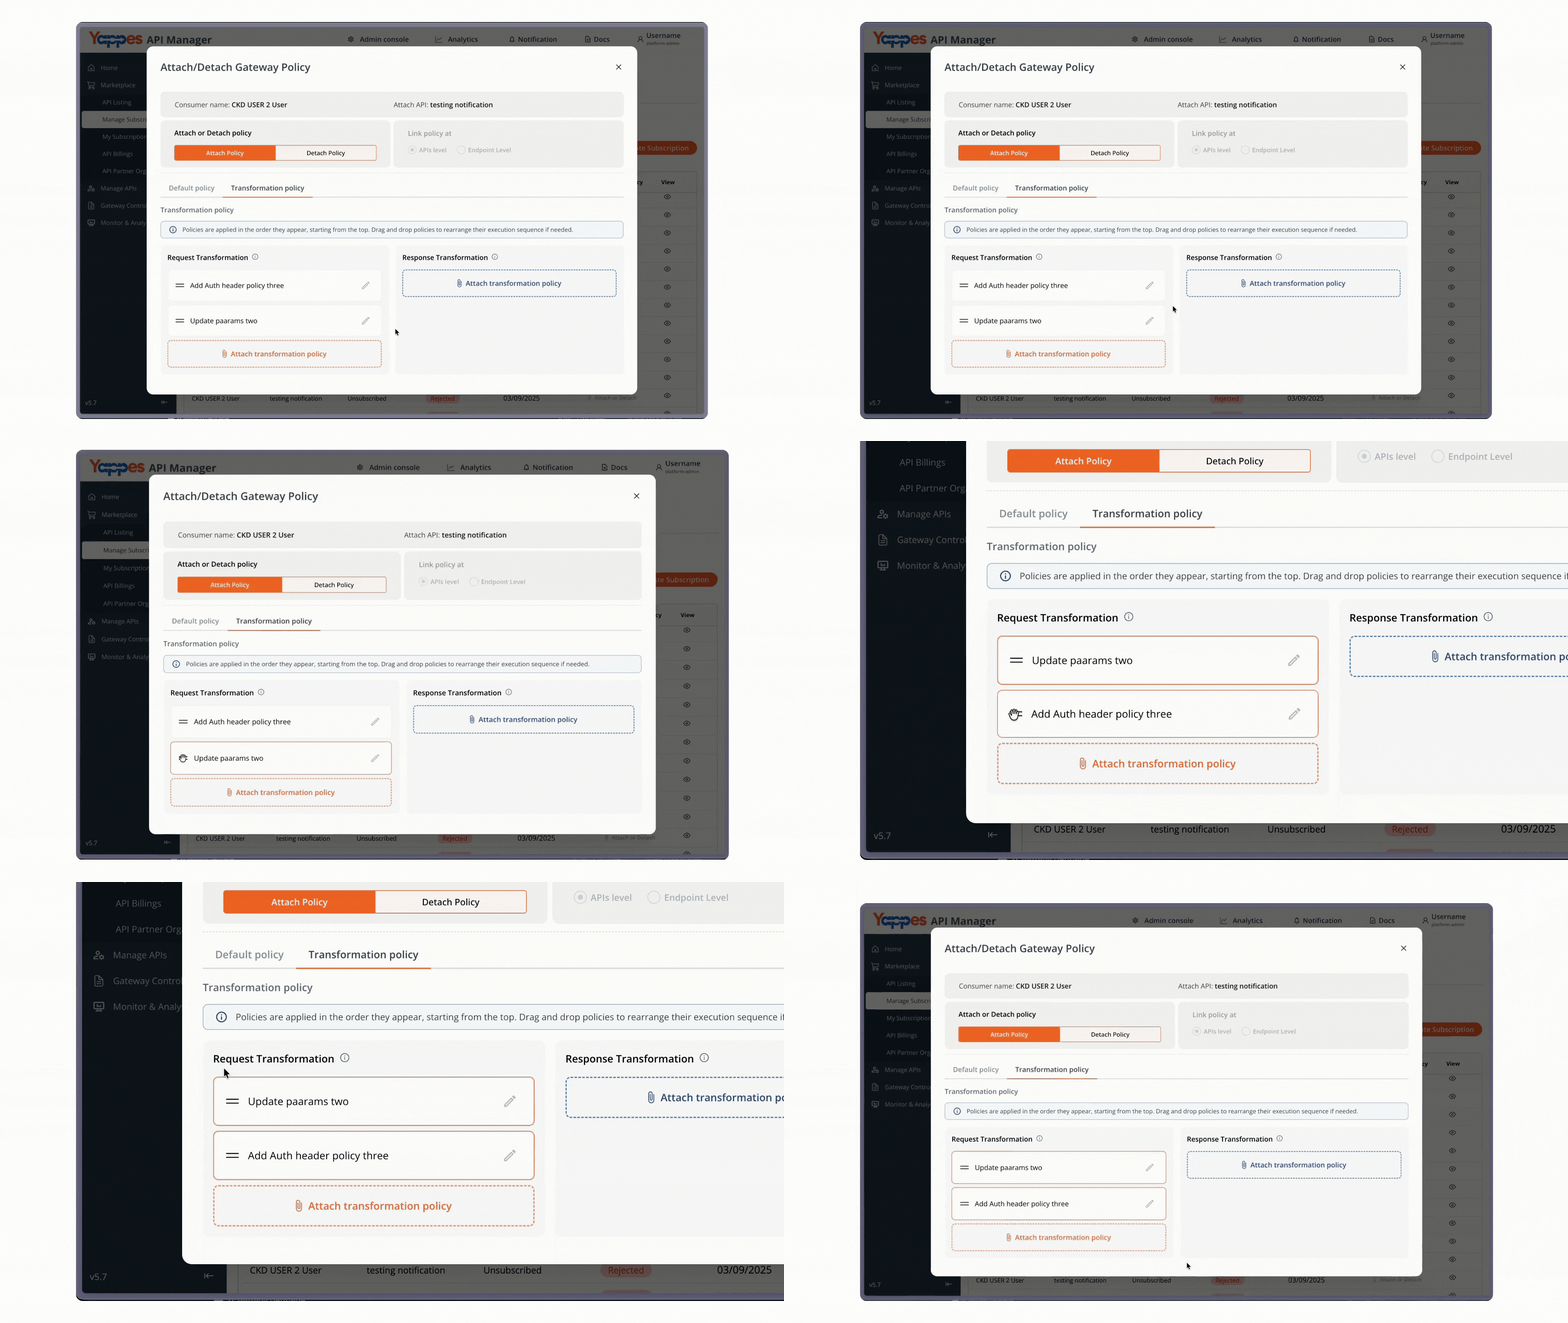
Step 9: Rearrange execution order
- Click and hold the policy card
- Drag to rearrange the policy card for execution order change
Understanding the Interface
Main Transformation Dashboard
The transformation interface consists of several key areas:
- Policy List View: Displays all active transformation policies with their configurations
- Action Buttons: Primary controls for creating, editing, and deleting policies
Policy Configuration Panel
When creating or editing a policy, you'll interact with:
Policy Information Section
- Policy Name: Identifier for transformation.
- Description: Documentation of policy purpose.
- Parameter Selector: Dropdown to choose between Header and Query Parameter
- Change Type Selector: Options for Add, Modify, or Remove actions
- Key Fields: Fixed reference fields (e.g., header/query name) that define the identity or lookup basis for the transformation.
- Value Fields: Dynamic fields based on parameter type selection
- API Selection: dropdown to choose target APIs
Configuration and Settings
Parameter Types
| Parameter Type | Use Case | Example |
|---|---|---|
| Header | Add authentication tokens, modify content type | Authorization: Bearer token123 |
| Query Parameter | Add tracking IDs, filters | ?source=yappes&version=2.0 |
Transformation Actions
| Action | Purpose | Impact |
|---|---|---|
| Add | Insert new headers/params | Expands request metadata |
| Update | Modify existing values | Ensures consistency |
| Remove | Delete headers/params | Simplifies requests |
Best Practices
- Use descriptive names (e.g.,
Add_AuthHeader_UserAPI). - Adopt naming conventions:
[Type][Action]_[Purpose]_[API]. - Avoid sensitive values in policies; use environment configs.
- Document transformation logic in the description field.
- Group related transformations for easier maintenance.
- Reorder policies carefully when multiple are applied.
- Test before production to avoid request failures.
Verification and Testing
Immediate Verification Steps
After creating a transformation policy, verify its successful implementation:
-
Check Policy List
-
Navigate to the transformation overview
-
Verify the correct parameter type and action are displayed
-
Test API Request
-
Use a Yappes Tryout or curl to send a test request
- Examine the request headers or URL parameters
- Confirm the transformation is applied correctly
Success Indicators
✅ Test requests show transformed data
✅ No error messages in the policy status
✅ API responses remain successful (200 OK)
Troubleshooting
Common Issues and Solutions
Policy Not Applied
Problem: Transformation policy created but not affecting API requests
Solutions:
- Check that the correct API is selected in the policy configuration
- Ensure the transformation type (Request/Response) matches your needs
- Clear browser cache and reload the interface
Incorrect Values in Transformation
Problem: Headers or parameters show wrong values
Solutions:
- Double-check spelling in Header Name and Header Value fields
- Verify no extra spaces before or after values
- Confirm the correct transformation action (Add vs Modify)
- Test with simple values first, then add complexity
Policy Attachment Fails
Problem: "Attach Policy" button doesn't save the configuration
Solutions:
- Ensure all required fields (marked with
*) are completed - Check for validation errors highlighted in red
- Verify your user permissions include policy creation
- Try logging out and back in to refresh your session
Multiple Policies Conflict
Problem: Multiple policies affecting the same parameter
Solutions:
- Review policy execution order in the interface
- Use unique parameter names to avoid conflicts
- Consider consolidating related transformations into single policies
- Delete conflicting policies
Error Messages and Resolutions
| Error Message | Likely Cause | Resolution |
|---|---|---|
| "Policy name already exists" | Duplicate policy name | Use a unique name for each policy |
| "Invalid parameter value" | Special characters or format issues | Remove special characters, use alphanumeric values |
| "API not found" | API selection error | Refresh the page and reselect the API |
| "Insufficient permissions" | User role limitations | Contact admin for policy creation rights |
When to Contact Support
Contact Yappes Support if you encounter:
- Repeated failures creating Transformation policies.
- Policies not applying after correct setup.
- Permissions or access limitations.
Pro Tip
Always create transformation policies in a development environment first. Test thoroughly with different request types before promoting to production.