Advance Routing
Overview
The Yappes Advance Routing allows you to create sophisticated traffic management policies for your APIs so you can achieve granular control over request routing, enhanced security, and optimized API performance.
This powerful gateway policy feature enables you to define custom routing rules based on headers, query parameters, and TLS configurations, ensuring that API requests are directed to the appropriate backend services according to your specific business requirements.
As a core component of the Yappes API management platform, Advance Routing provides the flexibility to implement routing policies either during the initial API onboarding process or independently through the Gateway Policy page.
This dual approach ensures that your routing strategies can evolve with your API ecosystem, supporting use cases ranging from simple request forwarding to complex scenarios like A/B testing, canary releases, and version-based routing.
Whether you're deploying a new API or optimizing existing services, Advance Routing gives you the control needed to manage API traffic efficiently while maintaining security and compliance standards.
Prerequisites
Before implementing Advance Routing on the Yappes platform, ensure you have:
-
Access Requirements
- Valid Yappes platform account with
API Manager access. - Appropriate permissions to
create and manage gateway policies. - Rights to
onboard and configure APIs.
- Valid Yappes platform account with
-
Preliminary Setup
- At least one API ready for onboarding (if using the onboarding method).
API hostnameandendpoint detailsconfigured.TLS certificatesprepared (if using secure routing).
-
Dependencies
- Access to the
Yappes API Manager interface - Understanding of your
API architectureandrouting requirements
- Access to the
Custom error and message
For error scenarios, you can override the default HTTP status code, error code, and message. See Custom Error and Message.
Step-by-Step Implementation
Method 1: Creating Advance Routing During API Onboarding
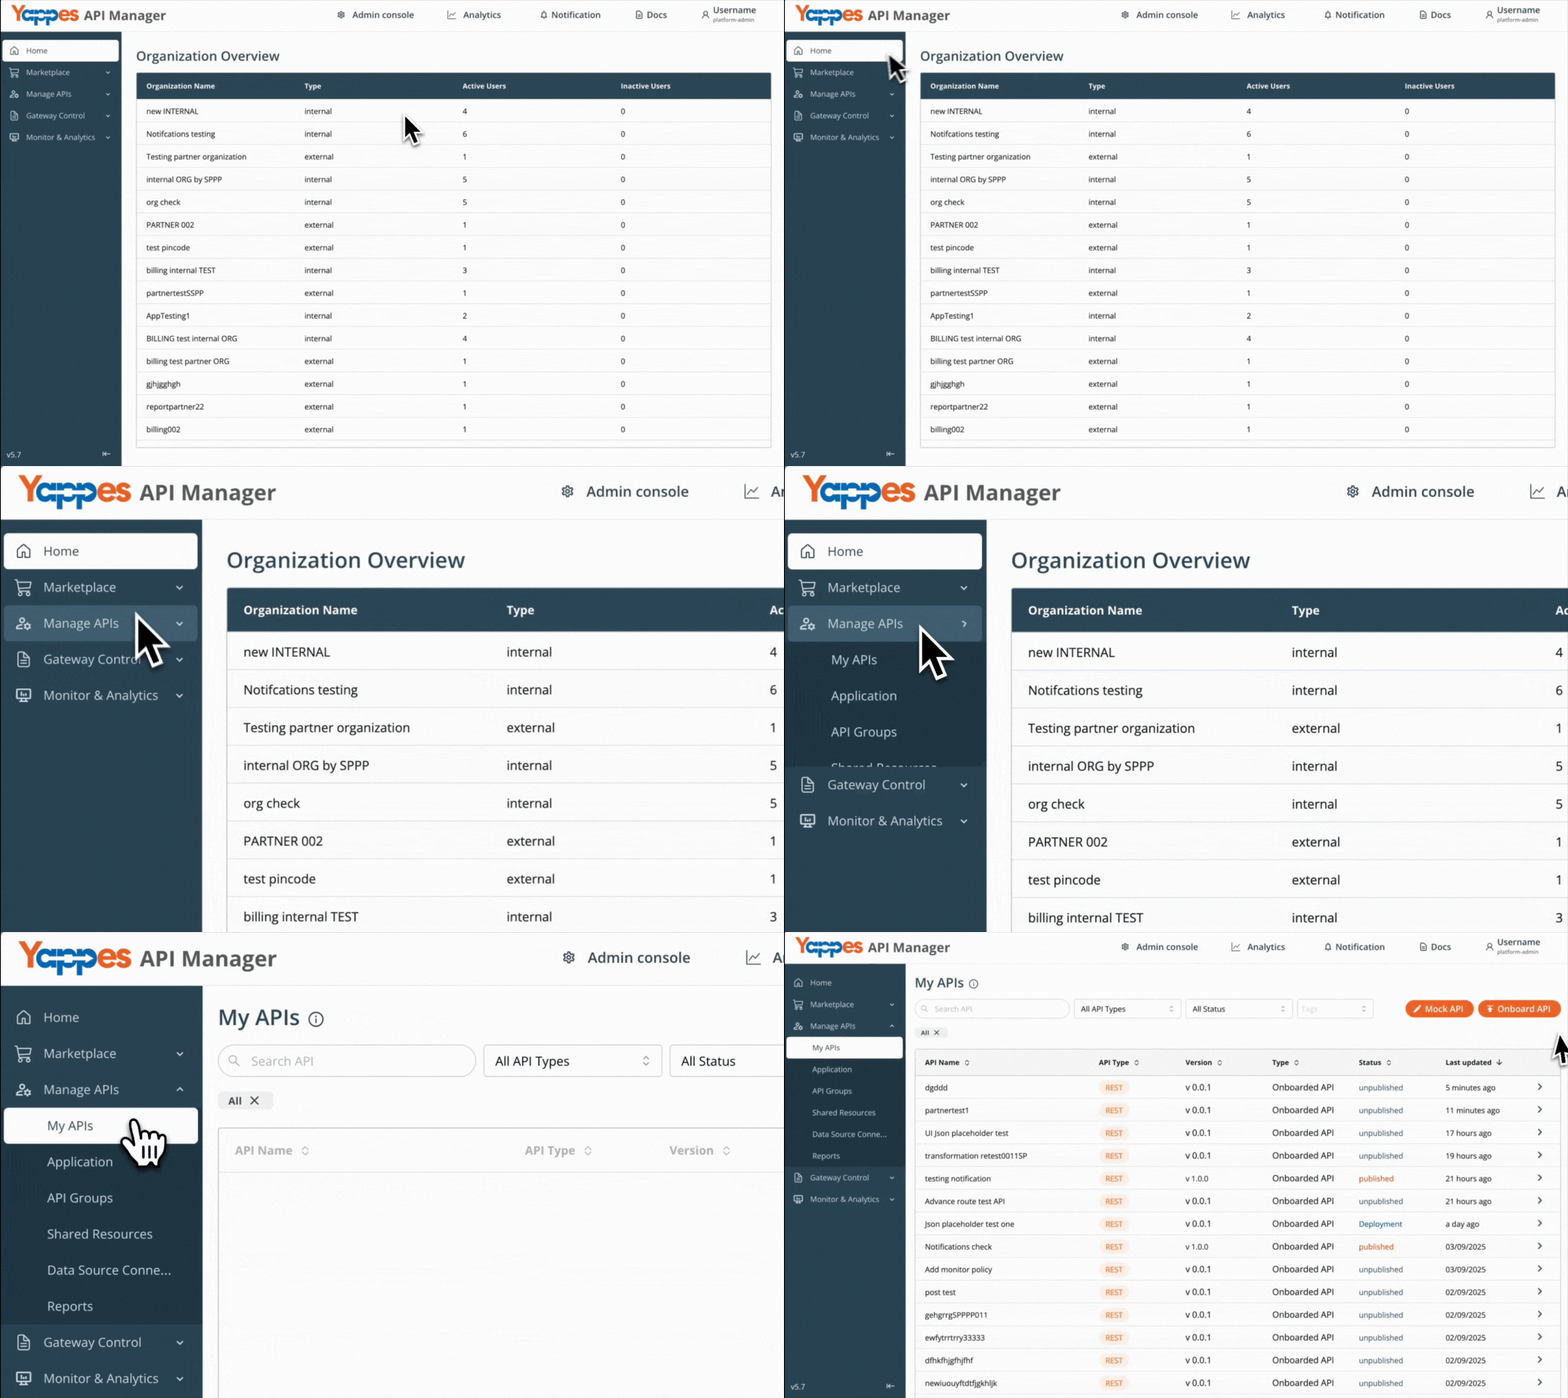
Step 1: Navigate to API Manager
- Click on
Manage APIsin the main dashboard - Select
My APIsfrom the submenu - You should now see your API management interface
Step 2: Initiate API Onboarding
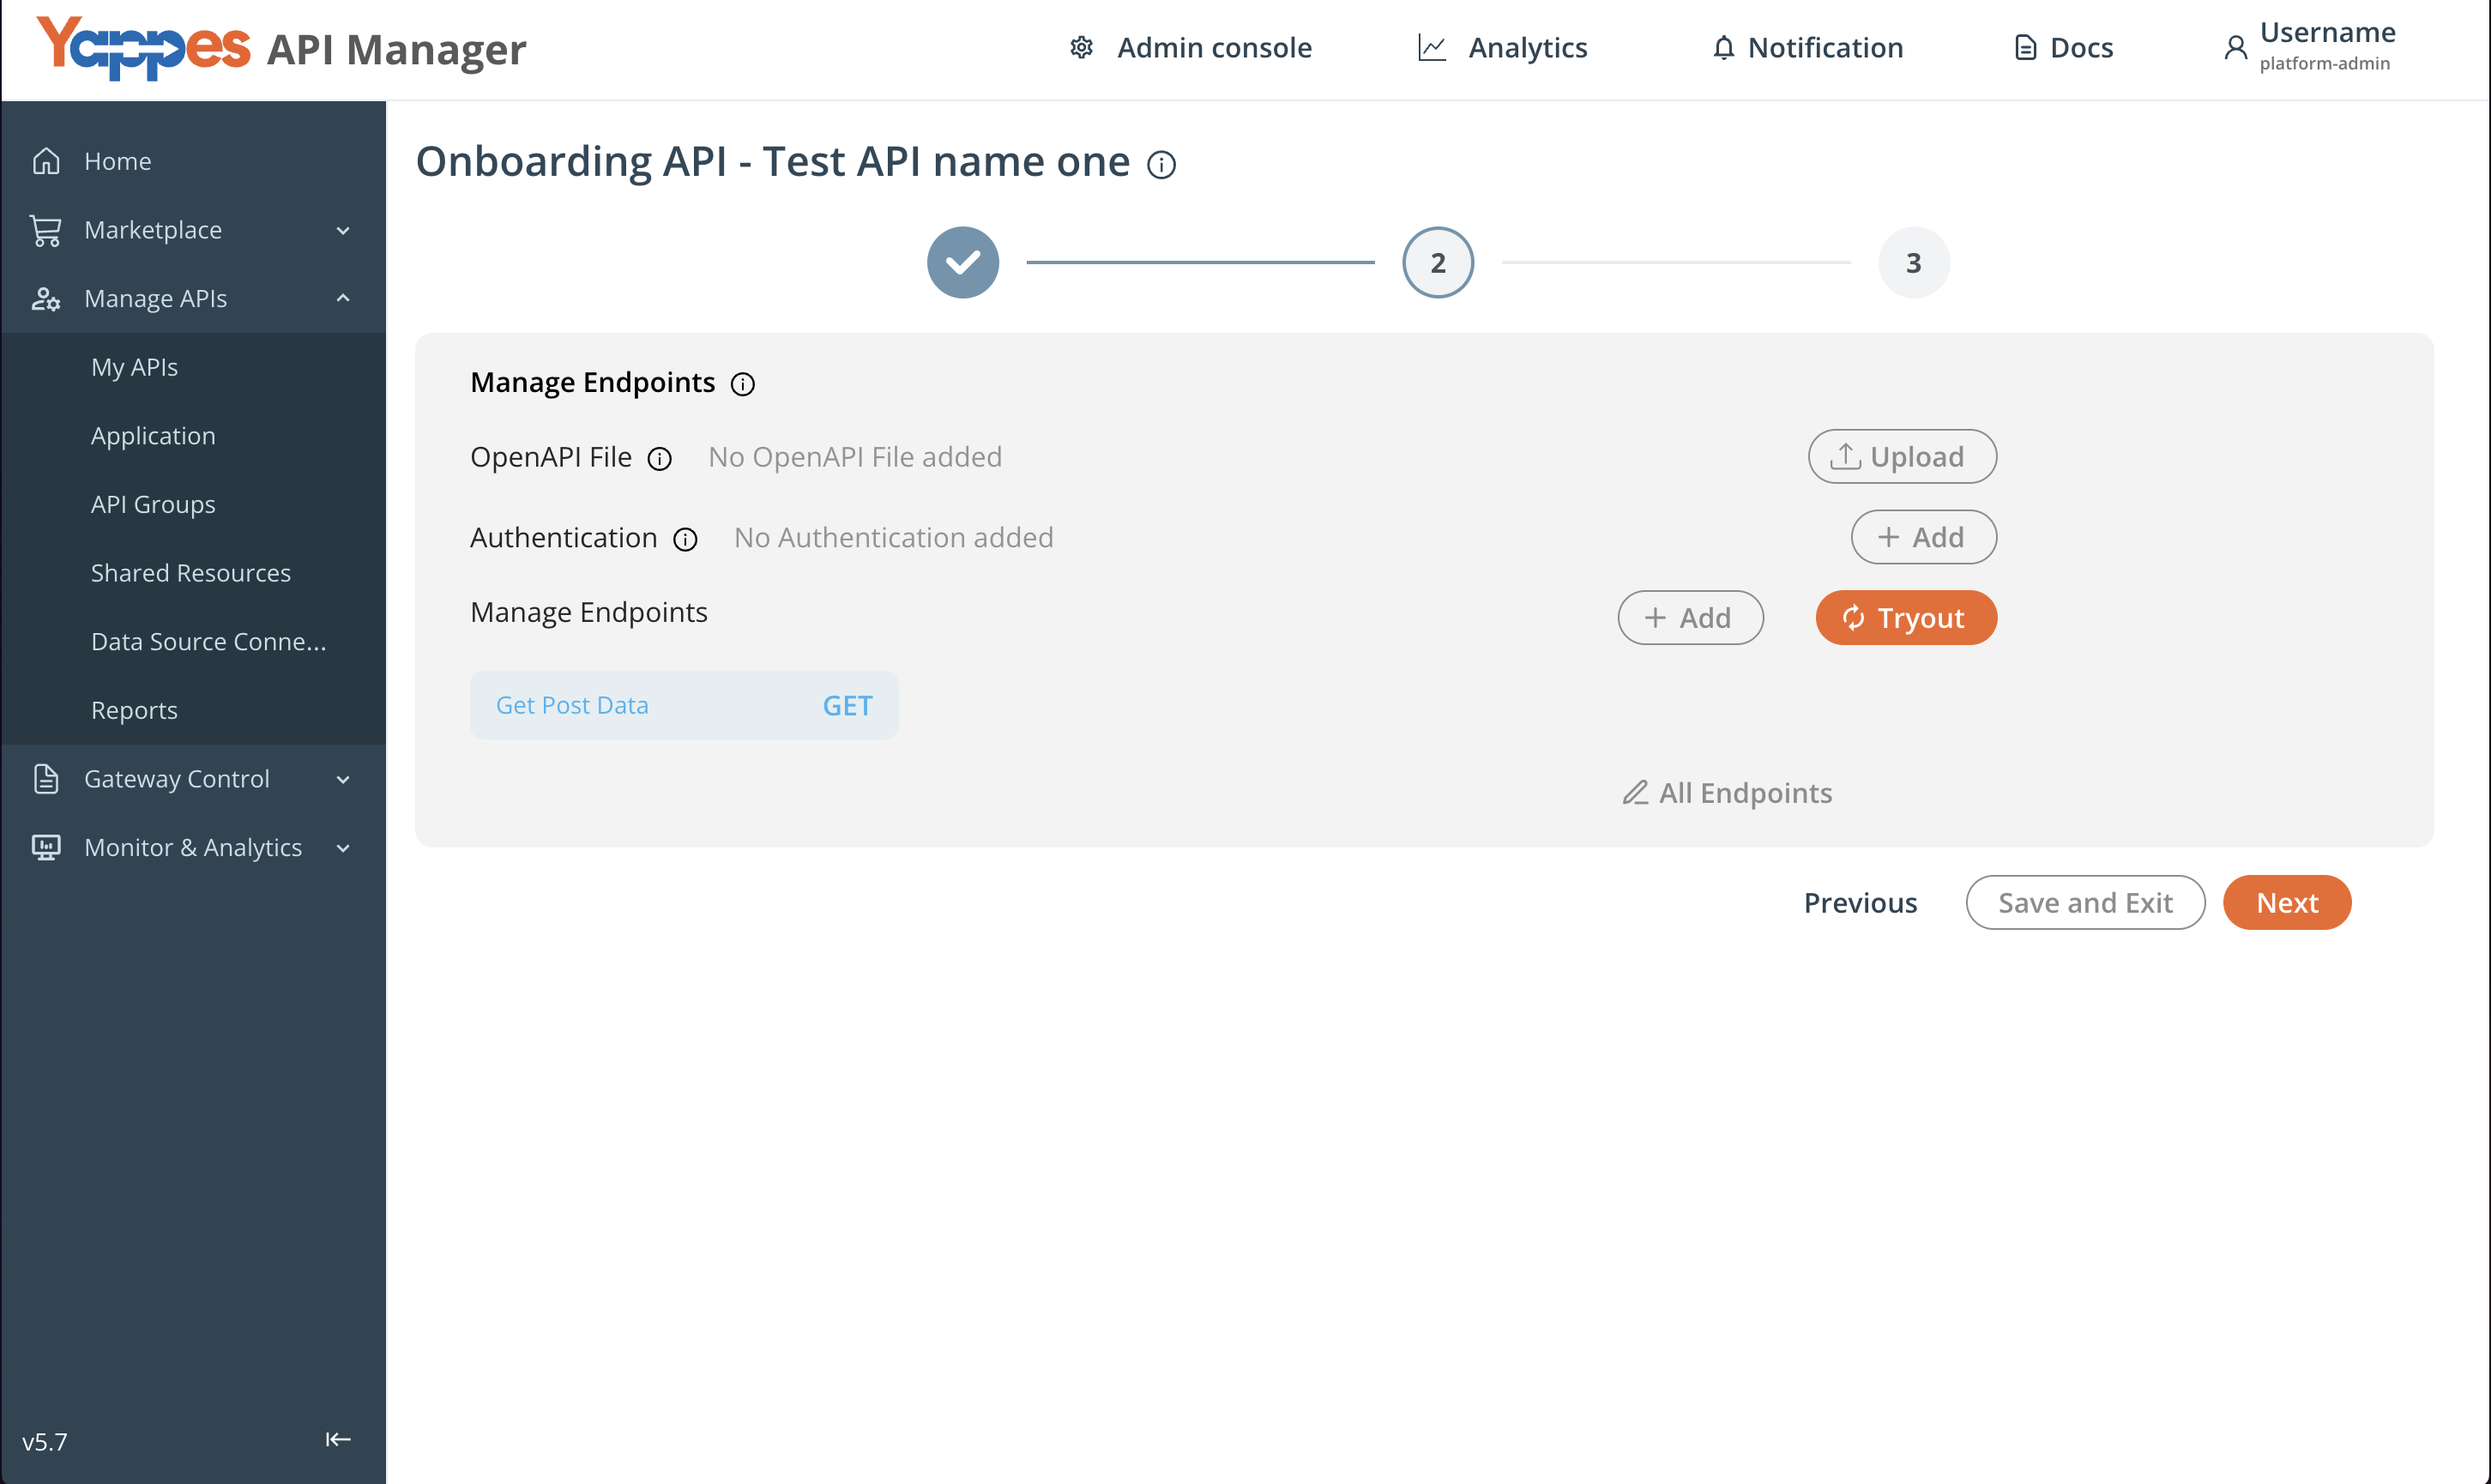
- Onboard from My APIs using the guide for your API type.
Step 3: Select Endpoint for attaching Advance Routing
- Click on your newly created endpoint (e.g.,
get Post Data) - The endpoint details panel will open
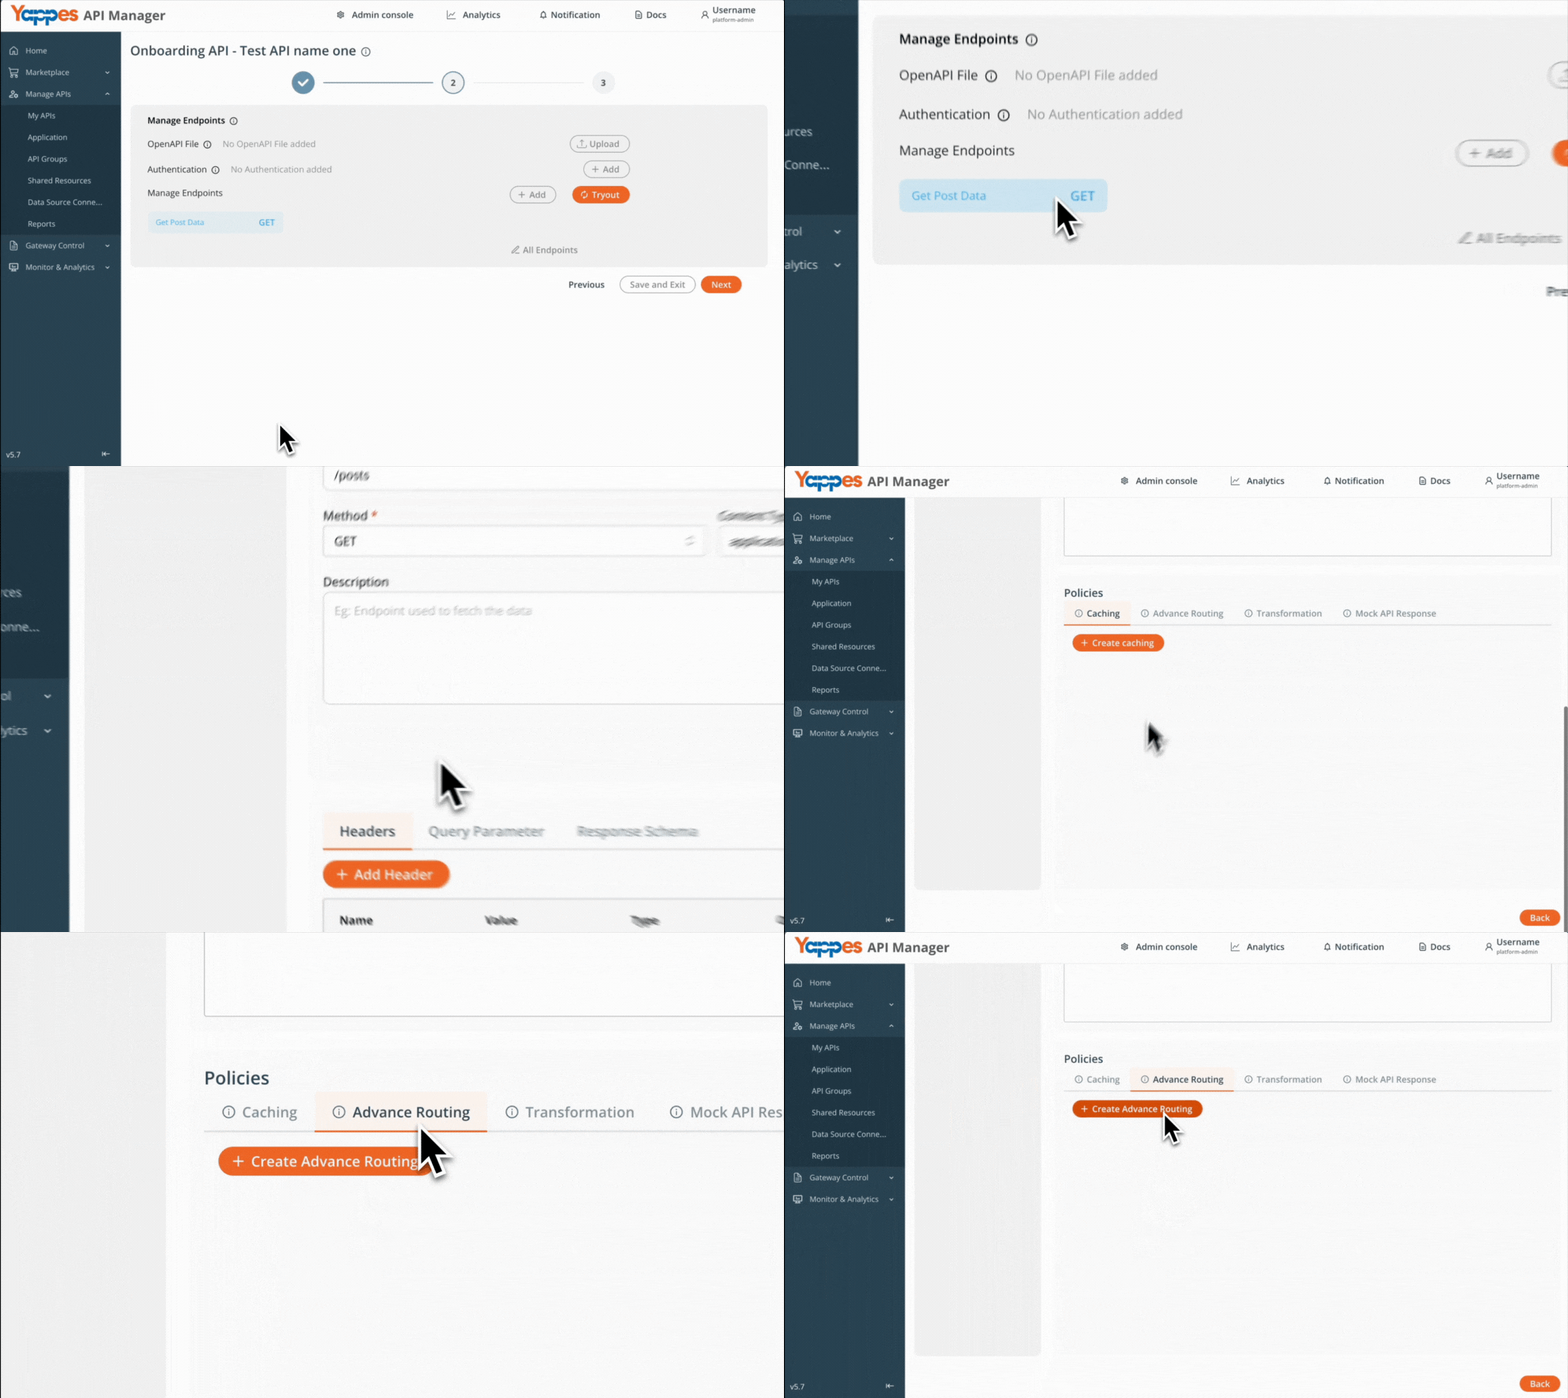
Step 4: Access Advance Routing Configuration
- Locate and click the
Advance Routingtab in the interface - Click
Create Advance Routingto open the policy configuration panel - The Advance Routing configuration dialog will appear
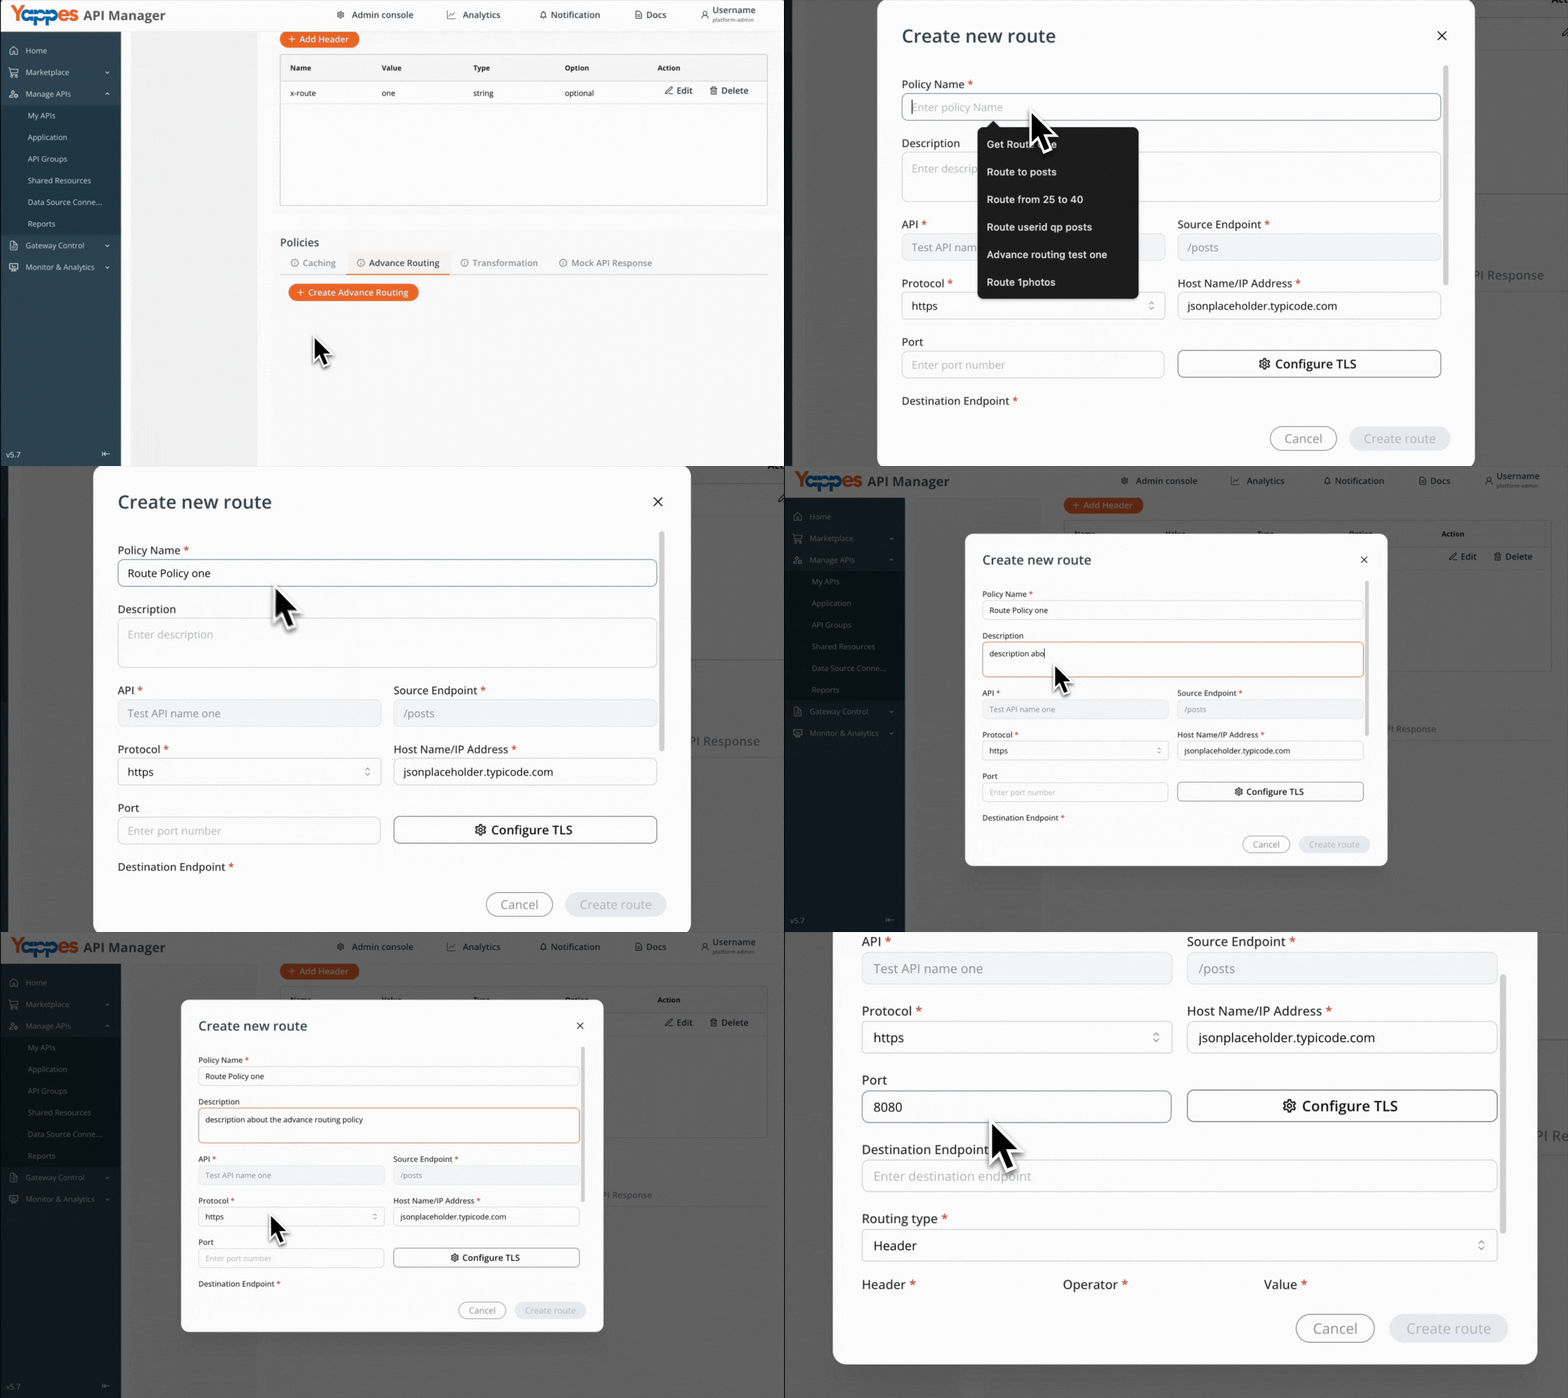
Step 5: Create the Advance Routing Policy
- Enter a descriptive name in the
Policy Namefield (e.g.,Route Policy One) - Add a detailed
descriptionin the Enter description field to document the policy purpose HostnameandProtocolwill be pre-filled; we can choose to edit- Configure the
Portfield if using a non-standard port
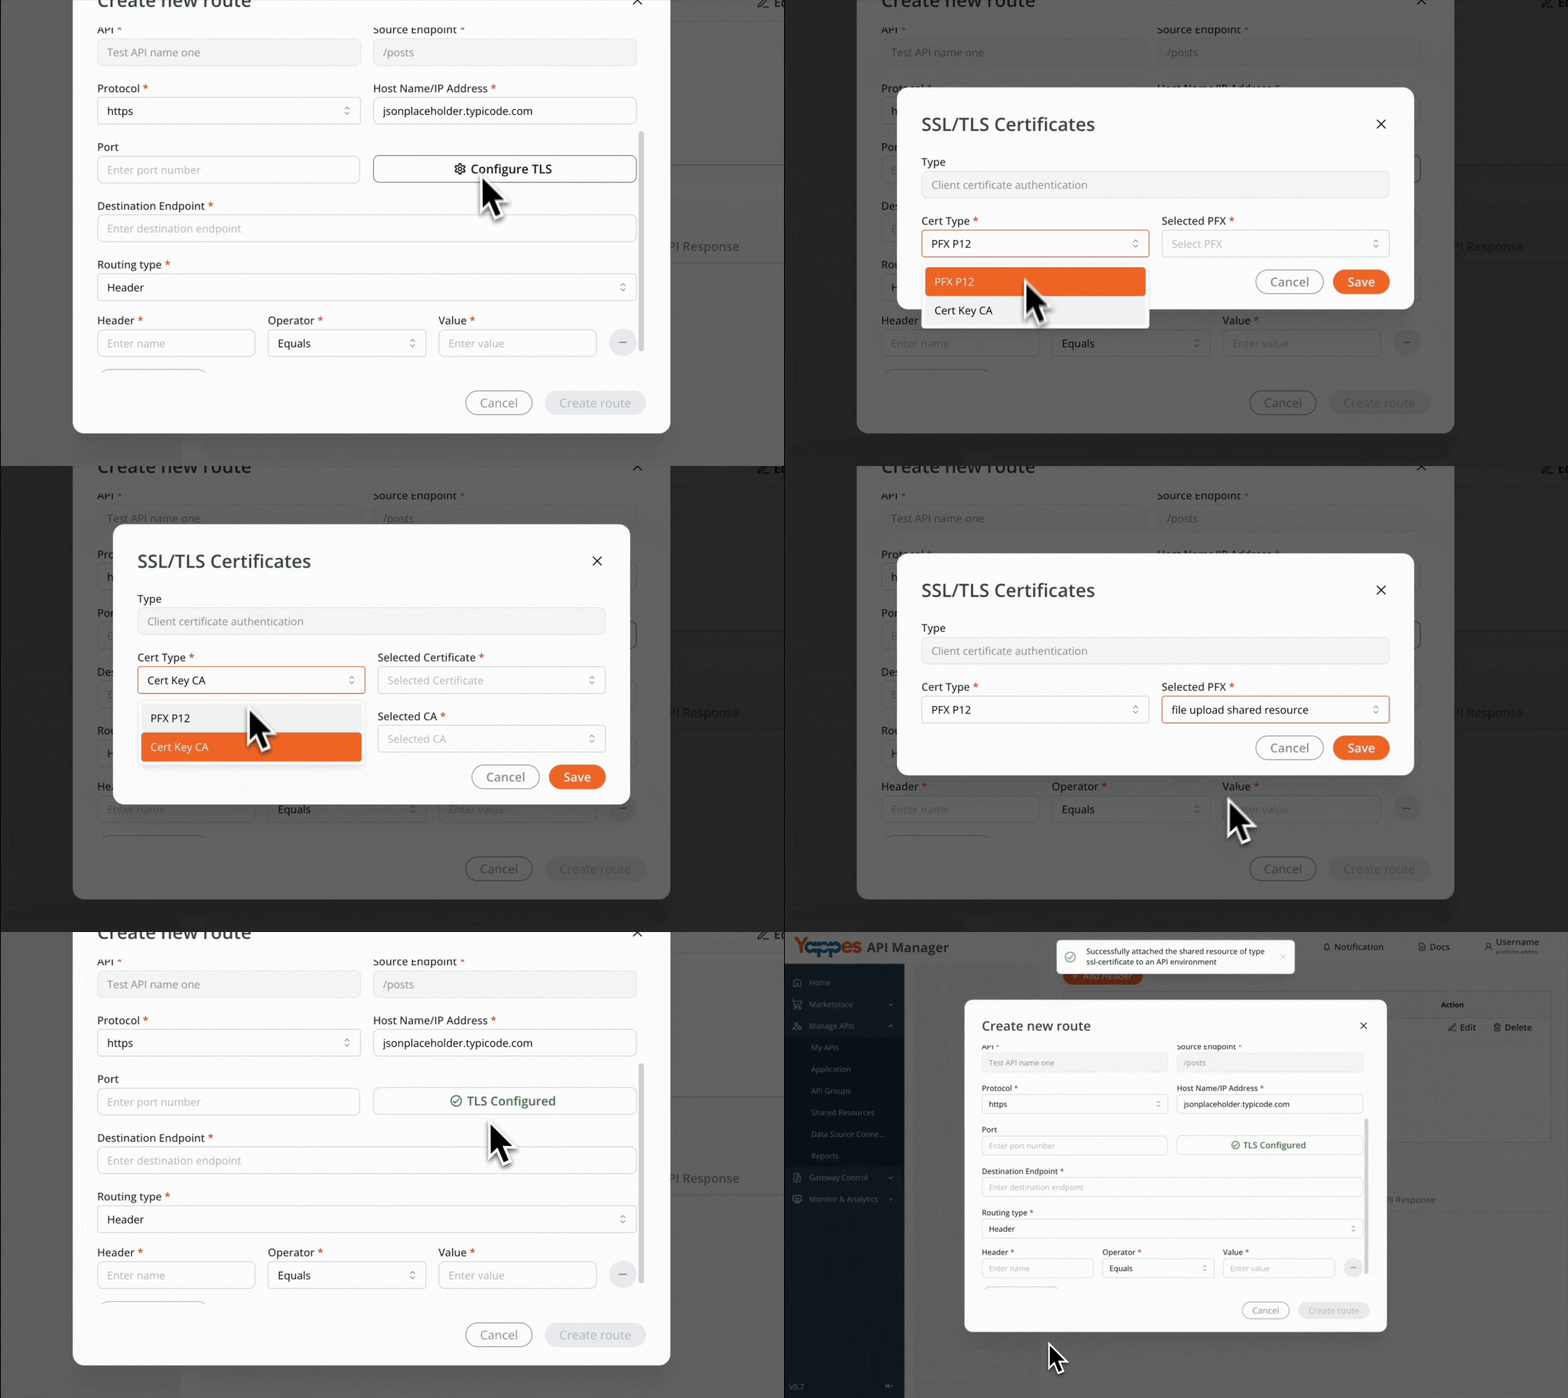
Step 6: Configure TLS Settings (Optional but Recommended)
- Click on
Configure TLSto enable secure routing - In the
Cert Type*field, select your certificate type (e.g.,Cert Key CA) - Select the appropriate
certificatefrom the available options - Verify that TLS configuration is properly applied and click on
Save
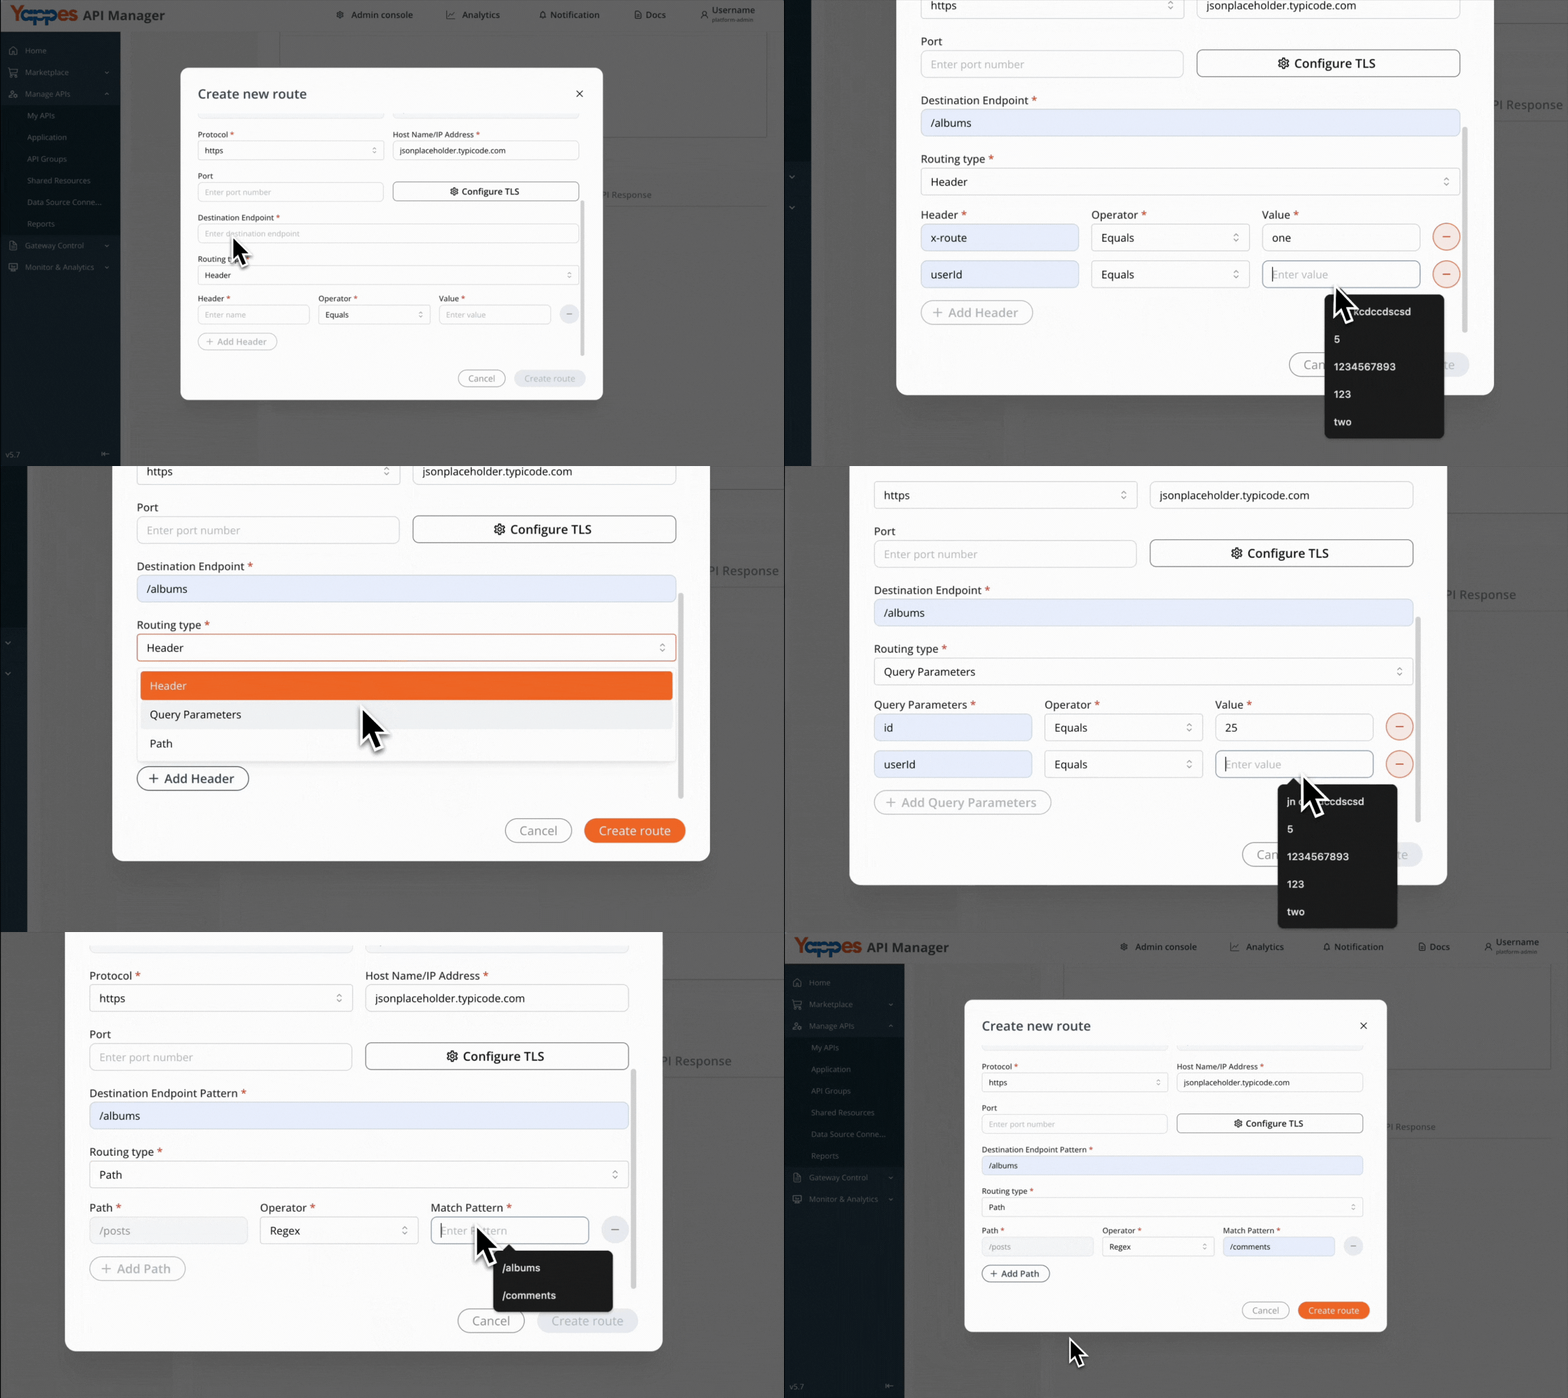
Step 7: Configure Destination Endpoint, Headers, Query Parameters and Path
- Specify the
Destination Endpointwhere the request should be routed once the conditions are met Routing Type- Headers
- Query Parameter
- Path
- Add any required
Headersfor routing logic - Configure
Query Parametersas needed for request routing - Define
Routing Rulesbased on these parameters
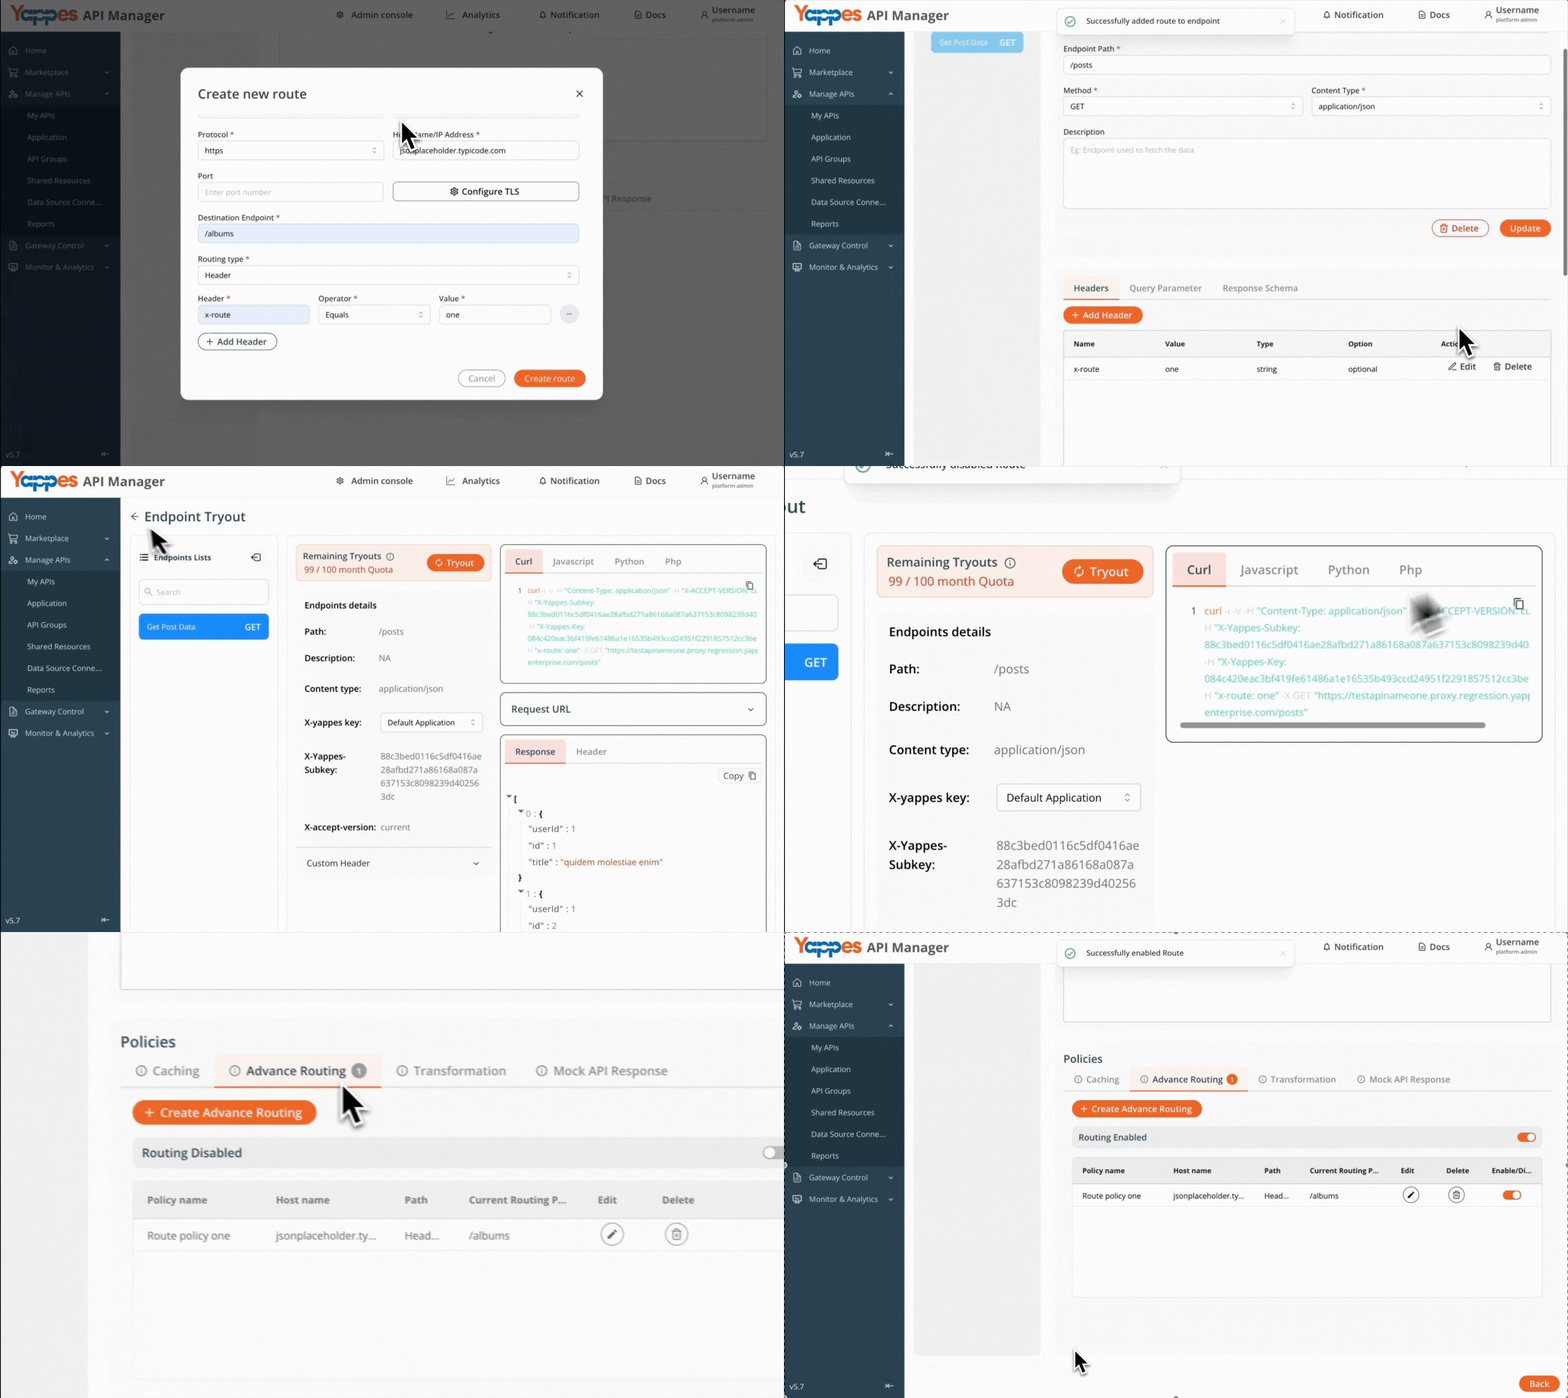
Step 8: Submit to Create Route
- Review all configuration settings
- Click
Submitto create the Advance Routing policy - You’ll receive confirmation of the Advance Routing policy created and attached to the API endpoint
Method 2: Creating Advance Routing from Gateway Policy Page
Step 1: Navigate to Gateway Policies
- Locate
Gateway Control → Gateway Policiesin the main navigation menu - The policies management interface will display
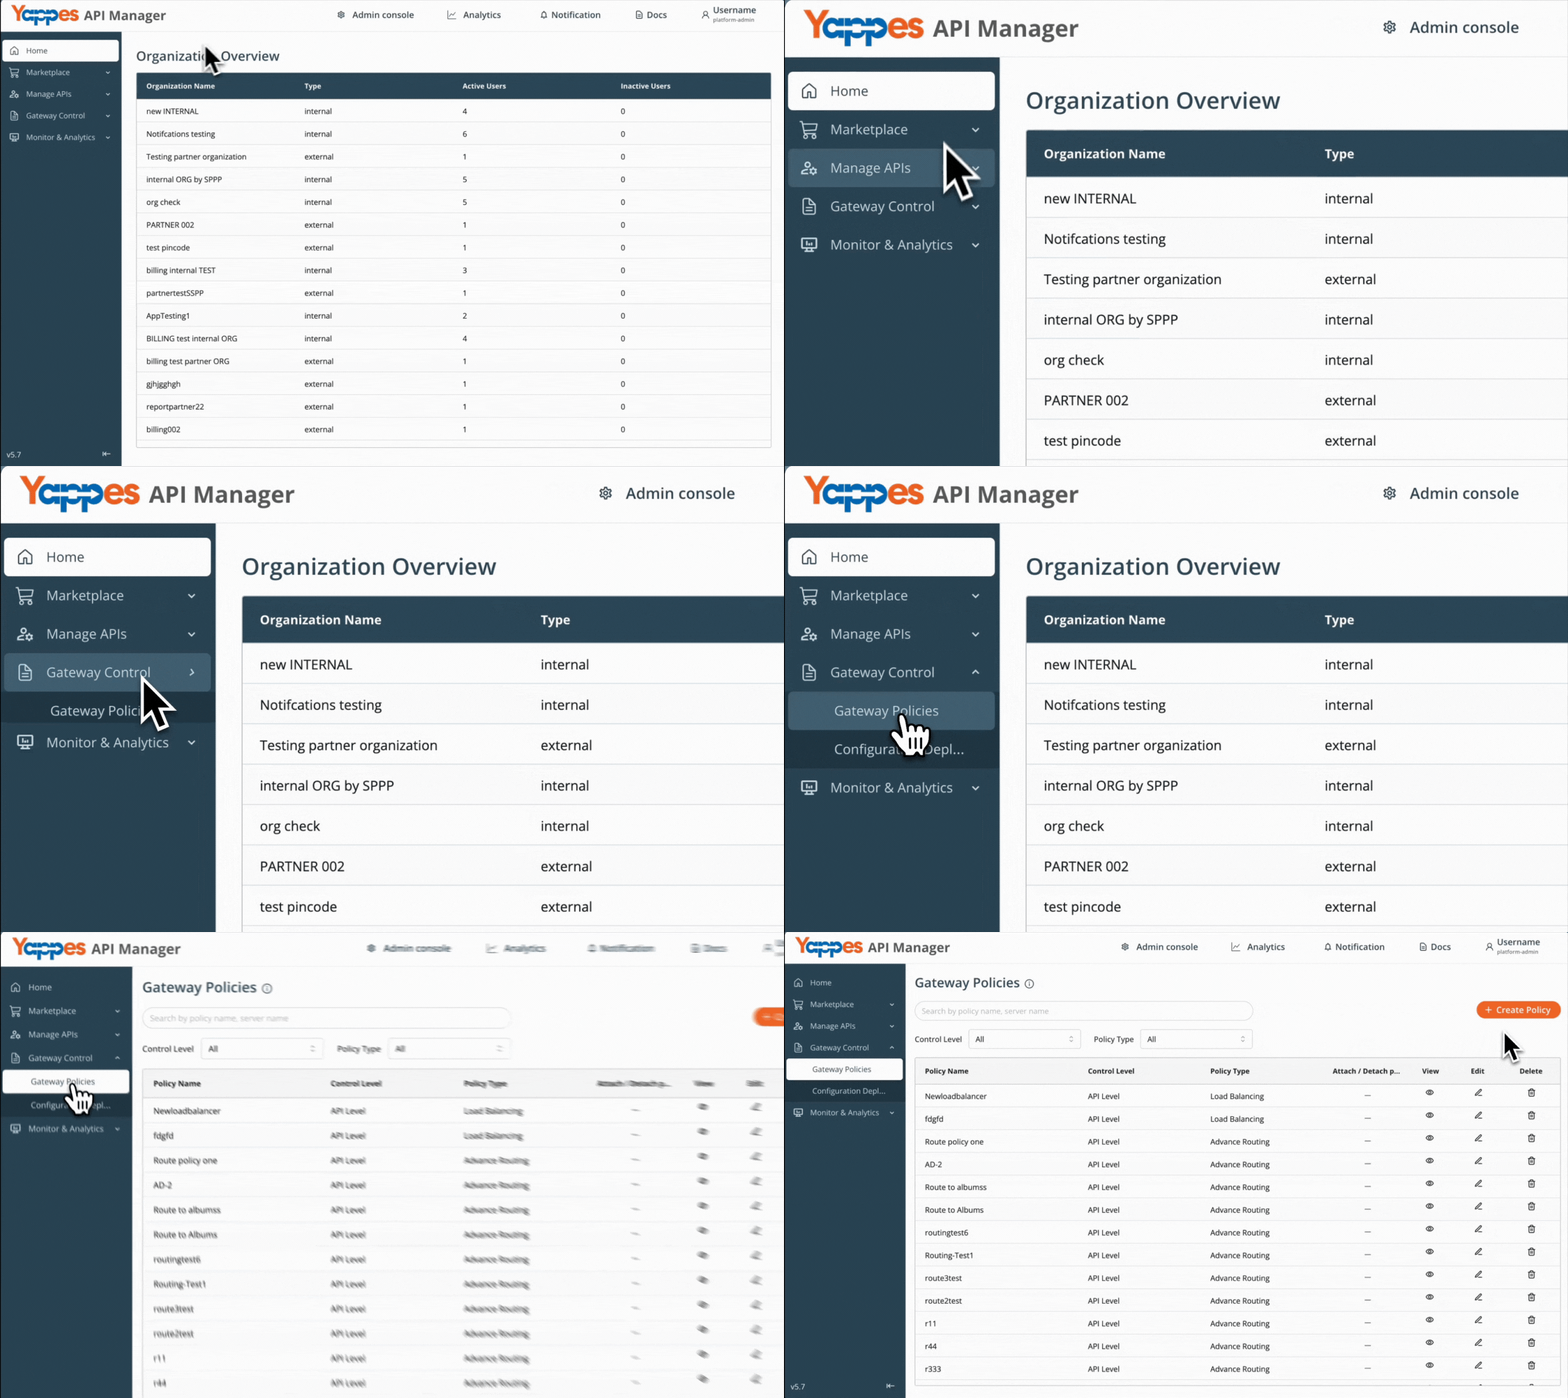
Step 2: Initialize New Policy Creation
- Click
+ Create Policybutton - The policy creation modal will open
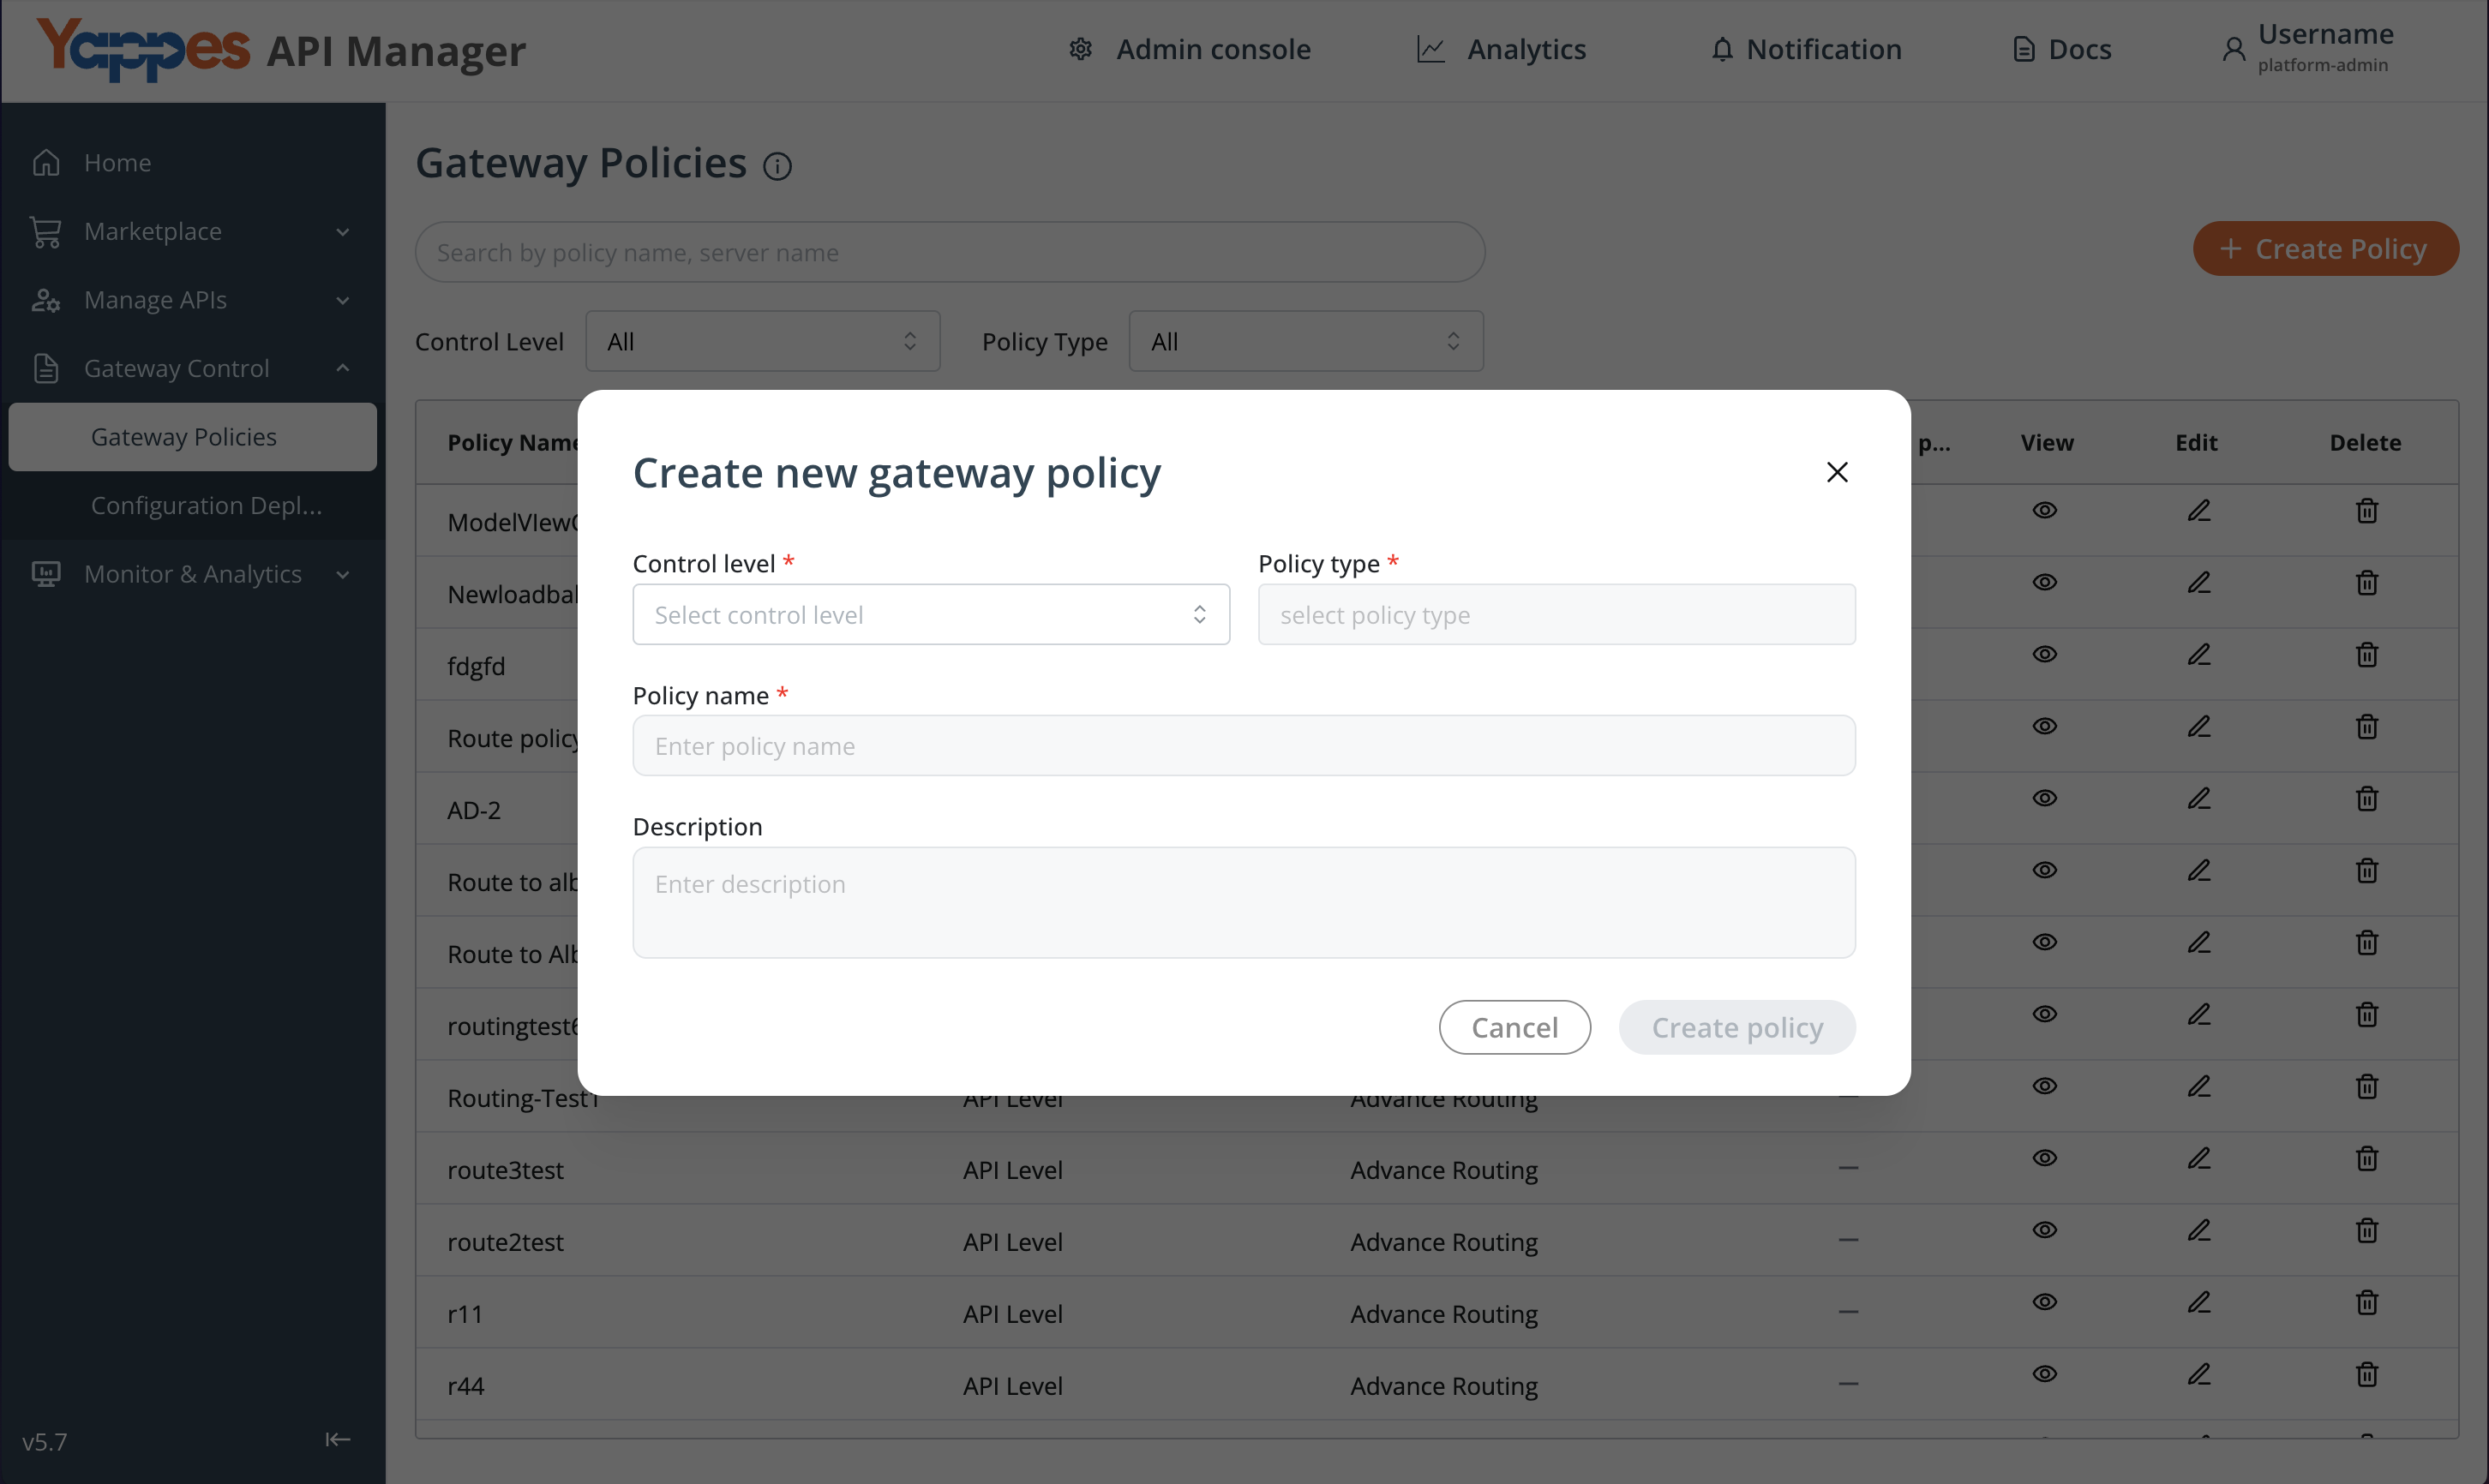
Step 3: Configure Policy Settings
-
Set the
Control LeveltoAPI Level -
In the
Policy Typedropdown, selectAdvance Routing -
These settings determine the policy scope and functionality
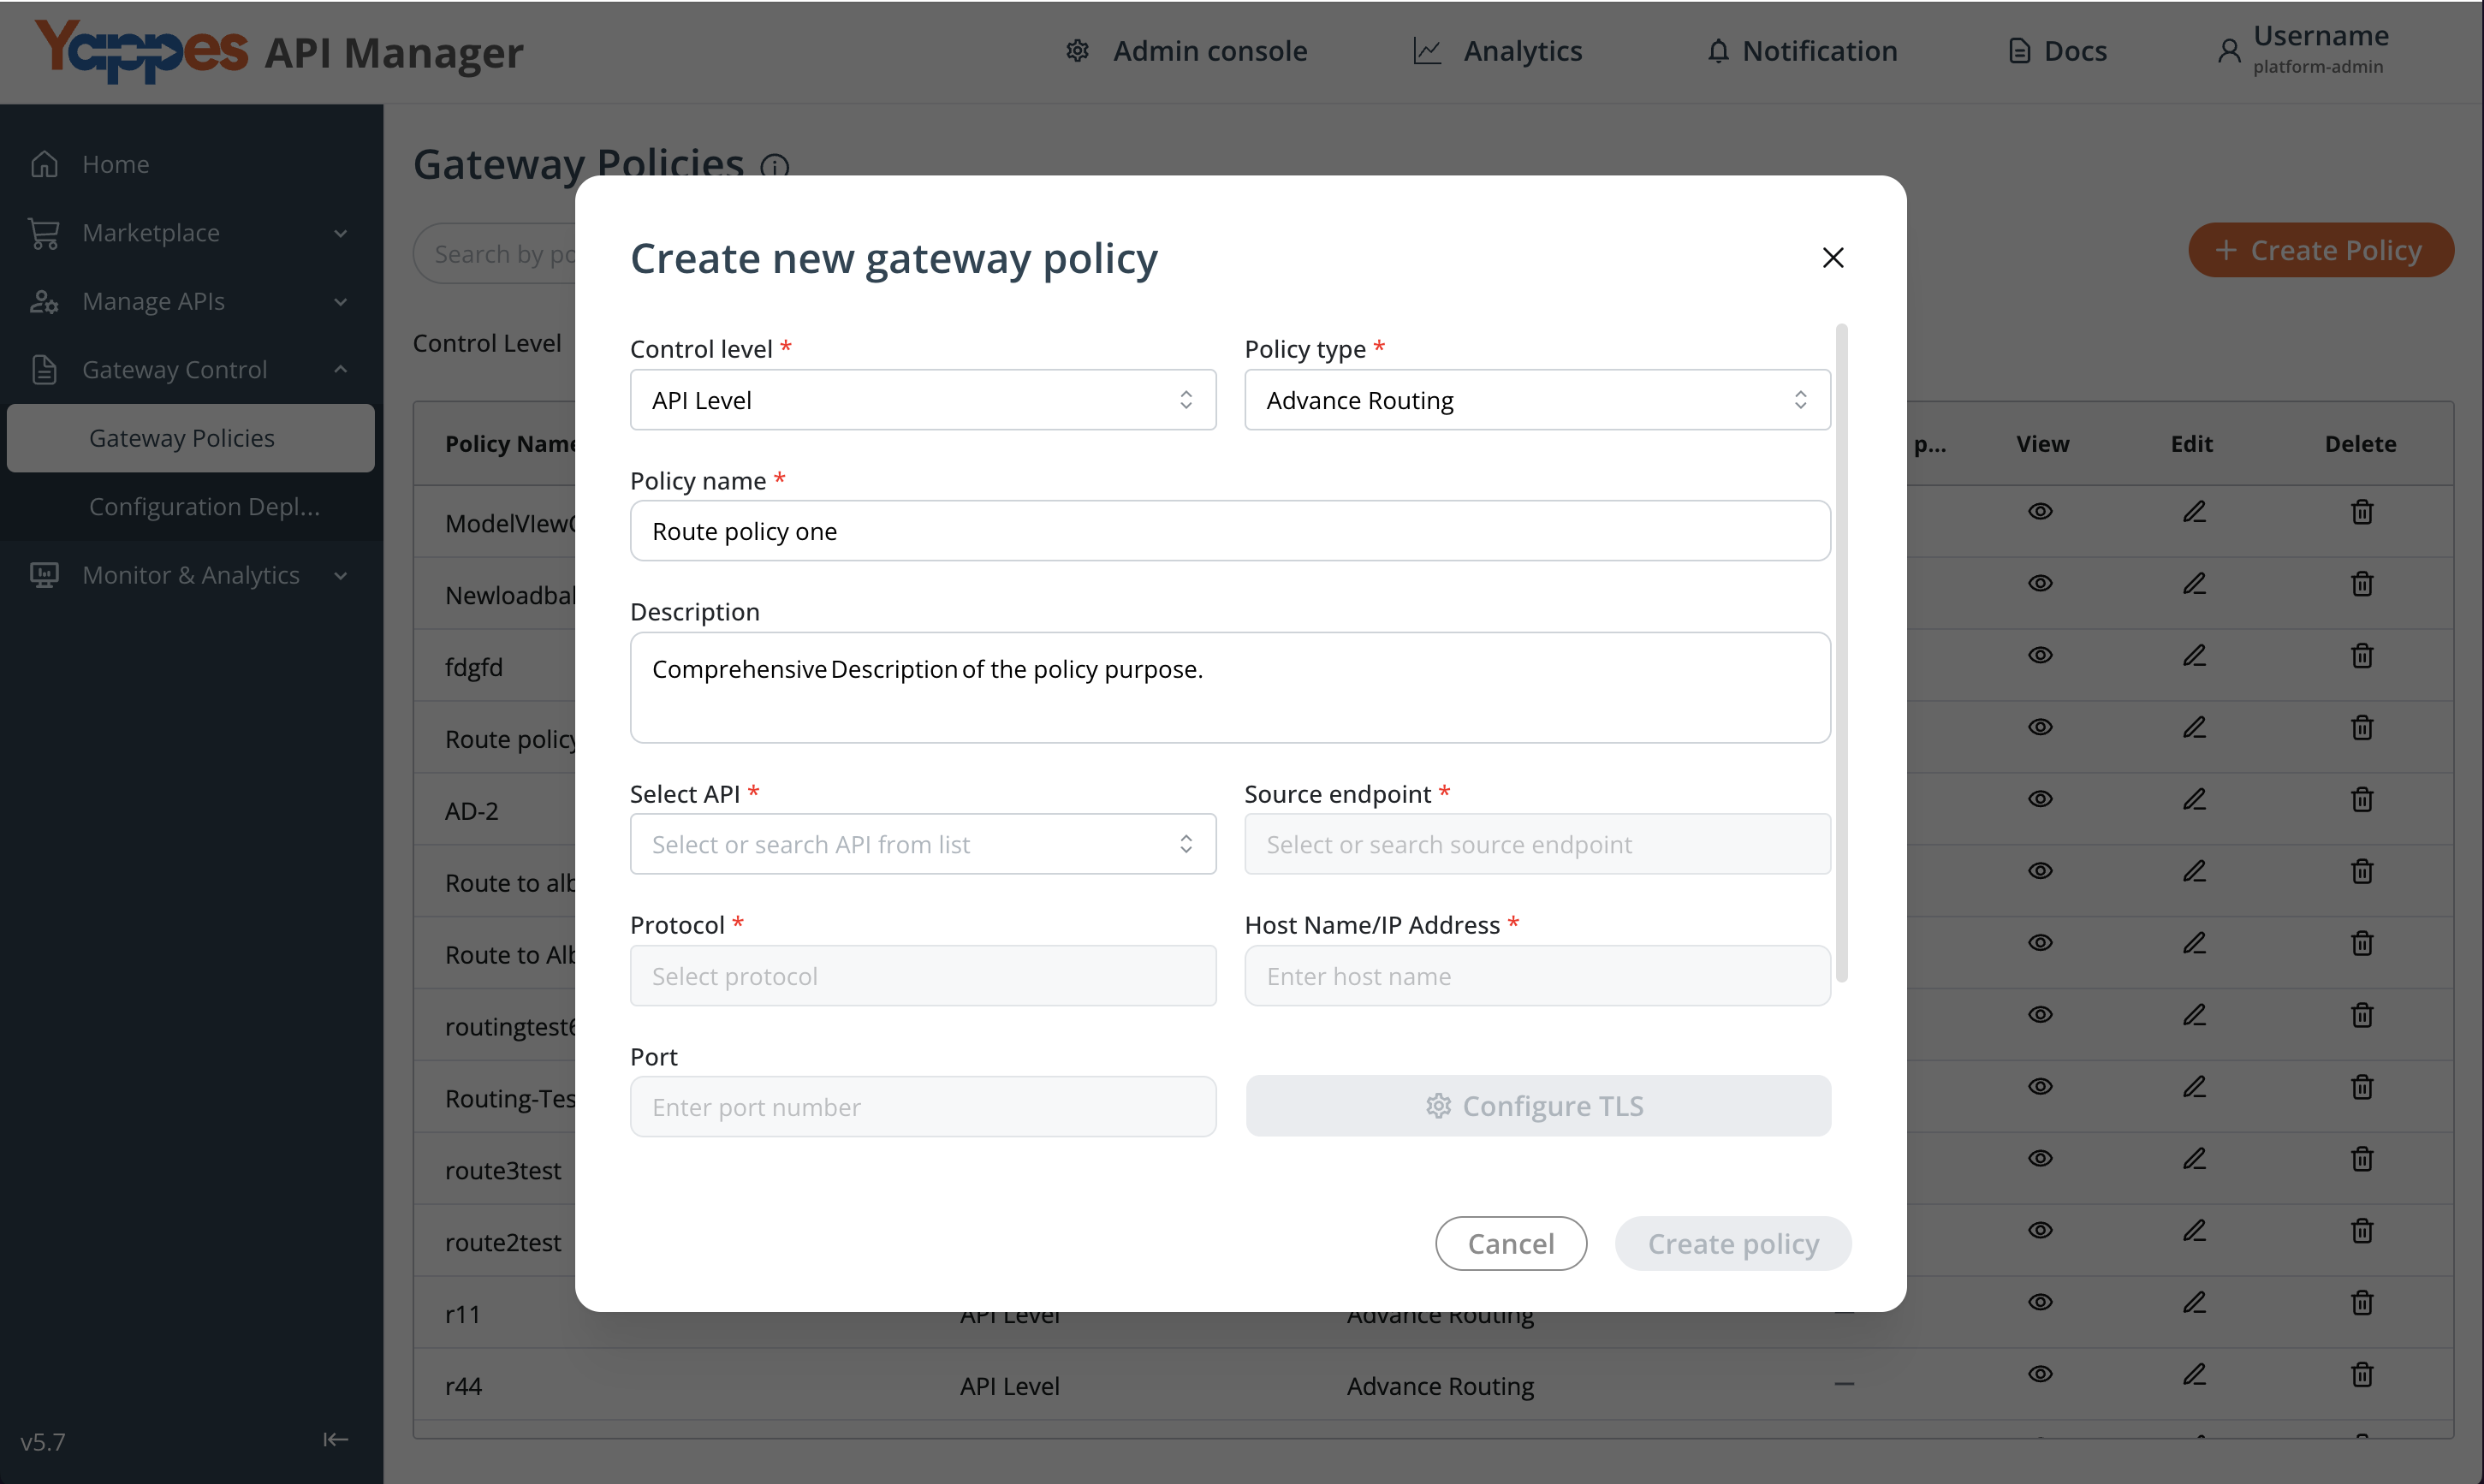
Step 4: Define Policy Details
-
Enter a unique
Policy Namefor identification -
Add a comprehensive Description of the policy purpose
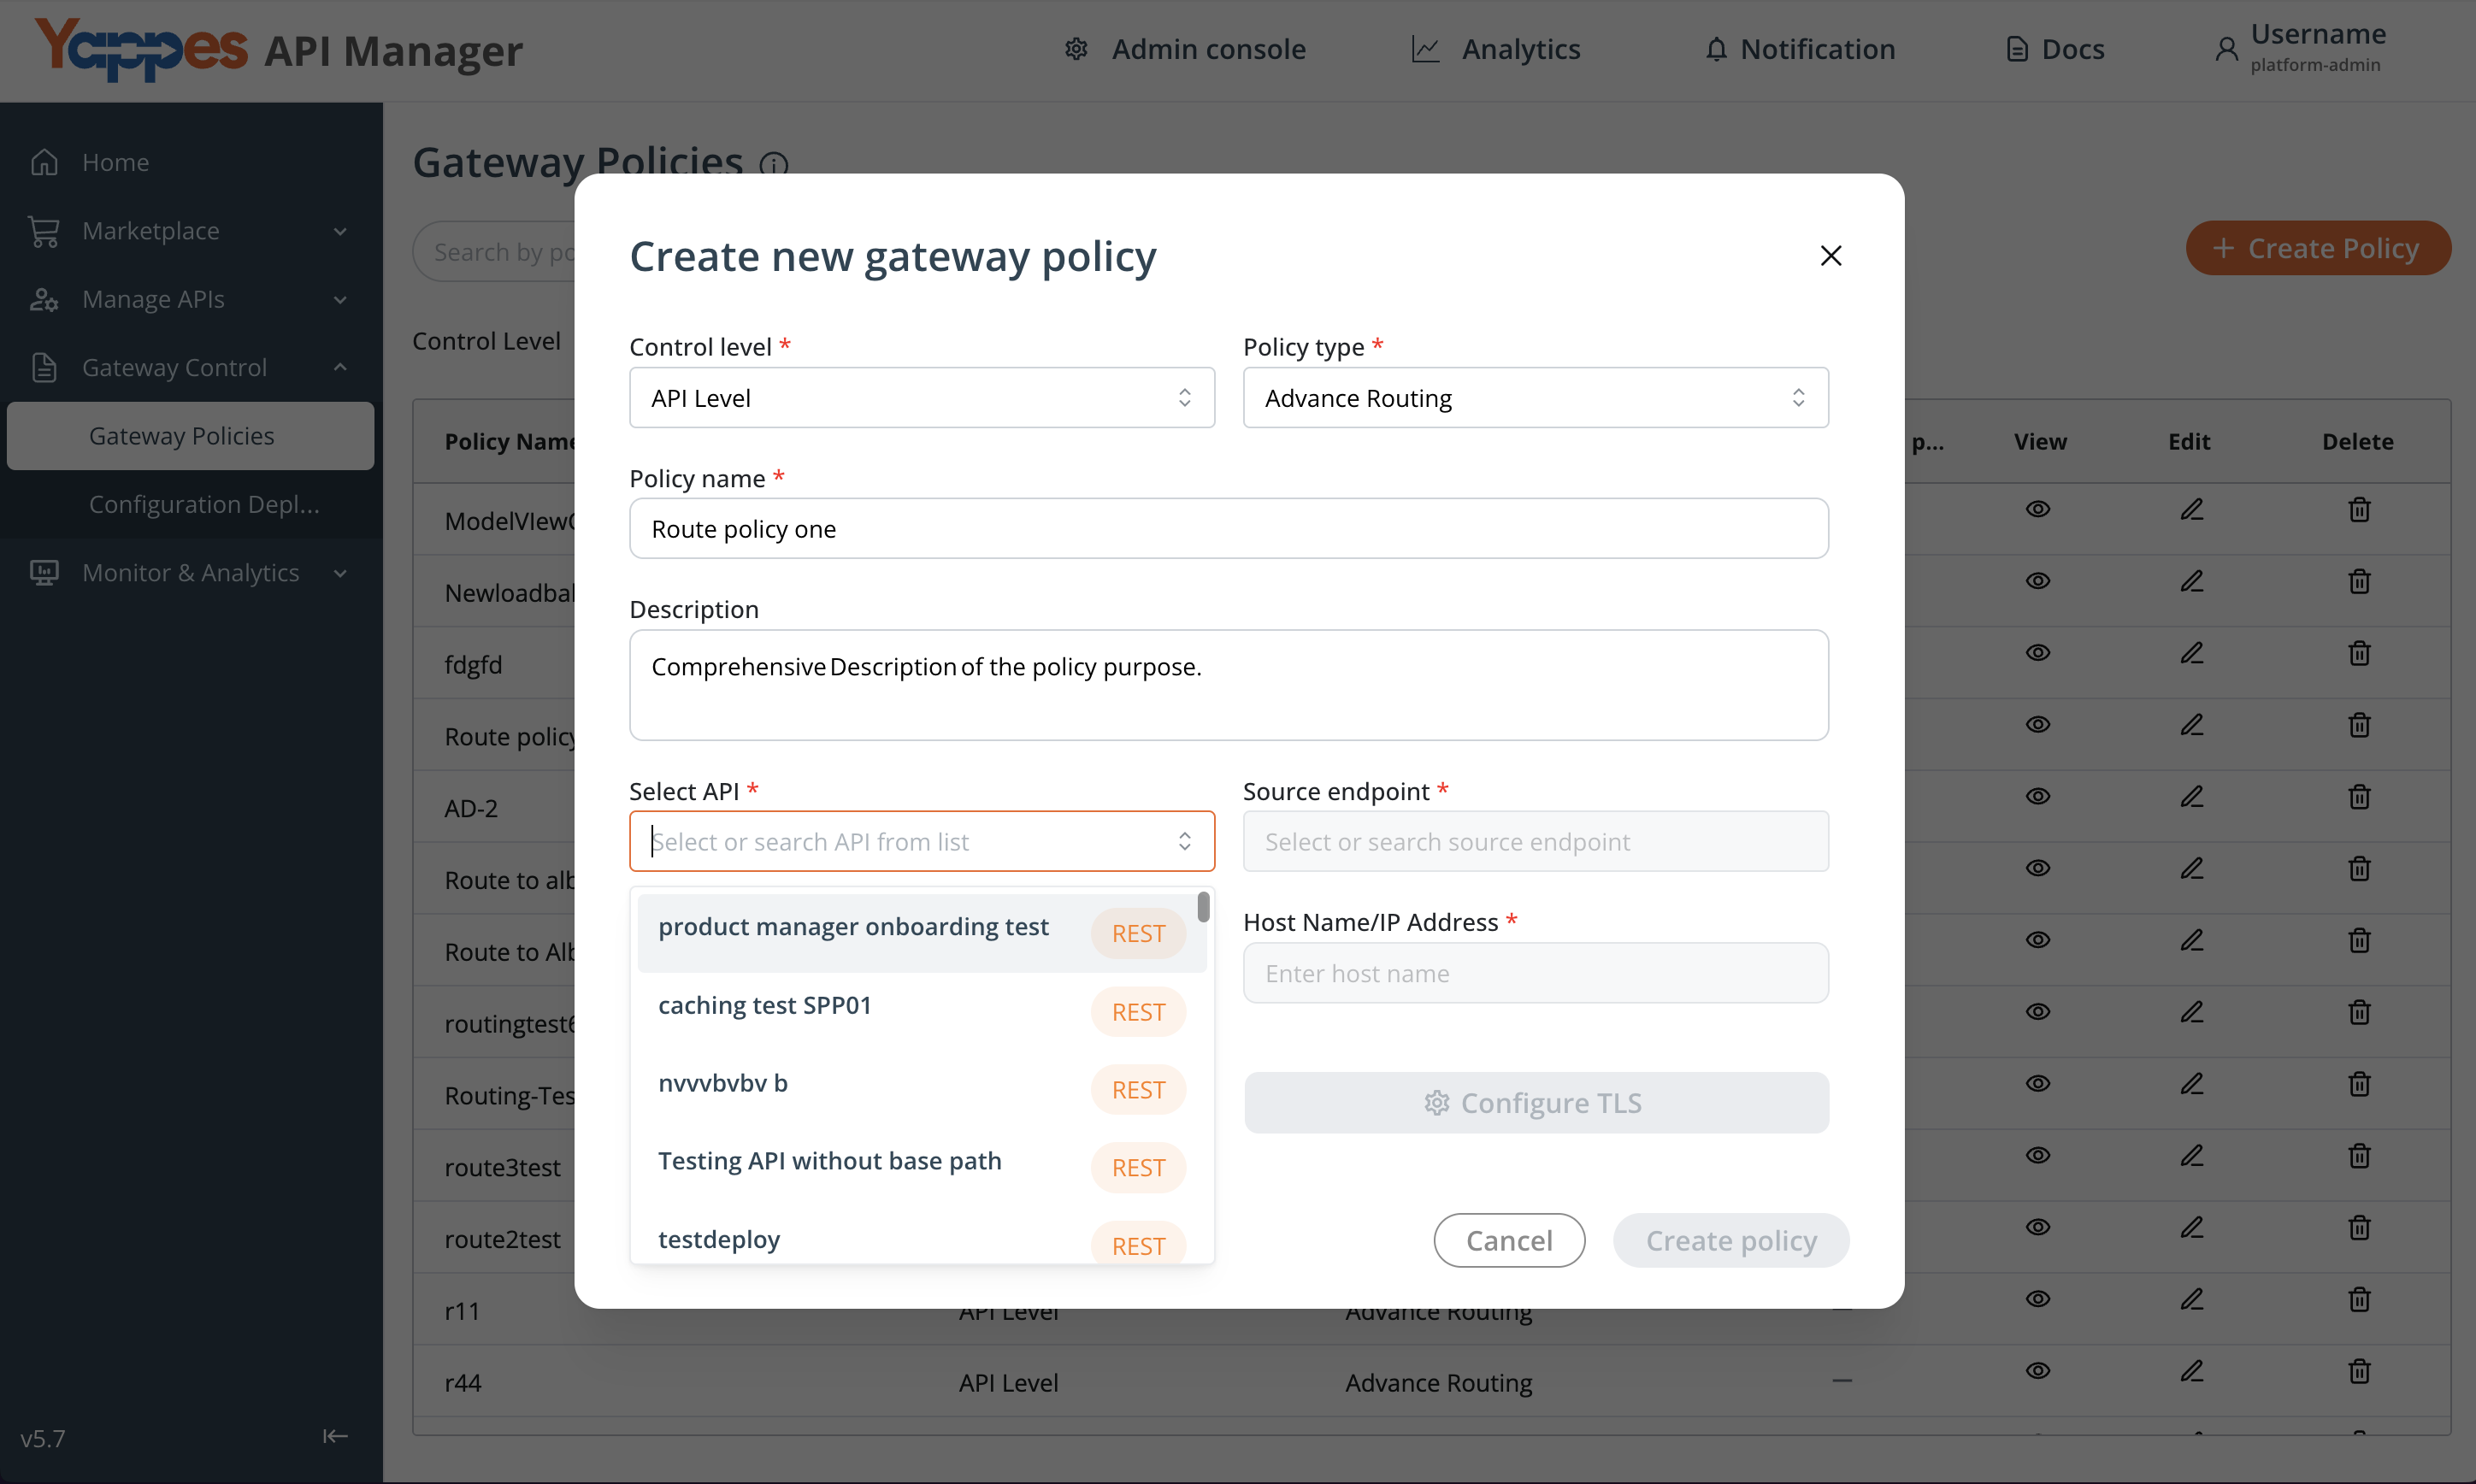
Step 5: Select Target API
- From the available APIs list, select the
API & Endpointto attach the policy
Step 6: Configure Hostname, Protocol, Port & TLS Details
-
HostnameandProtocolwill be pre-filled; we can choose to edit -
Configure the
Portfield if using a non-standard port -
TLS configurationcan be done
Step 7: Configure Destination Endpoint, Headers, Query Parameters and Path
- Specify the
Destination Endpointwhere the request should be routed once the conditions are met Routing Type- Headers
- Query Parameter
- Path
- Add any required
Headersfor routing logic - Configure
Query Parametersas needed for request routing - Define
Routing Rulesbased on these parameters
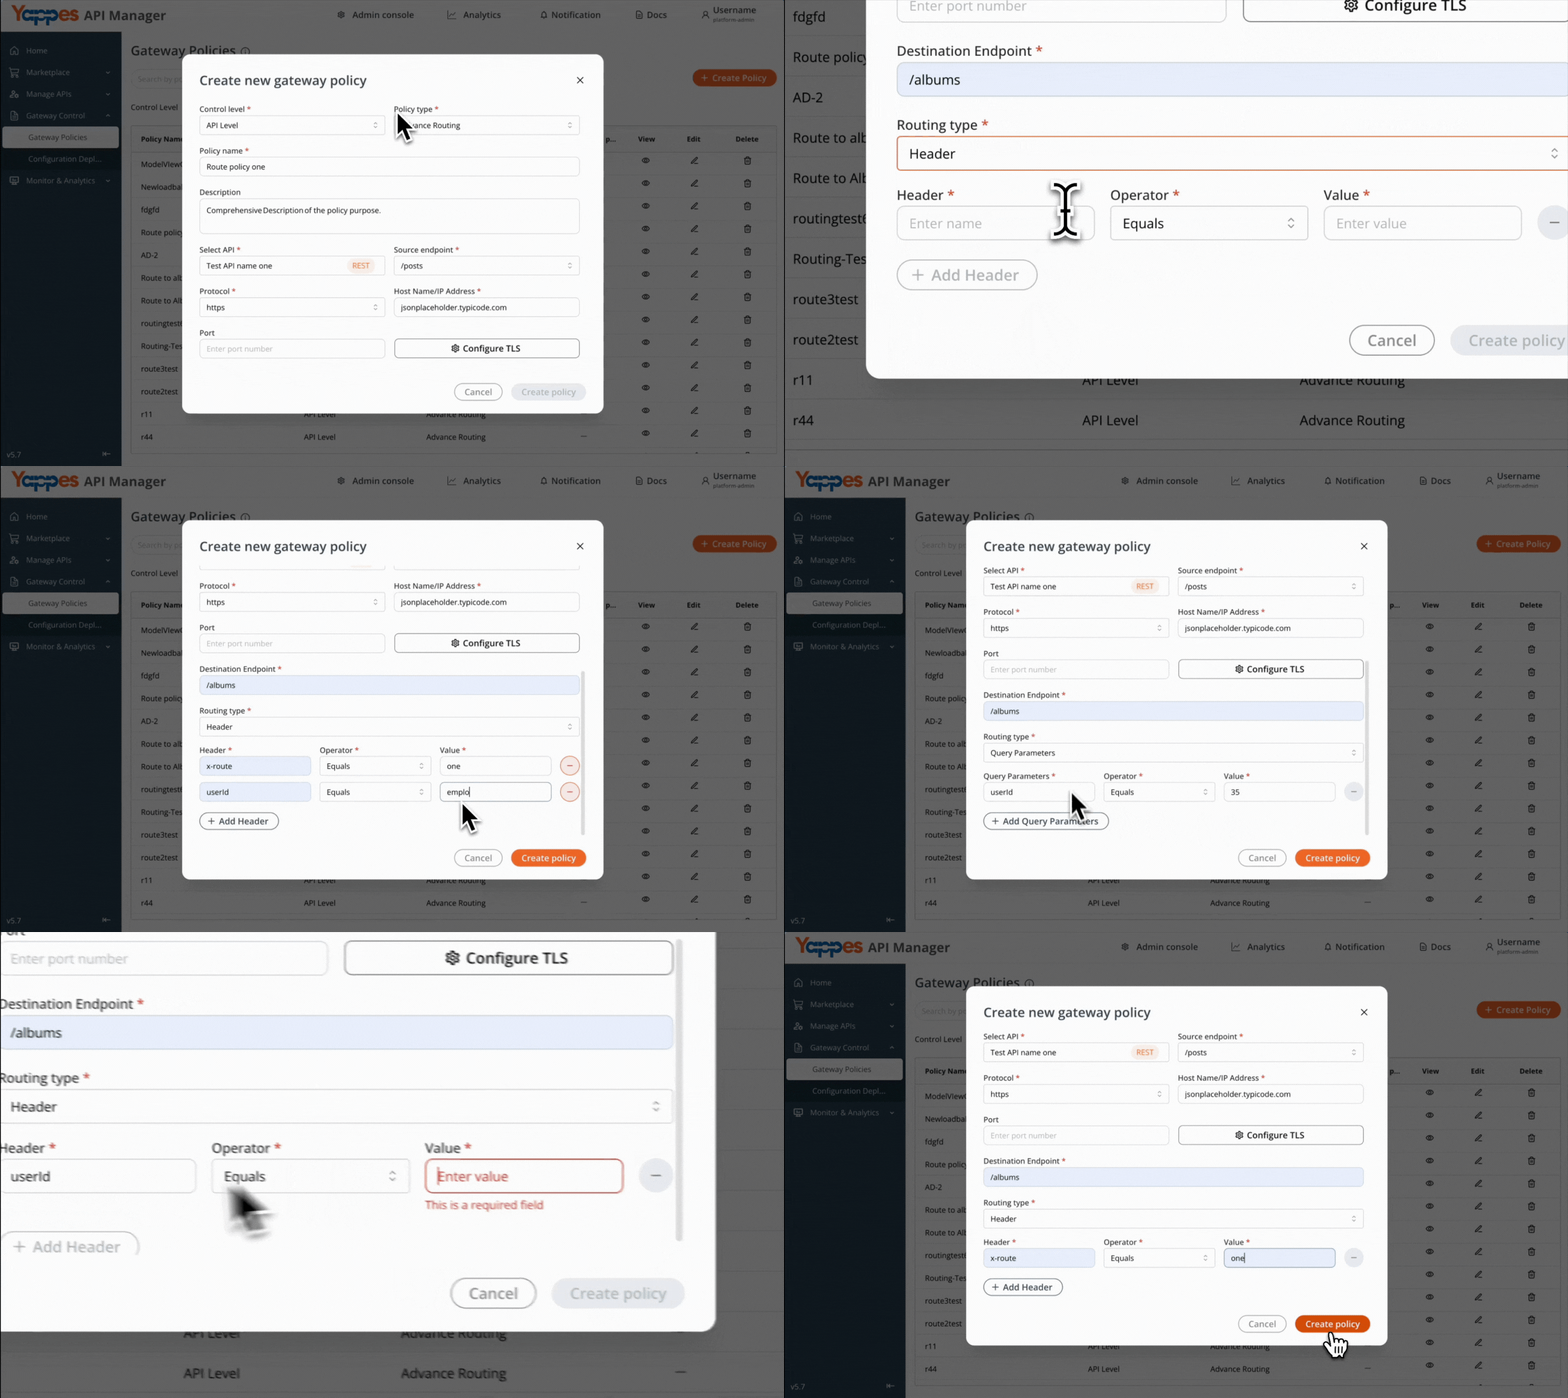
Step 8: Submit to Create Advance Routing Policy
- Review all policy configurations
- Click on
Create Policyto save the configurations - The policy will be active for the selected Endpoint of the API
Info
To check Advance Routing working at the endpoint, try out the endpoint
Understanding the Interface
Main Configuration Areas
Policy Information Section
- Policy Name: Unique identifier for your routing policy
- Description: Documentation field for policy purpose and behaviour
- Control Level: Determines scope (API Level for Advance Routing)
Connection Configuration
- Port Settings: Specify custom ports for backend connections
- TLS Configuration: Security settings for encrypted connections
- Certificate Management: Selection and application of security certificates
Routing Rules Panel
- Headers Configuration: Define header-based routing conditions
- Query Parameters: Set up parameter-based routing logic
- Routing Conditions: Create complex routing rules
Visual Indicators
- Required Fields: Marked with red asterisk (*)
- Success Messages: Green confirmation for successful operations
- Error Alerts: Red indicators for configuration issues
- Status Icons: Show policy active/inactive state
Configuration and Settings
Required Configuration Fields
| Field | Purpose | Example Value |
|---|---|---|
| Policy Name | Unique policy identifier | Advance Routing Production |
| API Selection | Target API for policy | Your API name |
| Control Level | Policy scope | API Level |
| Policy Type | Routing mechanism | Advance Routing |
Optional Configuration Options
| Setting | Use Case | Impact |
|---|---|---|
| Port | Non-standard ports | Routes traffic to specified port |
| TLS/SSL | Secure connections | Enables encrypted communication |
| Headers | Content-based routing | Routes based on header values |
| Query Parameters | Parameter routing | Directs traffic based on URL parameters |
| Certificate Type | Security compliance | Determines encryption method |
Best Practices for Configuration
Key Recommendations
- Always use descriptive policy names that indicate purpose.
- Configure TLS for production environments.
- Document routing logic in the description field.
- Test routing rules before applying to production APIs.
Verification and Testing / Confirming Successful Implementation
For Onboarding Method
- Navigate to My APIs section.
- Locate your newly onboarded API.
- Check for the Advance Routing indicator.
- Verify policy name appears in API details.
For Gateway Policy Method
- Go to Gateway Policies page.
- Find your policy in the active policies list.
- Verify status shows as Active.
- Check that the correct API is associated.
Testing Your Routing Configuration
Send Test Request
- Use your API testing tool (Postman, cURL, etc.).
- Include configured headers/parameters.
- Verify request routes correctly.
Monitor Traffic Flow
- Check API analytics dashboard.
- Verify routing metrics.
- Confirm expected backend receives requests.
Validate Security Settings
- Test TLS connection if configured.
- Verify certificate validation.
- Check for secure connection indicators.
Troubleshooting Common Issues and Solutions
Policy Not Appearing
- Problem: Created policy doesn't show in the list.
- Solution:
- Refresh the Gateway Policies page.
- Verify you have proper permissions.
- Check if policy creation was completed successfully.
Routing Not Working
- Problem: Requests not routing according to policy.
- Solution:
- Verify policy is set to Active status.
- Check header/parameter values in requests match policy configuration.
- Ensure API is properly associated with the policy.
TLS Configuration Errors
- Problem: Certificate errors when configuring TLS.
- Solution:
- Verify certificate format is correct (Cert Key CA).
- Ensure certificate hasn't expired.
- Check certificate permissions and access.
Connection Test Failures
- Problem: Test connection fails during onboarding.
- Solution:
- Verify API host name is correct and accessible.
- Check network connectivity to backend service.
- Ensure proper port configuration.
When to Contact Support
Contact Yappes Support if you encounter:
- Persistent policy creation failures.
- Unexpected routing behaviour after proper configuration.
- Certificate management issues.
- Access or permission problems.
Pro Tip
Always create routing policies in a development environment first, thoroughly test them, and then promote to production.
This approach minimizes the risk of service disruptions and ensures your routing logic works as expected.