Raise Fault
Overview
Raise Fault in Yappes returns custom error responses from the API Gateway when configured rule conditions match during request or response processing.
This feature helps organizations to:
- Return standardized fault responses without changing backend services
- Apply conditional error handling at the gateway based on request or response attributes
- Reuse the same fault policy across multiple subscription endpoints
- Separate Request and Response fault logic per endpoint
When applied at the API or subscription level, Raise Fault evaluates JSON rules at the Yappes Gateway and returns the configured status code, headers, and payload when a condition matches.
Raise Fault policy modals may also include Custom error and message to override default raise-fault error responses when the policy triggers. That is separate from Raise Fault's JSON rule configuration — see Custom Error and Message.
Related policies: Schema Validation | Custom Plugin
When to Use Raise Fault
Use Raise Fault when:
- You need custom HTTP error responses returned directly from the gateway
- Fault logic depends on request query parameters, payload, headers, or response attributes
- You want separate Request and Response fault policies per endpoint
- A reusable subscription-level policy should be attached to specific consumer endpoints
When Not to Use Raise Fault
Avoid using Raise Fault in the following scenarios:
- Payload structure validation is required (use Schema Validation)
- Request rate or burst control is needed (use Throttling Policy)
- Custom gateway code is required (use Custom Plugin)
- Complex business logic belongs in backend services rather than the gateway
Prerequisites
Before configuring Raise Fault policies, ensure the following requirements are met.
Required Access and Permissions
Common Requirements
- Active Yappes platform account
API Manageraccess- Permission to create and manage Gateway Policies
- At least one API created under
My APIs
API Level
- A target endpoint must be available
Subscription Level
- API must be
published - An
active subscriptionmust be available on the Manage Subscriptions page
System Requirements
- Supported web browser:
Chrome,Edge, orFirefox
Raise Fault Configuration
Raise Fault is configured in the Raise Fault section. Select Context type to load a default JSON template, then edit Configuration in the code editor.
Context Options
| UI Label | Config Value | Stored Policy Type | When Rules Apply |
|---|---|---|---|
| Request | request |
raise-fault-request |
Before or during request handling at the gateway |
| Response | response |
raise-fault-response |
On the response path at the gateway |
Rule Structure
Each entry in the rules array must include:
| Field | Required | Description |
|---|---|---|
name |
Yes | Rule identifier (e.g. RF-ZIPCODE-MISSING) |
condition |
Yes | Boolean expression evaluated at the gateway |
set.headers |
Yes | HTTP headers returned when the condition matches |
set.status-code |
Yes | HTTP status code returned (e.g. 400) |
set.payload |
Yes | JSON error body returned to the client |
Default Request Template Example
{
  "rules": [
    {
      "name": "RF-ZIPCODE-MISSING",
      "set": {
        "headers": {
          "content-type": "application/json"
        },
        "status-code": "400",
        "payload": {
          "code": "invalid-data",
          "reason": "ZIPCODE_MISSING",
          "message": "request data is invalid format"
        }
      },
      "condition": "(req.queryparams.zipcode == null || req.payload.id != 123)"
    }
  ]
}
Note
The default template may include null in the sample condition. The platform validator does not support null literals — update conditions to use supported comparators and references before saving.
Default Response Template Example
{
  "rules": [
    {
      "name": "RF-ZIPCODE-MISSING",
      "set": {
        "headers": {
          "content-type": "application/json"
        },
        "status-code": "400",
        "payload": {
          "code": "invalid-data",
          "reason": "ZIPCODE_MISSING",
          "message": "request data is invalid format"
        }
      },
      "condition": "(res.statusCode == 400)"
    }
  ]
}
Condition Syntax
| Element | Supported Values |
|---|---|
| Comparators | ==, !=, >, <, >=, <= |
| Boolean operators | &&, \|\| |
| Grouping | Parentheses ( ) |
| Literals | true, false, numbers, quoted strings |
Request Context Conditions
Each statement separated by && or || must reference one of:
req.queryparamsreq.payloadreq.headers
Example: (req.headers.Authorization == 'invalid')
Response Context Conditions
Each statement separated by && or || must reference a res.* attribute.
res.queryparamsis not allowed in response conditions.
Example: (res.statusCode == 400)
Validation Rules
| Rule | Description |
|---|---|
| Valid JSON | Configuration must be valid JSON |
rules array |
At least one rule is required in configuration.rules |
Rule name |
Each rule must have a non-empty name |
Rule condition |
Each rule must have a non-empty condition with valid syntax |
No null literal |
null is not supported in conditions |
set object |
Each rule must include headers, status-code, and a non-empty payload object |
| Context match | Request conditions must use req.*; response conditions must use res.* |
Note
- Click the Expand icon to open the editor in full-screen mode (Configure Raise Fault).
- Use Save and Close in the expanded editor to apply changes.
Step-by-Step Implementation
Method 1: Creating Raise Fault from the Endpoint Tab
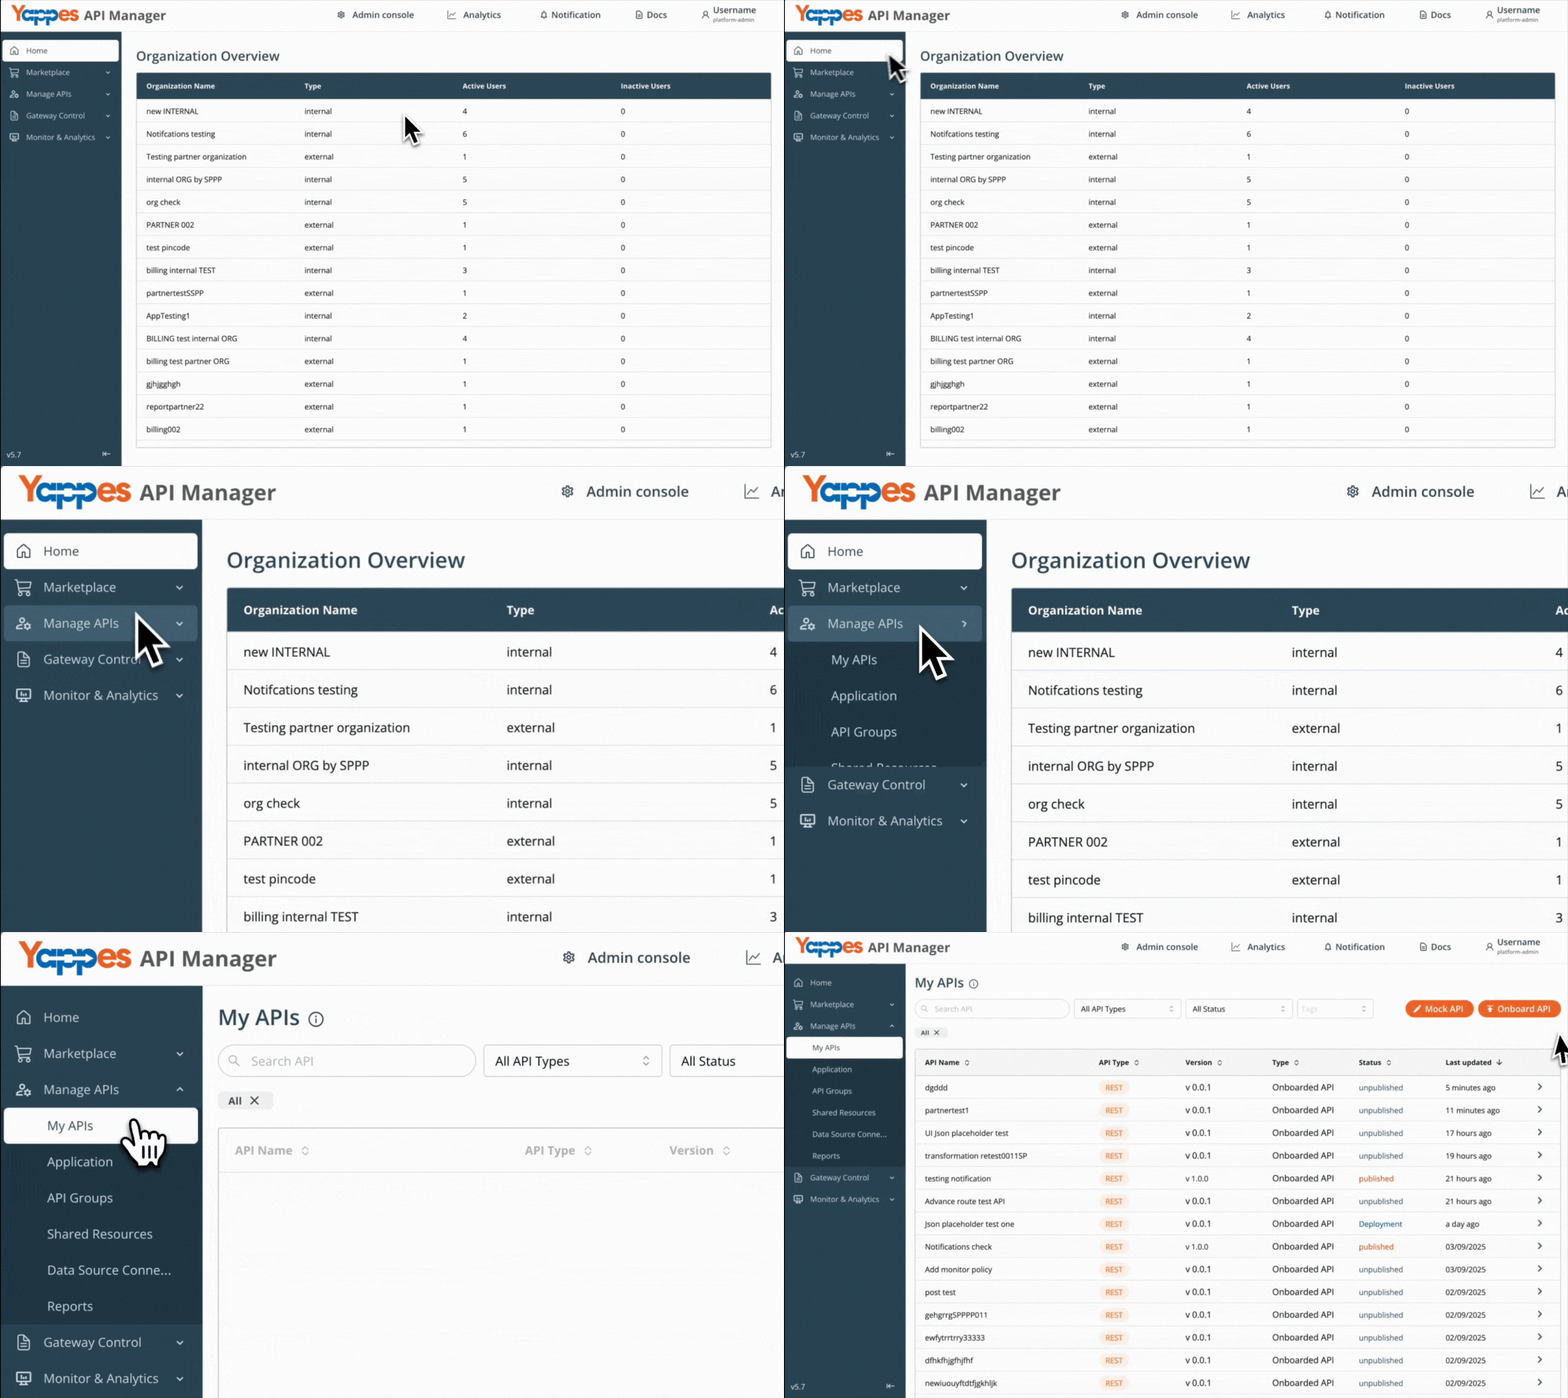
Step 1: Navigate to API Manager
- Click on
Manage APIsin the main dashboard. - Select
My APIsfrom the submenu.
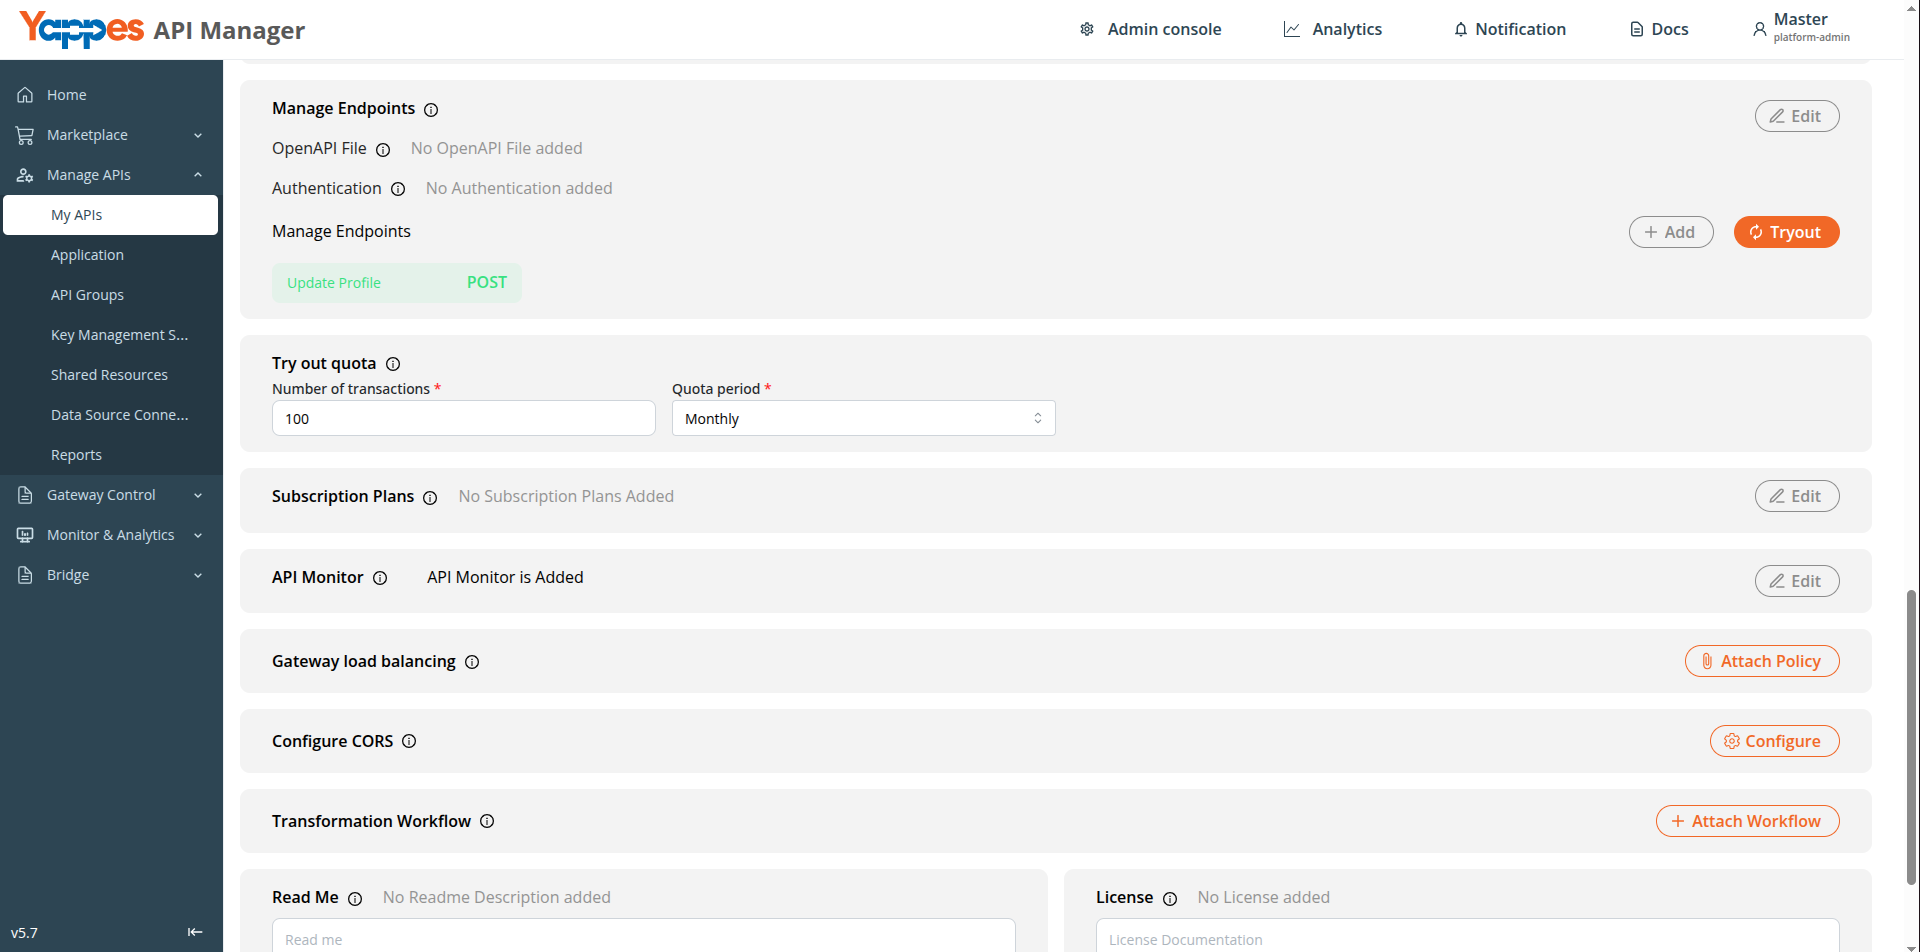
Step 2: Open Your API and Select an Endpoint
- For a new API, onboard from My APIs using the guide for your API type, then open endpoint details.
- For an existing API, select it from
My APIsand click the target endpoint.
Step 3: Open Raise Fault Tab
- Click the
Raise Faulttab on the endpoint details panel. - Click
Create Raise Faultto create a new policy, orEdit/Viewon an existing attached policy.
Step 4: Enter Policy Details
- Enter a descriptive
Policy name(e.g.MissingZipcodeRequestFault). - Add a
Description(max 500 characters). Select APIand endpoint fields are read-only.
Step 5: Select Context Type and Configure Rules
- Select
Context type—RequestorResponse. - Edit
Configurationin the JSON editor. Refer to Raise Fault Configuration for rule structure and condition syntax.
Step 6: Save the Policy
- Review the configuration.
- Click
Save(orCreatewhen creating). Expected Result: The policy is attached to the endpoint.
Info
Each endpoint can have one Request and one Response Raise Fault policy attached.
The Create Raise Fault button is hidden when both contexts are already attached. Create Raise Fault is disabled when the API is published.
Method 2: Creating Raise Fault from Gateway Policies Page
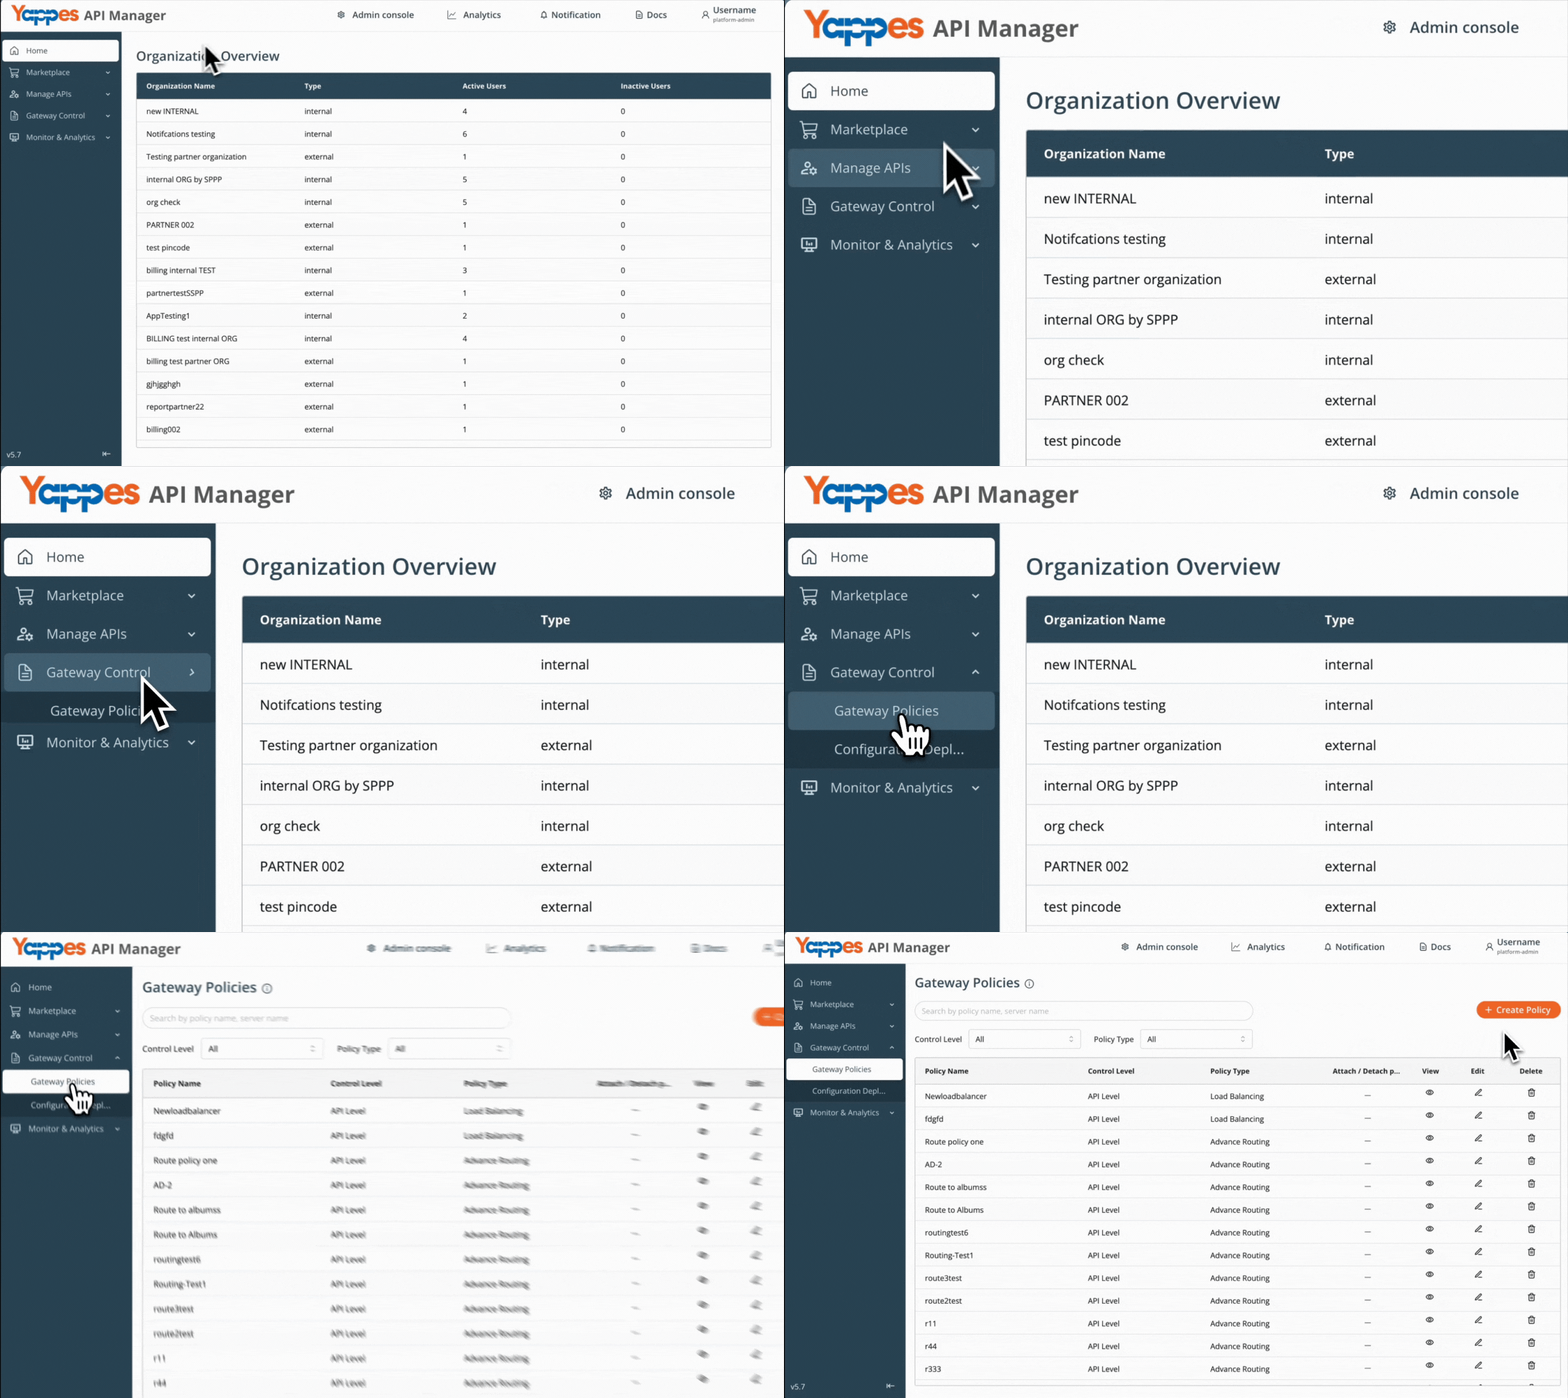
Step 1: Navigate to Gateway Policies
- Locate
Gateway Control → Gateway Policiesin the main navigation menu.
Step 2: Configure Policy Settings
- Click
Create Policy. - Select the appropriate
Control Levelbased on where the policy is required: API Level— Applies Raise Fault to a specific API endpoint at creation.Subscription Level— Creates a reusable policy for attachment to consumer subscription endpoints.- In
Policy Type, selectRaise Fault.
For general policy creation guidance, see Creating a policy (w/edit and delete).
Step 3: Define Policy Details
- Enter
Policy NameandDescription.
Step 4: Select API and Endpoint (API Level Only)
- If
Control Levelis set toAPI Level: - Select the target
APIandSource endpoint. - If
Control Levelis set toSubscription Level: - No API or endpoint selection is required.
Step 5: Select Context Type and Configure Rules
- Select
Context type—RequestorResponse. - Edit
Configurationin the JSON editor. Refer to Raise Fault Configuration for details.
Info
At Subscription Level, both Request and Response context types are available during policy creation. Attach each context policy to the intended endpoints in Manage Subscriptions.
Step 6: Create the Policy
- Review all settings.
- Click
Create Policy.
Success
The Raise Fault policy is successfully created.
Attaching Raise Fault Policy to Subscriptions
Use this flow when you created a policy with Control Level set to Subscription Level in Gateway Policies.
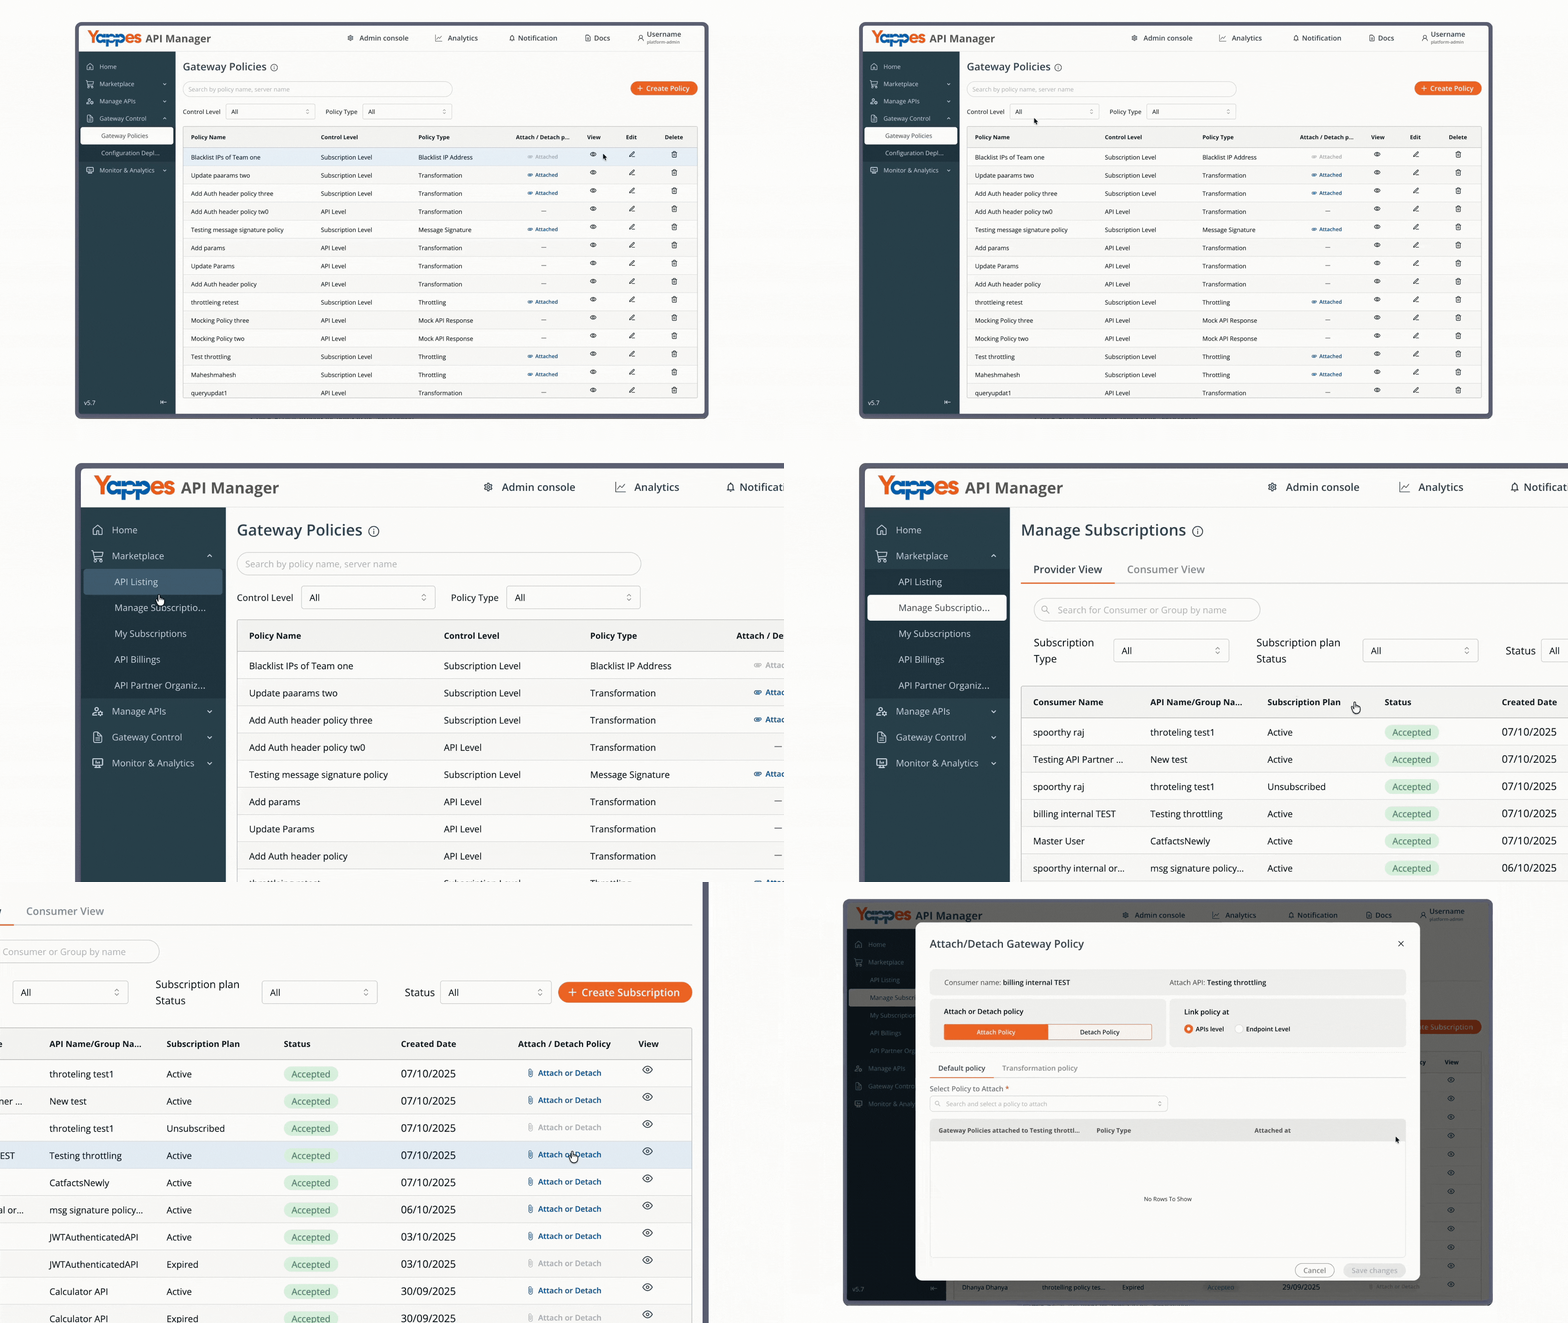
Step 1: Navigate to Manage Subscriptions
- From the main menu, click
Manage Subscriptions. - The
Manage Subscriptionspage displays a list of all API subscriptions. - Locate the subscription where you want to apply the Raise Fault policy.
Step 2: Open the Policy Attachment Dialog
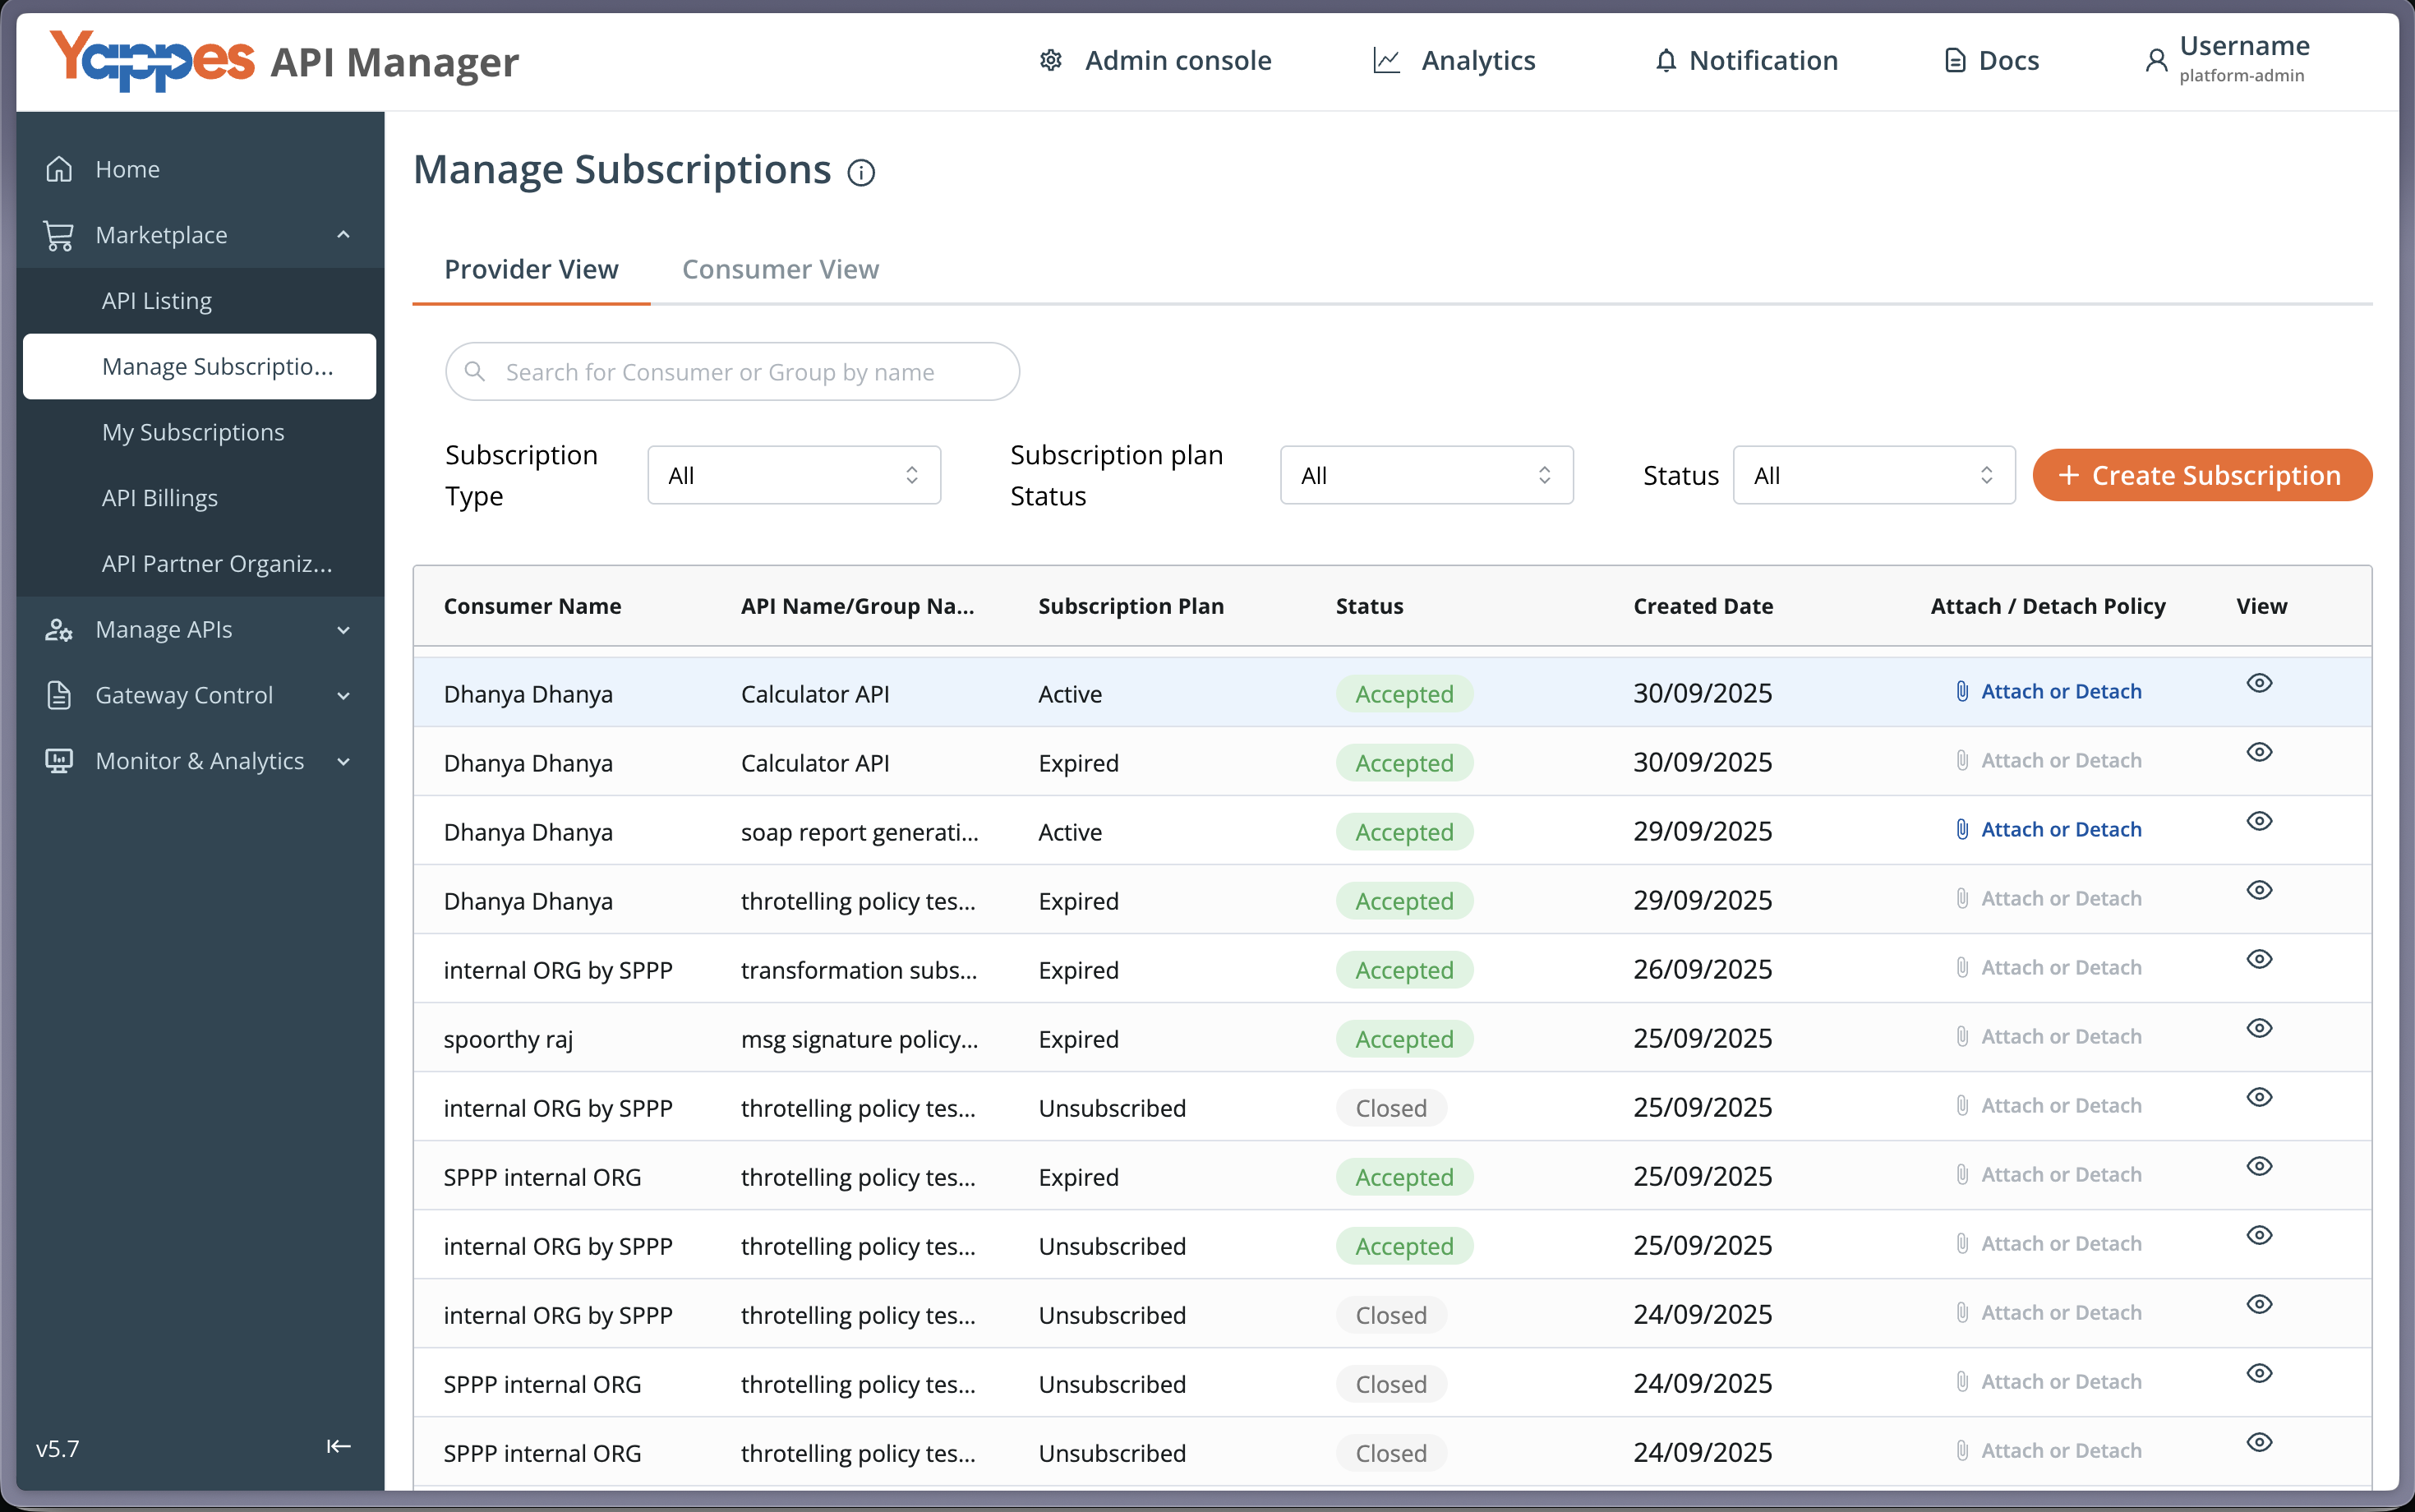
- Click
Attach or Detachfor the relevant subscription. - The policy attachment dialog opens.
Step 3: Select Endpoint Level
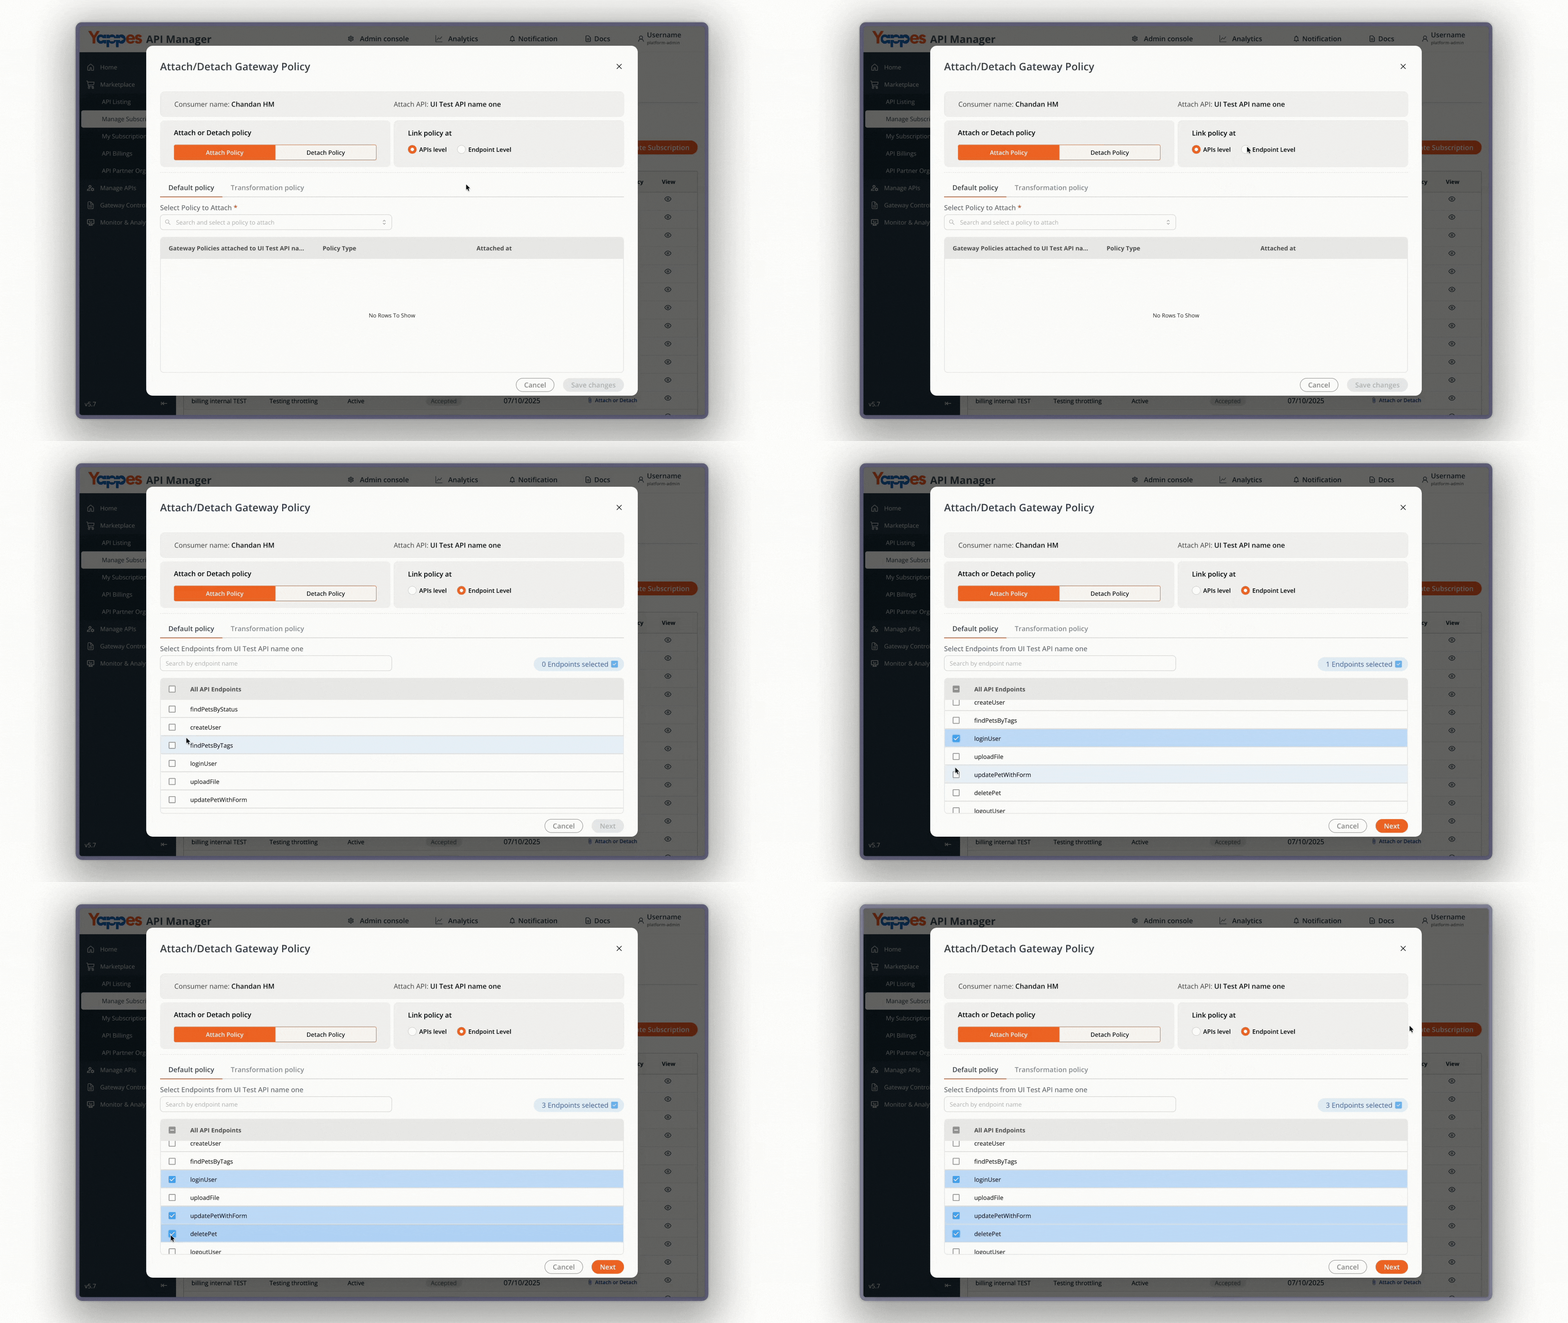
- In the
Attach Policytab, selectEndpoint Level.
Step 4: Select Endpoints
- Select one or more endpoints from the list.
- After selecting endpoints, proceed to the policy selection step.
For general attach and detach steps, see Manage Subscriptions — Attach/Detach Gateway Policies.
Step 5: Select and Attach the Policy
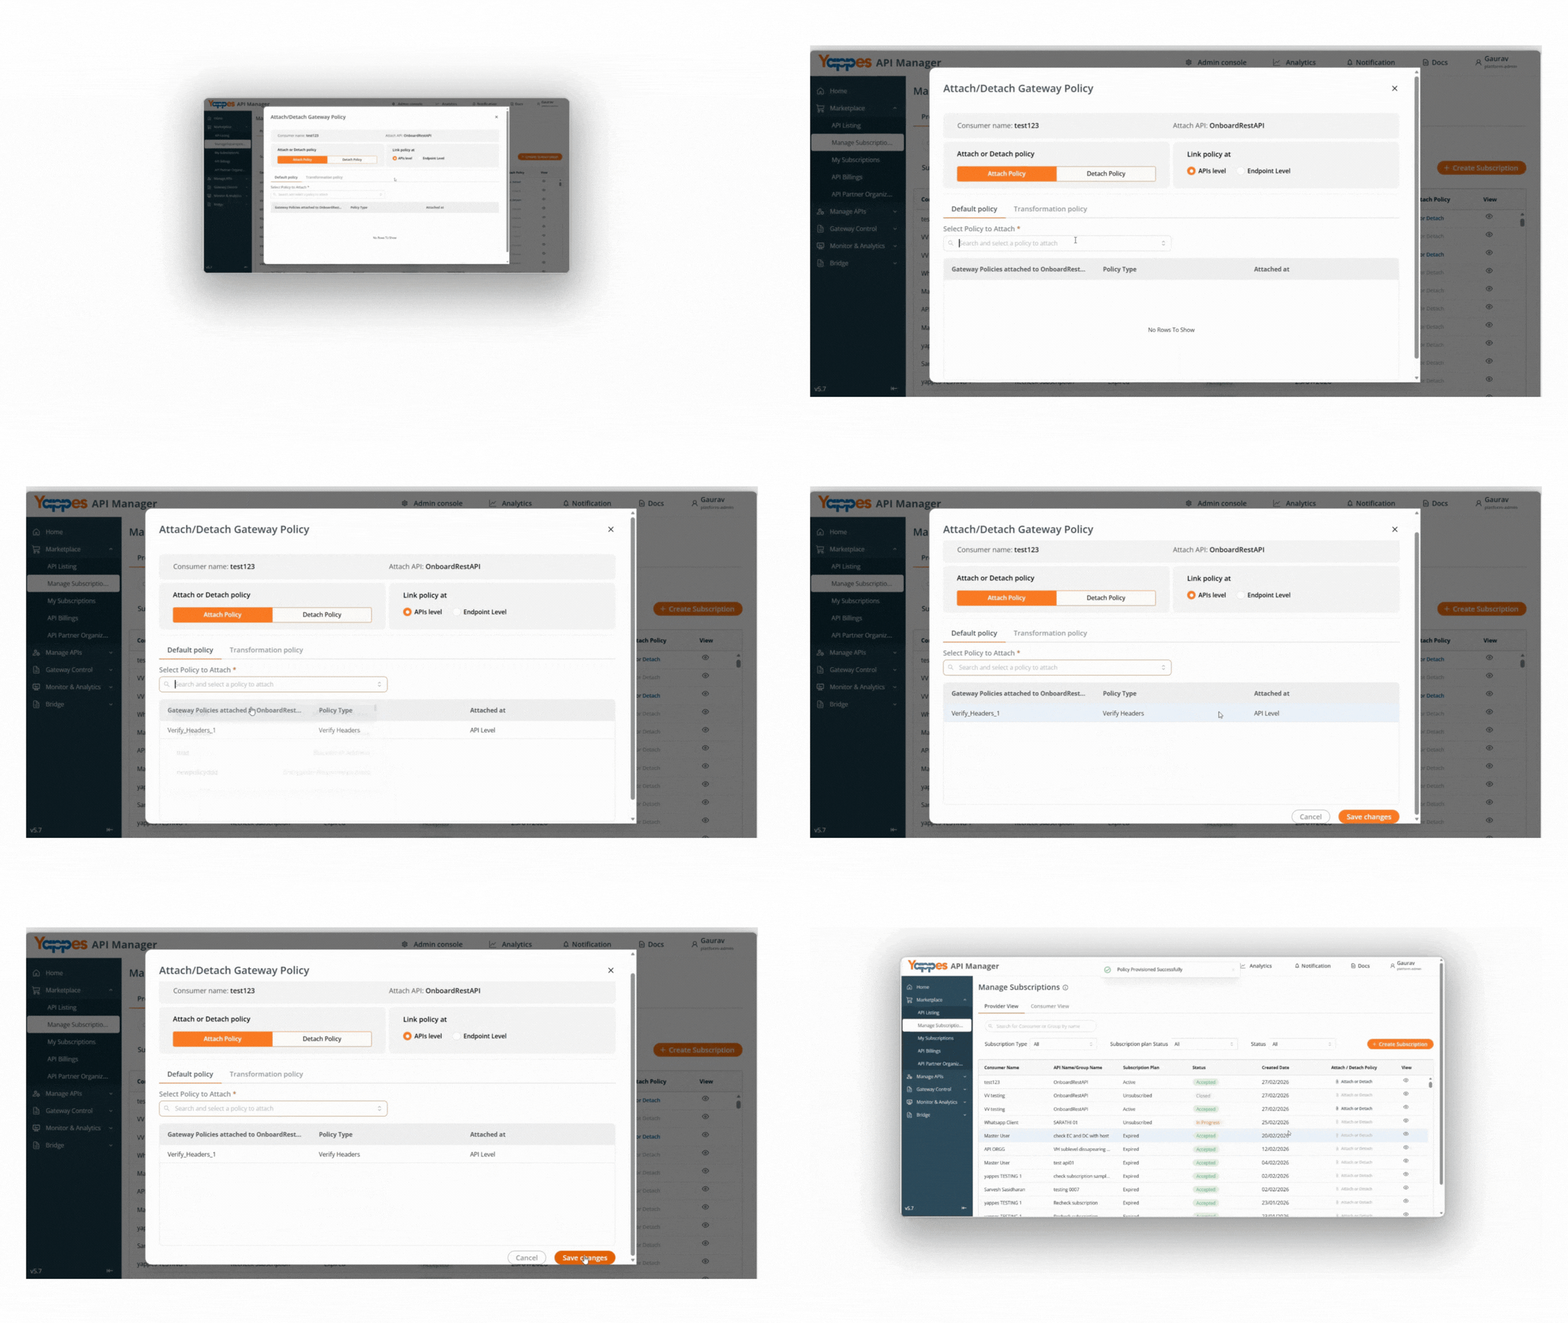
- In
Select Policy to Attach, choose your subscription-level Raise Fault policy (RequestorResponse). - Click
Save Changesto apply the policy to the selected endpoints.
Note
- Attach
RequestandResponsepolicies separately when both contexts are needed. - Each endpoint supports at most one Request and one Response Raise Fault policy.
- Only one policy of the same type can be attached to a subscription at a time. Detach the existing policy before attaching a replacement.
Understanding the Interface
| Component | Description |
|---|---|
| Policy Name | Identifies the Raise Fault policy |
| Description | Documents the policy purpose |
| Context type | Request or Response — when rules are evaluated |
| Configuration | JSON editor for fault rules |
| Control Level | API Level (single endpoint at creation) or Subscription Level (attach via Manage Subscriptions) |
Control Level Summary
| Control Level | API/Endpoint at Creation | Attach Path |
|---|---|---|
| API Level | Required | Endpoint tab or Gateway Policies (auto-attached to selected endpoint) |
| Subscription Level | Not required | Manage Subscriptions → Endpoint Level |
Configuration and Settings
Required Configuration Fields
| Field | Requirement | Description |
|---|---|---|
| Policy Name | Mandatory | Min 3 characters; must start with a letter |
| Description | Optional | Max 500 characters |
| Control Level | Mandatory | API Level or Subscription Level |
| API Selection | Mandatory at API Level | Target API; not required at Subscription Level |
| Endpoint Selection | Mandatory at API Level | Target endpoint; not required at Subscription Level |
| Context type | Mandatory | Request or Response |
| Configuration | Mandatory | Valid JSON with at least one rule in rules |
Info
Each endpoint supports at most one Request and one Response Raise Fault policy.
Best Practices for Configuration
| Best Practice | Benefit |
|---|---|
| Use separate Request and Response policies when fault logic differs | Clearer control per execution phase |
| Use descriptive rule names | Easier troubleshooting and policy management |
| Keep fault payloads aligned with your API error contract | Consistent client experience |
Avoid null in conditions |
Passes platform validation |
| Test rules in non-production before rollout | Reduces risk of blocking legitimate traffic |
| Prefer built-in policies when they fit | Simpler to maintain than custom fault rules |
What Happens When a Rule Matches
If Raise Fault evaluates a rule and the condition matches:
- The gateway returns the configured status-code, headers, and payload
- For Request context, the backend service may not be invoked
- For Response context, the configured fault response is returned on the response path
- The event is logged for monitoring and audit purposes
Verification and Testing
After configuring Raise Fault:
- Send a request that does not match any rule and confirm normal API behavior.
- Send a request or response that matches a rule condition and confirm the gateway returns the configured fault.
- Verify Request and Response policies apply independently when both are configured.
- Confirm rules apply to the selected endpoint.
Troubleshooting
| Issue | Possible Cause | Resolution |
|---|---|---|
| Create Raise Fault button disabled | API is published | Use Gateway Policies to create or edit policies |
| Create button not visible | Both Request and Response policies already attached | Edit or delete an existing policy, or choose the other context |
| Configuration save fails | Invalid JSON or rule validation error | Fix errors shown in the editor (syntax, missing fields, invalid condition) |
null is not supported error |
Condition uses null literal |
Rewrite the condition without null |
| Request condition rejected | Statement does not use req.queryparams, req.payload, or req.headers |
Update each && / \|\| segment to reference allowed request attributes |
| Response condition rejected | Uses res.queryparams or missing res.* reference |
Use allowed res.* attributes only |
| Context type disabled | That context is already attached to the endpoint | Choose the other context or edit the existing policy |
| Policy not listed in Manage Subscriptions | Wrong attach scope or policy not subscription-level | Create with Subscription Level and use Endpoint Level attach |
Impact of Policy Changes
- Adding or tightening conditions may cause previously accepted traffic to receive fault responses.
- Changing status codes or payloads affects client error handling immediately.
- Removing rules may allow traffic that previously received fault responses to proceed.
- Always test updates in non-production before deploying to production.
Frequently Asked Questions
How many Raise Fault policies can I attach per endpoint?
One Request and one Response policy per endpoint.
Is Raise Fault available at subscription level?
Yes. Create the policy with Control Level set to Subscription Level in Gateway Policies, then attach it via Manage Subscriptions at Endpoint Level. See Attaching Raise Fault Policy to Subscriptions.
Can I create or edit a policy from the endpoint tab after the API is published?
No. On the endpoint Raise Fault tab, create and edit are disabled when the API is published. Use Gateway Policies to manage existing policies.
What is the difference between Request and Response context?
Request rules evaluate req.queryparams, req.payload, and req.headers before or during request handling. Response rules evaluate res.* attributes on the response path.
What is the difference between Raise Fault and Schema Validation?
Schema Validation enforces payload structure against a schema. Raise Fault returns custom error responses when configurable conditions match.
What is the difference between Raise Fault and Custom Plugin?
Custom Plugin runs Go code at the gateway. Raise Fault uses JSON rules with conditions and predefined fault responses — no custom code required.
Pro Tip
Raise Fault in Yappes returns custom error responses from the API Gateway when rule conditions match. Start with the default template for your Context type, replace sample conditions with validated expressions, and attach separate Request and Response policies where needed.