CORS (Cross Origin Resource Sharing) Policy
Overview
CORS (Cross Origin Resource Sharing) allows you to control which browser-based applications can access your API from a different origin (domain, protocol, or port). When a web application makes a cross-origin request, the browser enforces CORS rules before allowing the response to be read by client-side JavaScript.
On the Yappes platform, CORS is enforced at the API Gateway as a gateway policy. You define which origins, HTTP methods, and headers are permitted, and optionally configure the gateway to handle browser preflight OPTIONS requests directly. This ensures consistent cross-origin behavior without requiring every backend service to implement CORS independently.
CORS on Yappes is available only at the API level — it applies to the entire API and is not configurable at the subscription or endpoint level. The feature integrates into the API management workflow with two flexible implementation paths:
- You can configure it from the Configure CORS section on your API page — during initial setup or anytime after onboarding
- Or create it separately through the Gateway Policies page at any time
Only one CORS policy can be attached to each API.
Prerequisites
Before implementing CORS on the Yappes platform, ensure you have:
Required Access & Permissions
- Active Yappes Enterprise account with API Manager access
- Permission to create and manage gateway policies
- Access to onboard new APIs or modify existing ones
Setup Requirements
- An API already created or in the onboarding process
- A list of allowed frontend origins (e.g.,
https://app.example.com) - The HTTP methods your browser clients will use (GET, POST, PUT, PATCH, DELETE)
- The custom request and response headers your application requires
Custom error and message
For error scenarios, you can override the default HTTP status code, error code, and message. See Custom Error and Message.
Step-by-Step Implementation
Method 1: Creating CORS During API Onboarding
Step 1: Navigate to API Management
- Click
Manage APIsin the main dashboard - Select
My APIsfrom the submenu - You should now see your API management interface
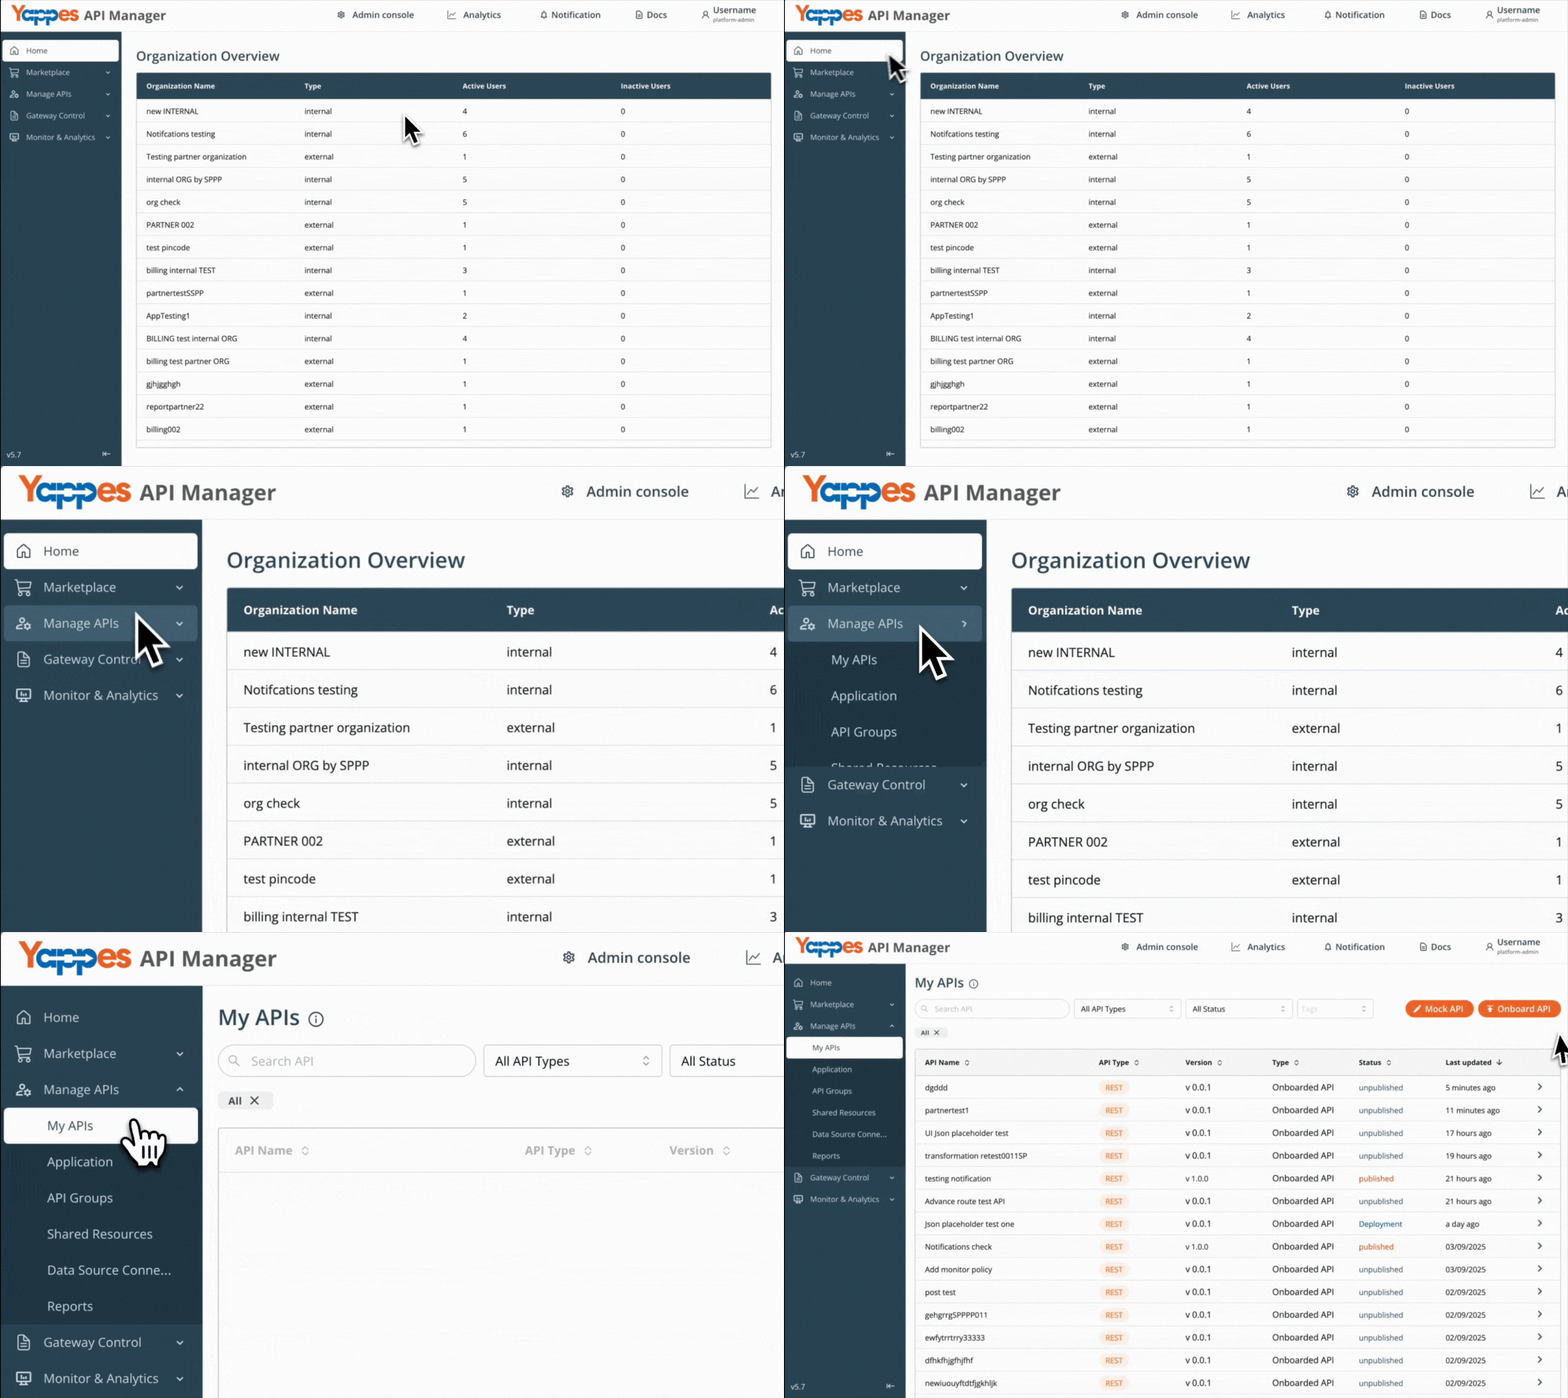
Step 2: Initiate API Onboarding
- Onboard from My APIs using the guide for your API type to reach
Step 3.
Step 3: Open Configure CORS
- Locate the
Configure CORSsection on the API onboarding page - If no policy exists, click the
Configurebutton - If a policy already exists, review the
Configured policydetails and clickEditto modify it (orDeleteto remove it) - Click
ConfigureorEditto open theConfigure Gateway CORS Policymodal
Step 4: Enter Policy Metadata
- In the
Policy namefield, enter a descriptive name (e.g.,MyApiCorsPolicy) - Add a detailed description in the
Descriptionfield (max 500 characters) - The
Select APIfield displays your current API name (read-only)
Step 5: Configure CORS Settings
- Configure the CORS fields described in Understanding the Interface below
Step 6: Create and Save Policy
- Review all policy settings
- Click
Create policy Expected Result: CORS policy is created and attached to your API; a success message confirms creation
Method 2: Creating CORS from Gateway Policies Page
Step 1: Navigate to Gateway Policies
- Locate
Gateway Control → Gateway Policiesin the main navigation menu - The policies management interface will display
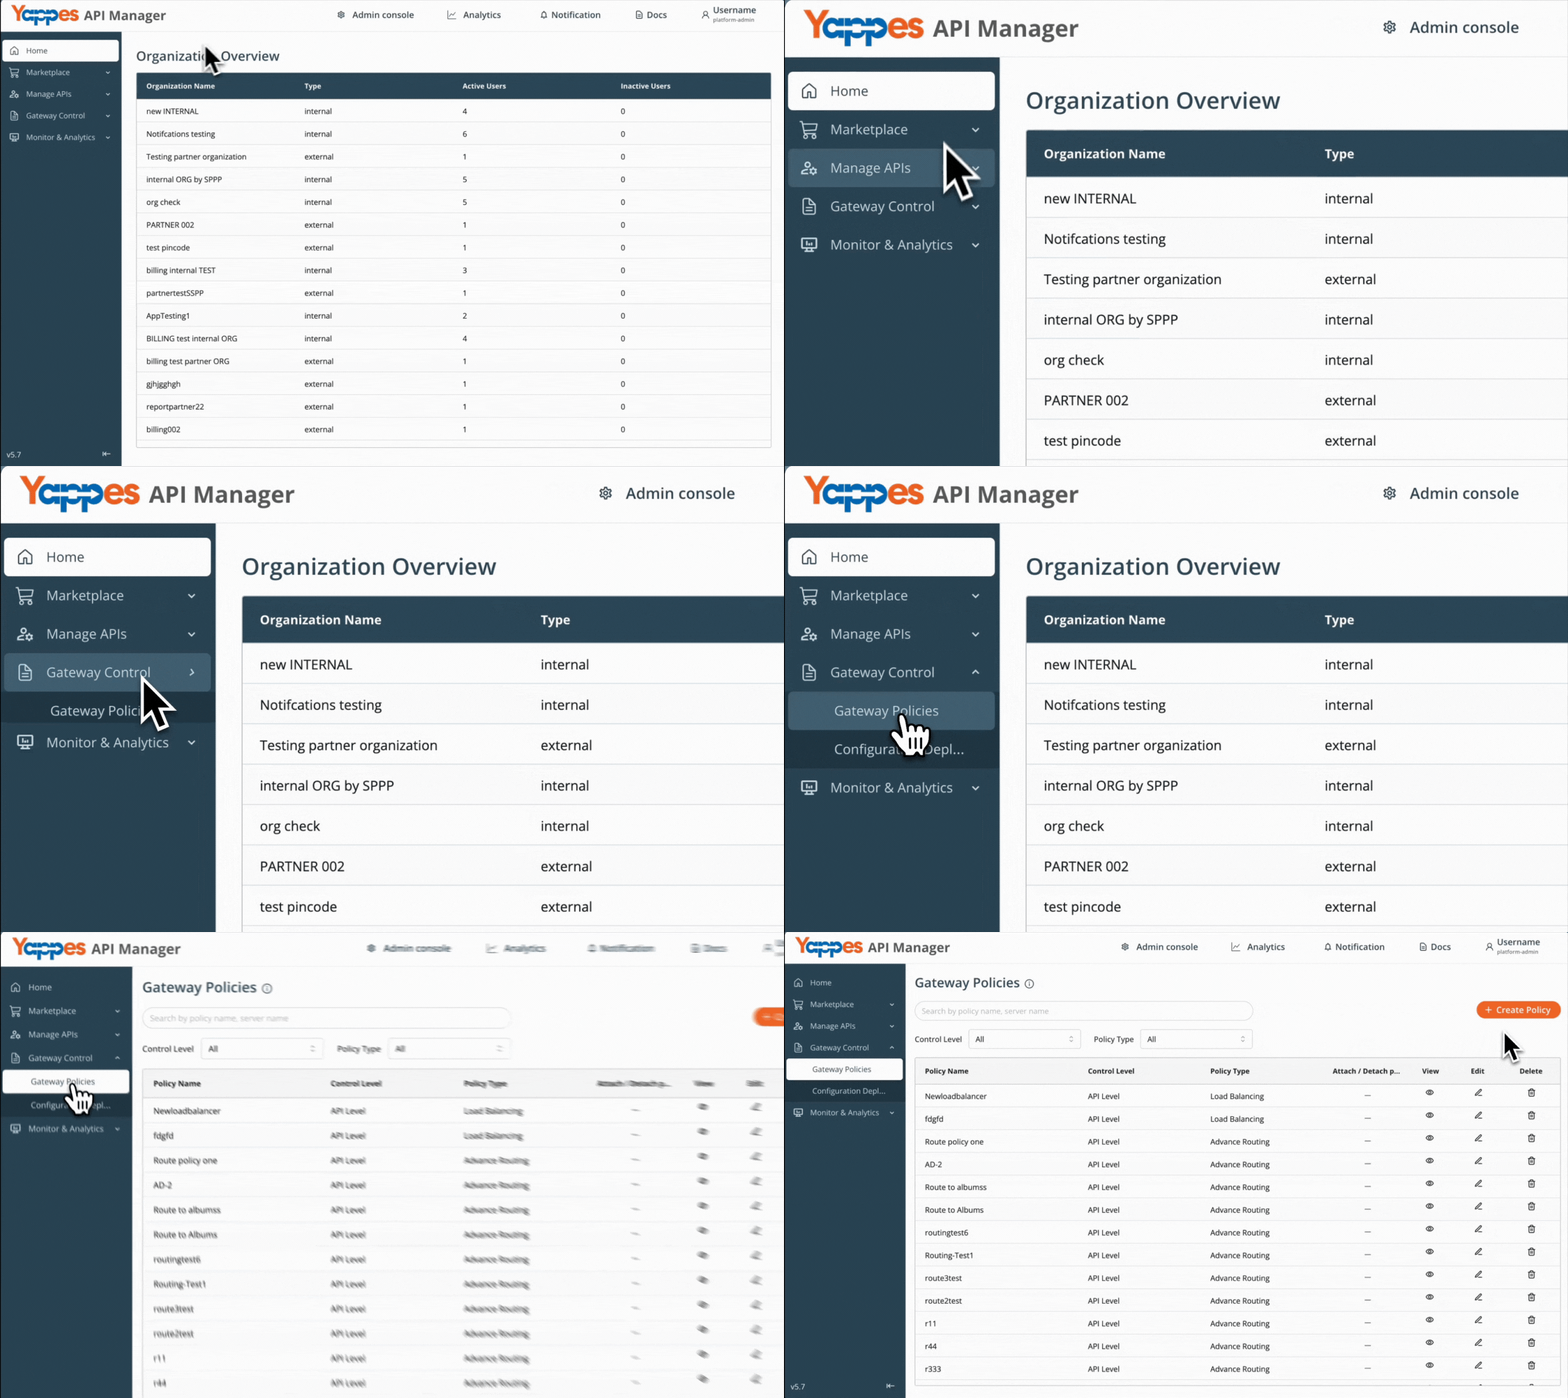
Step 2: Create API-Level CORS Policy
- Click
Create policyfrom the gateway page - Set the
Control LeveltoAPI Level - In the
Policy Typedropdown, selectCORS - Cross Origin Resource Sharing
For general policy creation guidance, see Creating a policy (w/edit and delete).
Step 3: Enter Policy Metadata
- In the
Policy Namefield, enter a descriptive name (e.g.,MyApiCorsPolicy) - Add a detailed description in the text area field to document the policy purpose
Step 4: Select Target API
- Select the target
APIfrom the dropdown list - The platform checks whether a CORS policy already exists for the selected API
- If a policy already exists, you will see:
"CORS policy is already attached to this API. Only one CORS policy is allowed per API. Please select a different API to attach a new policy." - Select a different API, or edit the existing CORS policy instead
Step 5: Configure CORS Settings
- If no existing CORS policy is found for the API, configure the CORS fields
- See Understanding the Interface for field details
Step 6: Create Policy
- Review all policy settings
- Click
Create Policy Expected Result: CORS policy is created at the API level
Understanding the Interface
The CORS configuration form consists of several key sections:
| Section | UI Label | Purpose |
|---|---|---|
| Policy metadata | Policy name, Description, Select API | Identifies the policy and scopes it to one API |
| Error handling | Continue on error | Allows the request to proceed to the backend even if CORS evaluation fails |
| Origins | Origins allowed | Lists domains permitted to access the API; * allows all origins |
| Wildcard origins | Origins patterns - Wildcard | Defines subdomain patterns (e.g., https://*.domain.com) |
| Methods | Methods allowed | HTTP methods permitted: GET, POST, PUT, PATCH, DELETE |
| Request headers | Allowed Headers | Headers the browser may include in requests (e.g., Authorization) |
| Response headers | Exposed Headers | Headers exposed to client-side scripts (e.g., X-Custom-Header) |
| Credentials | Allow Cookies/Auth | Sends cookies and authorization headers in cross-origin requests |
| Preflight | Handle Preflight | Gateway responds to OPTIONS preflight requests directly |
| Preflight cache | Preflight cache duration | How long the browser caches preflight results (seconds; -1 disables caching) |
Note
Do not include the default headers (Accept, Accept-Language, Content-Language, Content-Type) in your CORS configuration. Browsers handle these automatically.
Configuration and Settings
Field Validation Rules
| Field | Rules |
|---|---|
| Policy name | Required; minimum 3 characters; must start with a letter |
| Description | Maximum 500 characters |
| Methods allowed | At least one method required |
| Allowed Headers | At least one header required |
| Exposed Headers | At least one exposed header required |
| Origins allowed | Each entry must be * or a valid http:// / https:// URL |
| Origins patterns | Must match a pattern like https://*.domain.com or https://domain.com |
| Preflight cache duration | Required when Handle Preflight is enabled; must be -1 or 0 or greater |
Origins and Wildcard Behavior
- Type an origin URL and press Enter to save it as a tag
- Enter
*and press Enter to allow requests from all origins *cannot be combined with specific origin URLs- Origins patterns - Wildcard is disabled when
*is set in Origins allowed - On save, the API base URL is automatically included in allowed origins (unless
*is used and the base URL is already listed)
CORS Configuration: Best Practices
| Scenario | Recommendation |
|---|---|
| Public API | Use specific origins; avoid * in production |
| Multiple subdomains | Use Origins patterns - Wildcard (e.g., https://*.example.com) |
| Authenticated SPA | Enable Allow Cookies/Auth and list the exact frontend origin |
| Preflight-heavy APIs | Enable Handle Preflight with a sensible cache duration |
| Development | Use specific dev origins (e.g., http://localhost:3000) rather than * when possible |
Verification and Testing
Confirming Successful Implementation
Check Policy Status
- Navigate to your API page in My APIs and confirm the Configured policy section displays your CORS settings
- Or navigate to Gateway Policies and confirm the policy appears with API Level control and type CORS
Test from an Allowed Origin
- Send a request from a browser or tool simulating an allowed origin
- Verify the response includes appropriate
Access-Control-*headers - Confirm the browser allows the client-side application to read the response
Test from a Disallowed Origin
- Send a request from an origin not listed in Origins allowed
- Confirm the browser blocks access to the response (unless Continue on error is enabled)
Validate Preflight Behavior
- If Handle Preflight is enabled, send an
OPTIONSrequest with the expected preflight headers - Confirm the gateway responds to the preflight without forwarding it to the backend
- Verify
Access-Control-Max-Agereflects your Preflight cache duration setting
Success Indicators
- Allowed origins can call the API without CORS errors in the browser console
- Disallowed origins are blocked as expected
- Preflight OPTIONS requests receive correct gateway responses
- Policy details match your configured origins, methods, and headers
Troubleshooting
Common Issues and Solutions
| Issue | Symptoms | Solution |
|---|---|---|
| Cannot create second CORS policy | Info message when selecting an API | Only one CORS policy per API is allowed; edit the existing policy or select a different API |
| Wildcard + specific origins | Error: "All origins are already allowed. Remove * to add specific origins." | Remove * from Origins allowed before adding specific origin URLs |
| Origin patterns disabled | Origins patterns - Wildcard field is greyed out | Patterns are unavailable when Origins allowed is *; remove * to use patterns |
| Browser still blocked | CORS errors in browser developer tools | Verify the origin URL matches exactly (scheme, host, port); confirm methods and headers are listed in the policy |
| Preflight fails | OPTIONS request returns an error | Enable Handle Preflight and set a valid Preflight cache duration (-1 or 0 or greater) |
Error Messages Guide
- "CORS policy is already attached to this API": Select a different API or edit the existing CORS policy
- "All origins are already allowed. Remove * to add specific origins.": Remove the
*wildcard before adding specific URLs - "At least one method is required" / "At least one header is required": Add at least one entry to Methods allowed, Allowed Headers, and Exposed Headers
❓ Frequently Asked Questions
Can I attach more than one CORS policy to the same API?
No. Only one CORS policy is allowed per API. Edit the existing policy or select a different API to create a new one.
Can CORS be configured at subscription or endpoint level?
No. CORS is available only at API Level. It is not listed as a subscription-level or endpoint-level policy type in the Gateway Policies UI.
What does * mean in Origins allowed?
It allows requests from all origins. When * is set, Origins patterns - Wildcard is disabled, and * cannot be combined with specific origin URLs.
Is my API base URL added automatically?
Yes. On save, the API base URL is automatically included in Origins allowed unless * is used and the base URL is already listed.
Should I add default headers like Content-Type to Allowed Headers?
No. The platform warns against including default headers (Accept, Accept-Language, Content-Language, Content-Type). Browsers handle these automatically in CORS requests.
When should I enable Handle Preflight?
Enable it when browsers send OPTIONS preflight requests — for example, when using custom headers or non-simple HTTP methods. The gateway responds to preflight directly instead of forwarding OPTIONS to the backend.
What value should I use for Preflight cache duration?
Use a number of seconds (0 or greater) to tell the browser how long to cache preflight results, or -1 to disable caching. This field is required only when Handle Preflight is enabled.
What does Continue on error do?
If enabled, the request proceeds to the backend even when CORS evaluation fails due to misconfiguration. Use with caution in production environments.
What does Allow Cookies/Auth do?
It enables cookies and authorization headers in cross-origin requests. Browsers require an explicit origin (not *) when credentials are included.
Does CORS replace API authentication?
No. CORS controls which browser origins can access your API responses. It does not authenticate or authorize API consumers.
Pro Tip
CORS enforces cross-origin access rules at the API Gateway. Start with explicit allowed origins in production, enable Handle Preflight for browser-heavy APIs, and avoid * unless the API is intentionally public.