Load Balancing Policy
Overview
The Yappes Load Balancer allows you to distribute incoming API requests across multiple backend servers so you can achieve optimal resource utilization, maximize throughput, minimize response time, and avoid server overload.
This enterprise-grade feature enables intelligent traffic distribution using sophisticated algorithms like Round Robin, IP Hash, and Least Connection, ensuring your APIs remain highly available and performant even under heavy load conditions. The Load Balancer integrates seamlessly into the Yappes API management workflow, providing two flexible implementation paths:
- You can configure it during API onboarding for immediate load distribution
- Or create it separately through the Gateway Policies page
By implementing load balancing, you'll improve application reliability, enable horizontal scaling of your backend infrastructure, and provide better user experiences through reduced latency and increased uptime. This feature fits naturally into typical Yappes workflows by acting as a gateway policy that intercepts API traffic before it reaches your backend servers, intelligently routing each request based on your chosen algorithm and server availability.
Prerequisites
Before implementing Load Balancer on the Yappes platform, ensure you have:
Required Access & Permissions
- Active Yappes Enterprise account with API Manager access
- Permission to create and manage gateway policies
- Access to onboard new APIs or modify existing ones
Setup Requirements
- At least 2 backend servers configured and accessible
- Server details ready: hostnames, IP addresses, protocols, and ports
- Understanding of your API traffic patterns for algorithm selection
Custom error and message
For error scenarios, you can override the default HTTP status code, error code, and message. See Custom Error and Message.
Step-by-Step Implementation
Method 1: Creating Load Balancer During API Onboarding
Step 1: Navigate to API Management
- Click
Manage APIsin the main dashboard - Select
My APIsfrom the submenu - You should now see your API management interface
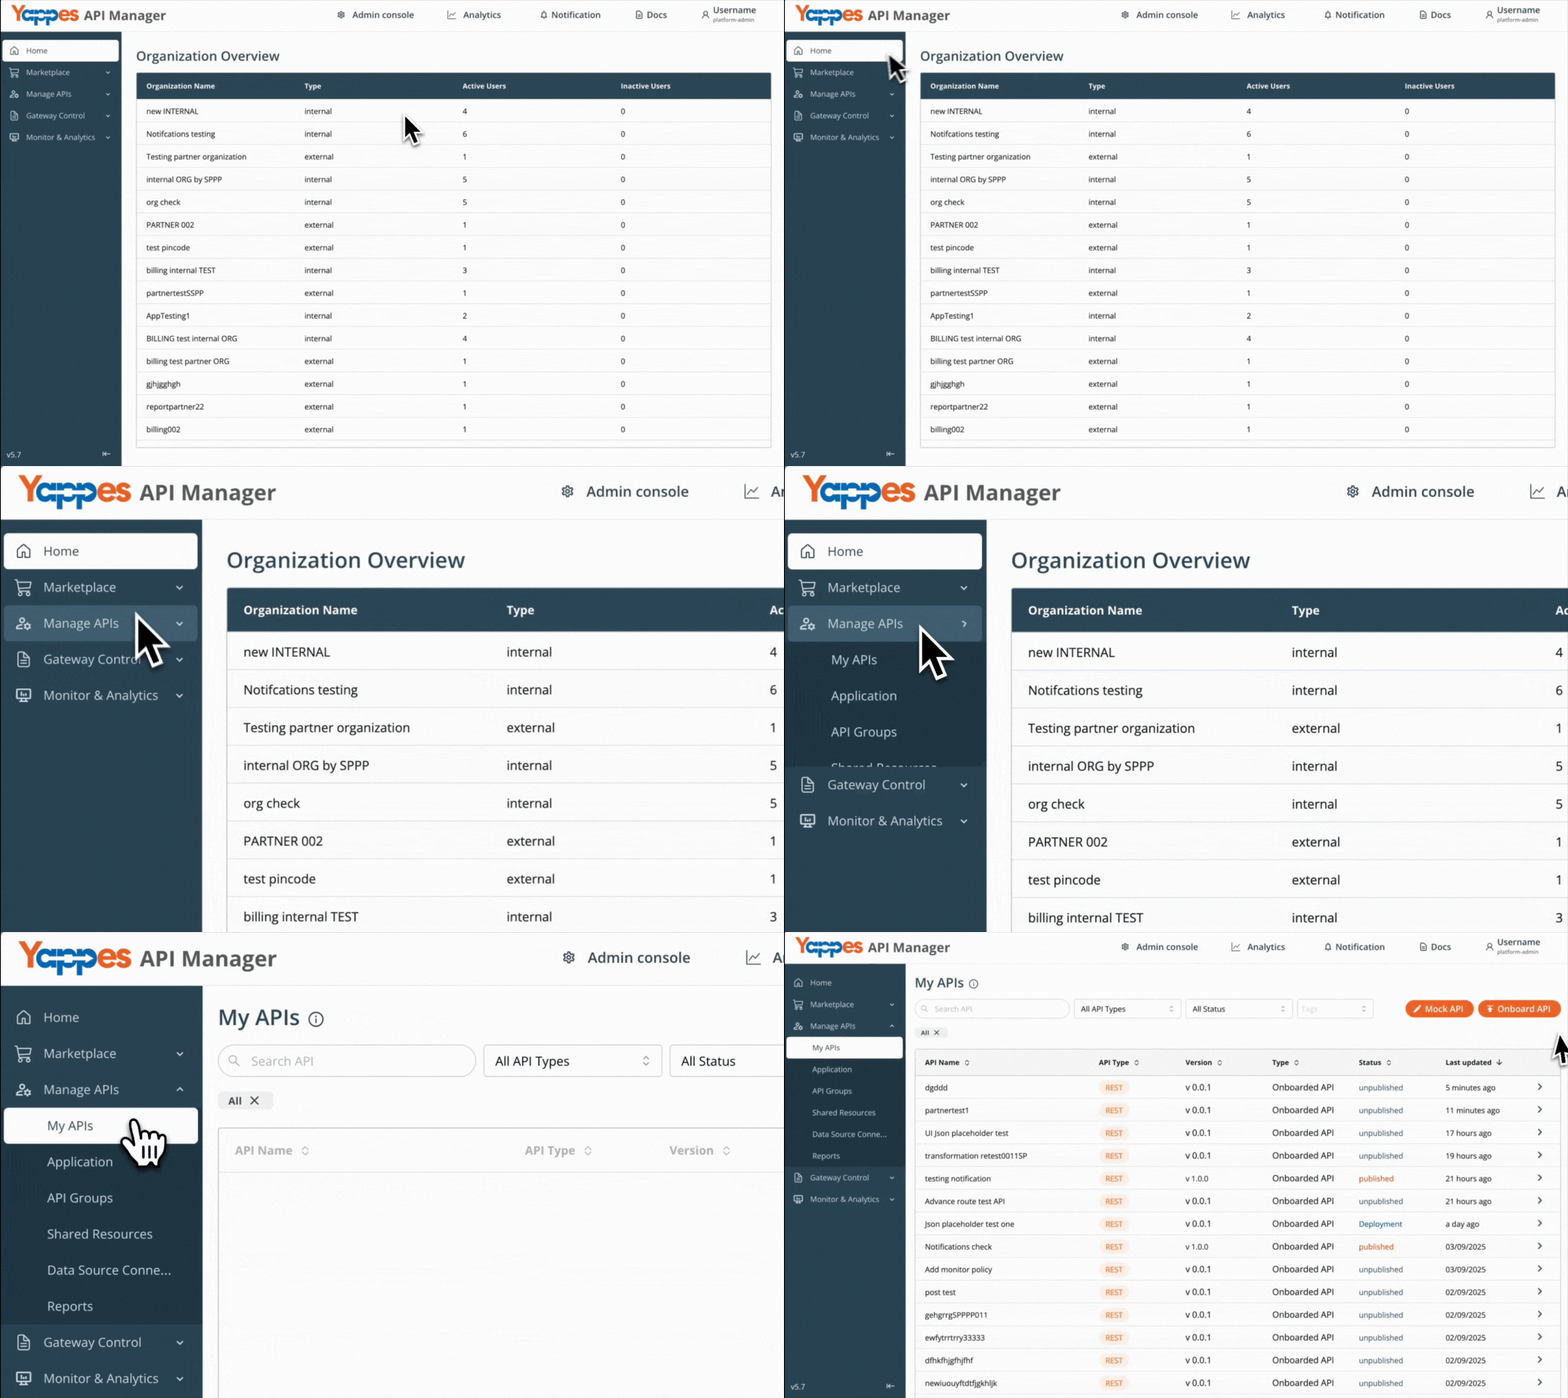
Step 2: Initiate API Onboarding
- Onboard from My APIs using the guide for your API type.
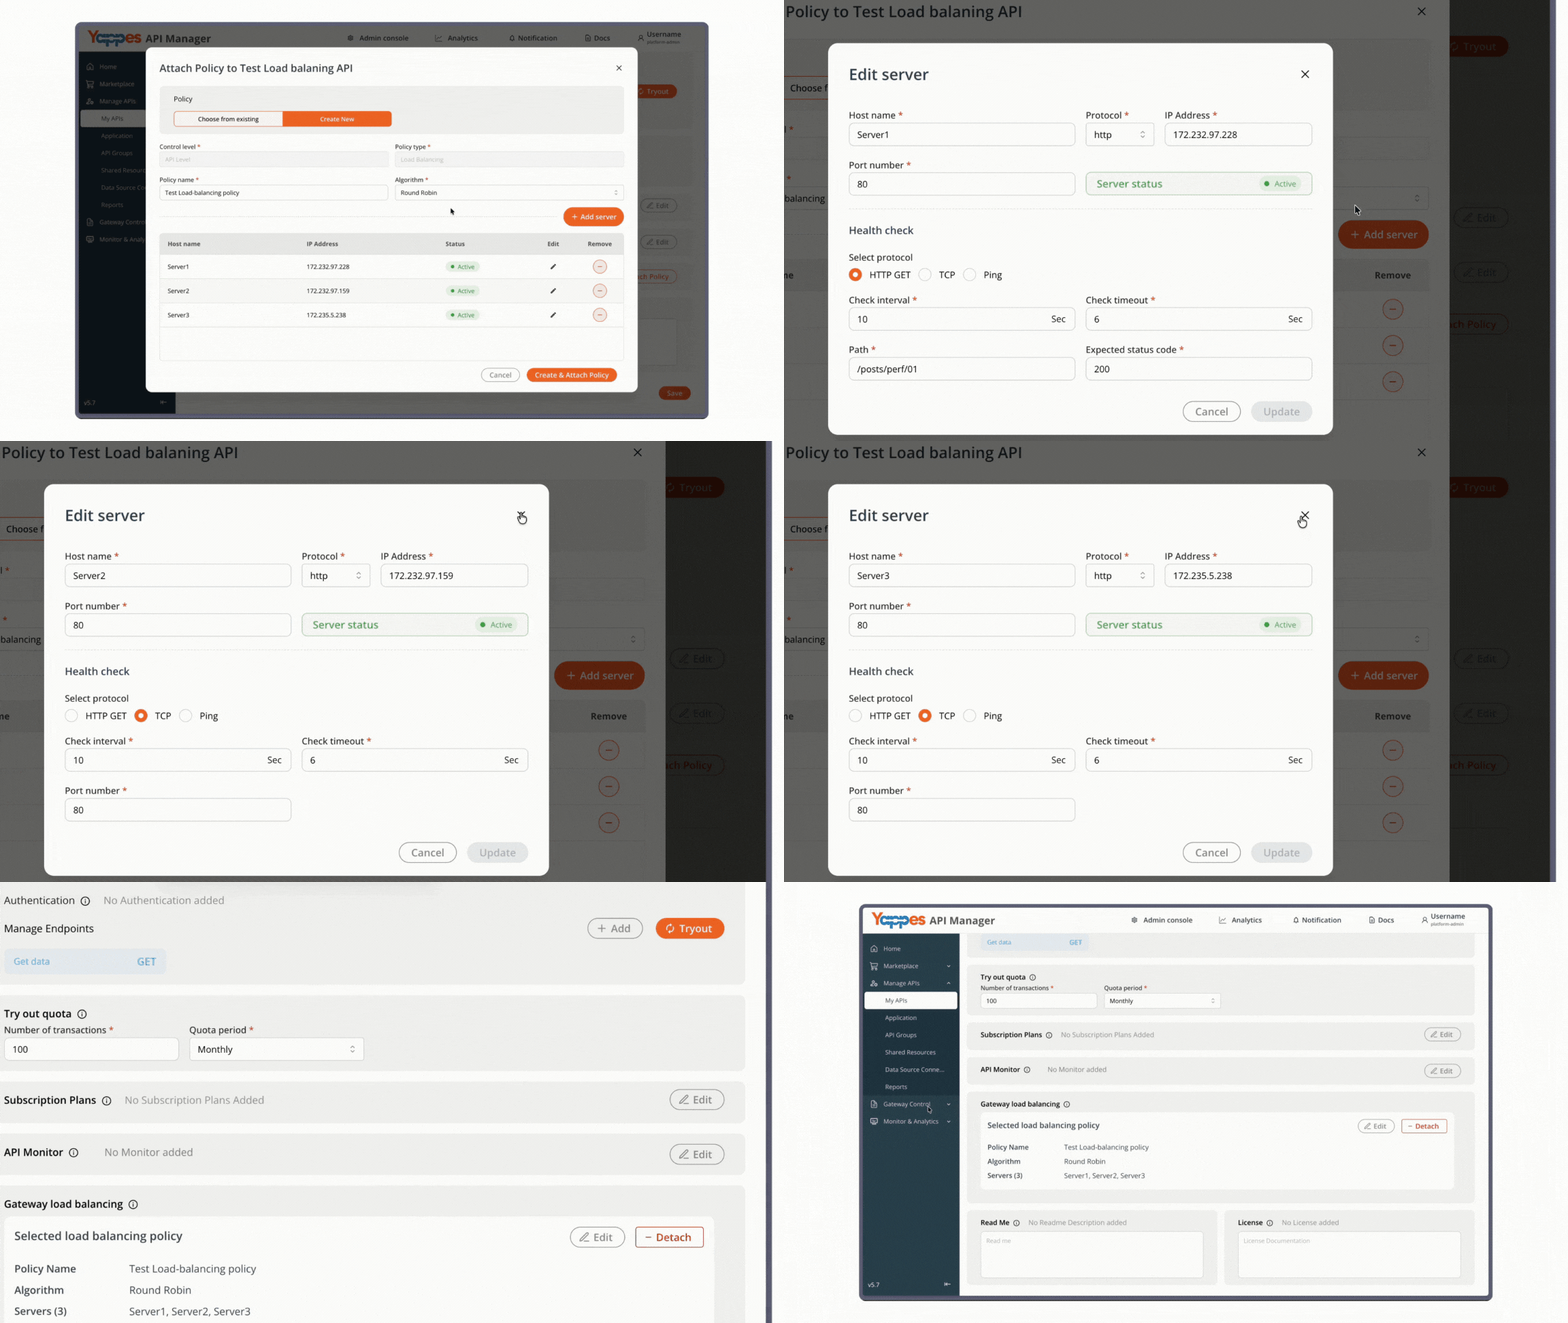
Step 3: Attach Load Balancer Policy
- Click the
Attach Policybutton - In the
Policy Namefield, enter a descriptive name (e.g.,Newloadbalancer) - Add a detailed description in the text area field to document the policy purpose
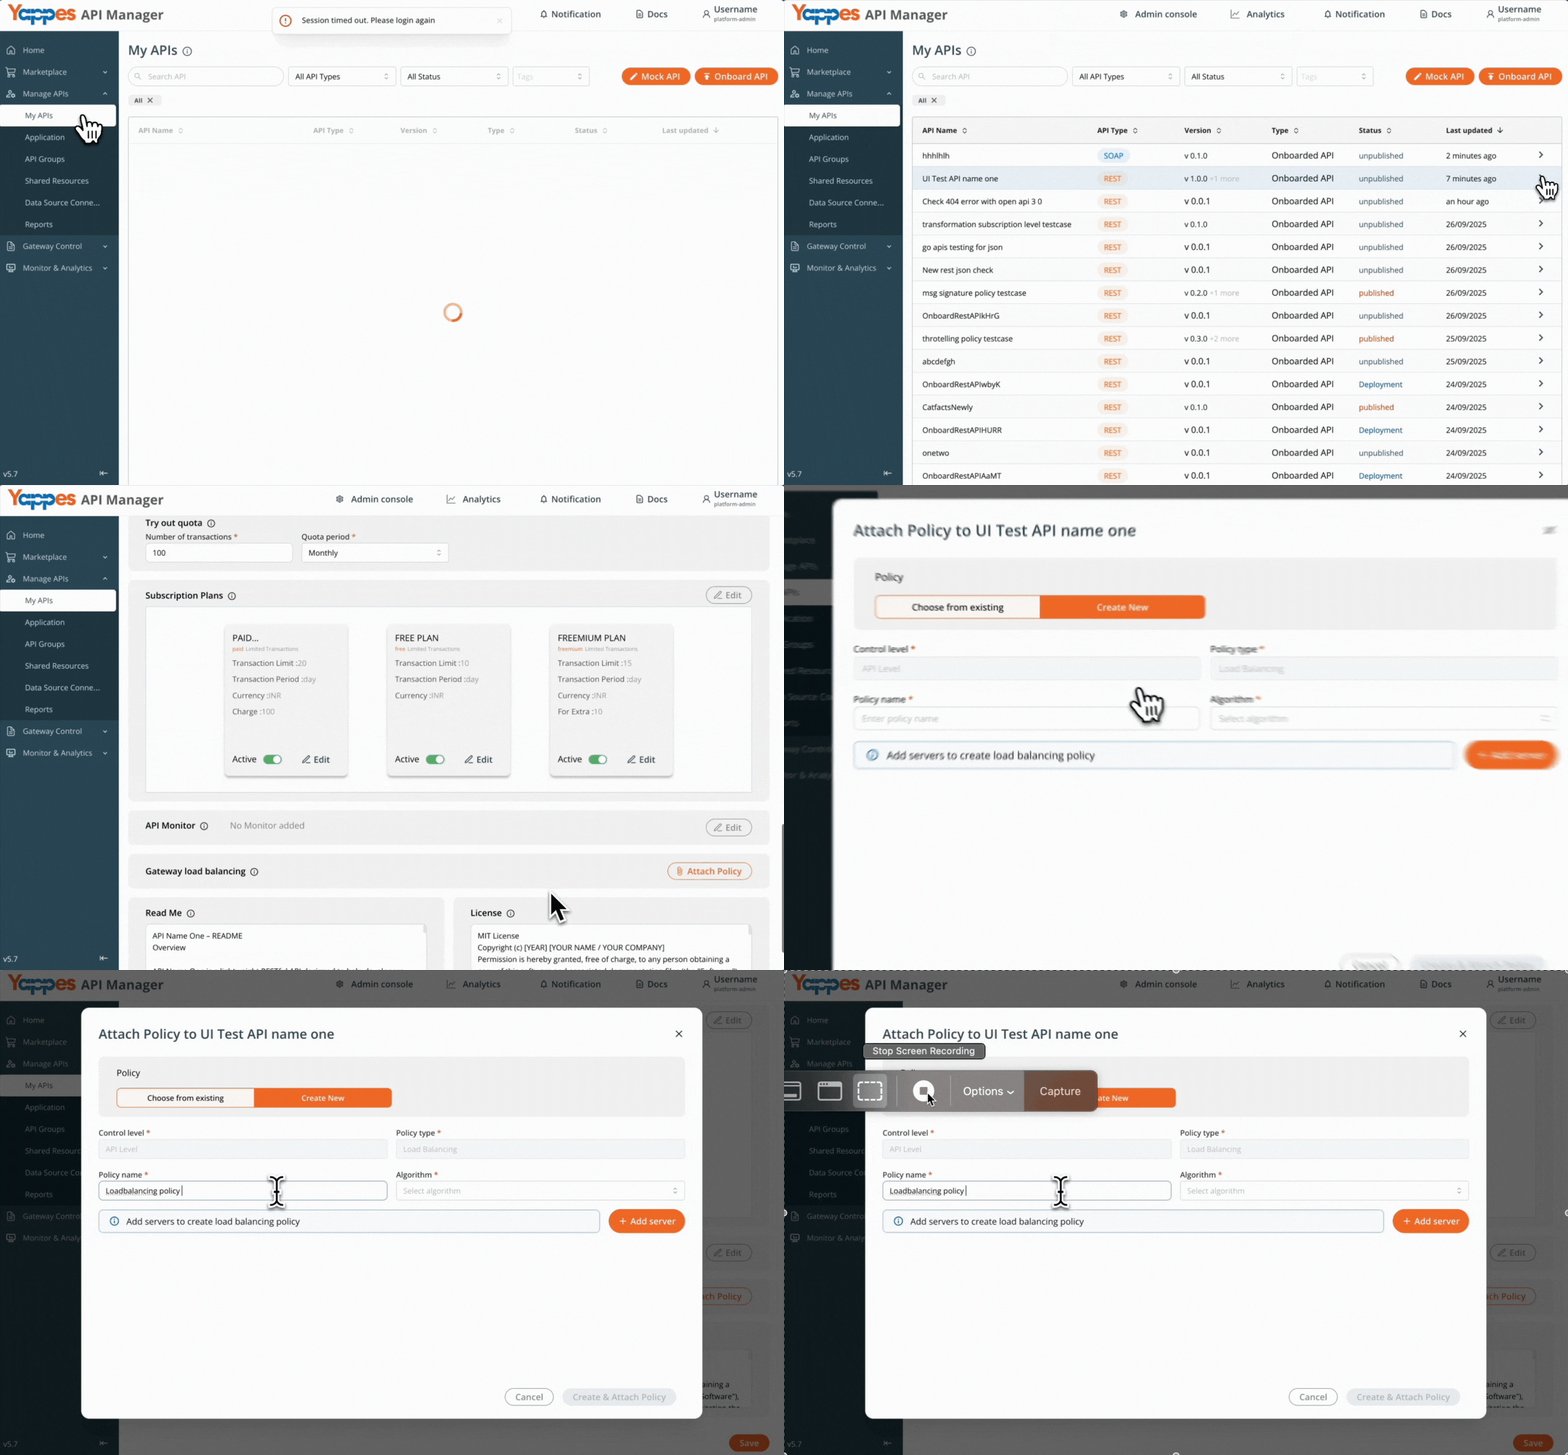
Step 4: Select Load Balancing Algorithm
- Click the
Algorithmdropdown field - Choose from the available options:
Round Robin: Sequential distributionIP Hash: Client IP-based routingLeast Connection: Routes to the least busy server
- Select the algorithm that best fits your use case
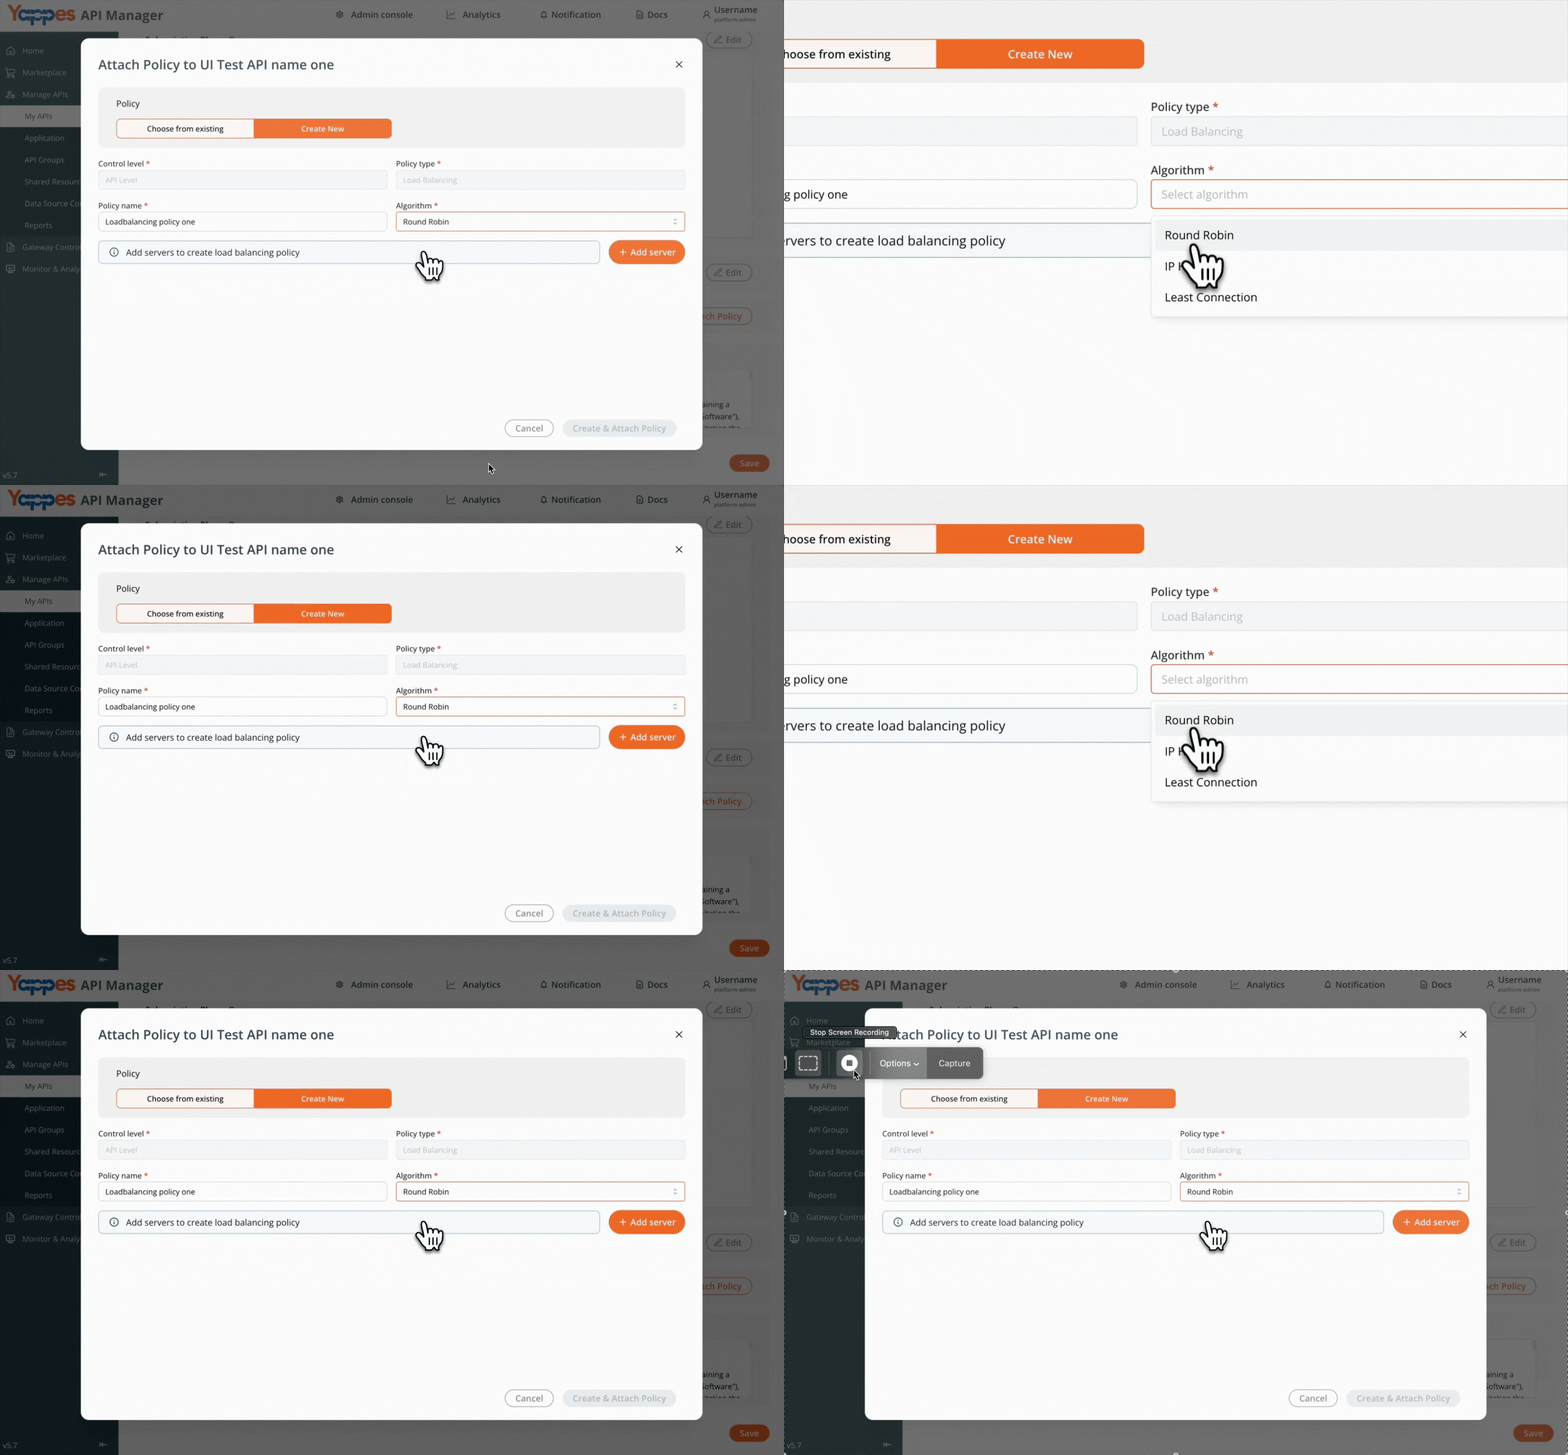
Step 5: Add Backend Servers
- Click the
Add Serverbutton -
For each server, enter:
Host name: Server hostname or domainProtocol: HTTP or HTTPSIP Address: Server IP addressPort: Server port number
-
Enter Health Check details:
Protocol:HTTP GET/TCP/PING
a.
If HTTP GET is selected:
-Check Interval: Frequency of the health check (seconds)
-Check Timeout: Max wait time for a response (seconds)
-Path: Endpoint path to verify (e.g.,/health)
-Expected Status Code: HTTP status code considered healthy (e.g.,200)b.
If TCP is selected:
-Check Interval: Frequency of the health check (seconds)
-Check Timeout: Max wait time before marking host as unhealthy
-Port Number: Port to test connectivity onc.
If PING is selected:
-Check Interval: Frequency of the health check (seconds)
-Check Timeout: Max wait time before declaring failure (seconds)
-Packet Size: Size of each ICMP packet (bytes)
-Packet Count: Number of packets sent per check -
Click
Add Serverto verify the server status - If the server is active, it will be added to the list
- If the server is inactive, check that the provided details are correct and confirm that the server is running
- Repeat for all backend servers (
two servers are mandatory for Load Balancing) - Review your server list
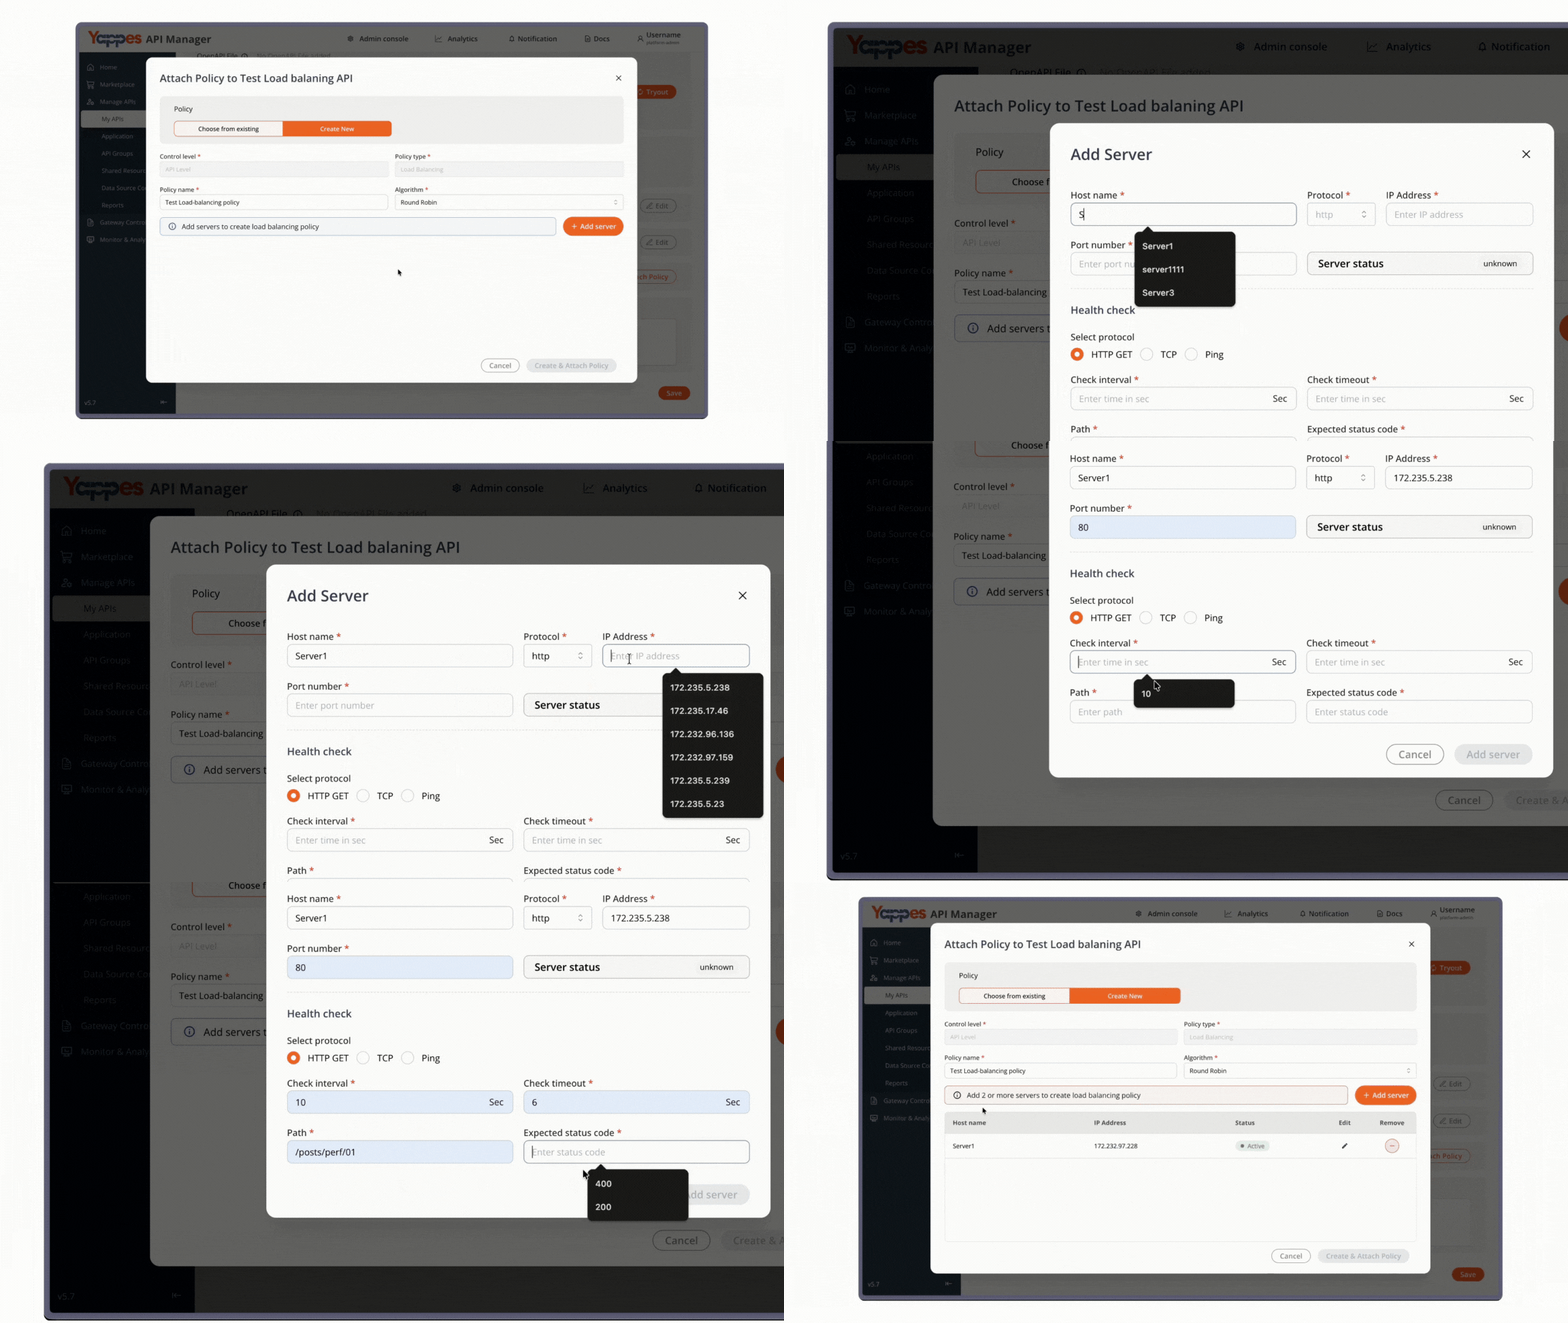
Step 6: Create and Attach Policy
- Review all policy settings
- Click
Create Policy - Preview the complete configuration
Expected Result: Load Balancer policy is created and attached to your API
Method 2: Creating Load Balancer from Gateway Policies Page
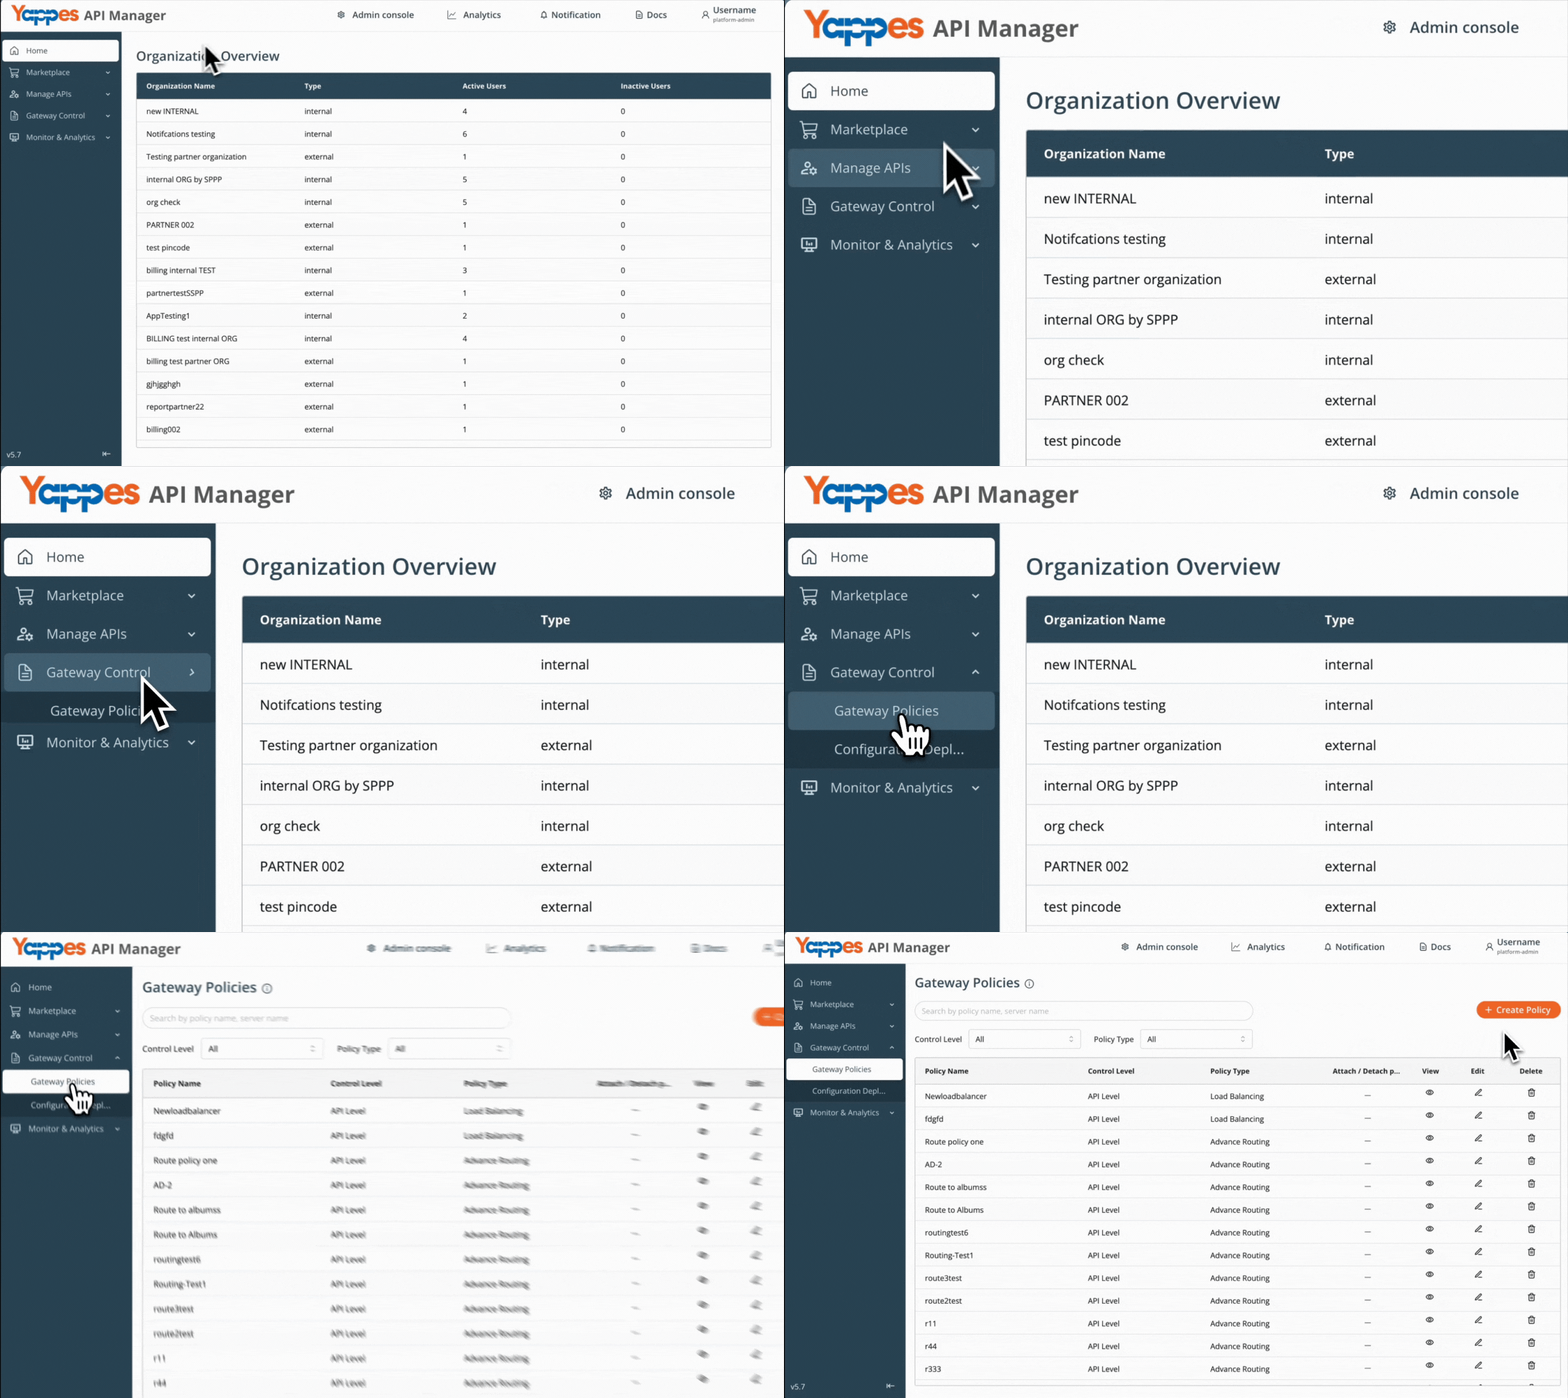
Step 1: Navigate to Gateway Policies
- Locate
Gateway Control → Gateway Policiesin the main navigation menu - The policies management interface will display
Step 2: Create Gateway-Level Policy
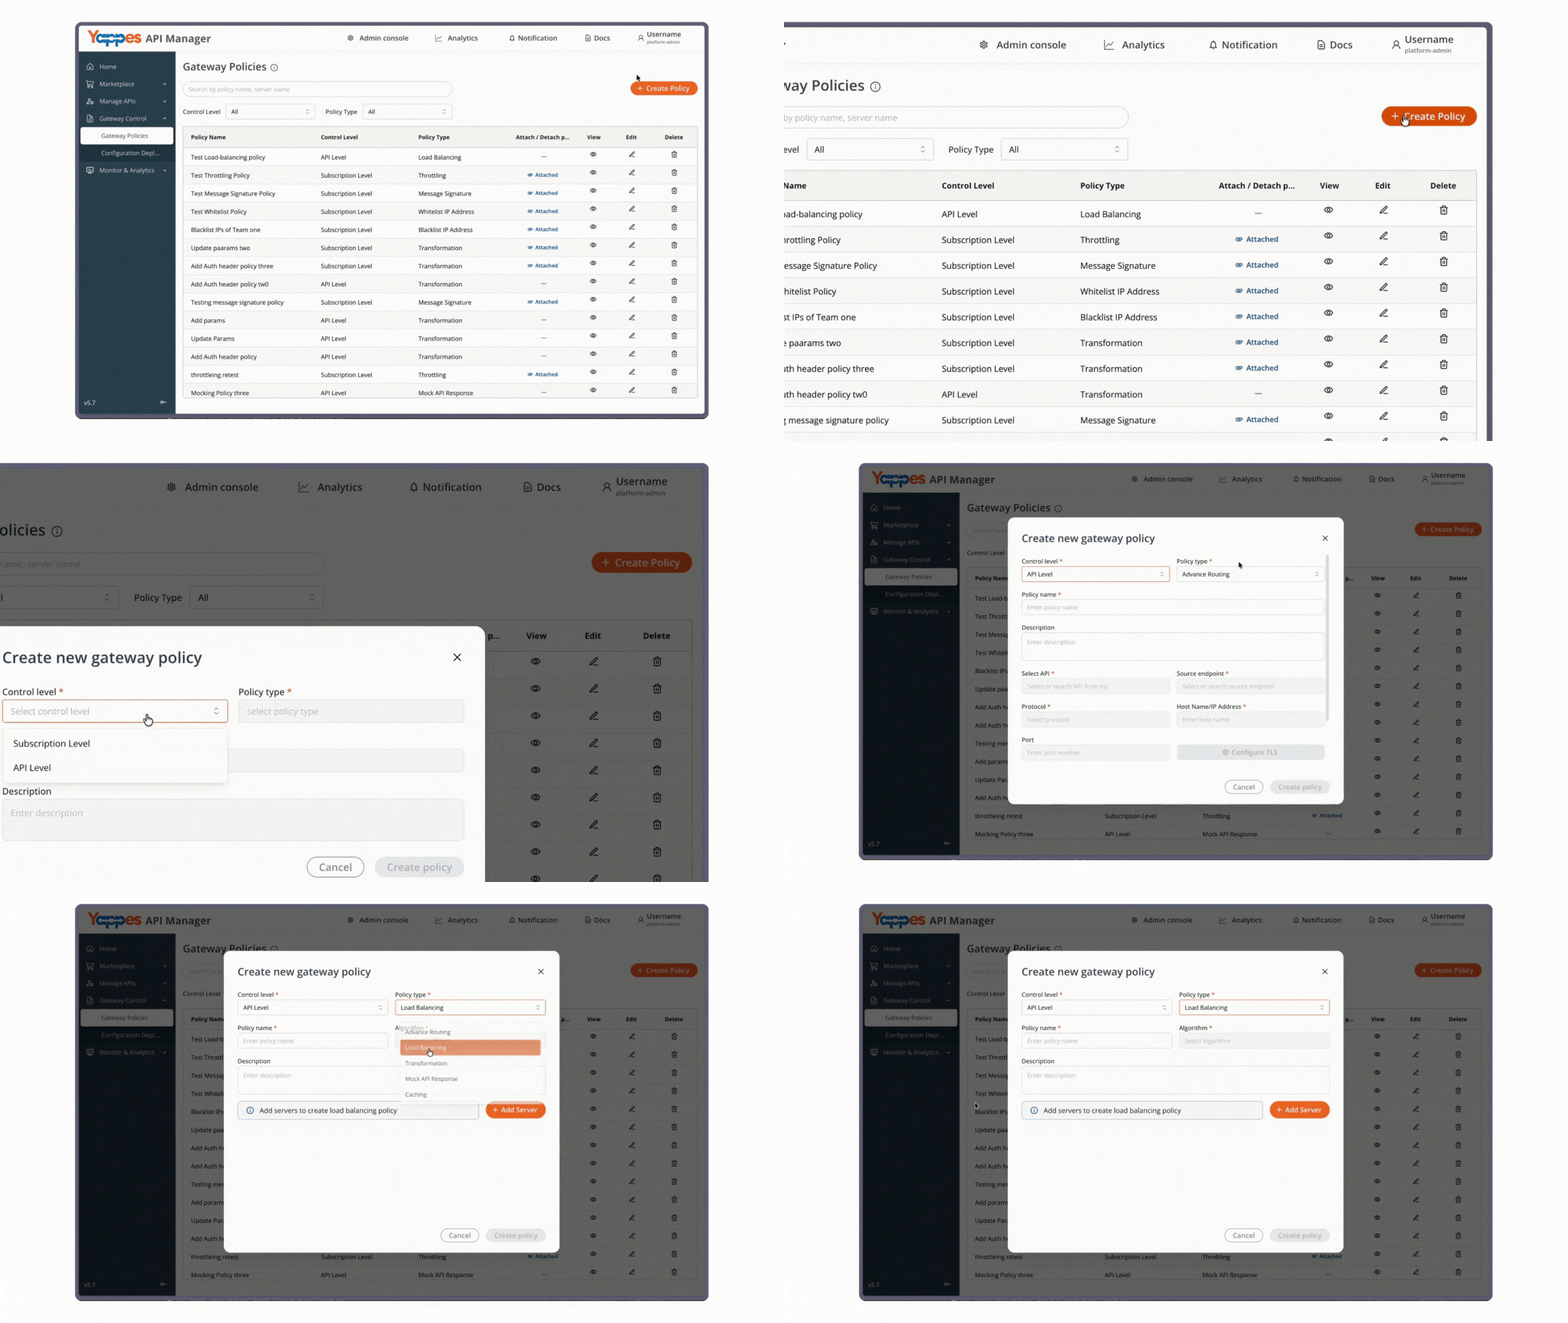
- Click
Create policyfrom the gateway page - Set the
Control LeveltoAPI Level - In the
Policy Typedropdown, selectLoad Balancing Policy
Step 3: Attach Load Balancer Policy
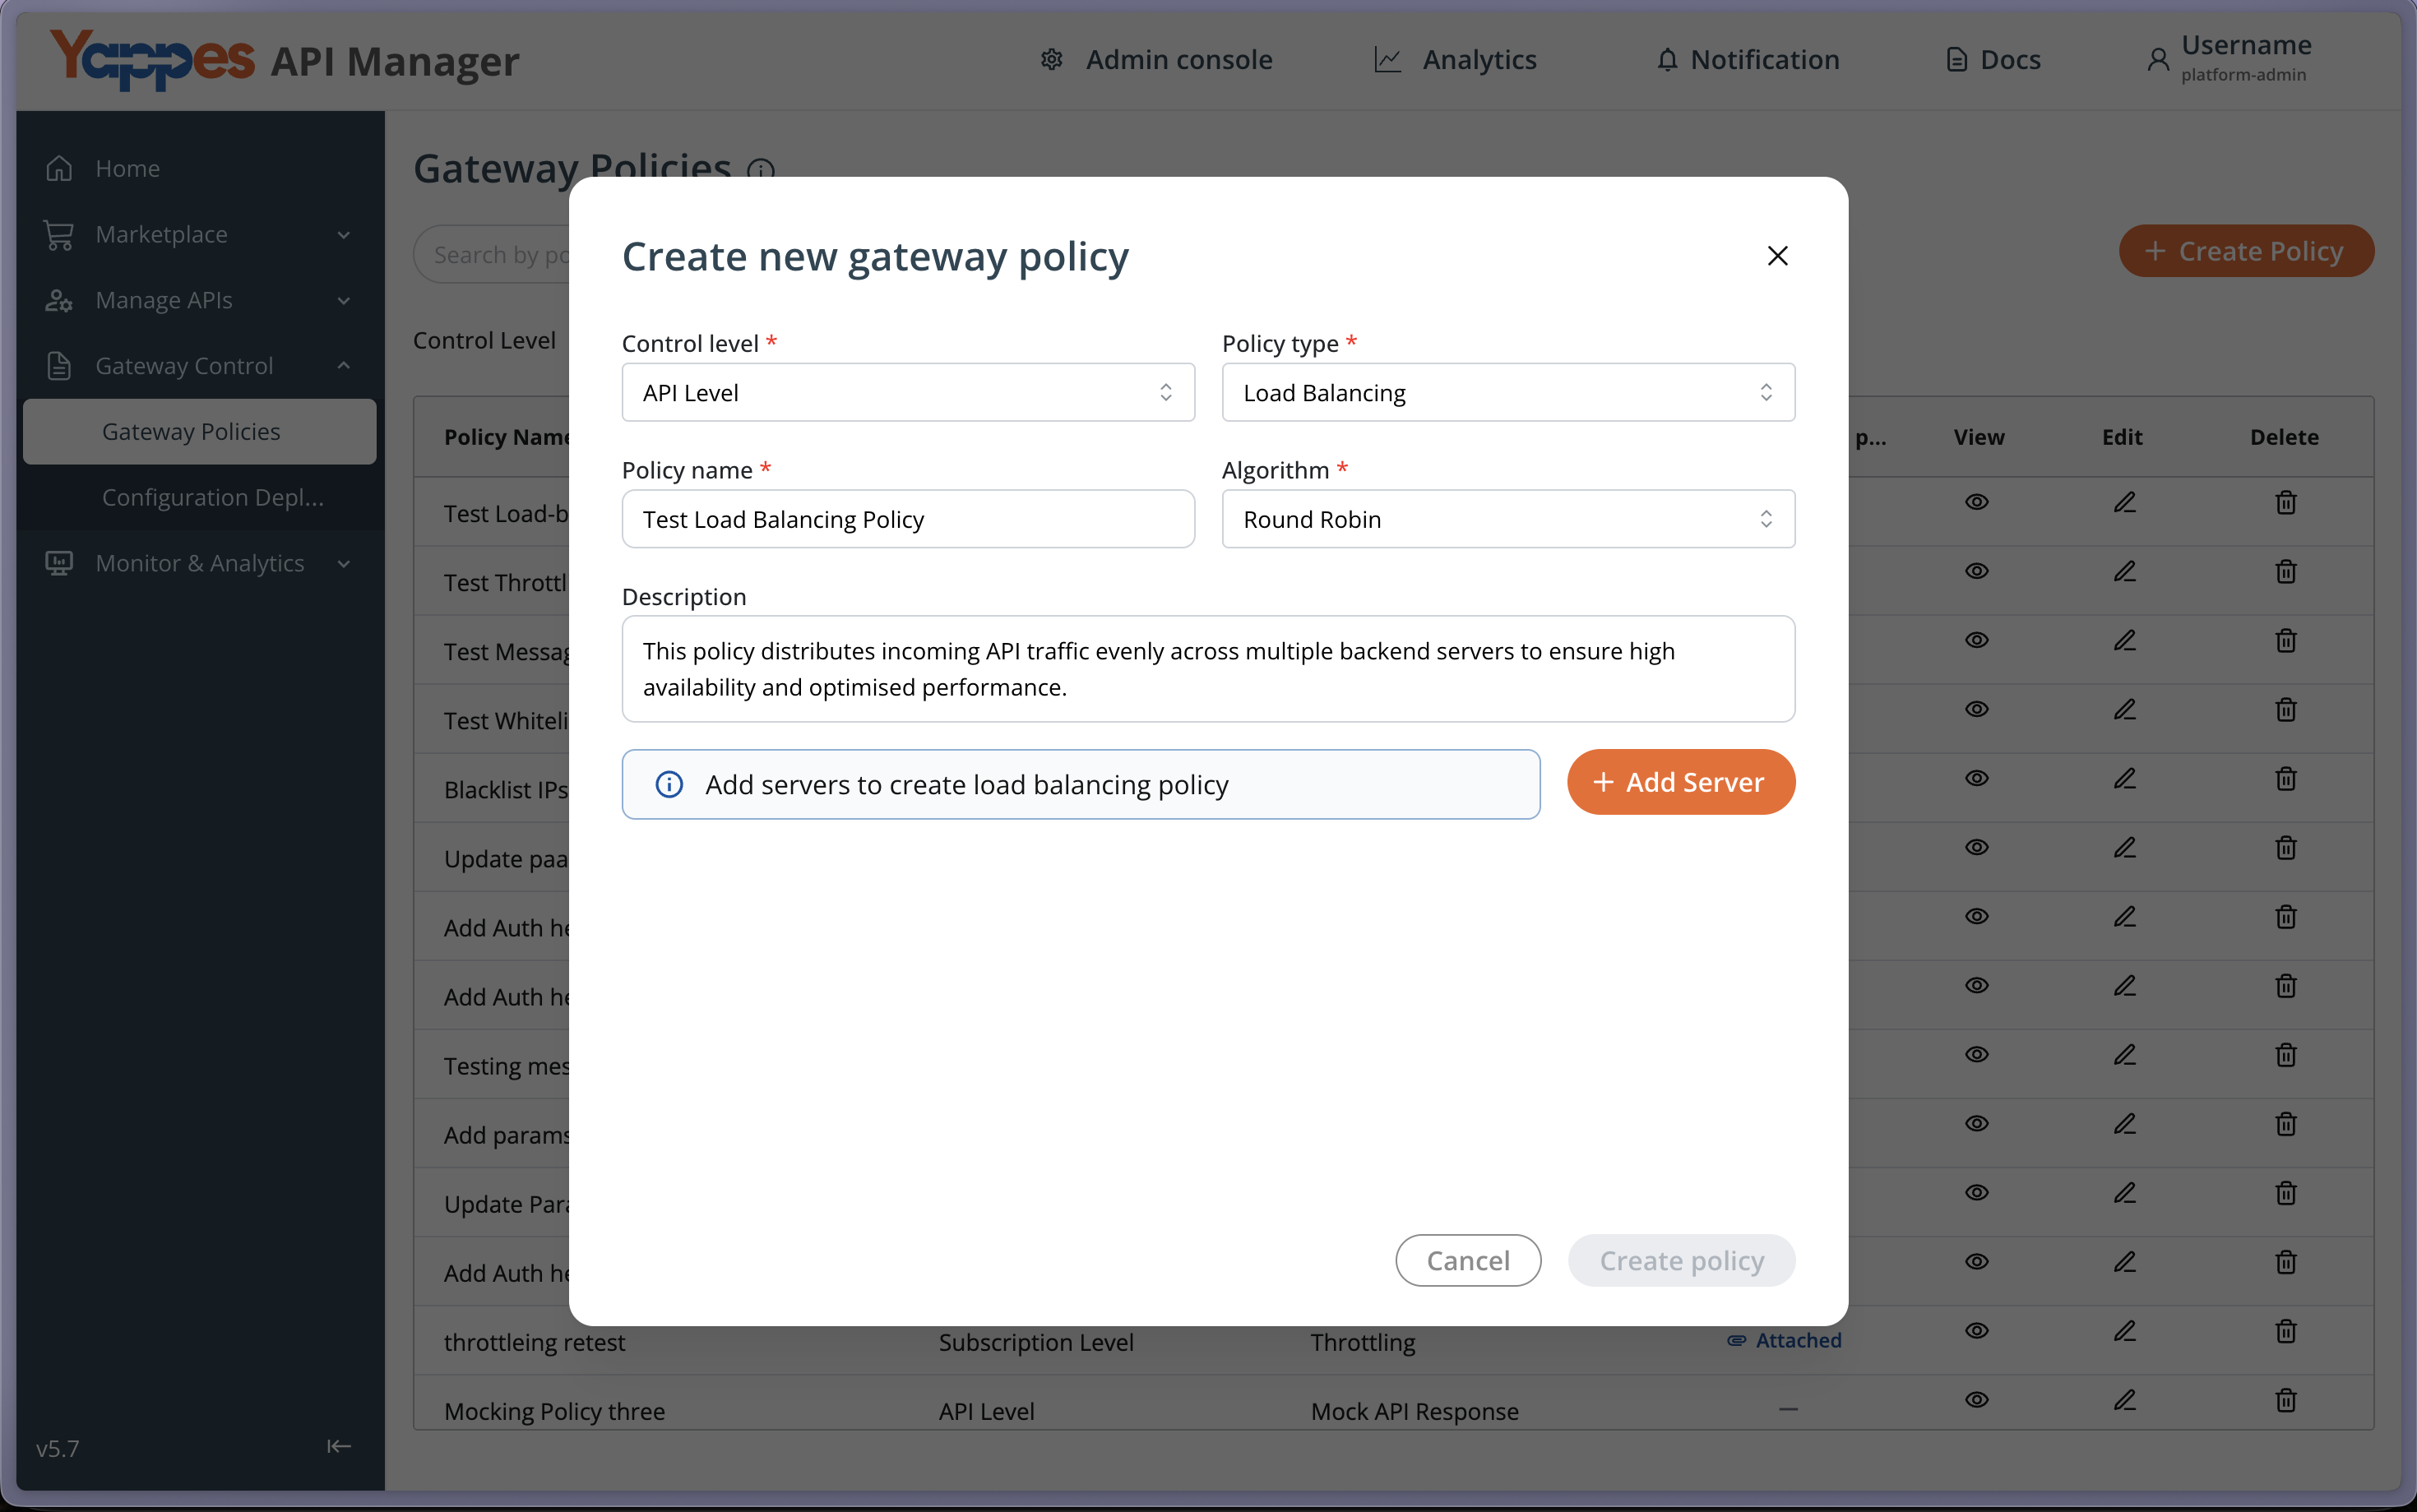
- In the
Policy Namefield, enter a descriptive name (e.g.,Newloadbalancer) - Add a detailed description in the text area field to document the policy purpose
- You'll now configure the load balancing settings
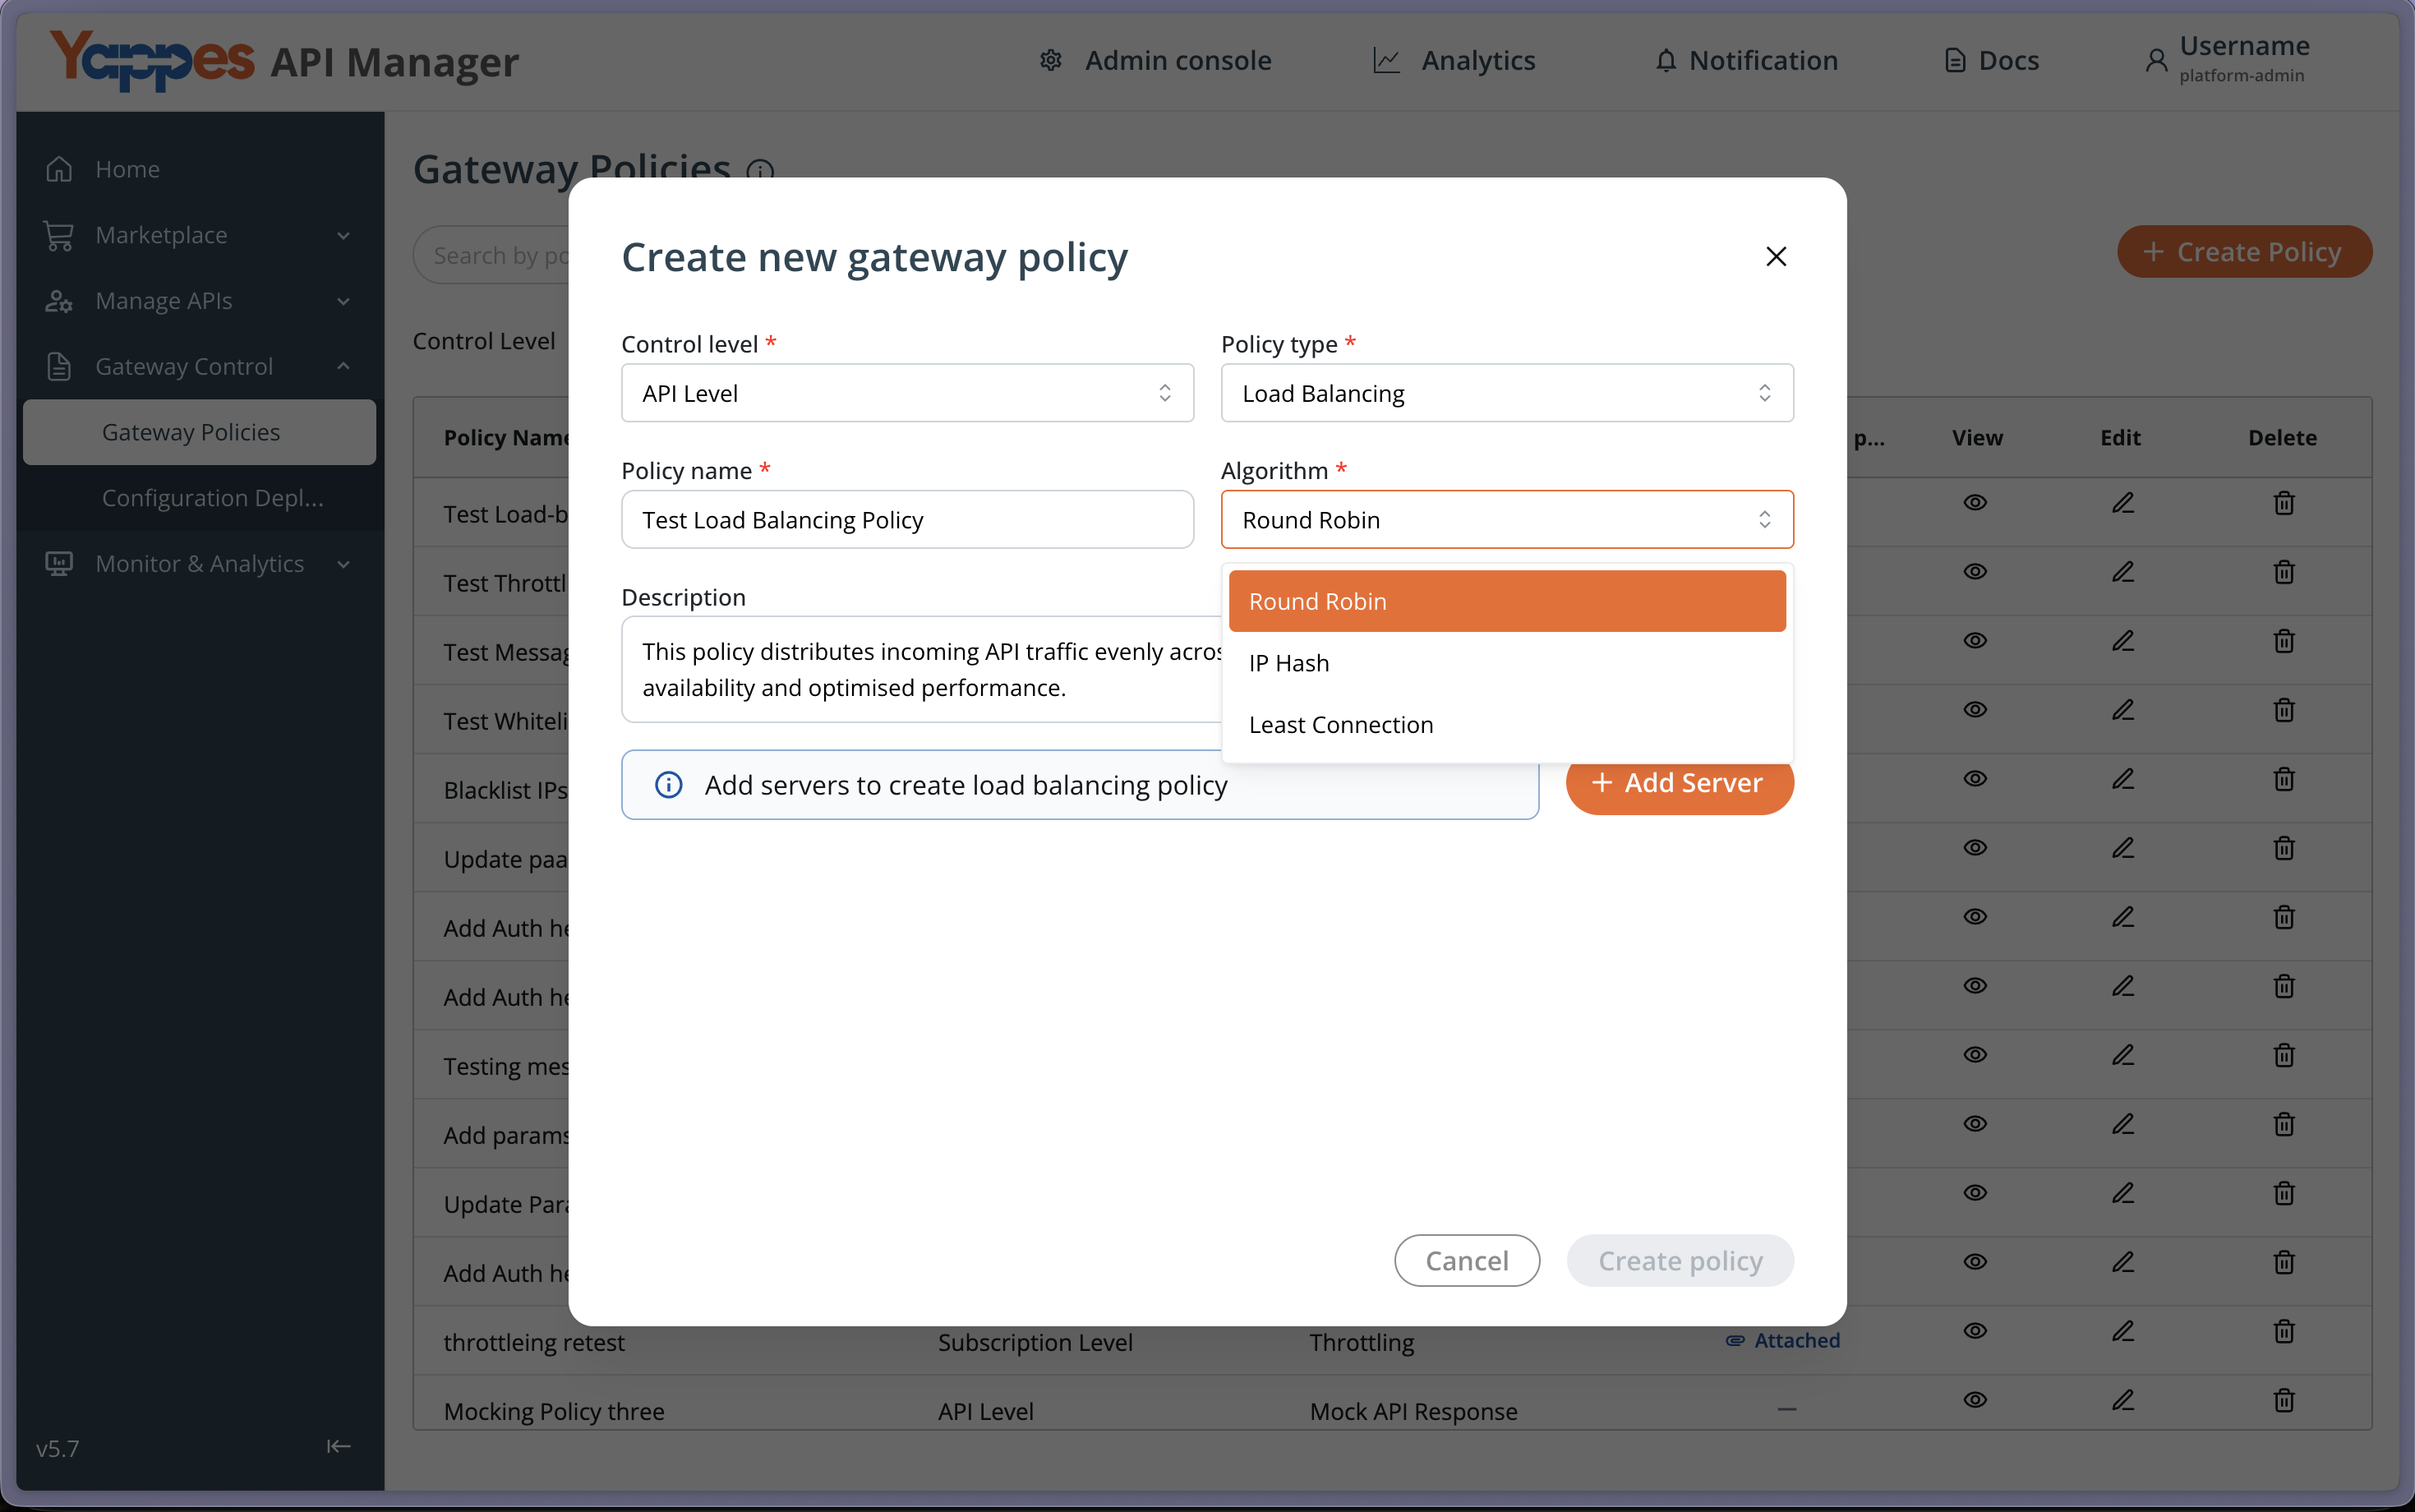
Step 4: Select Load Balancing Algorithm
- Click the
Algorithmdropdown field - Choose from the available options:
Round Robin: Sequential distributionIP Hash: Client IP-based routingLeast Connection: Routes to the least busy server
- Select the algorithm that best fits your use case
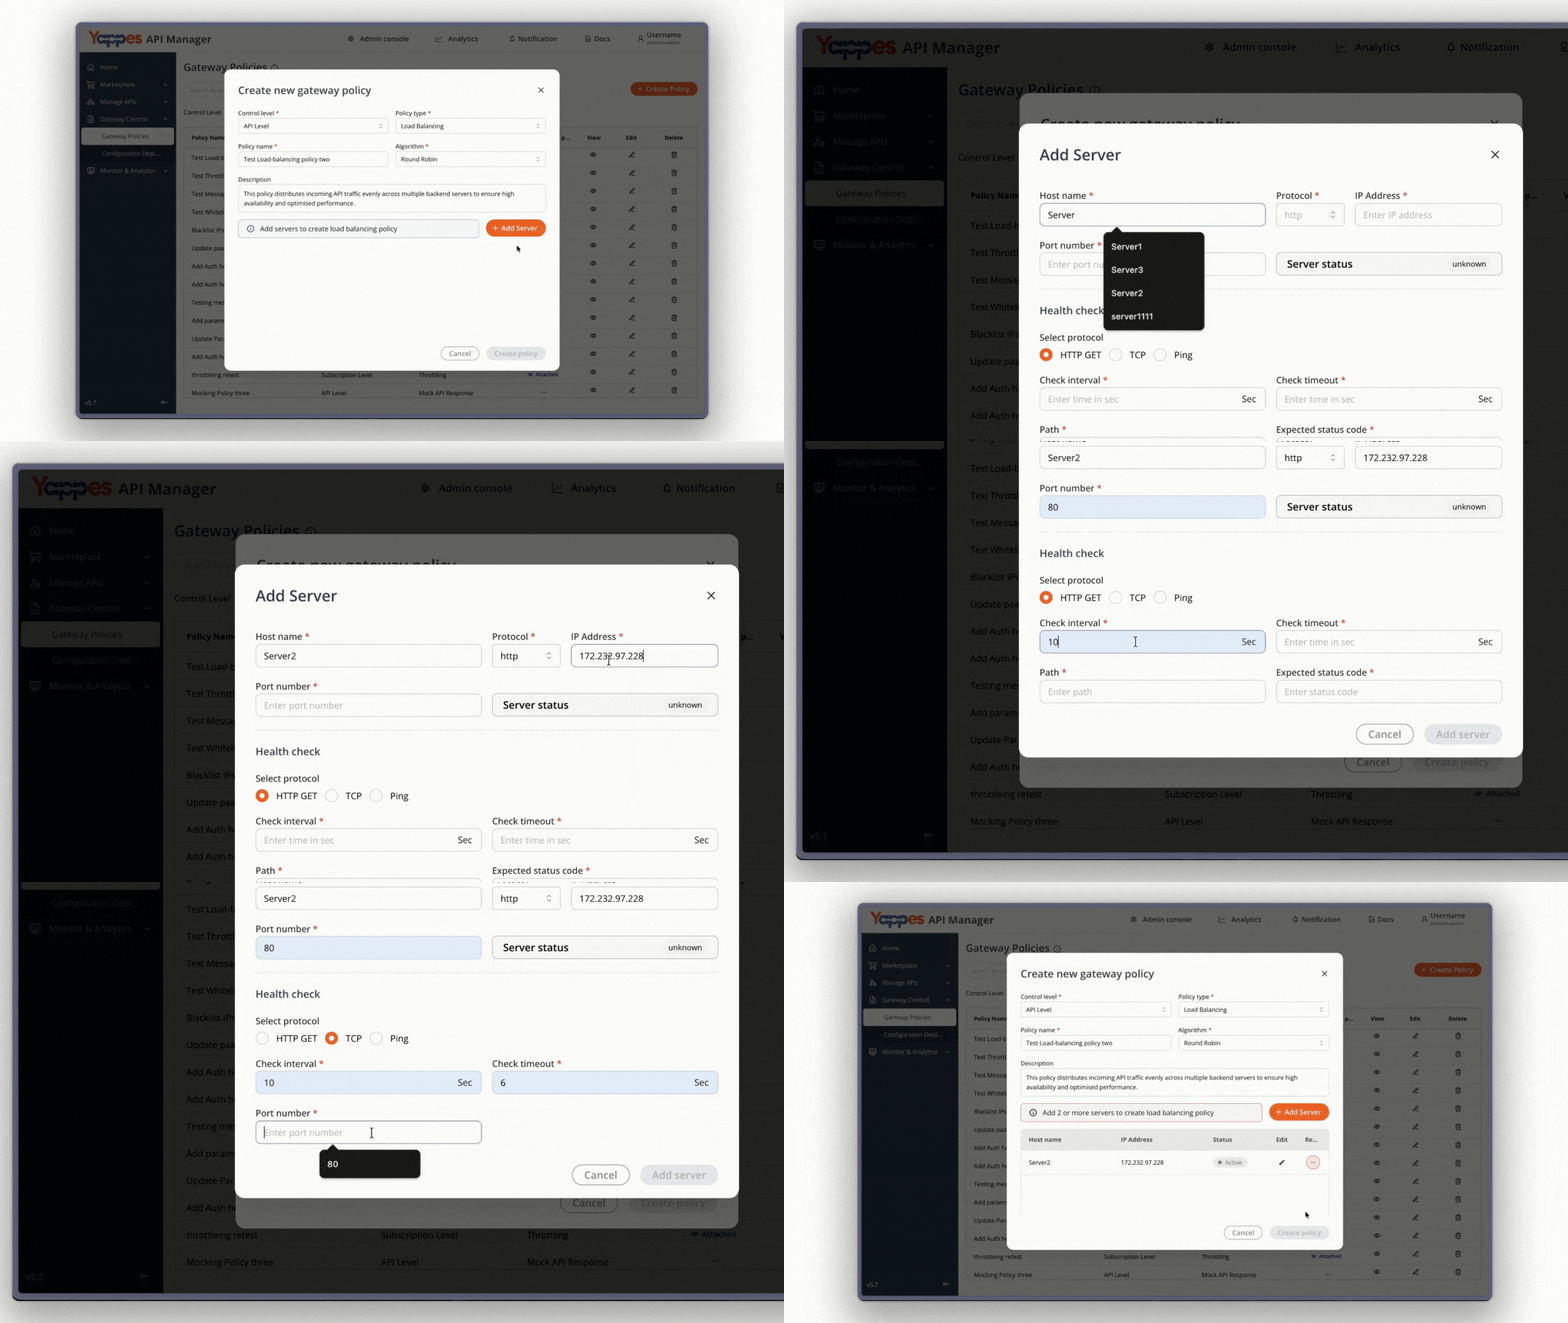
Step 5: Add Backend Servers
- Click the
Add Serverbutton -
For each server, enter:
Host name: Server hostname or domainProtocol: HTTP or HTTPSIP Address: Server IP addressPort: Server port number
-
Enter Health Check details:
Protocol:HTTP GET/TCP/PING
a.
If HTTP GET is selected:
-Check Interval: Frequency of the health check (seconds)
-Check Timeout: Max wait time for a response (seconds)
-Path: Endpoint path to verify (e.g.,/health)
-Expected Status Code: HTTP status code considered healthy (e.g.,200)b.
If TCP is selected:
-Check Interval: Frequency of the health check (seconds)
-Check Timeout: Max wait time before marking host as unhealthy
-Port Number: Port to test connectivity onc.
If PING is selected:
-Check Interval: Frequency of the health check (seconds)
-Check Timeout: Max wait time before declaring failure (seconds)
-Packet Size: Size of each ICMP packet (bytes)
-Packet Count: Number of packets sent per check -
Click
Add Serverto verify the server status - If the server is active, it will be added to the list
- If the server is inactive, check that the provided details are correct and confirm that the server is running
- Repeat for all backend servers (
two servers are mandatory for Load Balancing) - Review your server list
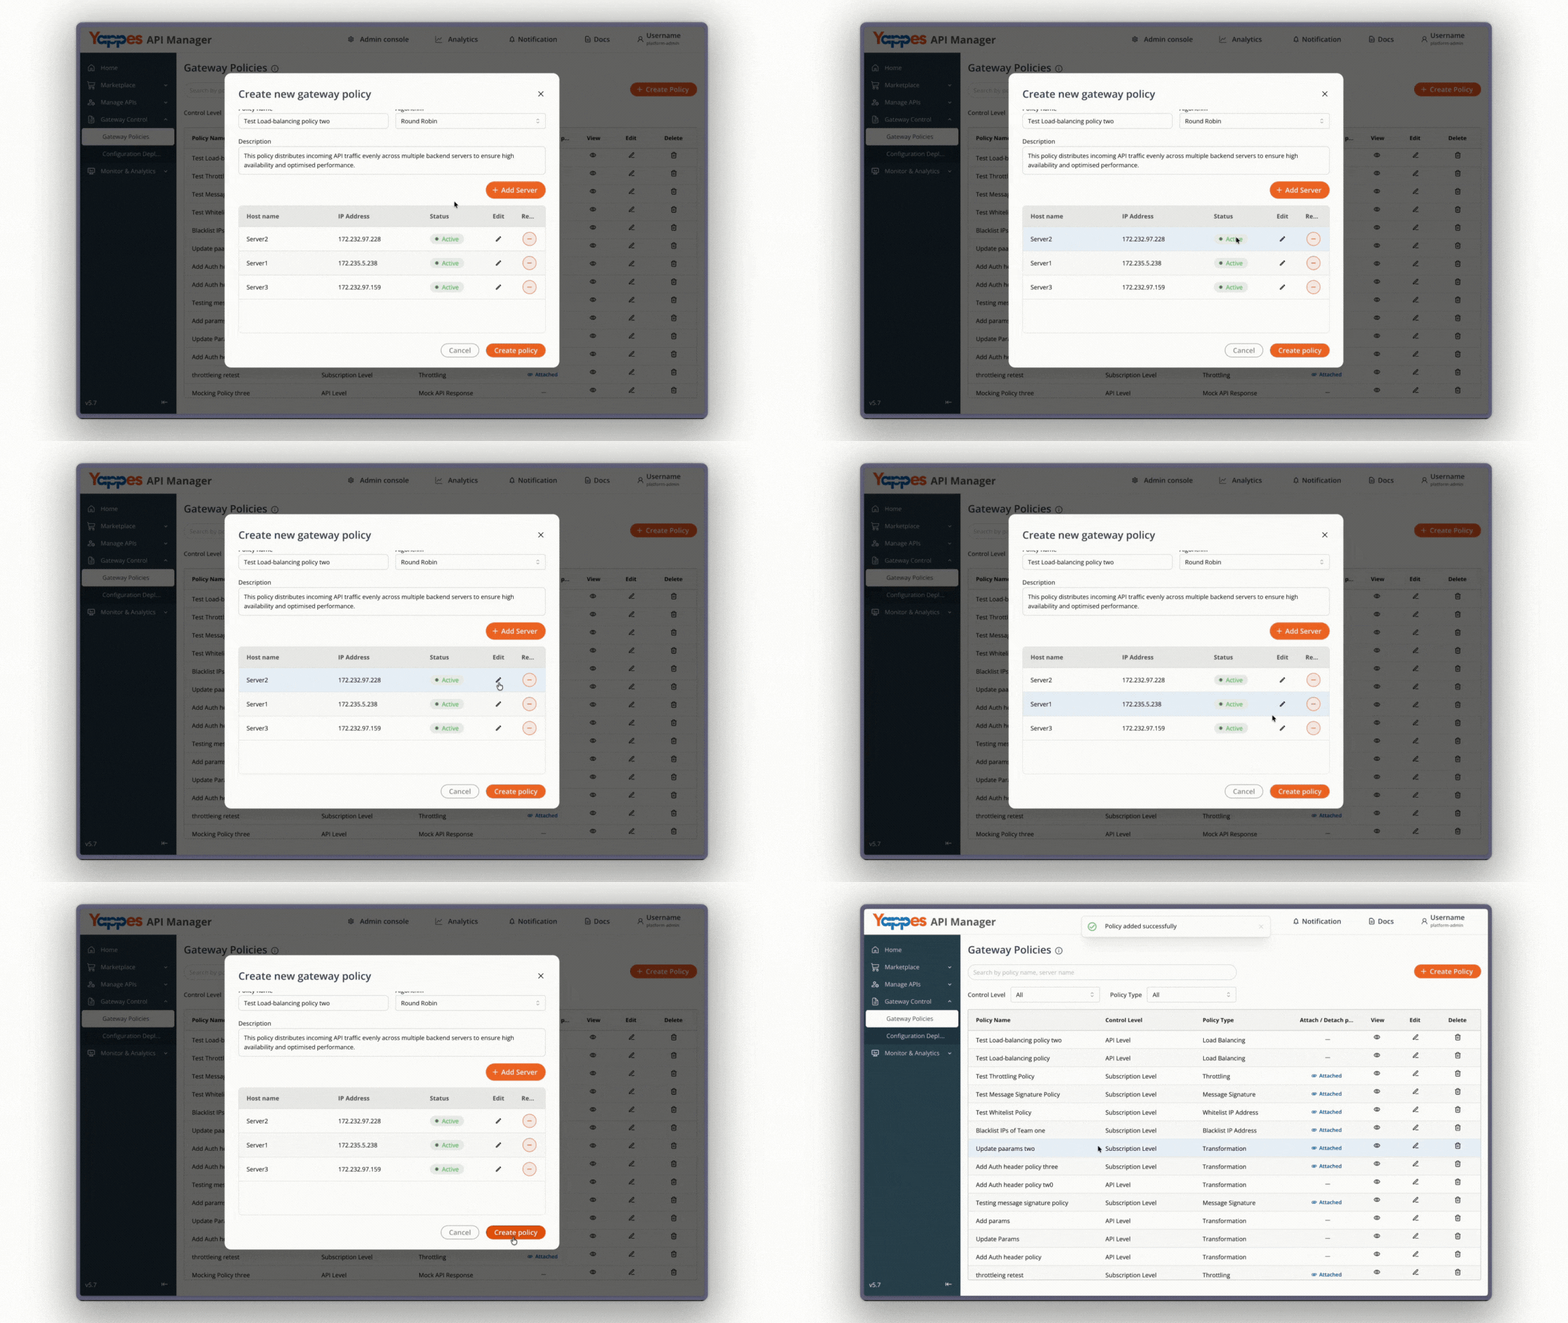
Step 6: Create and Attach Policy
- Review all policy settings
- Click
Create Policy - Preview the complete configuration
Expected Result: Load Balancer policy is created
Understanding the Interface
Main Policy Configuration Panel
The Load Balancer interface consists of several key sections:
| Section | Description | Purpose |
|---|---|---|
| Policy Name | Text field at the top | Identifies your load balancer policy uniquely |
| Algorithm Selector | Dropdown menu | Determines traffic distribution method |
| Server List | Table/grid view | Displays all configured backend servers |
| Add Server Button | Action button | Opens server configuration dialog |
| Test Connection | Validation tool | Verifies backend server availability |
Configuration and Settings
Load Balancing Algorithms: Best Practices
| Algorithm | Best Practices | Use Cases | Considerations |
|---|---|---|---|
| Round Robin | Use when all backend servers have similar capacity and performance. Avoid for stateful apps. | Stateless applications, uniform workloads, microservices with similar resource profiles | Not suitable if servers differ in capacity or if session persistence is required |
| IP Hash | Use when session persistence ("sticky sessions") is needed. Ensure a wide range of client IPs. | Applications requiring user session stickiness, e.g., shopping carts, user dashboards | May cause uneven load if client IP diversity is low; not ideal for highly dynamic IP scenarios |
| Least Connection | Use for workloads with variable or unpredictable request processing times. | Real-time applications, chat servers, APIs with long-lived or variable connections | Requires connection tracking, which adds overhead; best when connection duration varies |
Verification and Testing
Confirming Successful Implementation
Check Policy Status
- Navigate to your API's policy list
- Confirm all servers display "Healthy" status
Test Traffic Distribution
- Send multiple test requests to your API endpoint
- Monitor server logs to verify requests reach different backends
- Check response headers for server identification
Validate Algorithm Behavior
- Round Robin: Requests should cycle through servers sequentially
- IP Hash: Same client IP should always reach the same server
- Least Connection: New connections should favor less-loaded servers
Success Indicators
- All backend servers receive traffic
- Response times are consistent
- No connection errors or timeouts
- API endpoints respond correctly
Troubleshooting
Common Issues and Solutions
| Issue | Symptoms | Solution |
|---|---|---|
| Connection Test Fails | Error message when testing API connection | • Verify API hostname is correct • Check network connectivity • Ensure backend servers are running |
| Policy Not Applied | Requests not being distributed | • Confirm policy is attached to API • Check policy status is "Active" • Submit/deploy policy if pending |
| Uneven Distribution | One server gets most traffic | • Review algorithm selection • Check server health status • Verify all servers are properly configured |
| Backend Connection Errors | 502/503 errors returned | • Validate server IP addresses and ports • Check protocol matches (HTTP/HTTPS) • Verify firewall rules |
| Session Loss | Users losing session state | • Switch to IP Hash algorithm for session persistence • Configure sticky sessions |
Error Messages Guide
- "Failed to connect to backend server": Check server availability and network path
- "Policy deployment failed": Review policy configuration for missing required fields
Pro Tip
Start with Round Robin for simple deployments, then optimize based on your specific traffic patterns and requirements. The Yappes platform makes it easy to adjust algorithms without downtime.