Whitelist IP Address
Overview
The Yappes Whitelist IP Address feature allows you to create subscription-level gateway policies that exclusively permit access from specific IP addresses to your APIs, so you can implement strict access control and ensure only trusted sources can interact with your services.
This powerful security feature enables organizations to create an approved list of IP addresses that are granted access to their APIs, automatically denying all connection attempts from any IP address not explicitly included in the whitelist.
As a subscription-level gateway policy, the Whitelist IP Address feature provides precise control over API access management. Unlike blacklist policies that block specific threats, whitelist policies take a "deny all, permit by exception" approach - making them ideal for highly sensitive APIs that require the strictest security controls.
You can create multiple whitelist policies with different sets of approved IP addresses and selectively apply them to specific API subscriptions based on your security and compliance requirements.
The feature integrates seamlessly into the Yappes platform's gateway policy framework, working alongside other security measures to create a comprehensive API protection strategy. By implementing IP whitelisting at the subscription level, you can ensure regulatory compliance, protect mission-critical APIs from unauthorized access, and maintain complete visibility over who can access your services - perfect for scenarios requiring partner integrations, internal system communications, or restricted access to administrative endpoints.
Prerequisites
Before implementing the Whitelist IP Address feature, ensure you have:
- Administrative access to the Yappes API Manager platform
- Permission to create and manage Gateway Policies
- Access to the Manage Subscriptions section
- At least one active API subscription to attach the policy to
- List of approved IP addresses to be whitelisted (format:
xxx.xxx.xxx.xxx) - Verification that all legitimate users' IP addresses are included
Custom error and message
For error scenarios, you can override the default HTTP status code, error code, and message. See Custom Error and Message.
Step-by-Step Implementation
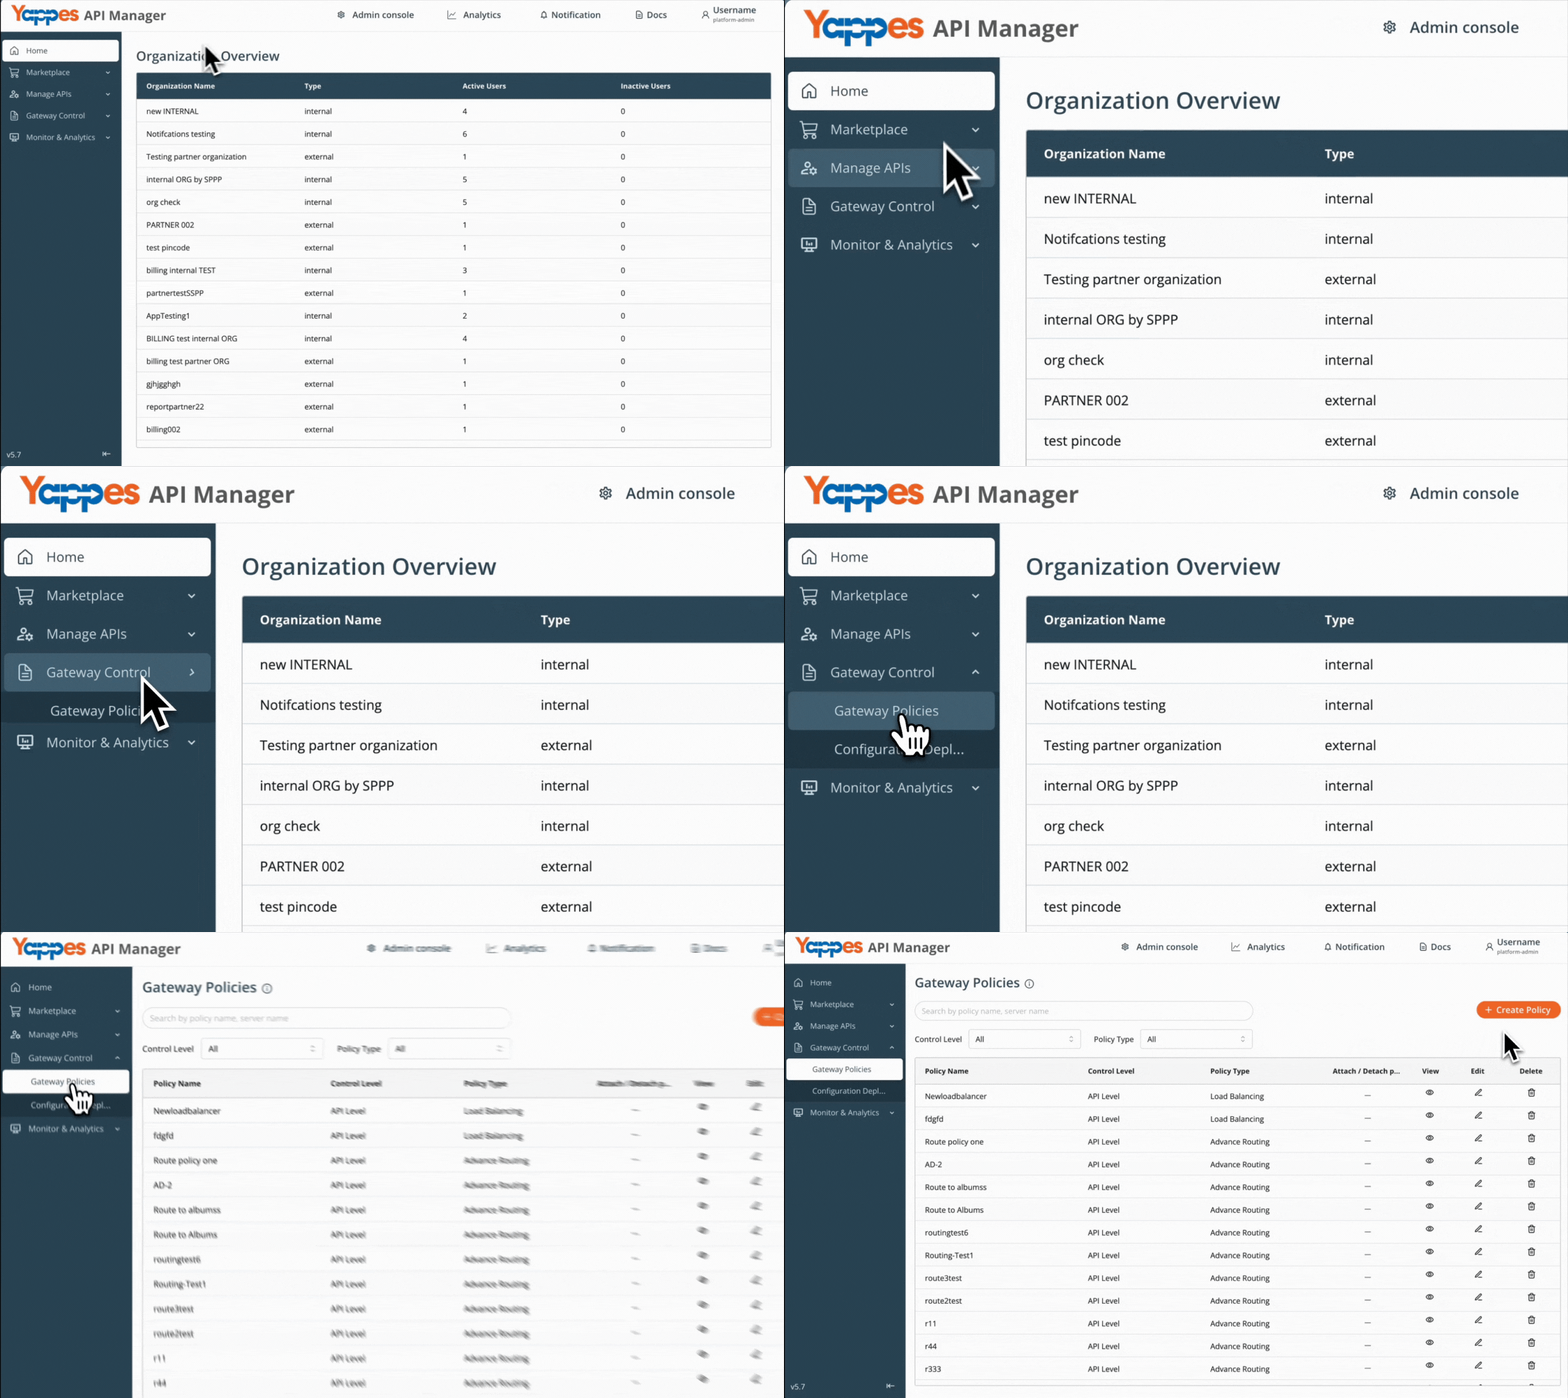
Step 1: Navigate to Gateway Policies
- Locate
Gateway Control → Gateway Policiesin the main navigation menu - The policies management interface will display
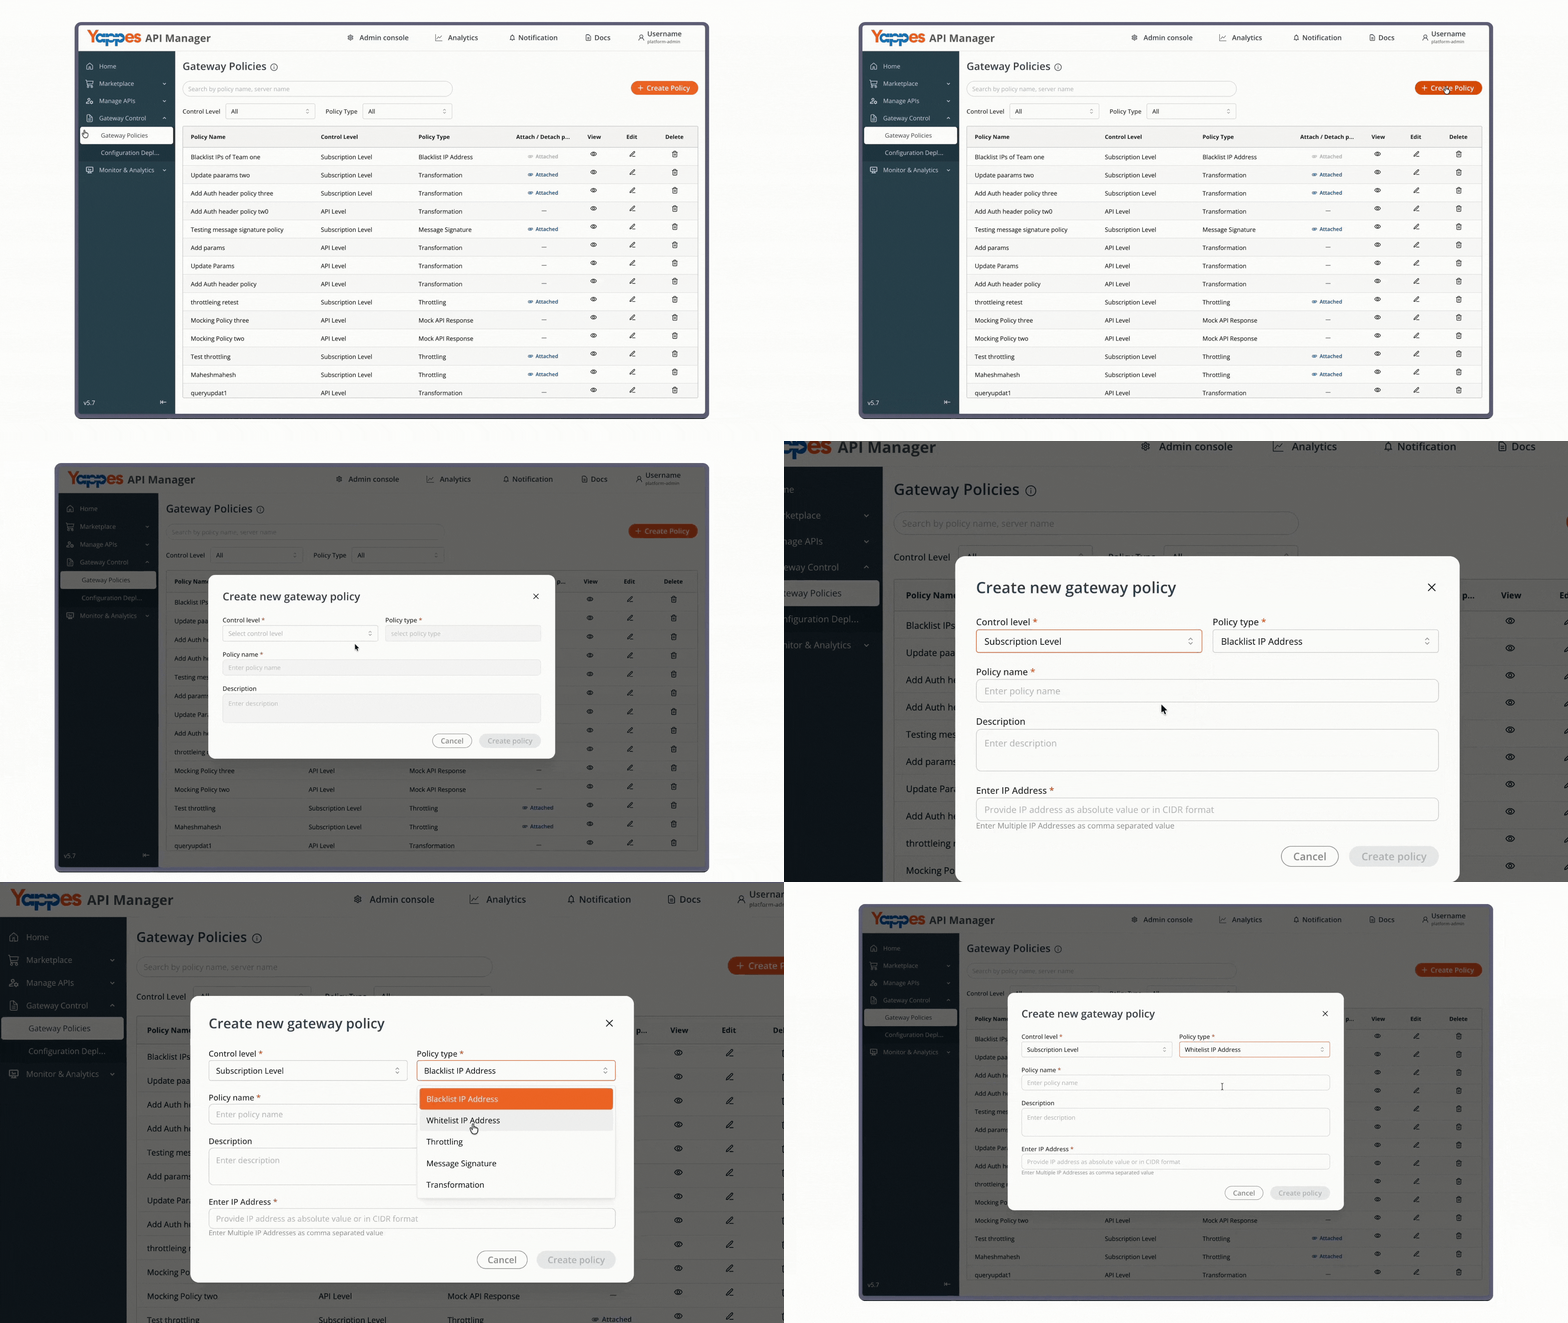
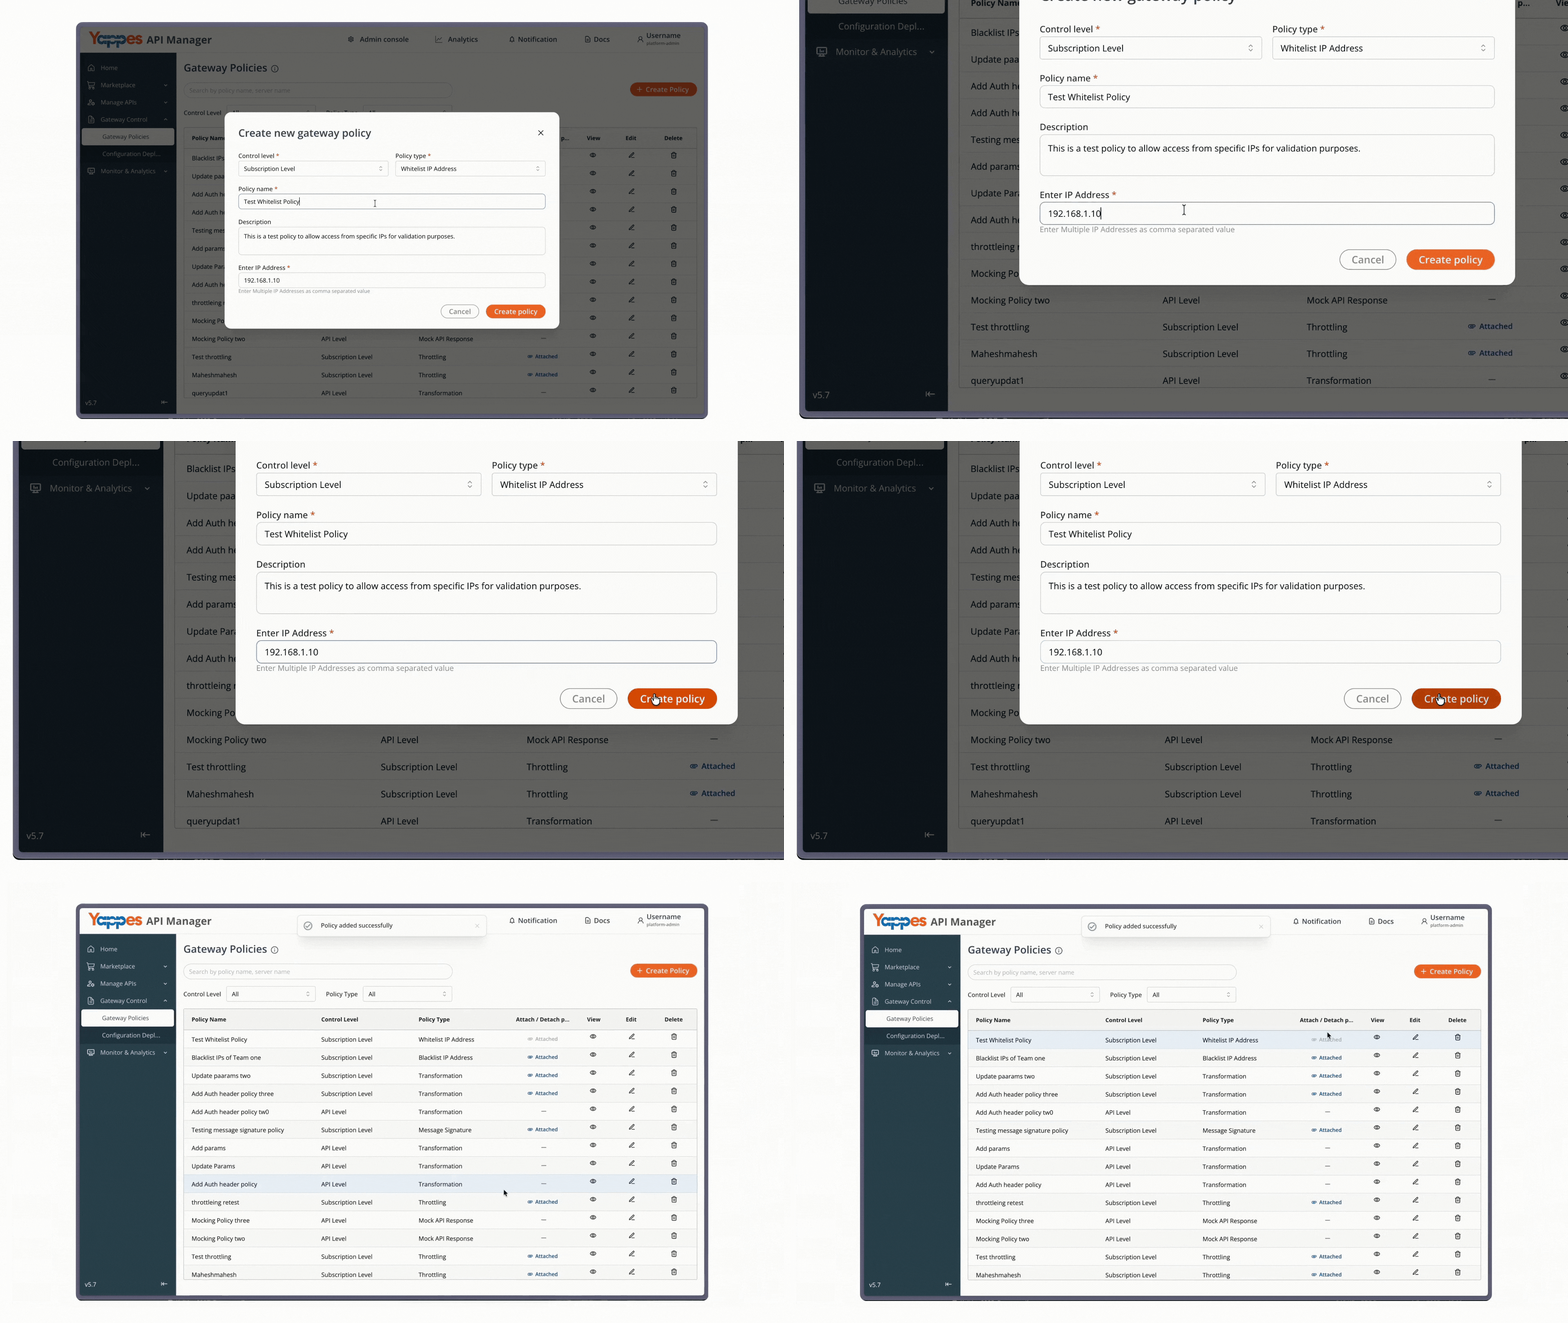
Step 2: Create a New Whitelist IP Address Policy
- Click
Create policyfrom the gateway page - Set the
Control LeveltoSubscription Level - In the
Policy Typedropdown, selectWhitelist IP Address
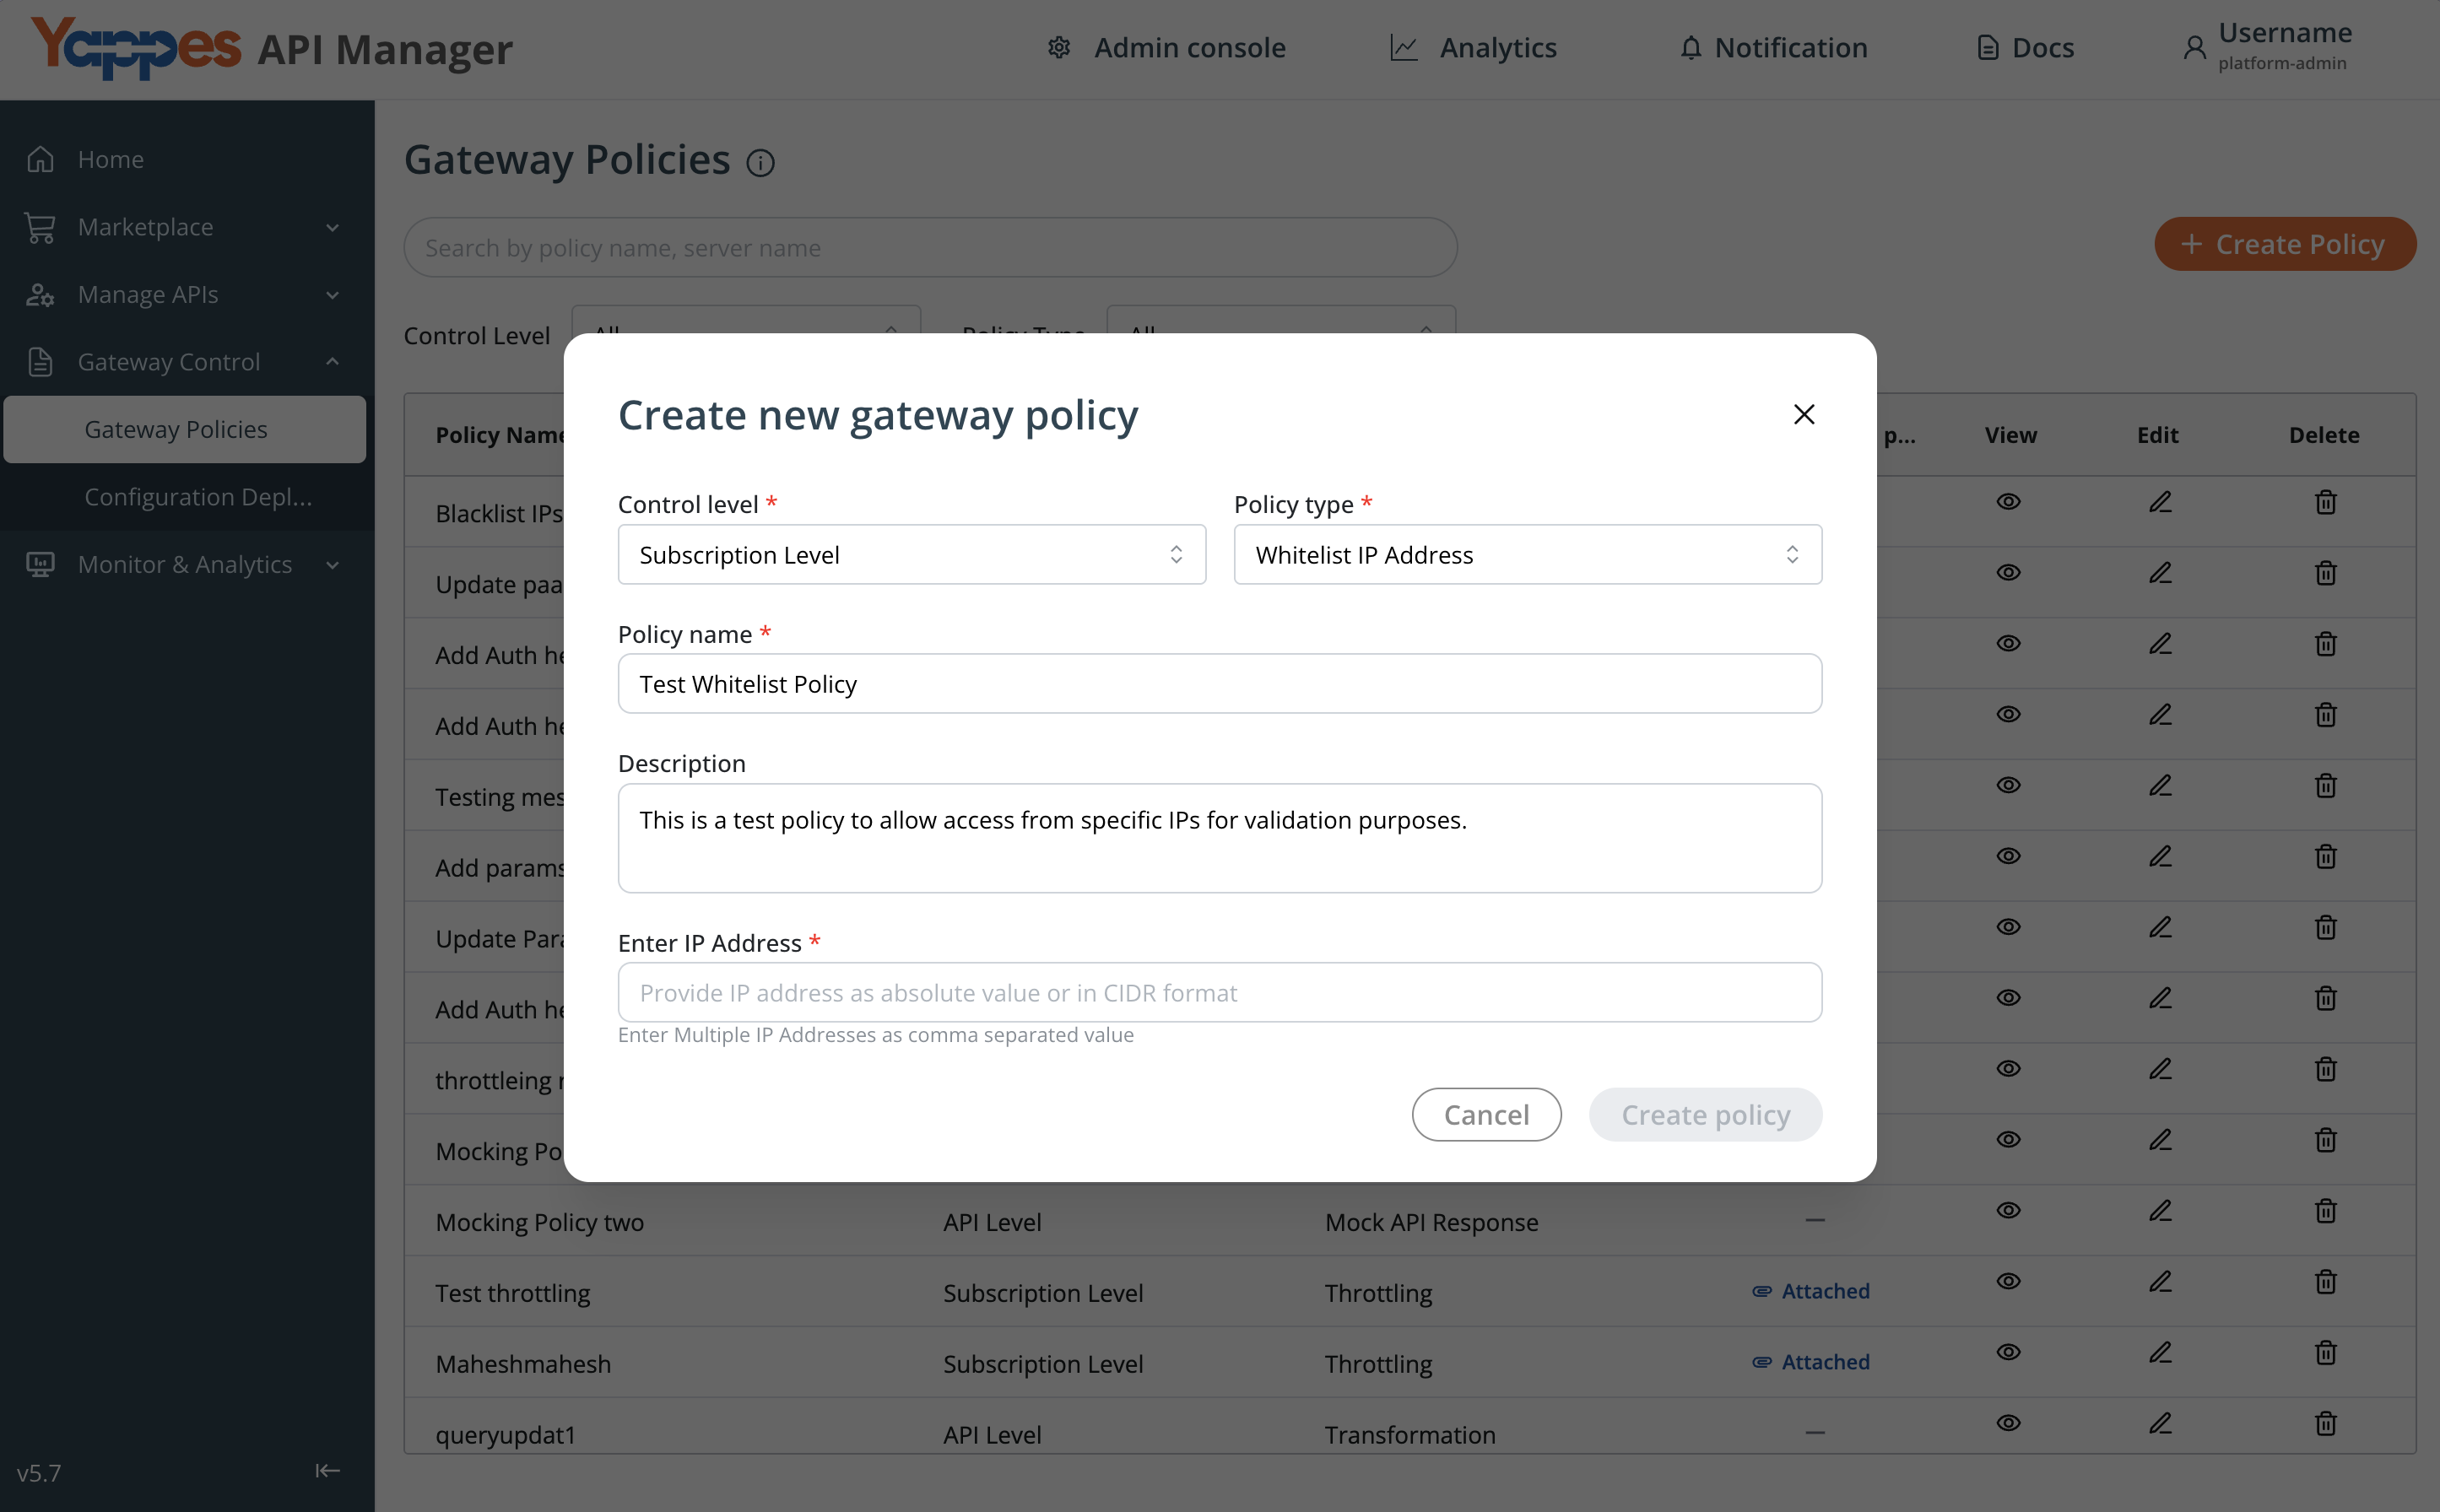
Step 3: Set the Policy Name
- Enter a descriptive name in the
Policy Name*field (e.g.,whitelist_ip_1) - Add a detailed description in the text area field to document the policy purpose
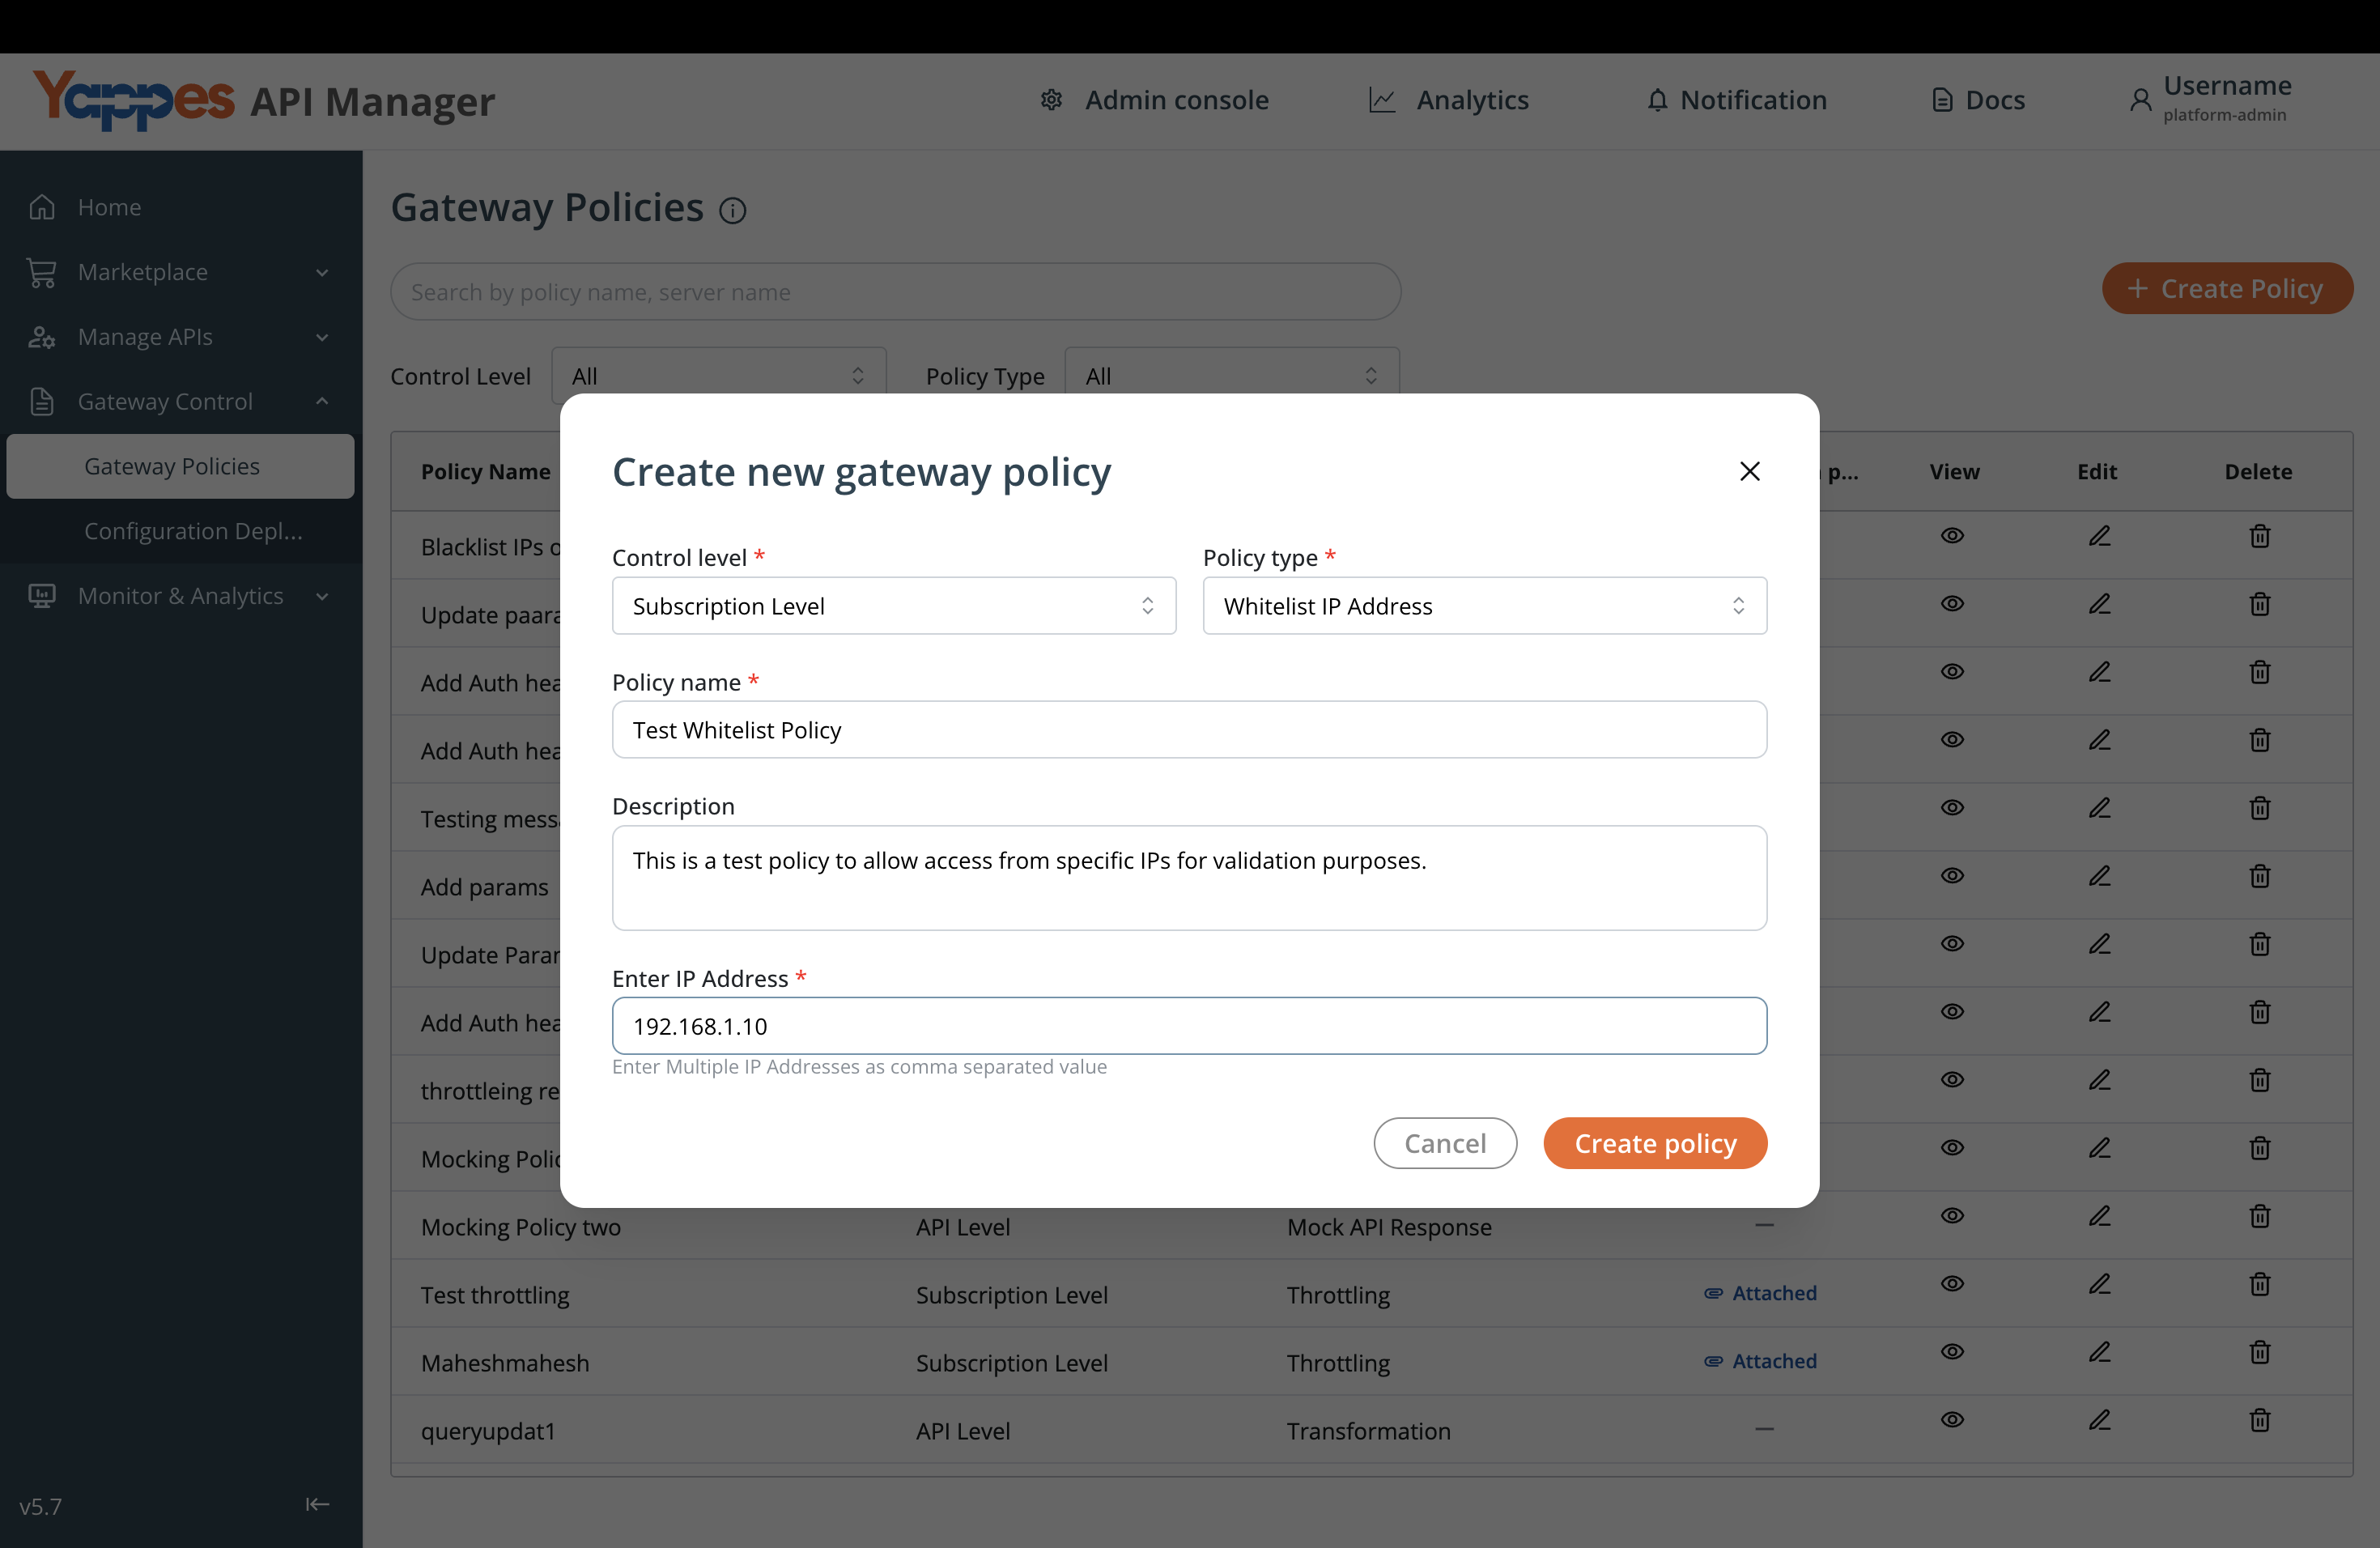
Step 4: Add IP Addresses
- In the
Enter IP Addressfield, input the IP addresses - Format: Enter IP addresses separated by commas
- Example:
172.1.2.3, 189.23.33.1 Critical:Ensure all legitimate user IPs are included to avoid access issues
Step 5: Save the Policy
- Review all entered information for accuracy
- Double-check that all necessary IP addresses are included
- Click the
Create Policybutton to create the policy - You should see a confirmation message, and the new policy will appear in the
Gateway Policieslist
Step 6: Navigate to Manage Subscriptions
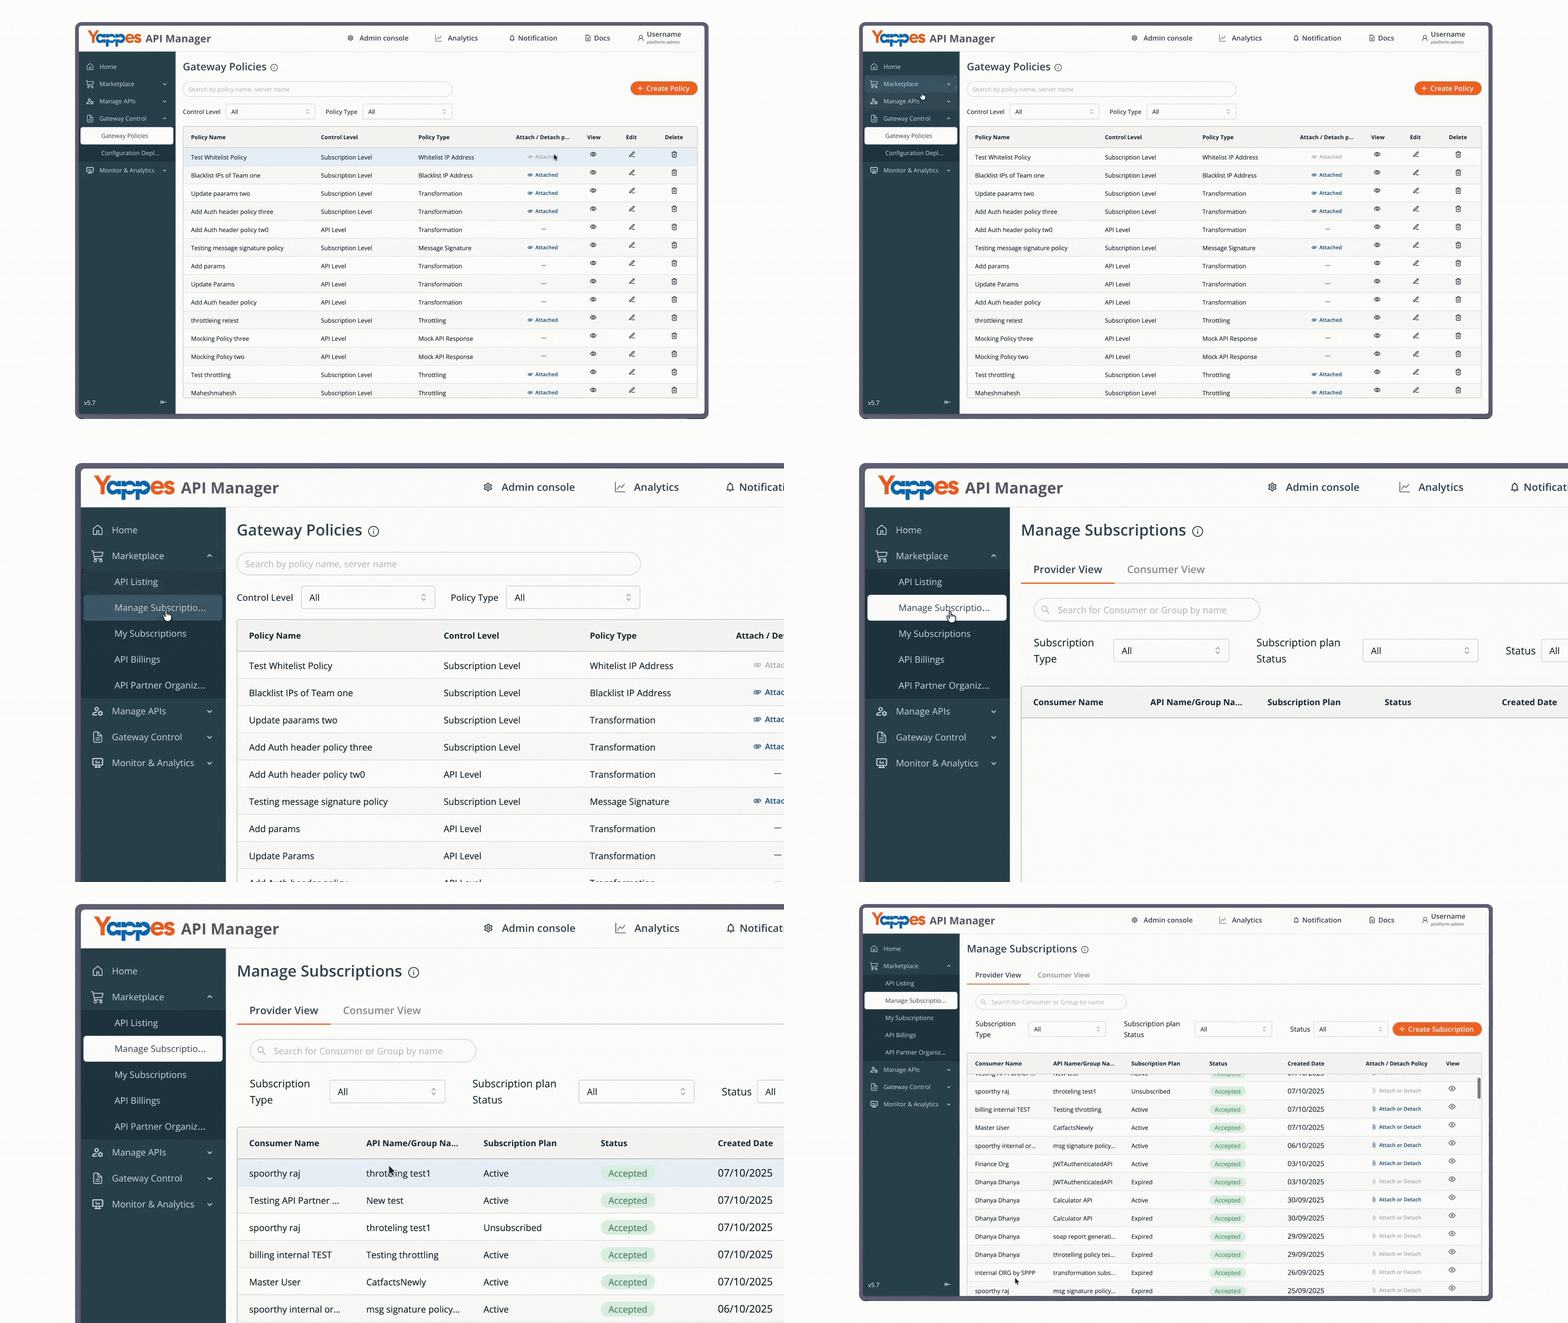
- From the main menu, click on
Manage Subscriptions - The
Manage Subscriptionspage will display a list of all API subscriptions - Locate the subscription(s) where you want to apply the whitelist policy
Step 7: Attach the Policy to Subscriptions
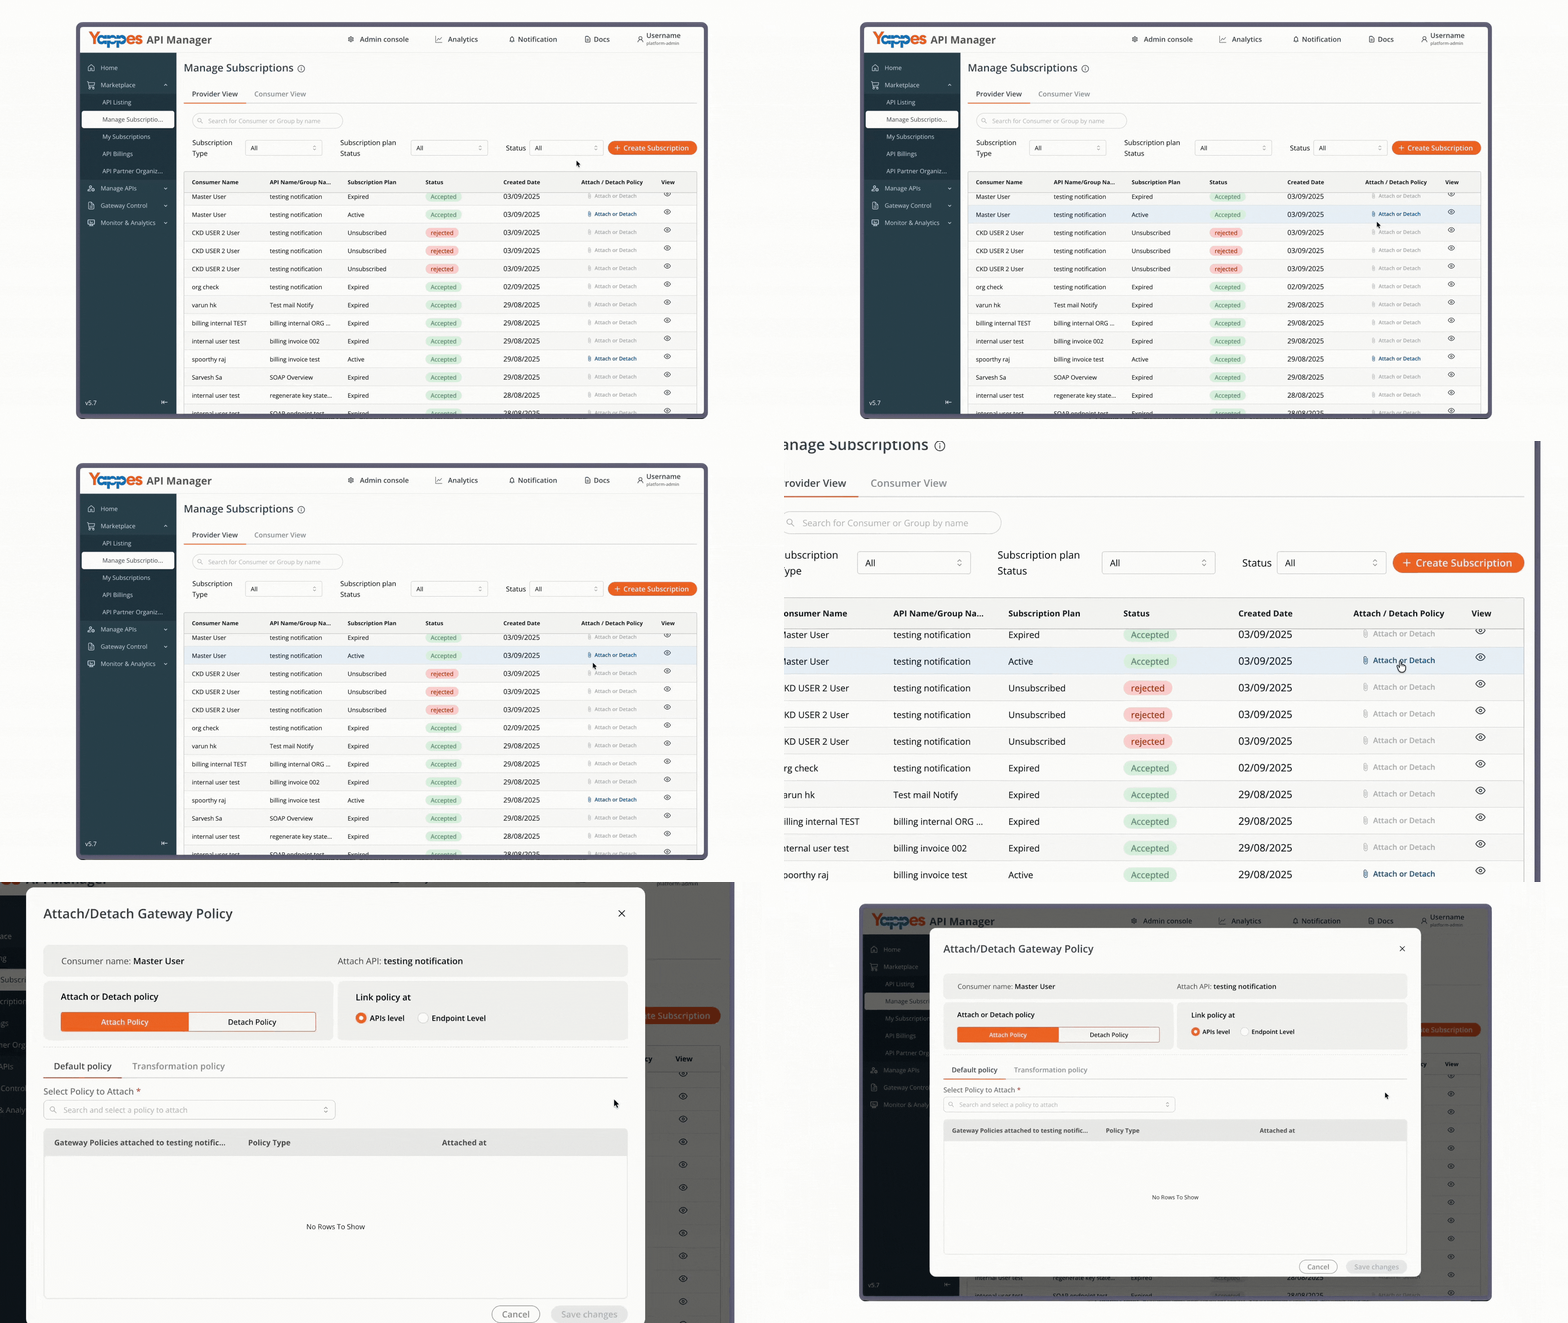
- Click the
Attach or Detachbutton for the relevant subscription - The policy attachment dialog will open
Step 8: Select and Attach the Policy
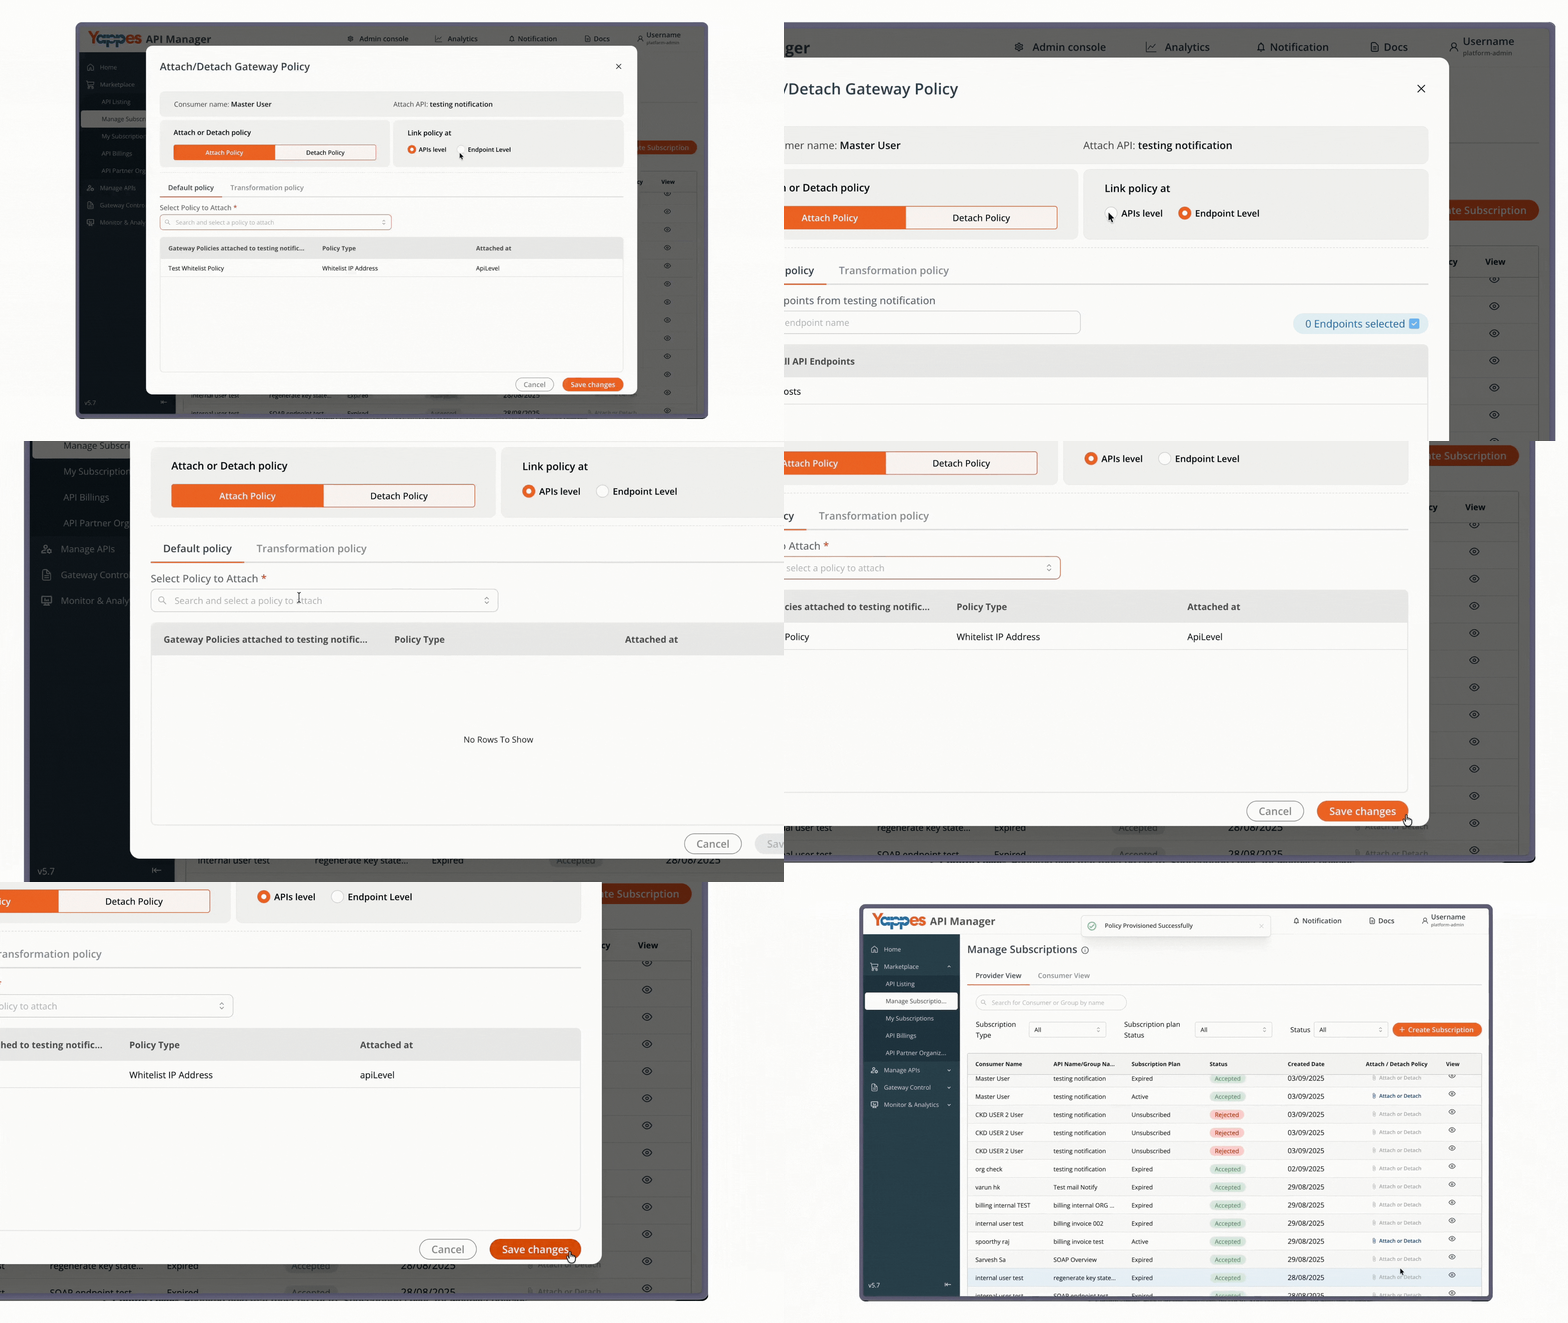
- In the
Select Policy to Attachdropdown field, choose your newly created whitelist policy (e.g.,whitelist_ip_1) - Choose the attachment level:
API Level:Applies Whitelist IP to all endpoints of an APIEndpoint Level:Applies Whitelist IP to specific endpoints only
- Click
Attachto apply the policy to the subscription
Step 9: Verify Policy Attachment
- Confirm that the policy appears in the attached policies list for the subscription
Test accessfrom bothwhitelistedandnon-whitelistedIPs to verify proper functioning
Understanding the Interface
Key Form Fields
- Control Level*: Required field that must be set to "Subscription Level" for whitelist policies
- Policy Name*: Required unique identifier for your policy
- Policy Type*: Determines the functionality – select "Whitelist IP Address"
- Description: Optional field for documenting the approved access scope
- Enter IP Address*: Comma-separated list of IP addresses to allow
Subscription Management Interface
The Manage Subscriptions section provides:
- List of all active API subscriptions
- Consumer/organization information
- API names and subscriptions
- Attach/Detach functionality for policy management
Configuration and Settings
Required Configuration Fields
- Control Level: Must be set to "Subscription Level"
- Policy Name: Unique identifier (no special characters recommended)
- IP Addresses: Valid IPv4 addresses in format
xxx.xxx.xxx.xxx
Best Practices for IP Address Entry
- Use comma separation between multiple IP addresses
- Avoid extra spaces:
192.168.1.1,10.0.0.2 - Include all necessary IPs before saving to prevent lockouts
- Consider using IP ranges for large networks (if supported)
- Document the owner/purpose of each whitelisted IP in the description
Policy Attachment Options
- API Level: Applies the whitelist to all endpoints within the API
- Consumer-Specific: Target specific consumers or organizations
- Multiple policies can be attached to a single subscription if needed
Warning
Ensure legitimate users maintain access after attachment.
Double-check all necessary IPs are included before saving to prevent accidental lockouts.
Verification and Testing
Confirming Successful Policy Creation
- Navigate back to
Gateway Policiesafter creation - Verify your policy appears in the list with:
- Correct policy name
Subscription Levelas control levelWhitelist IP Addressas policy type
Testing the Whitelist
Critical Testing Steps:
-
Test from Whitelisted IP:
- Attempt to access the API from an approved IP address
- The request should be successful with normal response
-
Test from Non-Whitelisted IP:
- Attempt to access from an IP not on the list
- The request should be denied with appropriate error message
-
Verify Business Continuity:
- Confirm all legitimate users can still access the API
- Check that partner integrations remain functional
Monitoring Policy Effectiveness
- Review API access logs for denied requests from non-whitelisted IPs
- Monitor for any false negatives (legitimate users being blocked)
- Track successful connections from whitelisted addresses
- Regularly audit the whitelist for outdated or unnecessary entries
Troubleshooting
Common Issues and Solutions
-
Issue: Legitimate users cannot access the API after whitelist implementation
Solution: Verify their IP address is included in the whitelist; check for dynamic IPs -
Issue: Policy not appearing in the attachment dropdown
Solution: Ensure the policy was saved successfully and set toSubscription Level -
Issue: Non-whitelisted IPs can still access the API
Solution: Verify the policy is properly attached to the correct subscription and API level -
Issue: "Access Denied" errors for whitelisted IPs
Solution: Check for typos in IP addresses; verify no conflicting policies are attached -
Issue: Dynamic IP addresses causing intermittent access issues
Solution: Consider whitelisting IP ranges or implementing alternative authentication
Error Messages
- "Invalid IP format": Check that all IP addresses follow
xxx.xxx.xxx.xxxformat - "Policy name already exists": Choose a unique name for your policy
- "Access denied from this IP": Confirms whitelist is working; IP not on approved list
- "No valid IP addresses provided": Ensure at least one valid IP is entered
Emergency Recovery Procedures
If you accidentally lock yourself out:
- Contact another administrator with access from a whitelisted IP
- Access the system from an already whitelisted location
- Use emergency console access if available
- Contact Yappes Support for policy removal assistance