Caching Policy
Overview
The Yappes Caching Policy allows you to improve API performance by storing frequently accessed responses at the gateway level, so you can reduce backend load and deliver faster response times to your users.
This powerful feature enables you to configure caching rules based on various parameters such as headers, paths, and query parameters, ensuring that your APIs serve cached content when appropriate while maintaining data freshness through configurable expiry times.
The caching feature integrates seamlessly into the Yappes API management workflow, offering flexible implementation options that adapt to your needs. Whether you're onboarding a new API or optimizing existing ones, caching policies help you achieve significant performance improvements with minimal configuration effort.
By implementing caching at the gateway level, you gain centralized control over cache management, reduce infrastructure costs, and enhance the overall user experience through faster API responses.
Prerequisites
Before implementing Caching on the Yappes platform, ensure you have:
Access Requirements:
- Valid Yappes platform account with API Manager access
- Appropriate permissions to create and manage gateway policies
- Rights to onboard and configure APIs
Preliminary Setup:
- At least one API ready for onboarding (if using the onboarding method)
Estimated Time:
- 15-20 minutes for initial setup
Custom error and message
For error scenarios, you can override the default HTTP status code, error code, and message. See Custom Error and Message.
Step-by-Step Implementation
Important: Caching policies can be created using two methods. Choose the approach that best fits your workflow.
Method 1: Creating Caching During API Onboarding
Step 1: Navigate to API Management
- Click on
Manage APIsin the main dashboard. - Select
My APIsfrom the submenu. - You should now see your API management interface.
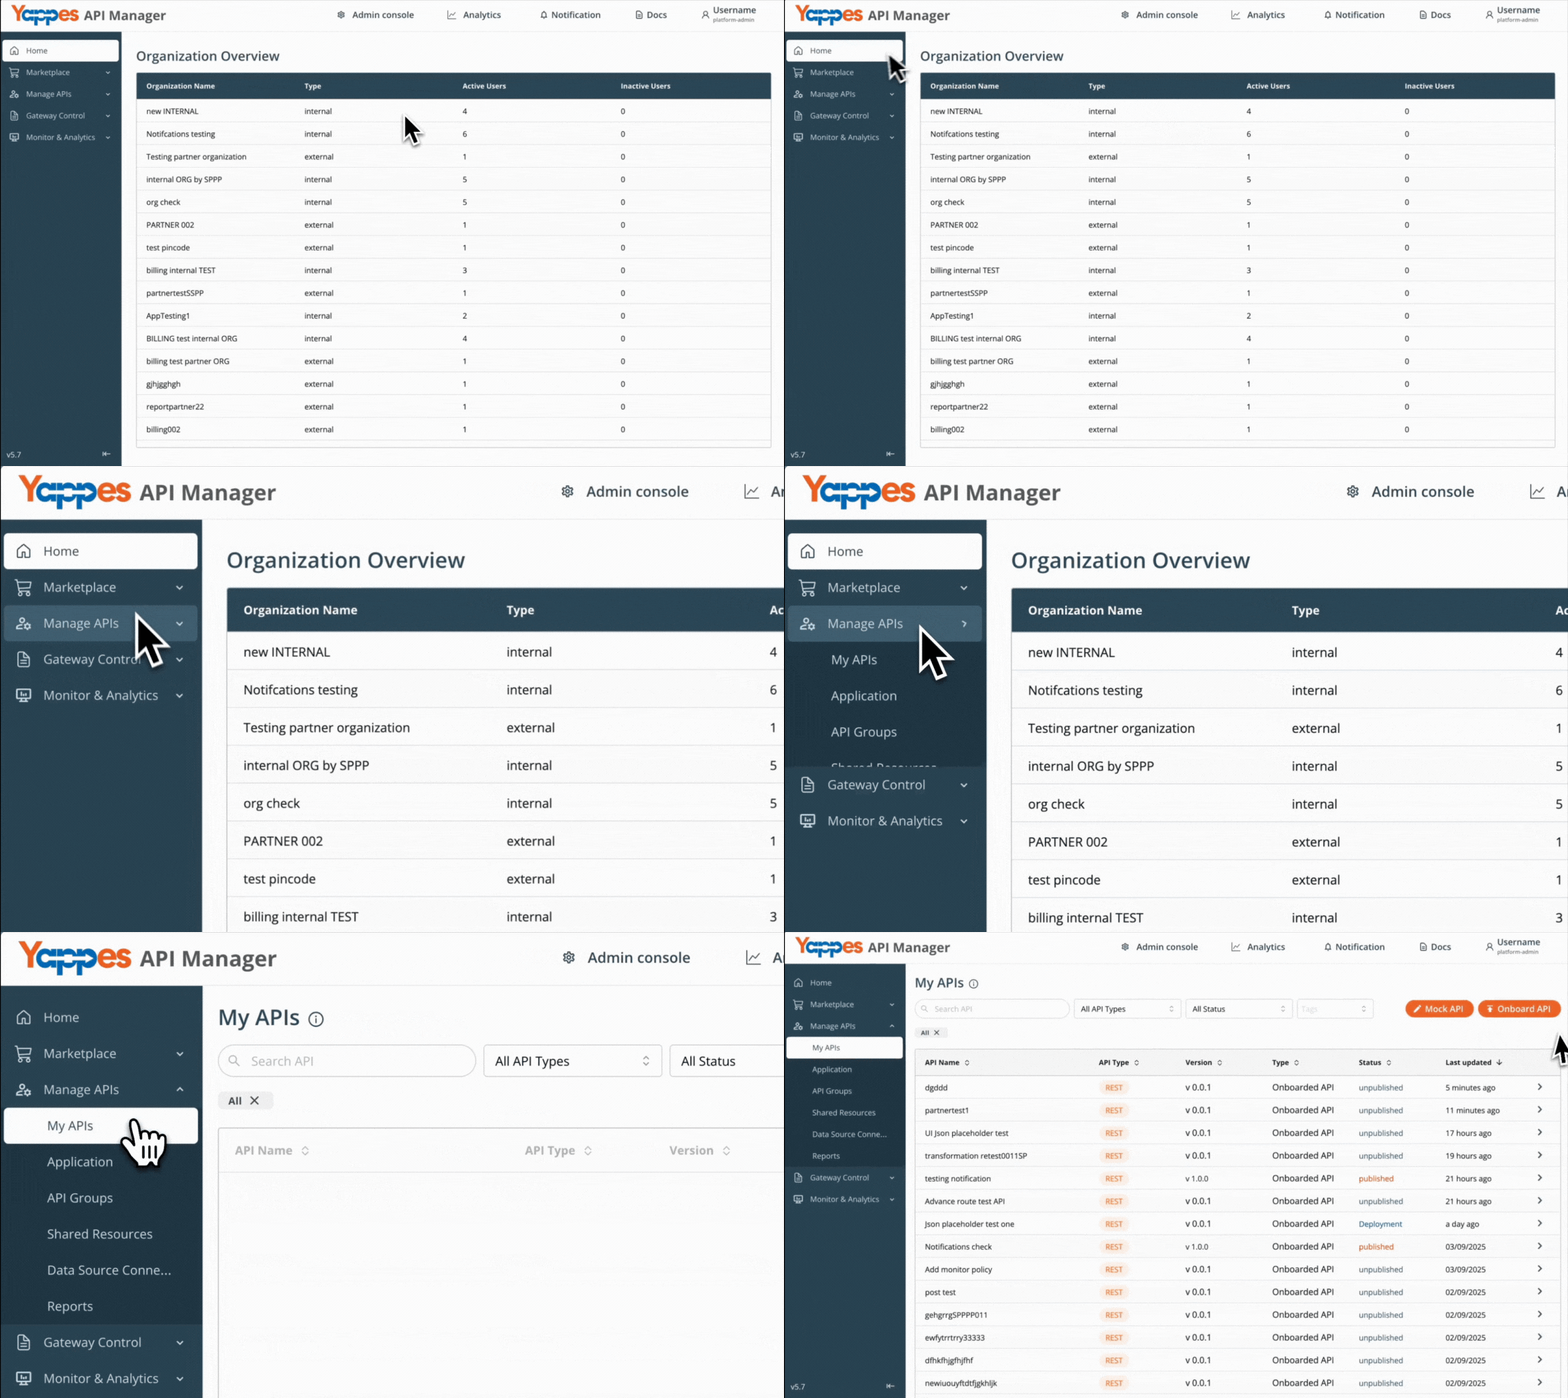
Step 2: Initiate API Onboarding
- Onboard from My APIs using the guide for your API type.
Step 3: Select Endpoint for Caching
- Click on your newly created endpoint (e.g., "Get Post Data").
- The endpoint details panel will open.
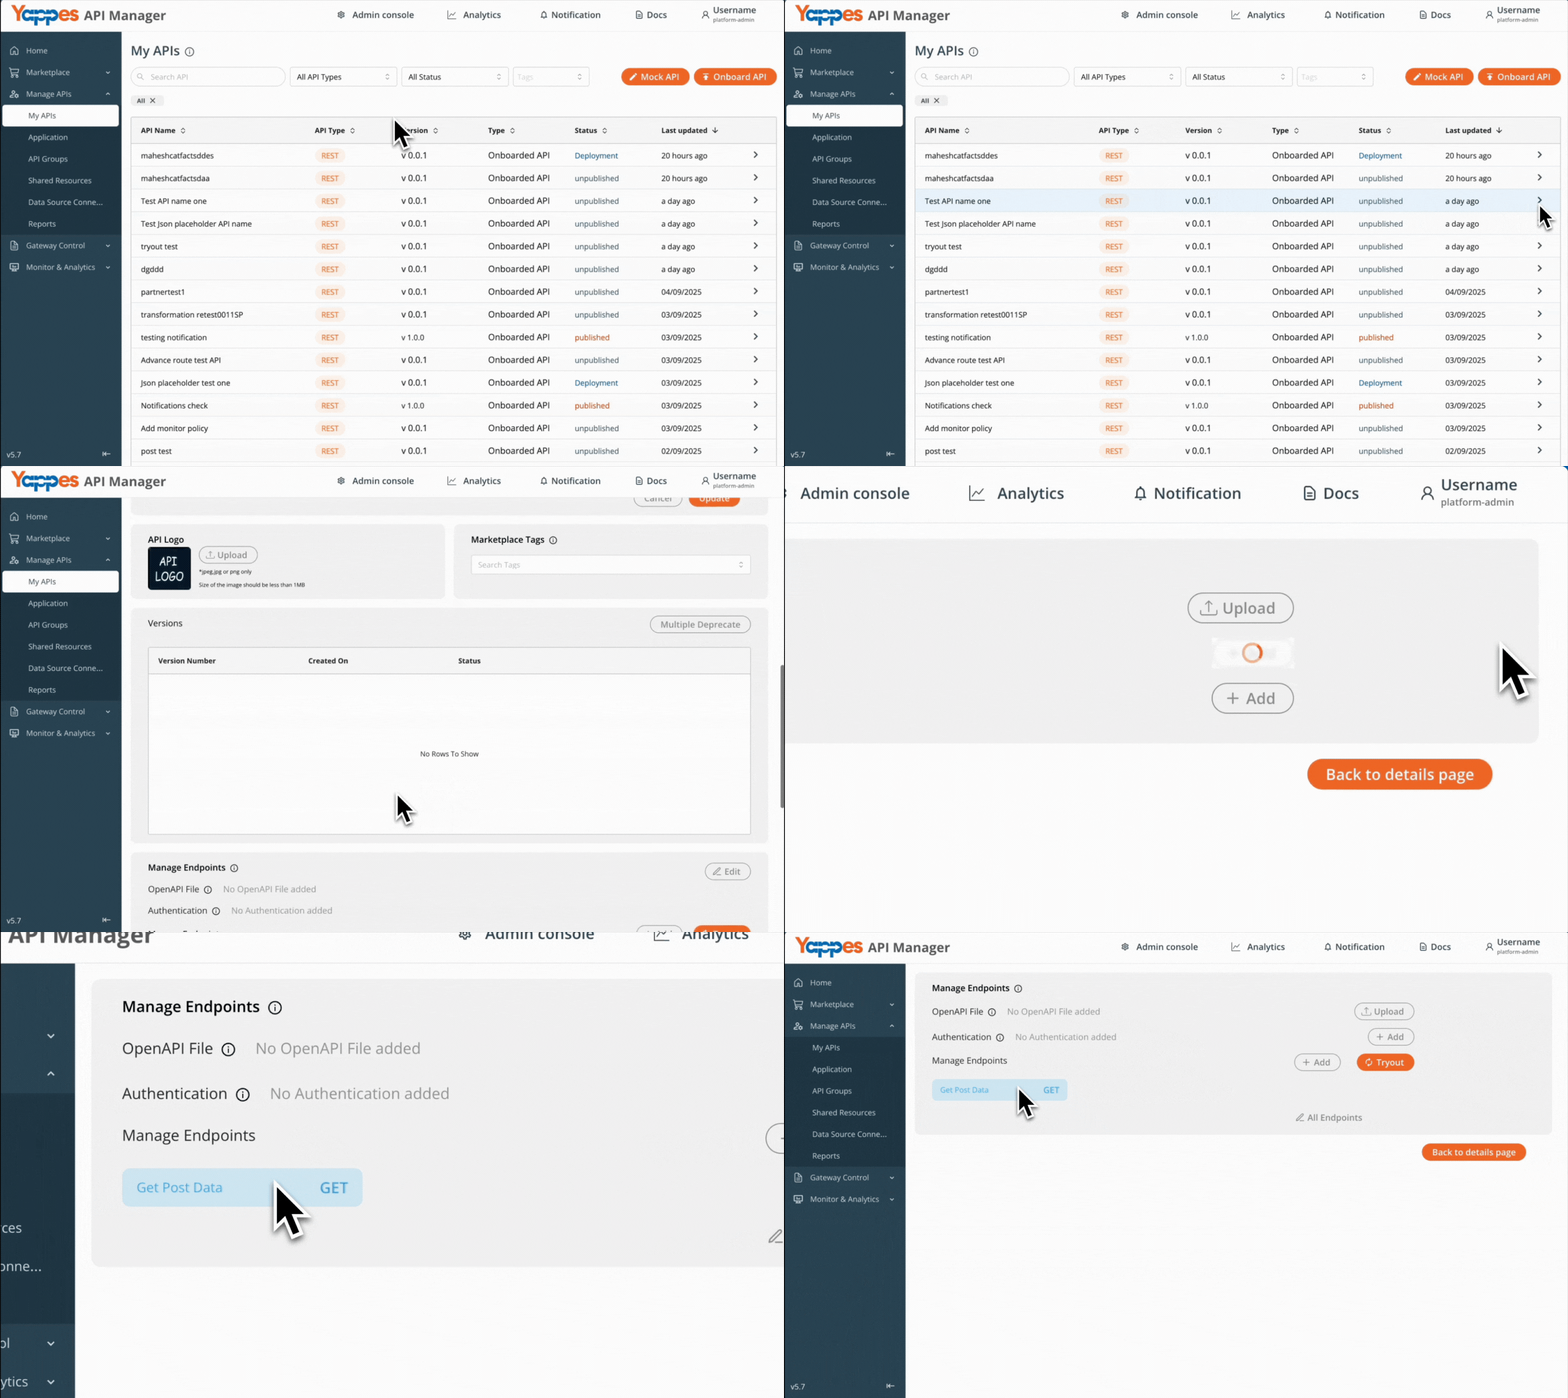
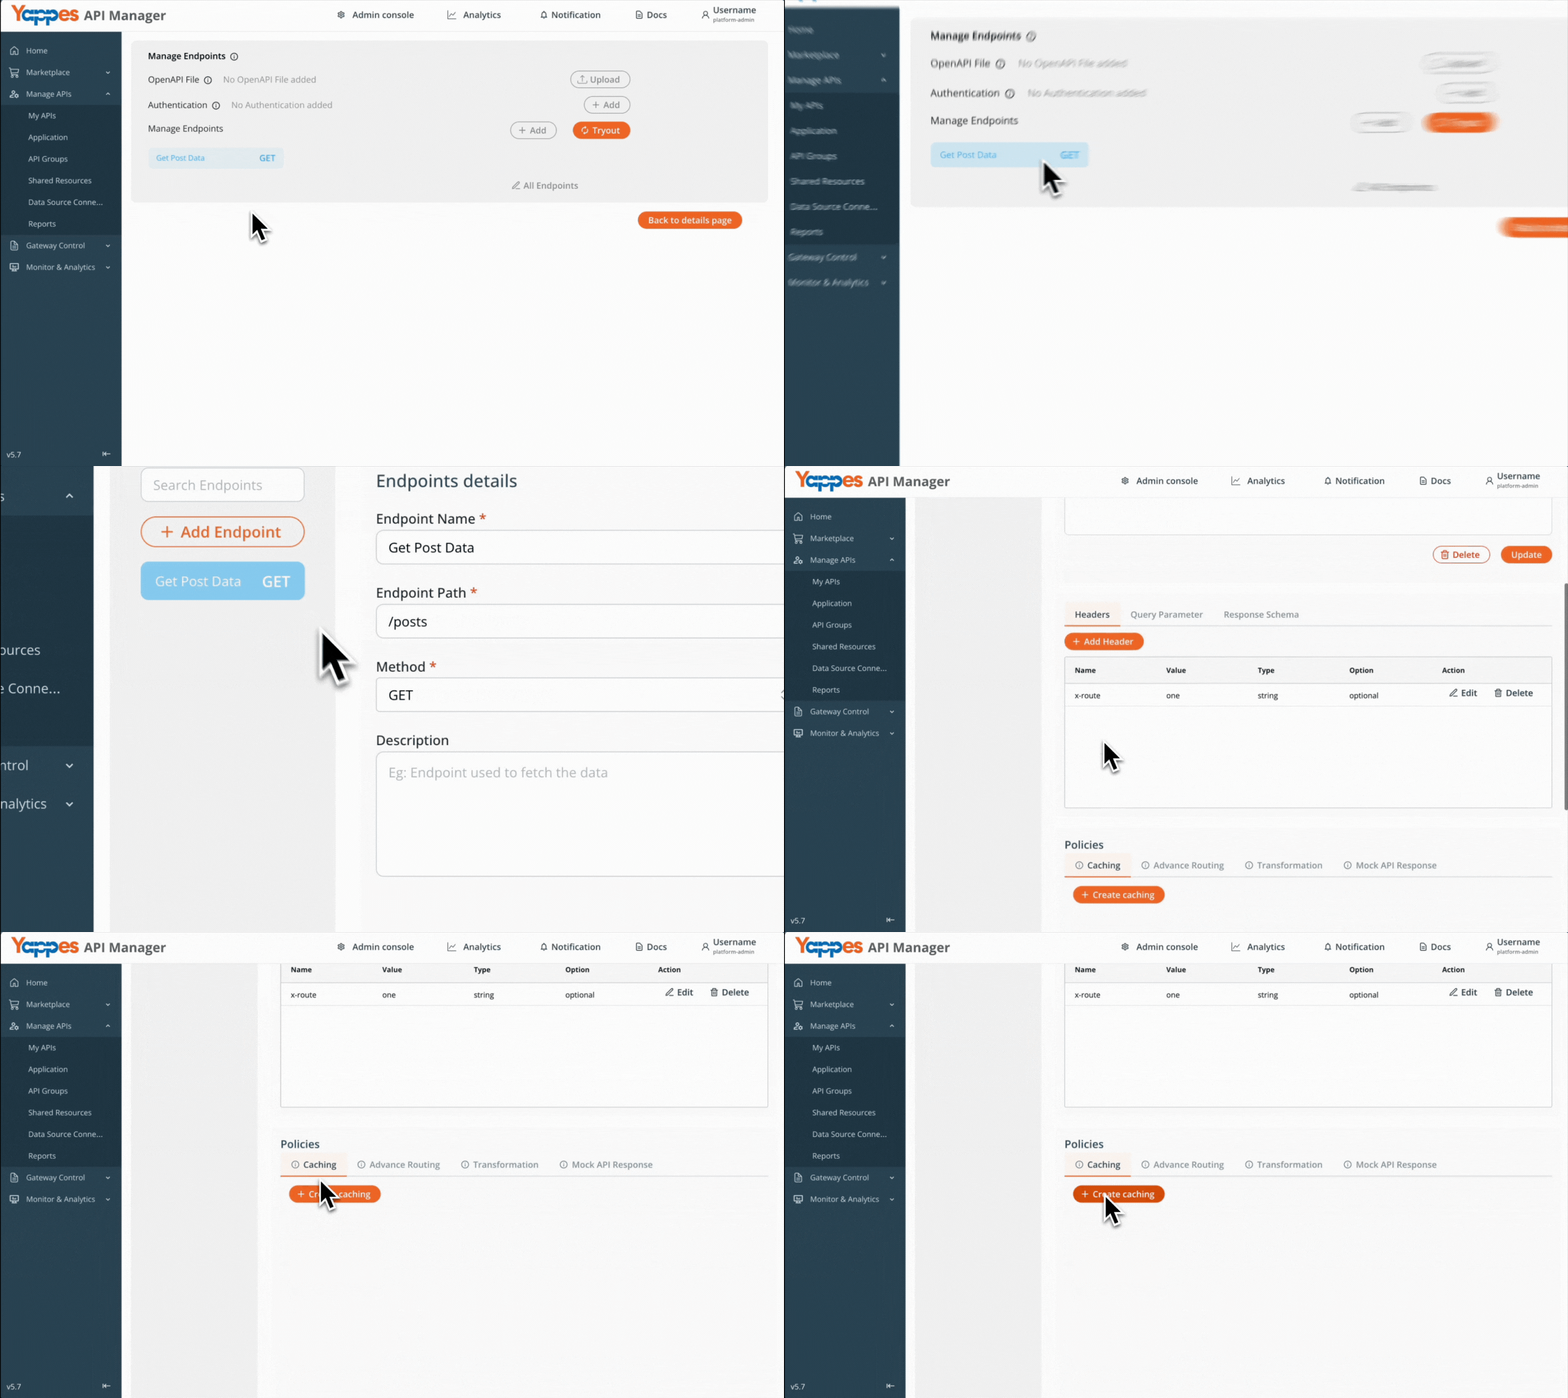
Step 4: Access Caching Configuration
- Locate and click the
Cachingbutton in the interface. - Click on
Create Cachingto open the policy configuration panel. - The caching configuration interface will display.
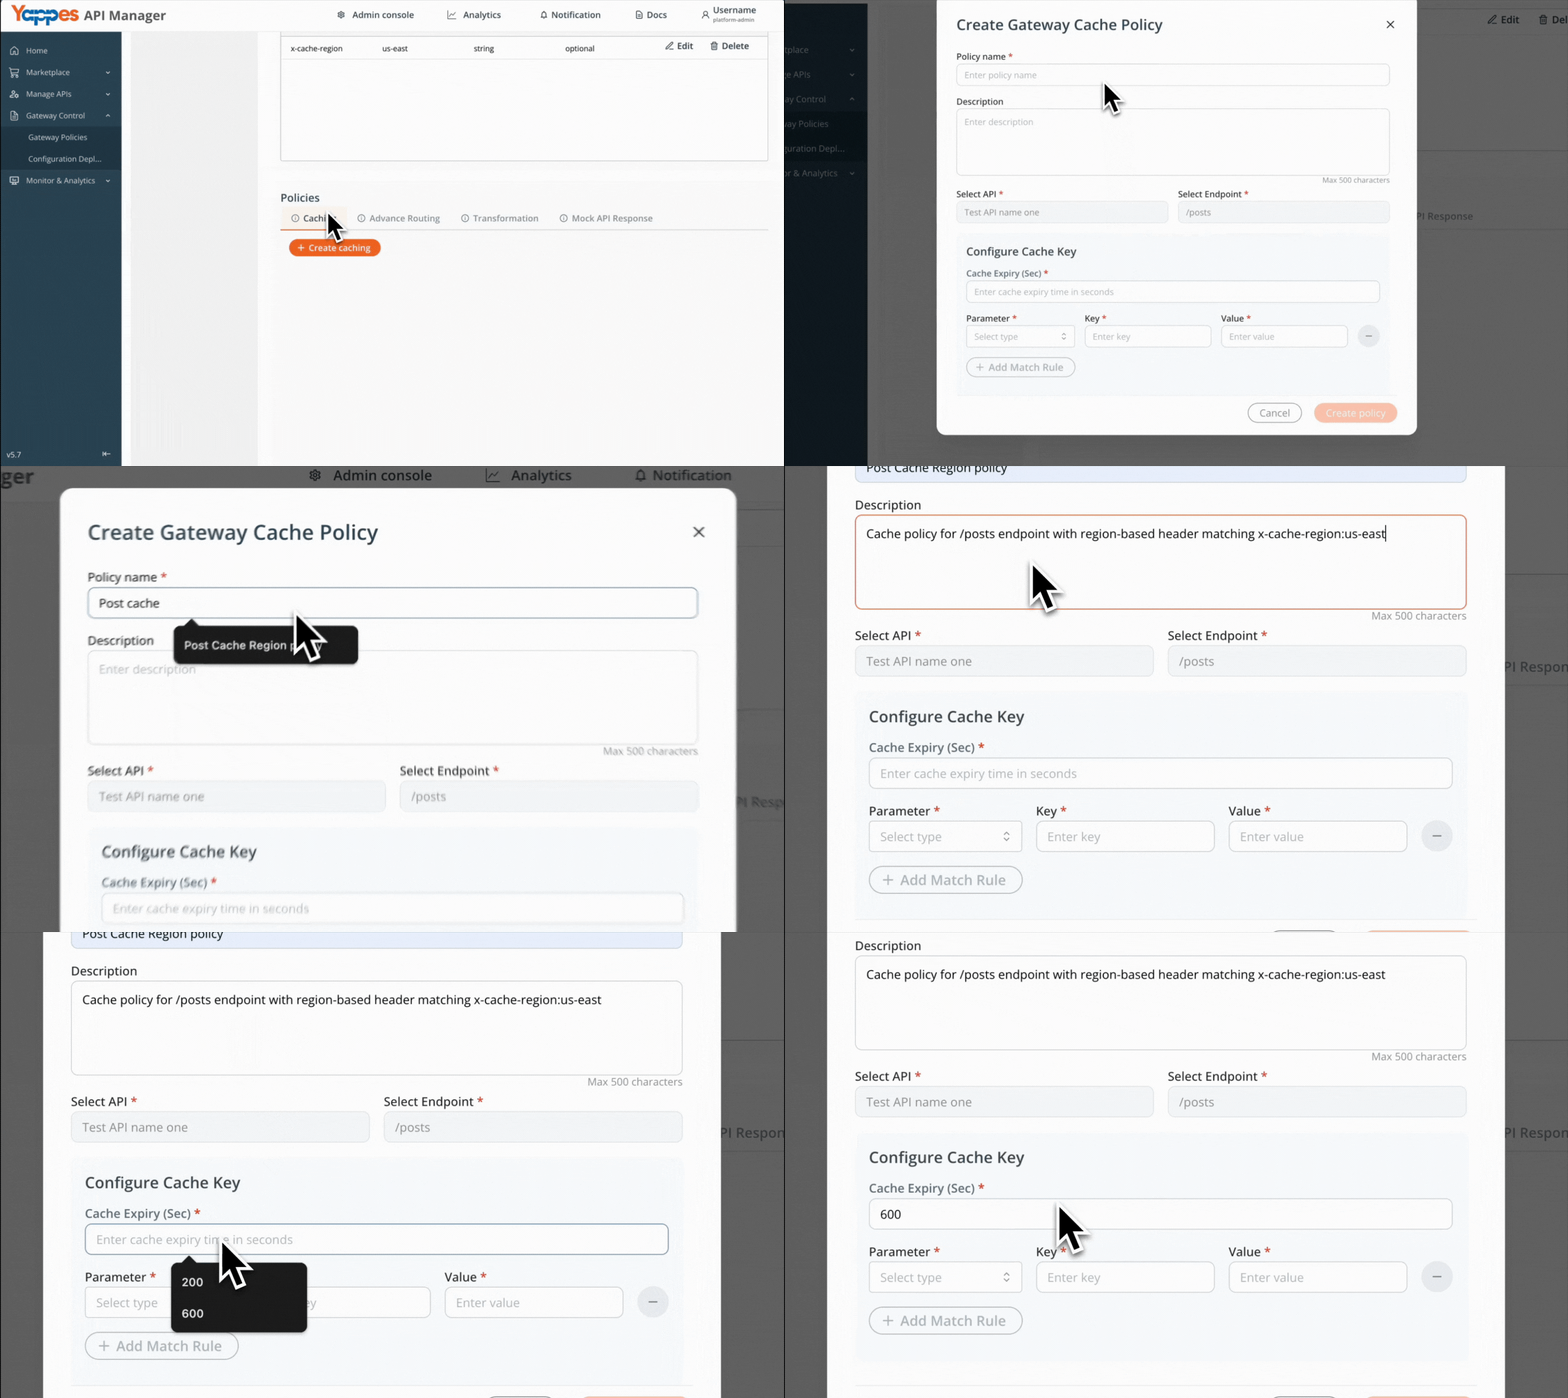
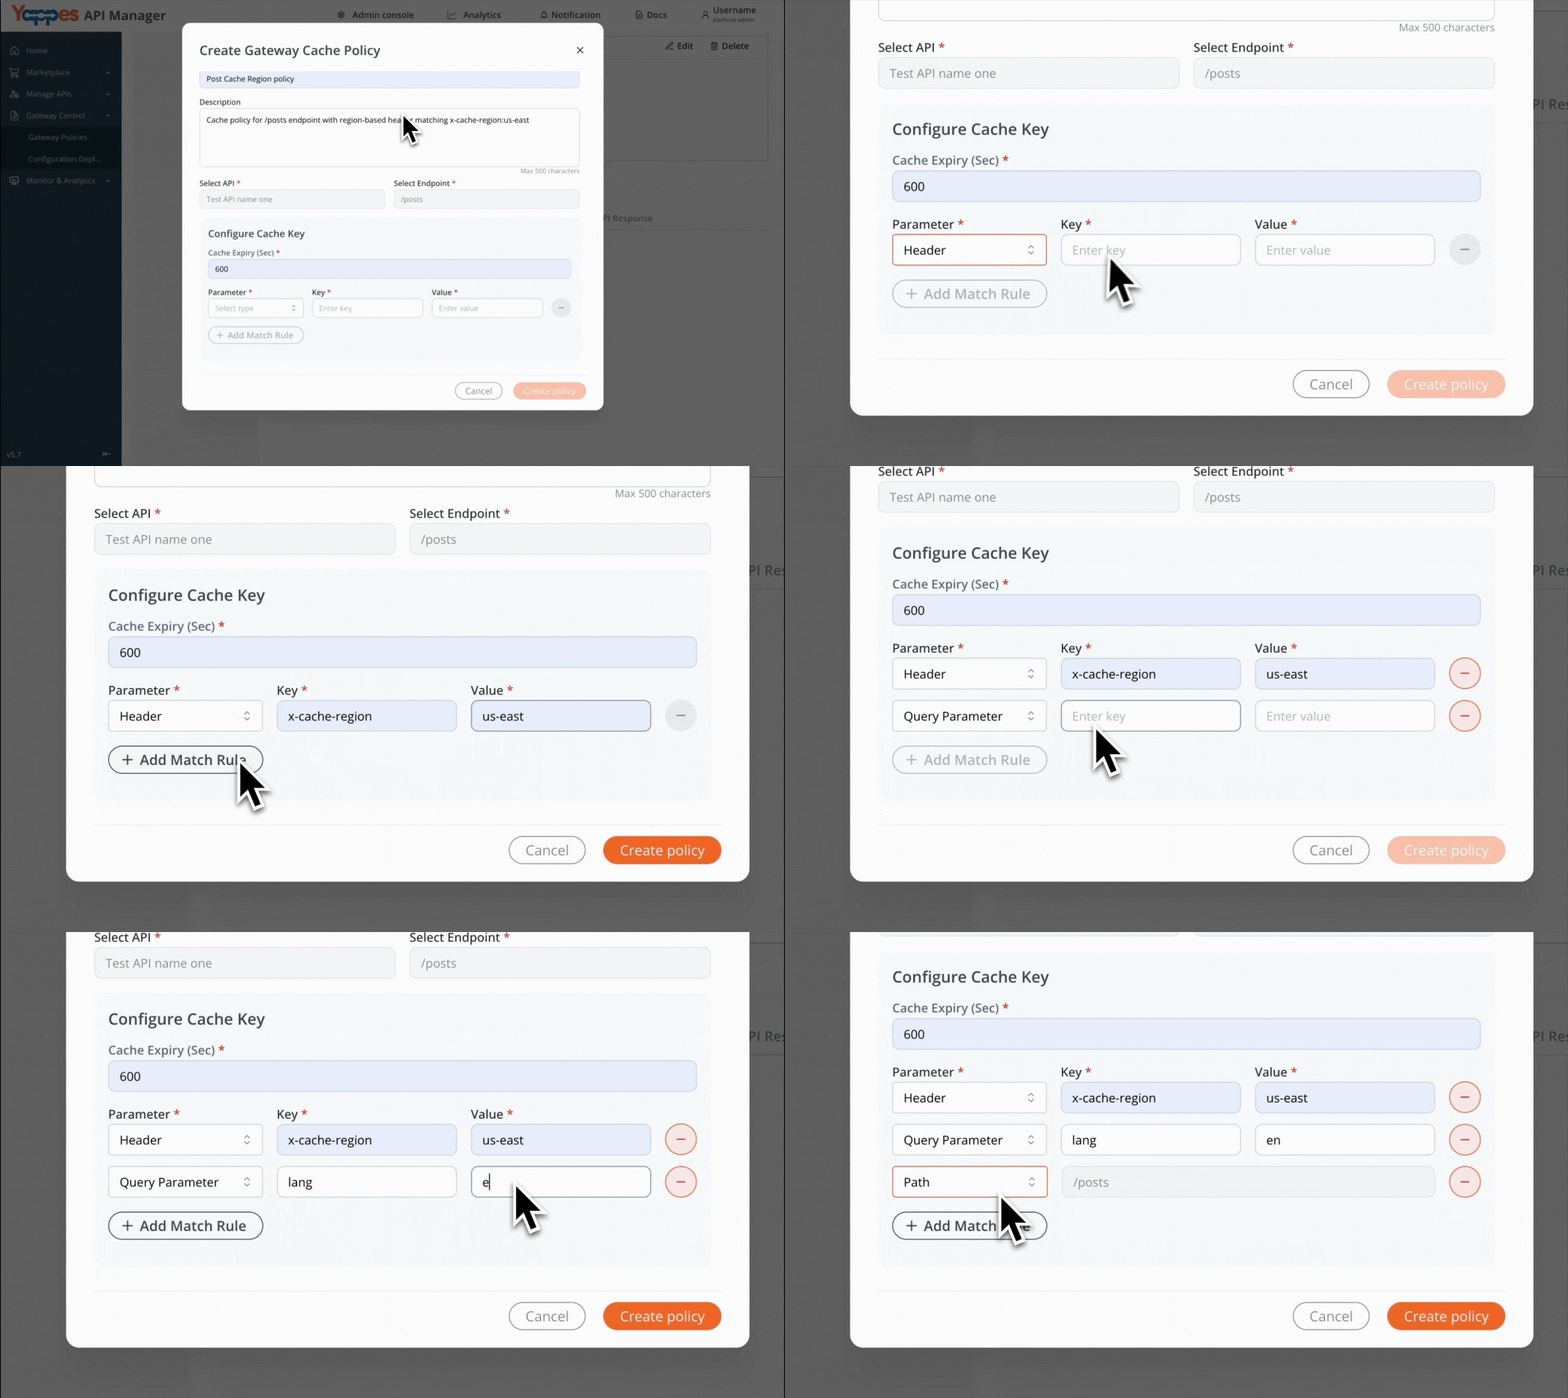
Step 5: Create the Caching Policy
- Enter a descriptive name in the
Policy Name* field (e.g., Post Cache Region policy). - Add a detailed description in the Enter description field to document the policy purpose.
- Set
Cache Expiry* to determines how long responses remain cached (e.g., 50).
Step 6: Define Cache Parameters
- In the
Parameter* dropdown, select your cache key type: - Header: Cache based on request headers
- Path: Cache based on URL path
- Query Parameter: Cache based on query strings
- Enter the
Key* (e.g., browser). - Enter the
Value* (e.g., chrome). - Click
Add Match Ruleto add another parameter.
Step 7: Finalize Caching Policy
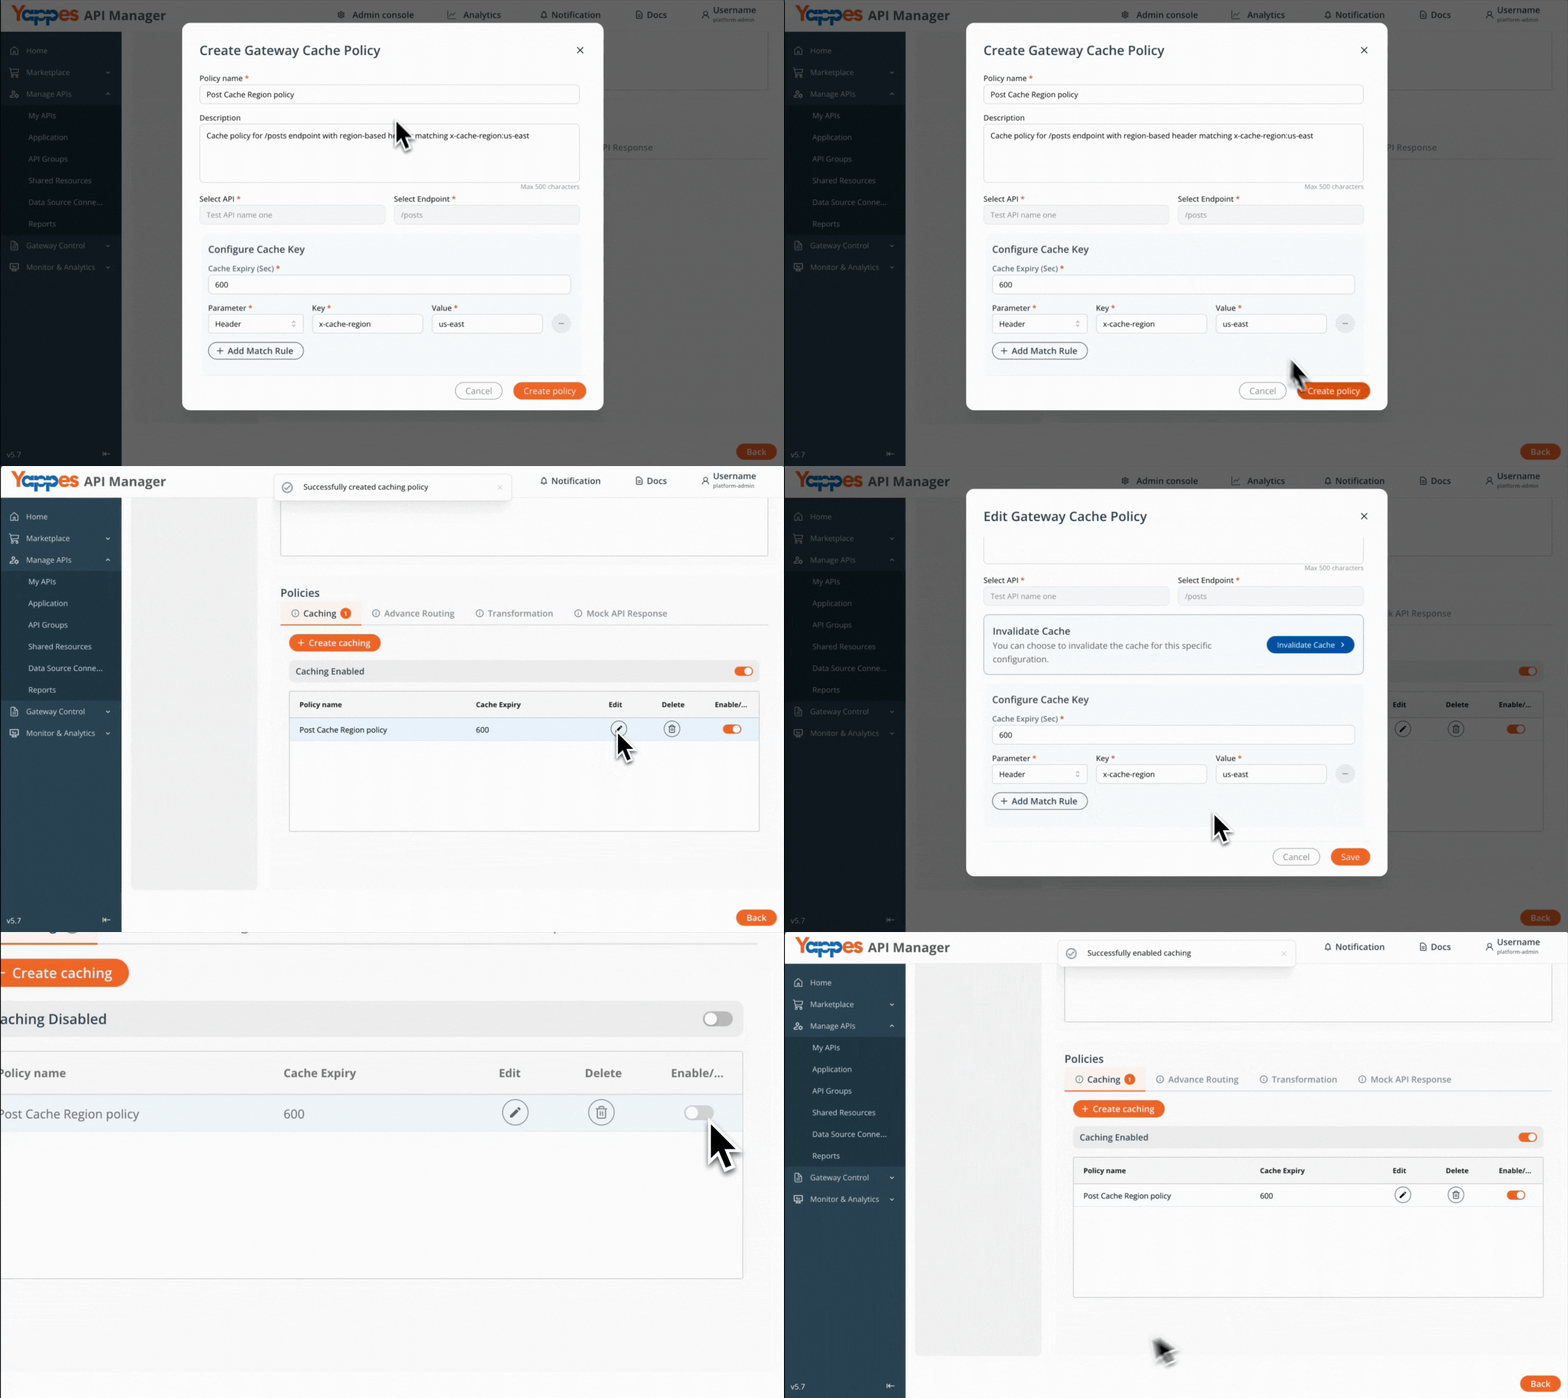
- Review your caching configuration.
- Click on
Create policyto save, attach and activate the caching policy.
Method 2: Creating Caching from Gateway Policy Page
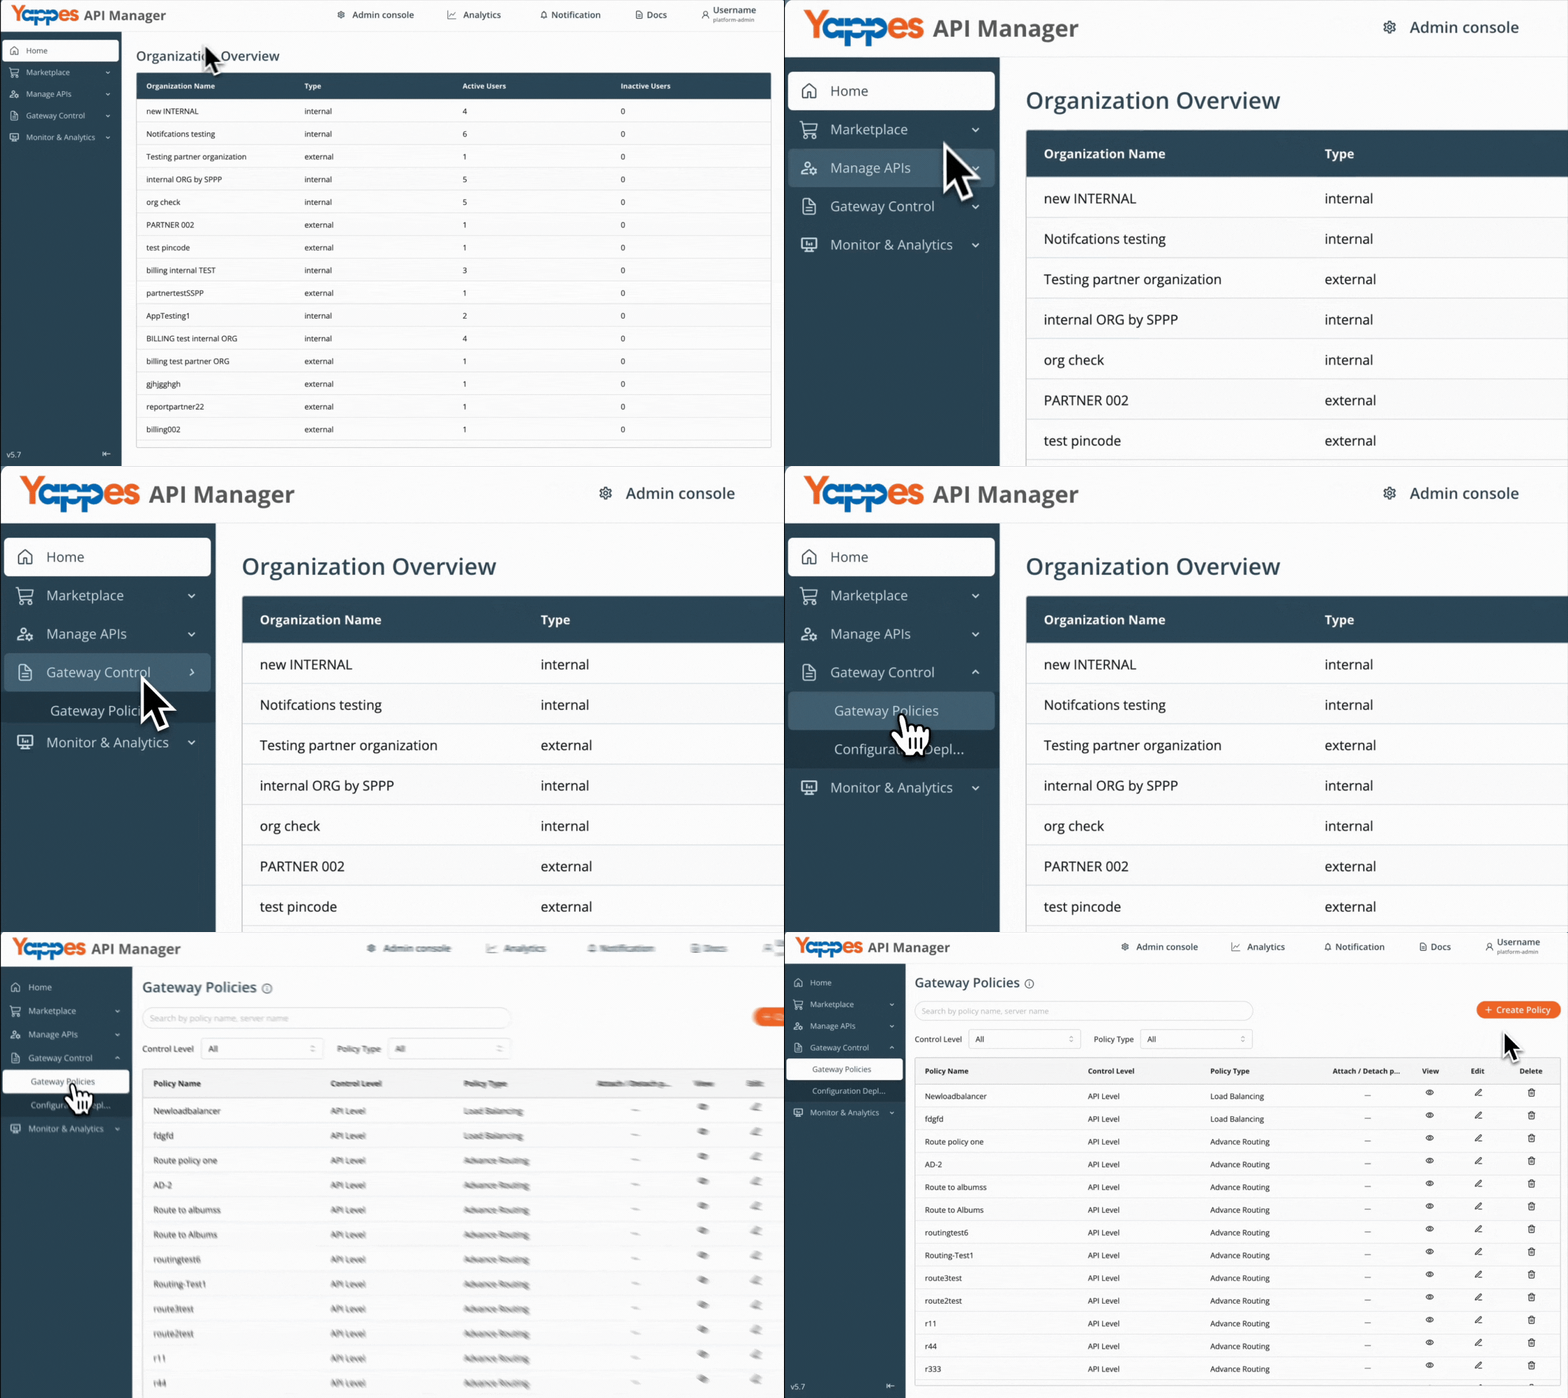
Step 1: Navigate to Gateway Policies
- Locate
Gateway Control -> Gateway Policiesin the main navigation menu. - The policies management interface will display.
Step 2: Initialize New Policy Creation
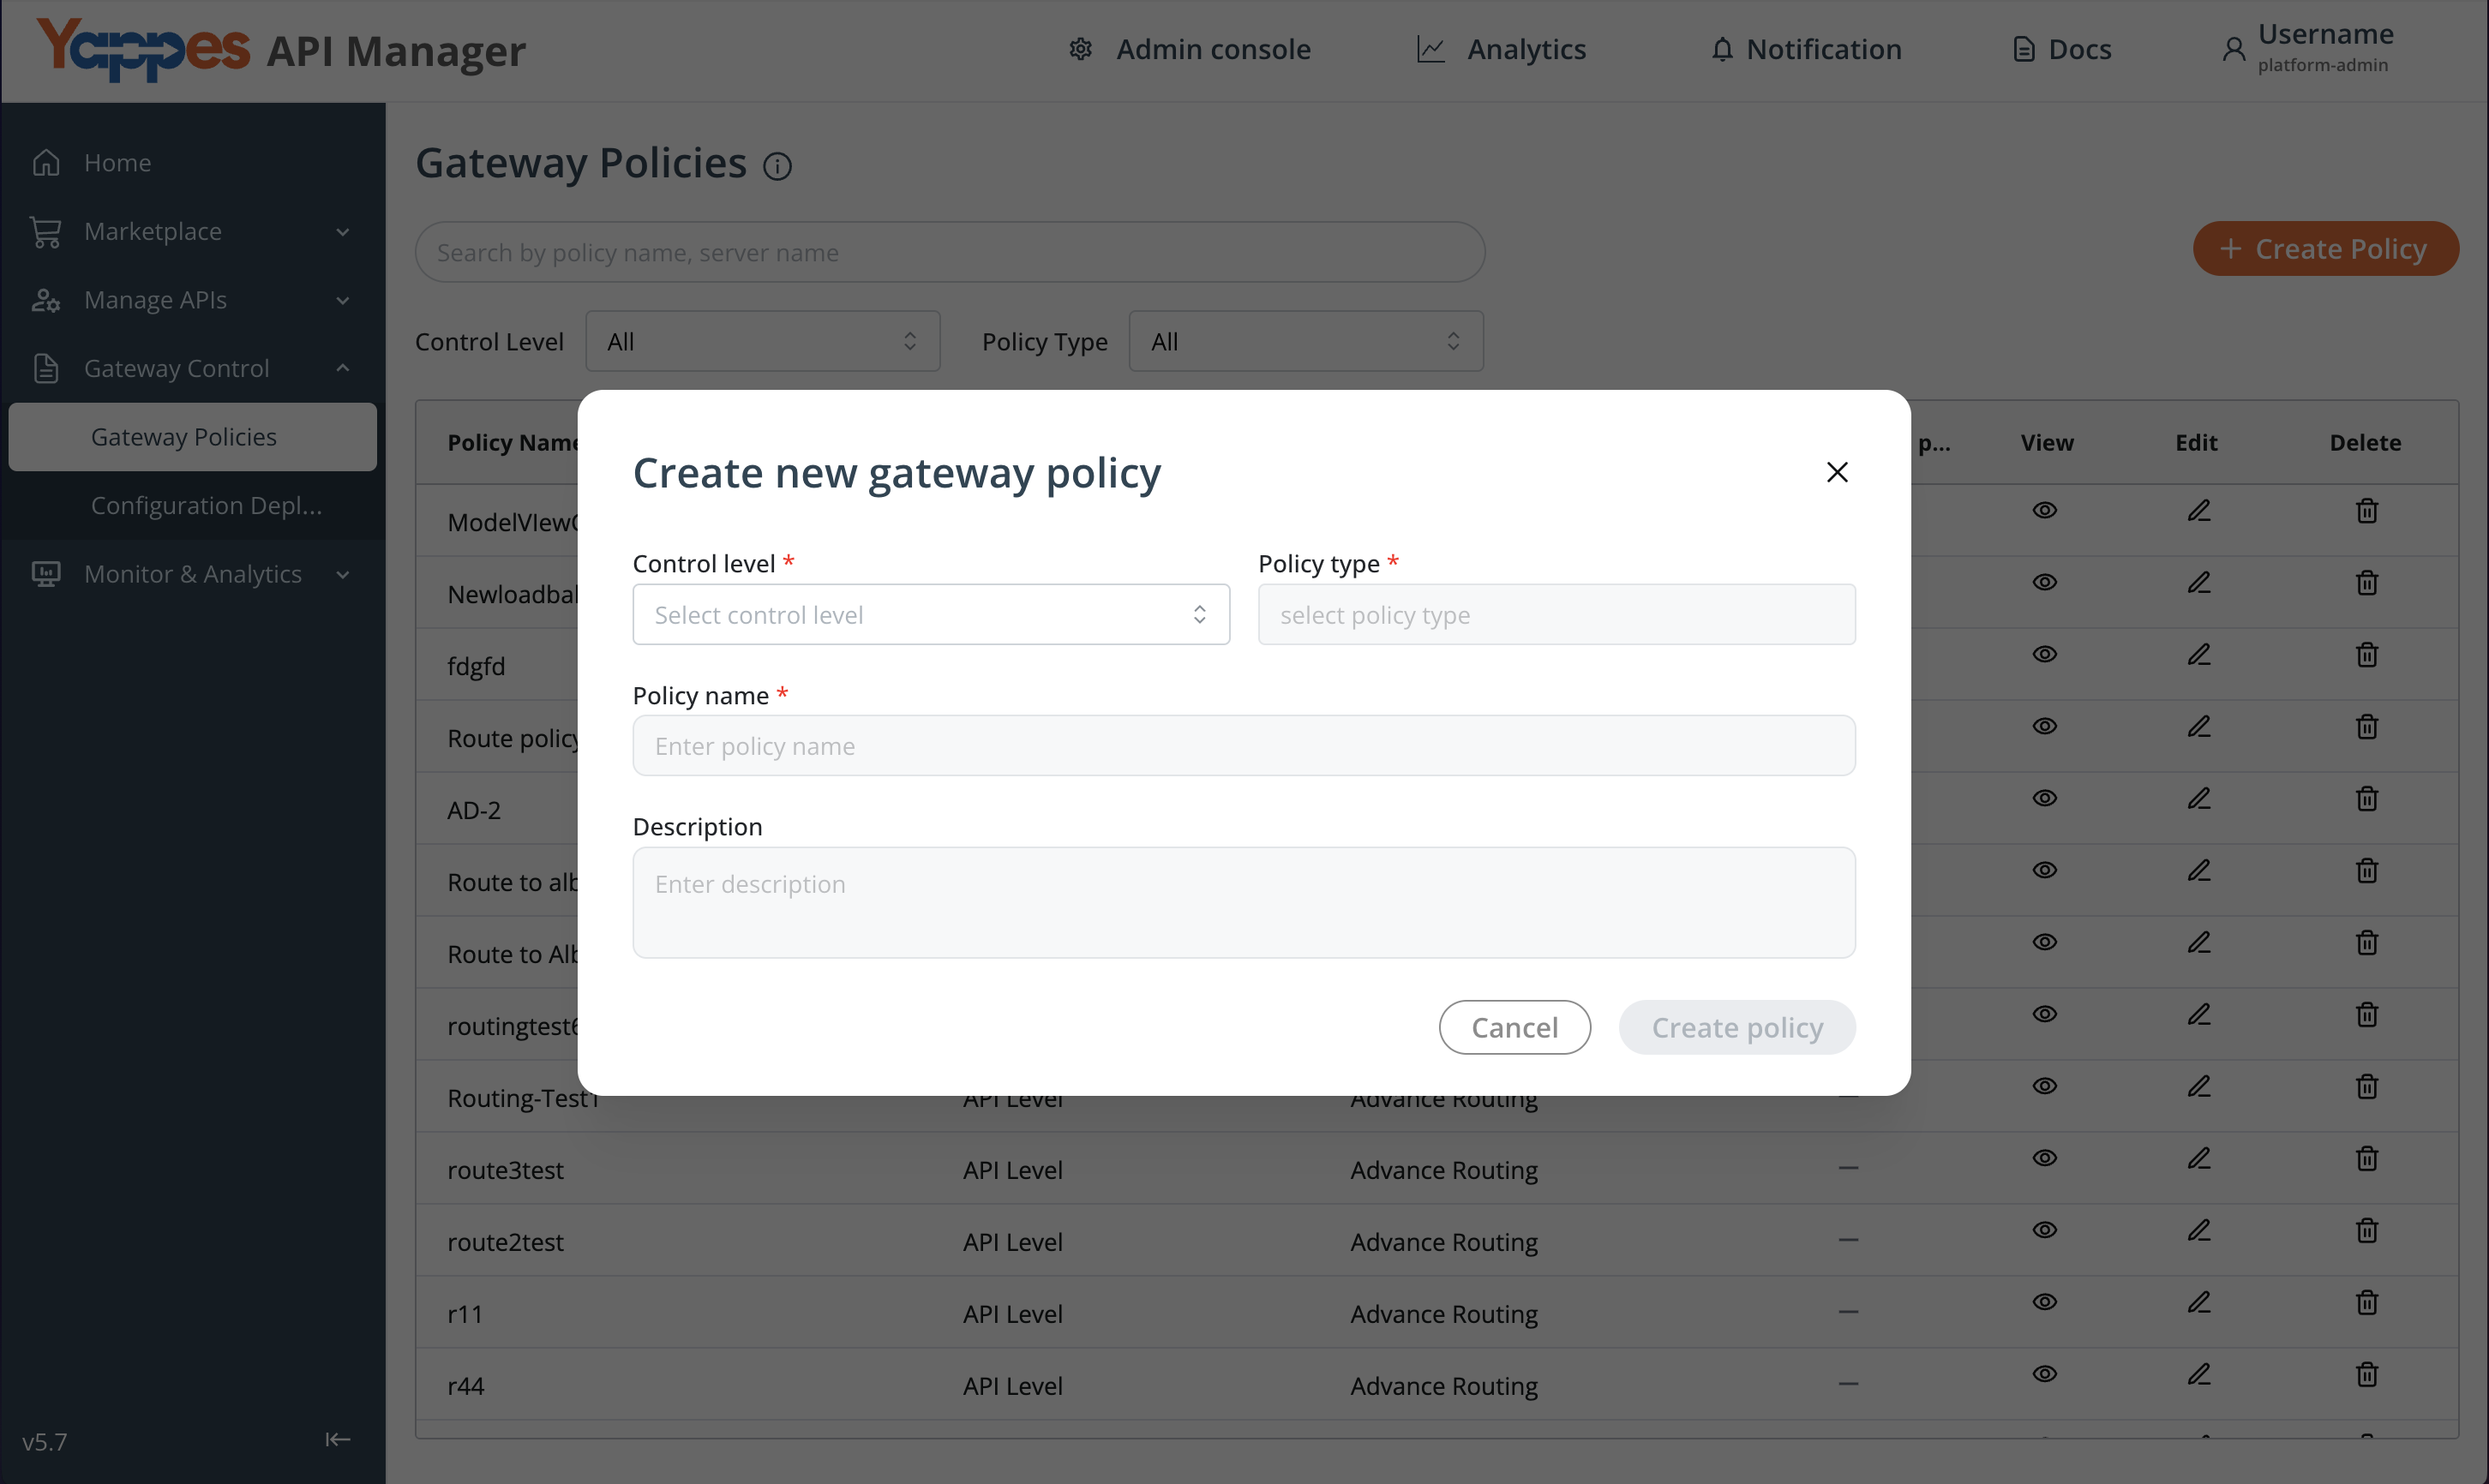
- Click on Create Policy button.
- The policy creation dialog will open.
Step 3: Configure Policy Settings
- Set the
Control LeveltoAPI Level. - In the
Policy Typedropdown, selectCaching. - These settings determine the policy scope and functionality.
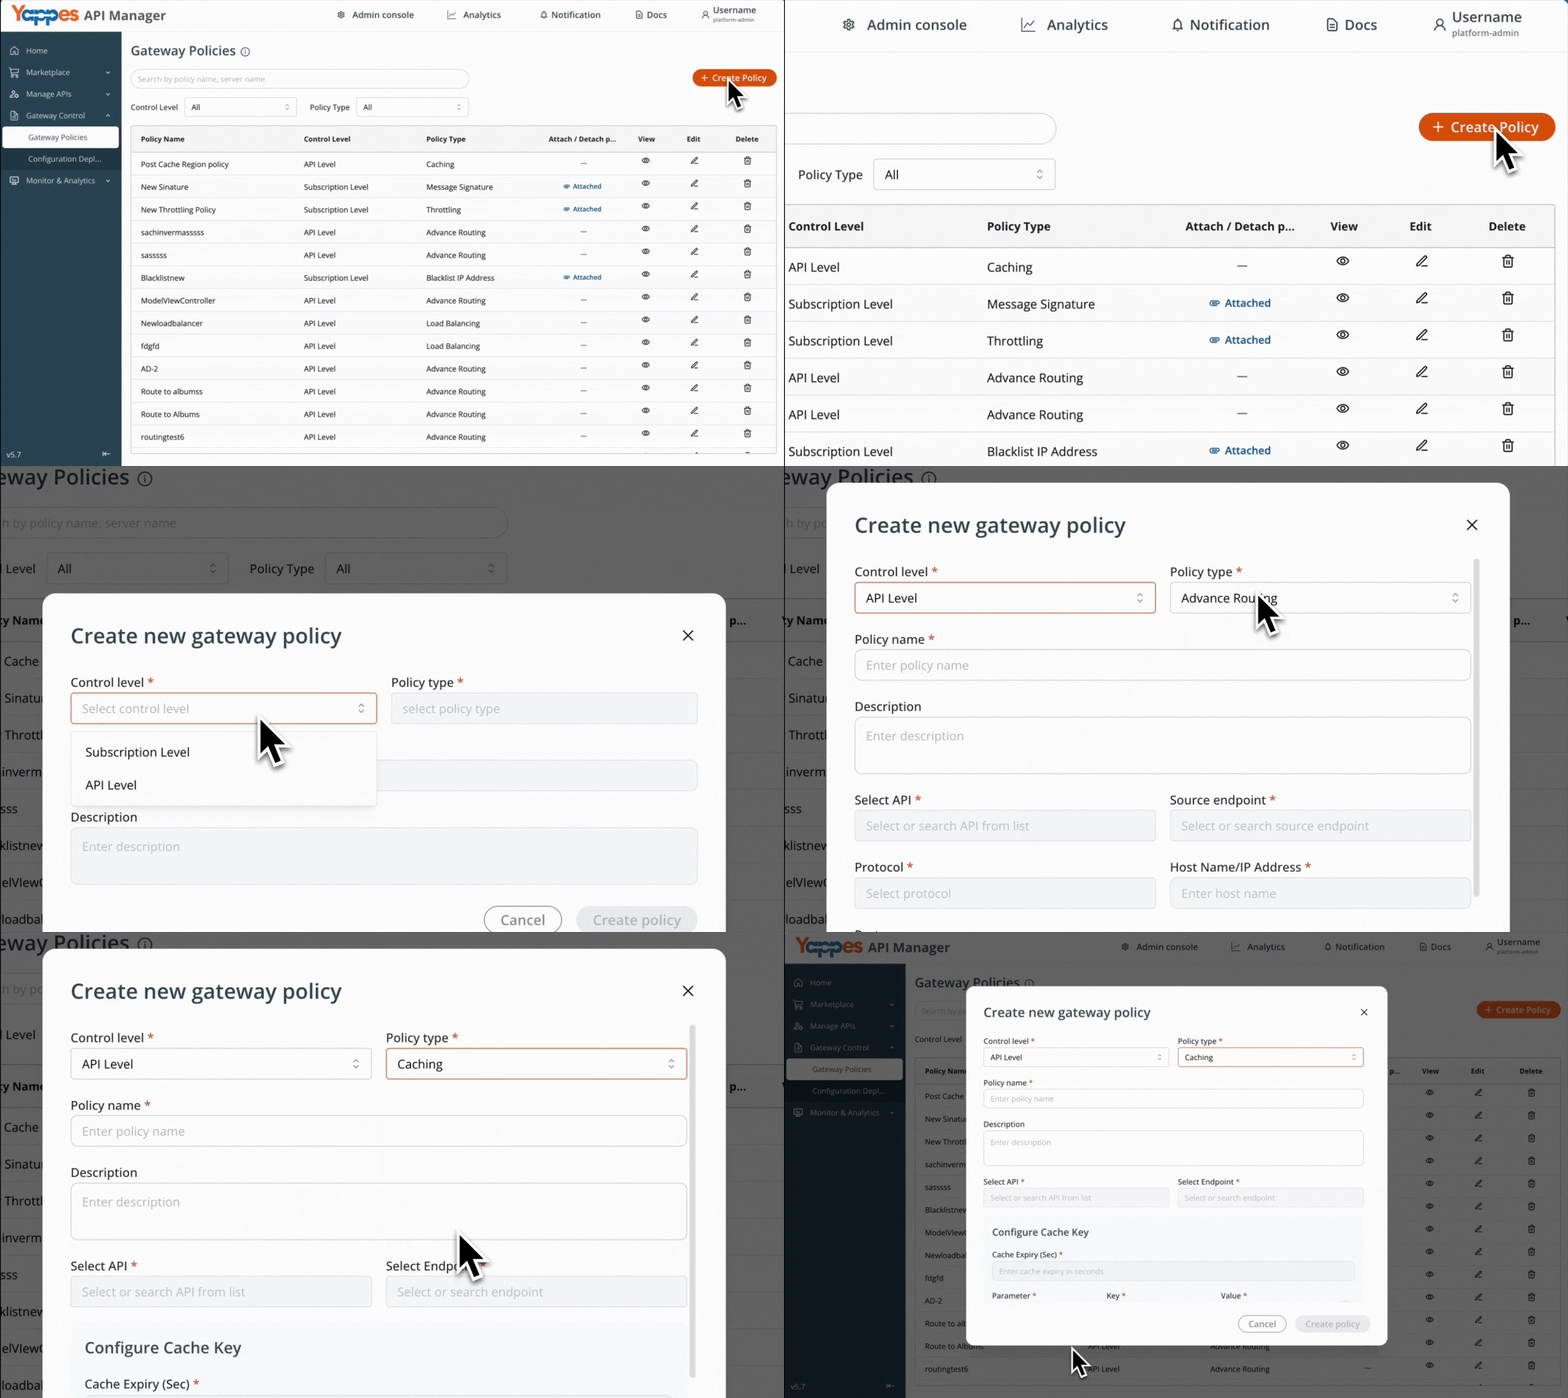
Step 4: Define Policy Details
- Enter a descriptive name in the
Policy Name* field (e.g., Post cache Region policy). - Add a detailed description in the
Descriptionfield to document the policy purpose. - Set
Cache Expiry* to determines how long responses remain cache0d. (e.g., 50). - Select the target
APIand theEndpointfrom the respective dropdown list. - Set
Cache Expiry Timein seconds (e.g., 50)
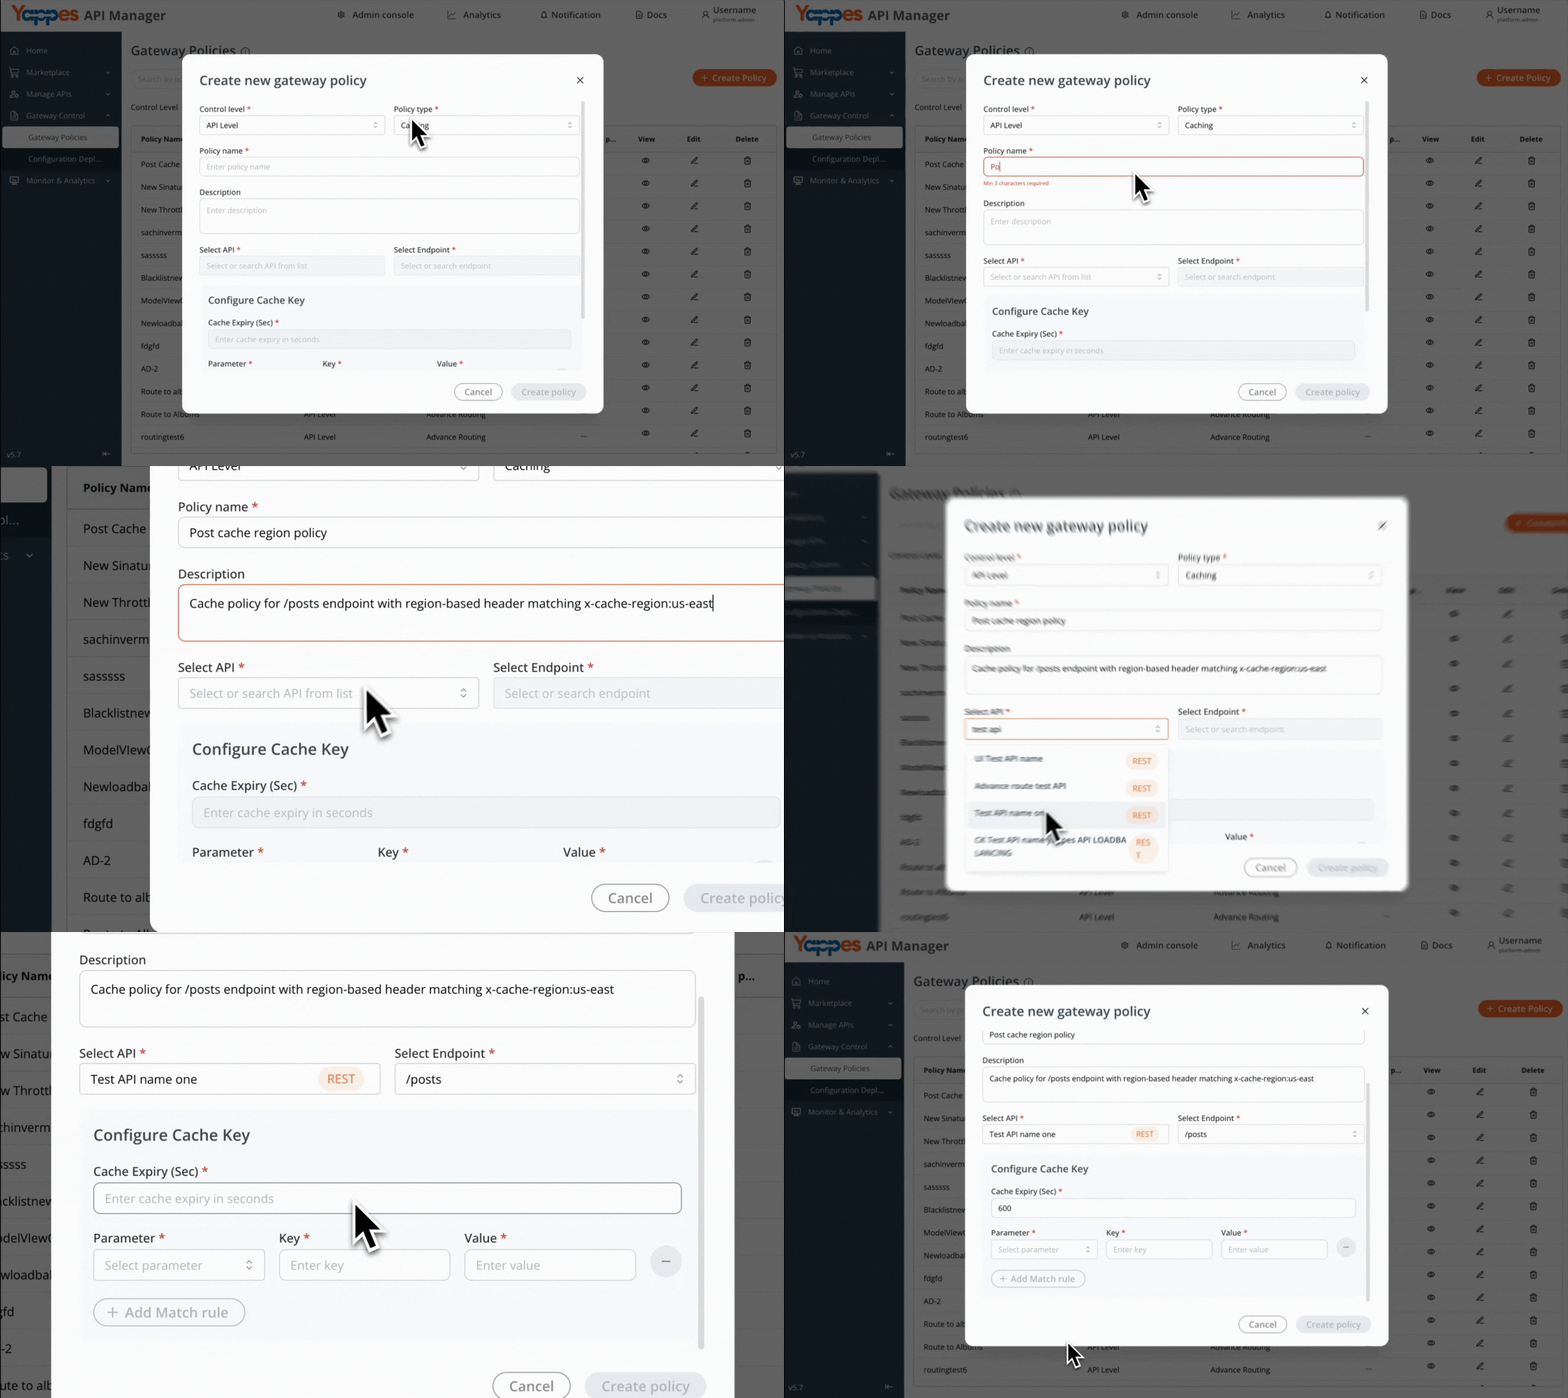
Step 5: Define Caching Parameters
- In the
Parameter* dropdown, select your cache key type: - Header: Cache based on request headers
- Path: Cache based on URL path
- Query Parameter: Cache based on query strings
- Enter the
Key* (e.g., browser). - Enter the
Value* (e.g., chrome). - Click
Add Match Ruleto add another parameter.
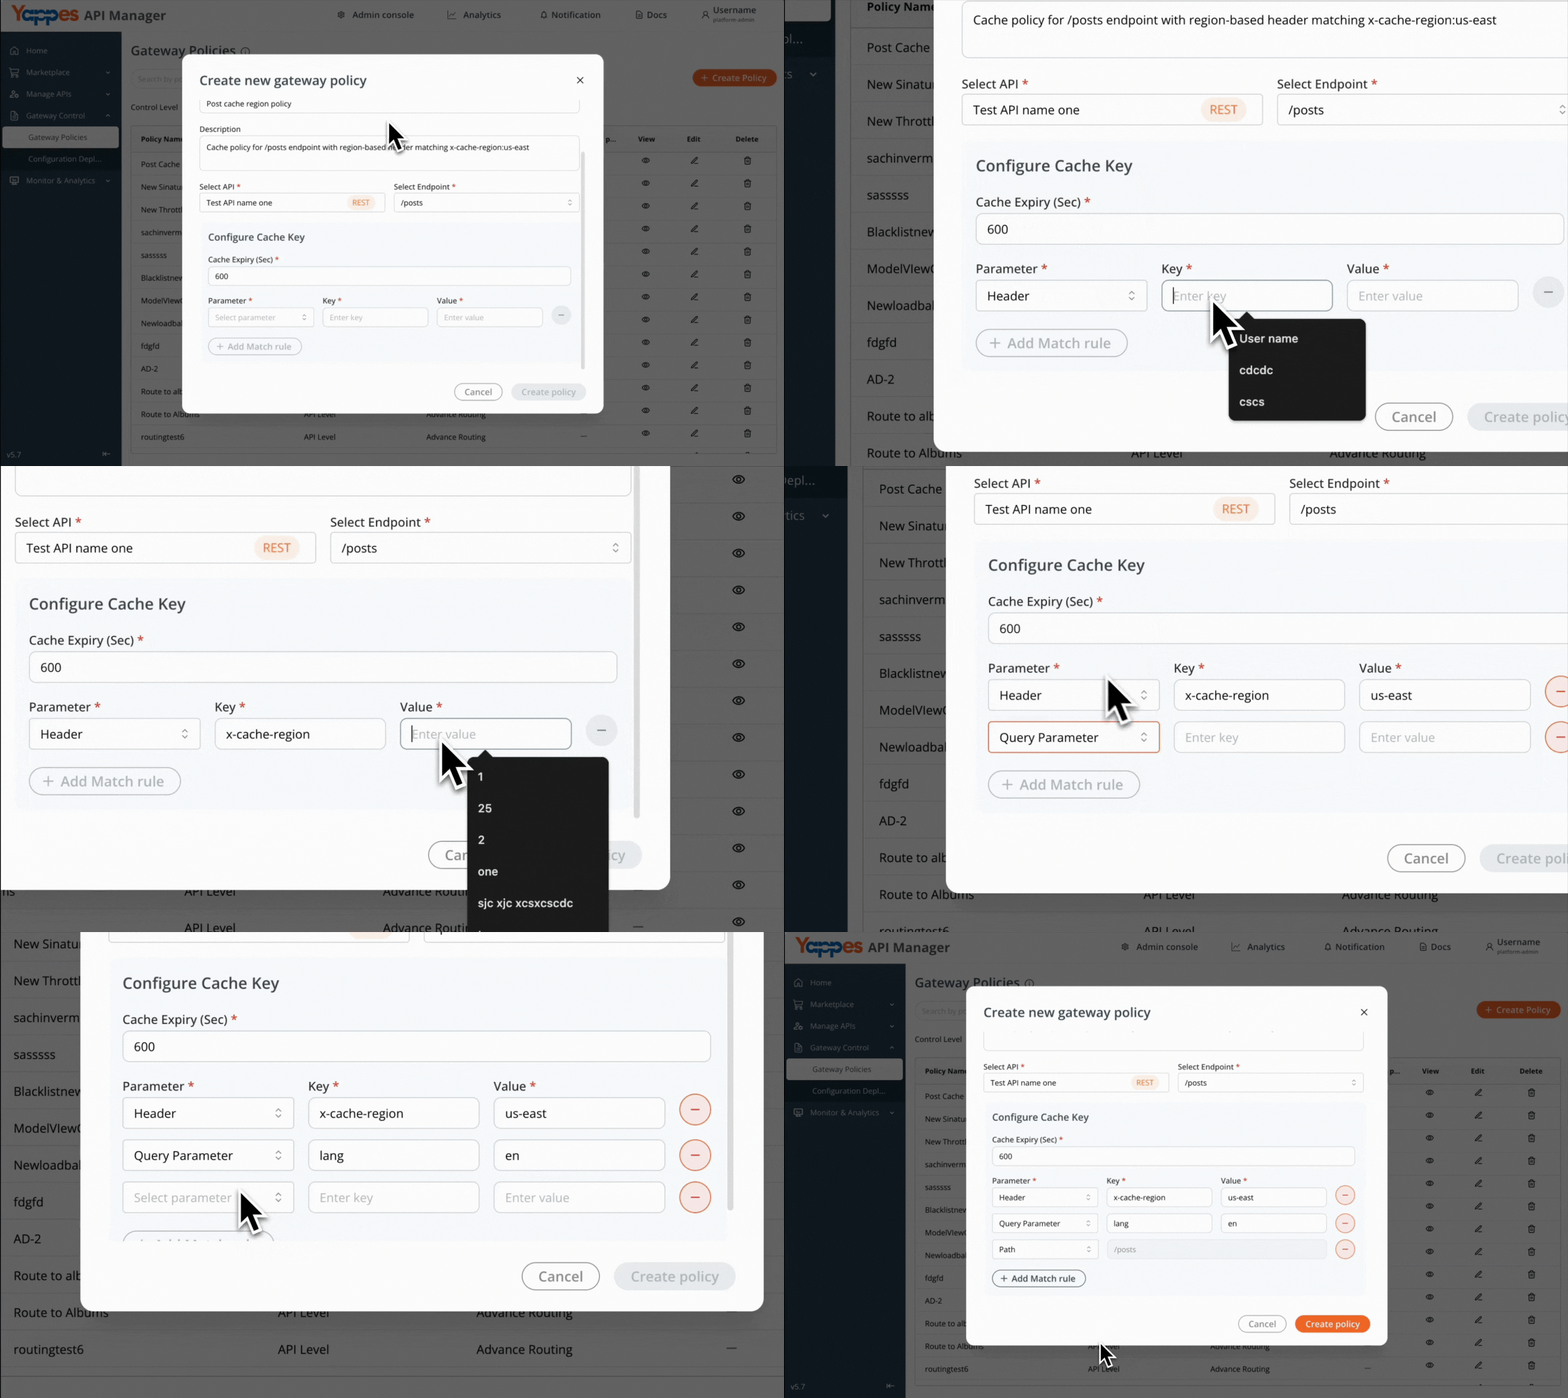
Step 6: Create and Activate Policy
- Review all settings carefully.
- Click
Create policyto finalize. - The policy will be immediately saved, attached and activated for the selected API’s endpoint.
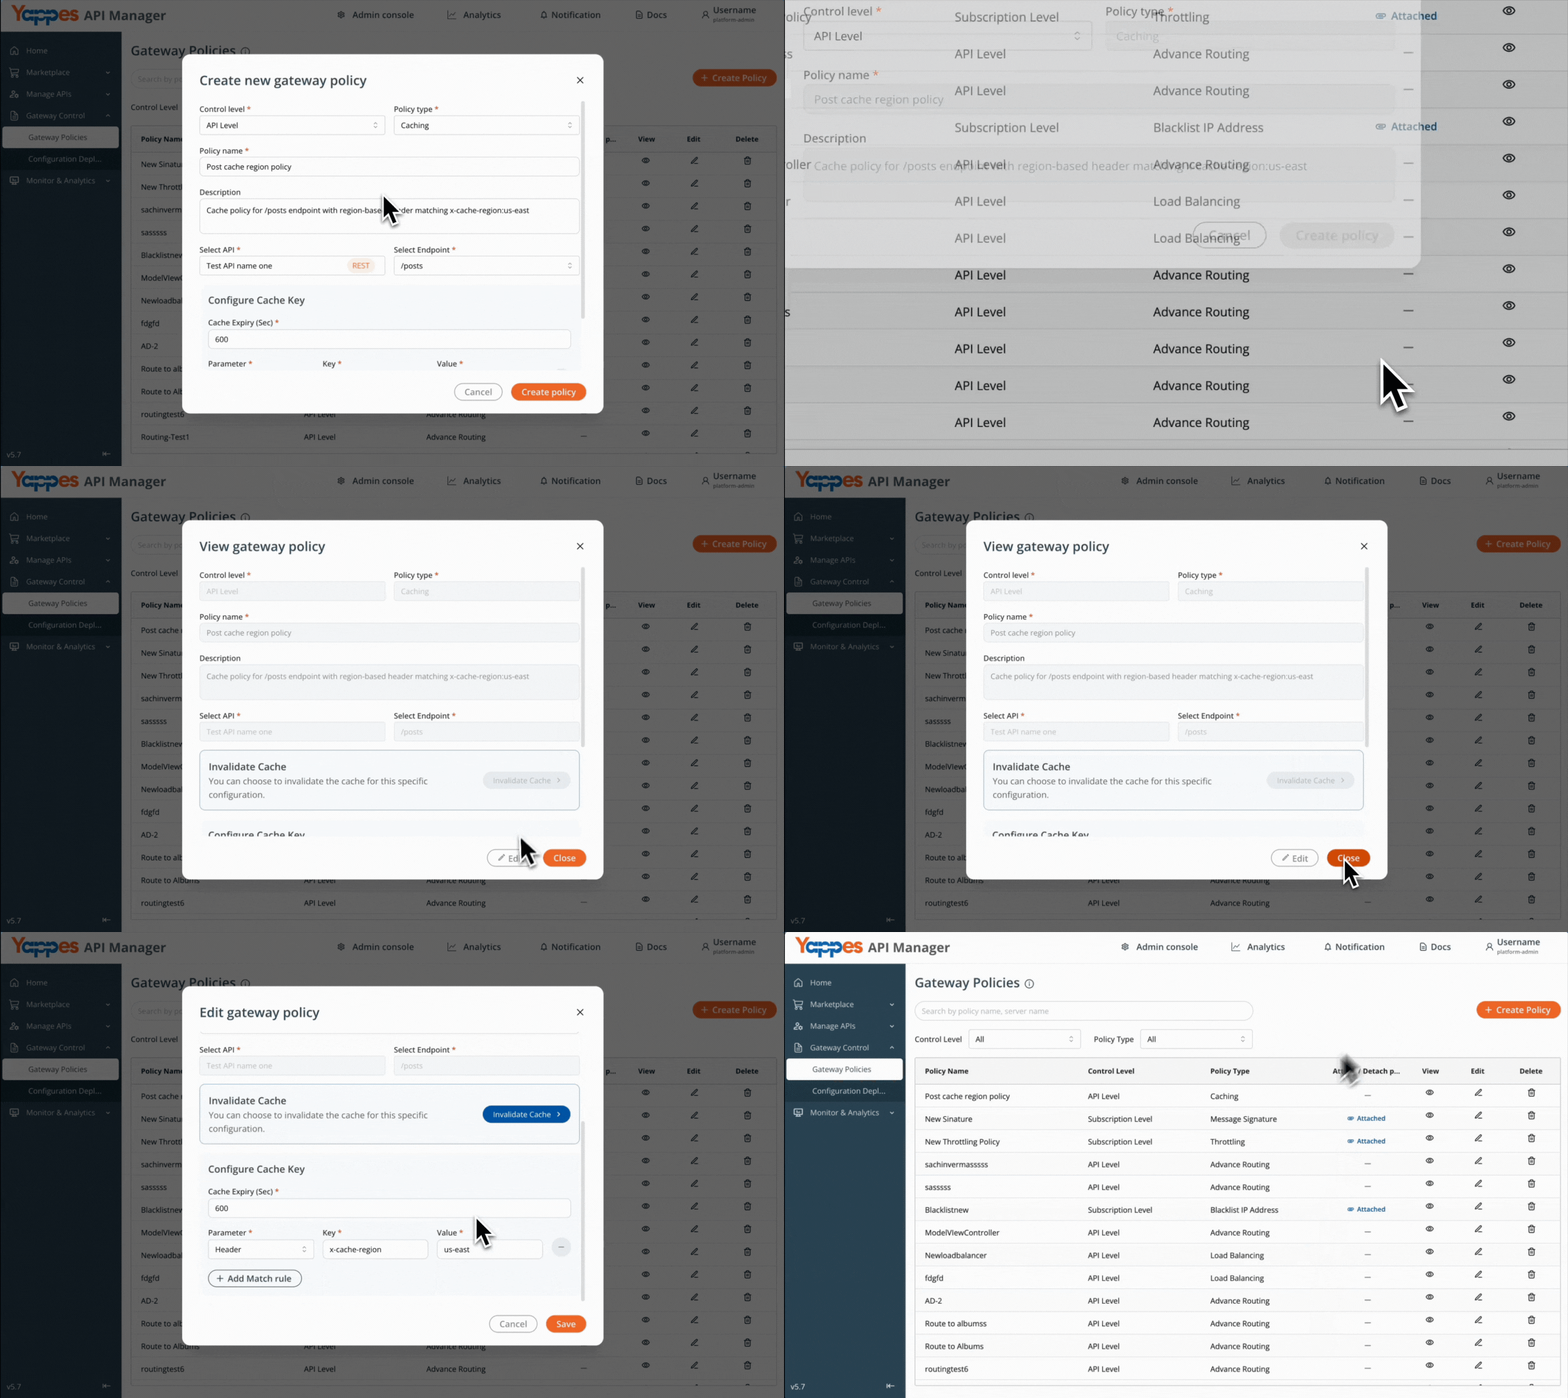
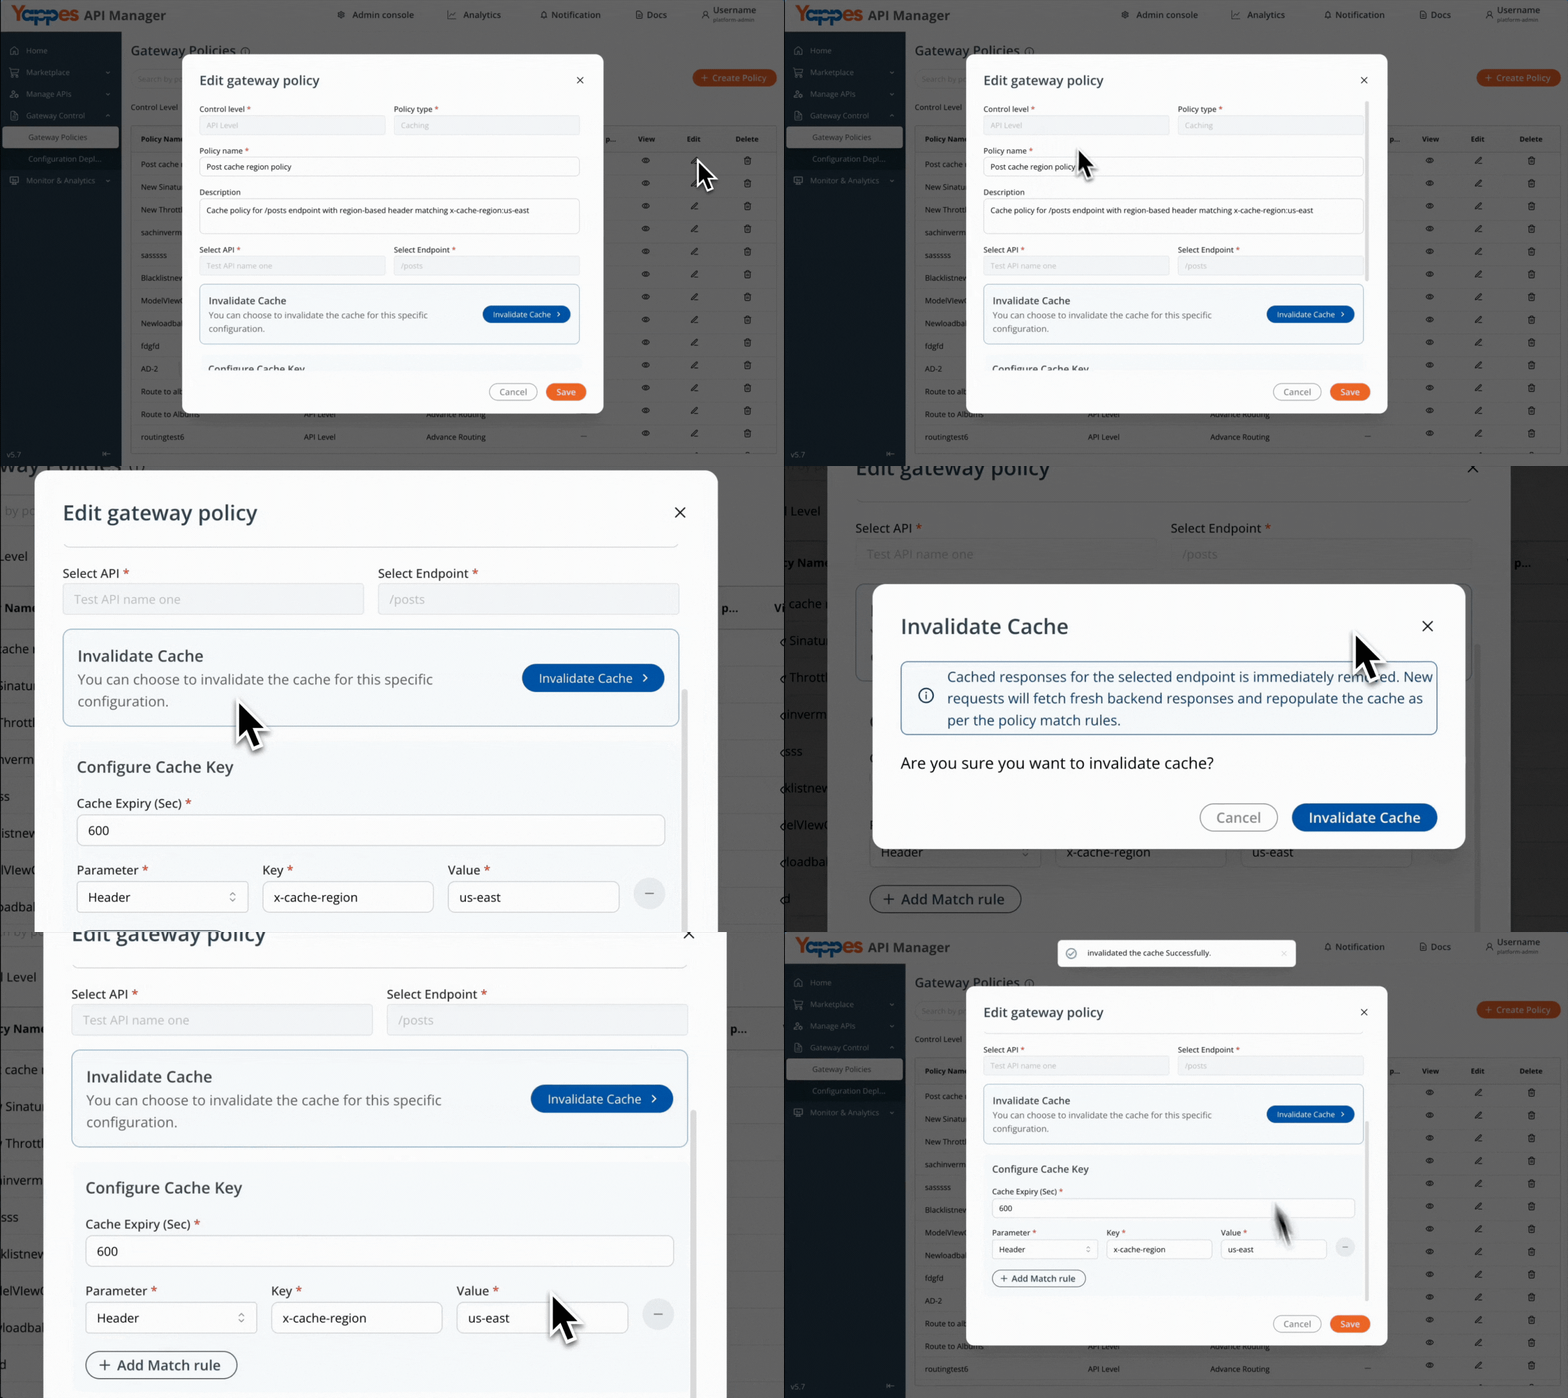
Invalidate Caching from Edit Policy Page
- Open edit cache dialog
- Click on invalidate cache to clear the cache from the storage
- Will get confirmation of cache invalidated
Understanding the Interface
Caching Policy Interface Overview
The caching policy interface includes several important sections:
Policy Information Panel
- Policy Name: Unique identifier for your caching policy.
- Description: Human-readable explanation of the policy purpose.
- Status Indicator: Shows if the policy is active or inactive.
- API Association: Displays which API the policy is attached to Configuration Settings Area.
- Cache Expiry Control: Slider or input field for setting cache duration.
- Parameter Type Selector: Dropdown for choosing cache key criteria.
- Match Rules Table: List of all configured cache matching rules.
- Add Matching Rule Button: Interface for adding new cache parameters.
Configuration and Settings
Core Configuration Options
| Setting | Description | Example | Best Practice |
|---|---|---|---|
| Policy Name | Unique identifier for the caching policy | user-data-cache |
Use descriptive names indicating cached content |
| Description | Detailed explanation of policy purpose | "Caches user profile data for 60 seconds" | Include cache duration and data type |
| Cache Expiry (Sec) | Duration before cache invalidation | 50 |
Balance freshness with performance needs |
| Control Level | Scope of policy application | API Level | Use API Level for targeted caching |
| Policy Type | Type of gateway policy | Caching | Always set to Caching for cache policies |
Parameter Configuration
Available Parameter Types:
-
Header Parameters
-
Use for: User-agent specific caching, authentication tokens.
- Example: Cache different responses for mobile vs desktop browsers.
-
Key: User-Agent, Value: Mobile.
-
Path Parameters
-
Use for: Resource-specific caching.
- Example: Cache individual user profiles.
-
Pattern: /users/{id}/*.
-
Query Parameters
- Use for: Search result caching, filtered data.
- Example: Cache search results by query.
- Key: search, Value: products.
Cache Expiry Guidelines
Best Practice: Set expiry times based on data volatility
- Static Content (images, documents): 3600–86400 seconds.
- User Profiles: 300–600 seconds.
- Product Catalogs: 600–1800 seconds.
- Real-time Data: 10–60 seconds.
- Analytics Data: 300–900 seconds.
Verification and Testing
Step 1: Initial Cache Test
- Send a request to your cached endpoint
- Note the response time (first request fetches from backend)
- Send an identical request immediately
- Compare response times - cached response should be significantly faster
Step 2: Verify Cache Headers
- Inspect response headers for cache indicators:
- Look for
X-Cache: HITfor cached responses - Check for
X-Cache: MISSon first requests - Verify
Cache-Controlheaders match your configuration
Step 3: Parameter-Based Testing
- Send requests with different parameter values
- Verify that only matching parameters return cached responses
- Test each configured match rule independently
Step 4: Expiry Validation
- Make a request and note the time
- Wait for cache expiry duration plus 5 seconds
- Repeat the request—it should fetch fresh data
- Subsequent requests should be cached again
Step 5: Backend Monitoring
- Check backend logs for reduced request volume
- Monitor API metrics for improved response times
- Verify cache hit ratio in gateway analytics
Troubleshooting
Common Issues and Solutions
Cache Not Working (All Requests Hit Backend)
- ✓ Verify policy is attached to correct API.
- ✓ Check that parameter values match exactly.
- ✓ Ensure cache expiry time is greater than 0.
- ✓ Confirm policy status shows as "Active".
Stale Data Being Served
- ✓ Review cache expiry settings—may be too long.
- ✓ Check if cache invalidation is working.
- ✓ Verify backend is returning updated data.
- ✓ Consider implementing cache purge for critical updates
Inconsistent Cache Behavior
- ✓ Check for multiple conflicting cache policies.
- ✓ Verify parameter matching rules are specific enough.
- ✓ Review gateway logs for policy execution errors.
- ✓ Test with simplified match rules first
Performance Not Improving
- ✓ Confirm cache hit ratio is above 50%.
- ✓ Check that frequently accessed endpoints are cached.
- ✓ Verify cache key parameters are appropriate.
- ✓ Consider increasing cache expiry for stable data
Error Messages
| Error | Cause | Solution |
|---|---|---|
"Policy creation failed" |
Invalid configuration | Review all required fields |
"Cache expiry invalid" |
Non-numeric or negative value | Enter positive integer for seconds |
"Parameter conflict" |
Duplicate match rules | Remove duplicate rules |
"API not found" |
Invalid API selection | Refresh and select valid API |
Pro Tip
Begin with caching on read-heavy endpoints with predictable access patterns. This provides immediate performance benefits while you learn optimal cache configurations for your specific use cases.