Verify Headers
Overview
The Yappes Verify Headers policy allows you to validate incoming API requests based on the presence and values of specific HTTP headers. This policy helps enforce request standards, improve security, and restrict access based on client metadata such as browser type, user identity, or custom headers.
When applied at the API or subscription level, the policy ensures that only requests matching the defined header rules are allowed through the Yappes Gateway before reaching backend services.
When to Use Verify Headers
Use Verify Headers when you want to:
- Enforce mandatory headers for all API requests.
- Allow access only from specific clients or environments.
- Validate request metadata without modifying backend services.
When Not to Use Verify Headers
Avoid using Verify Headers in the following scenarios:
- When request validation depends on request body logic.
- When cryptographic verification is required (use Message Signature).
- When header values are dynamic for each request.
Prerequisites
Before configuring Verify Headers policies, ensure the following requirements are met.
Required Access and Permissions
Common Requirements
- Active Yappes platform account.
API Manageraccess.- Permission to create and manage Gateway Policies.
- At least one API created under
My APIs.
API Level
- Policy can be applied to
published or unpublishedAPIs.
Subscription Level
- API must be
published. - An
active subscriptionmust be available in theManage Subscriptionpage.
System Requirements
- Supported web browser:
Chrome,Edge, orFirefox. - Ability to send
custom headersin API requests.
Custom error and message
For error scenarios, you can override the default HTTP status code, error code, and message. See Custom Error and Message.
Step-by-Step Implementation
Method 1: Creating Verify Headers During API Onboarding
Step 1: Navigate to API Manager
- Click on
Manage APIsin the main dashboard. - Select
My APIsfrom the submenu.
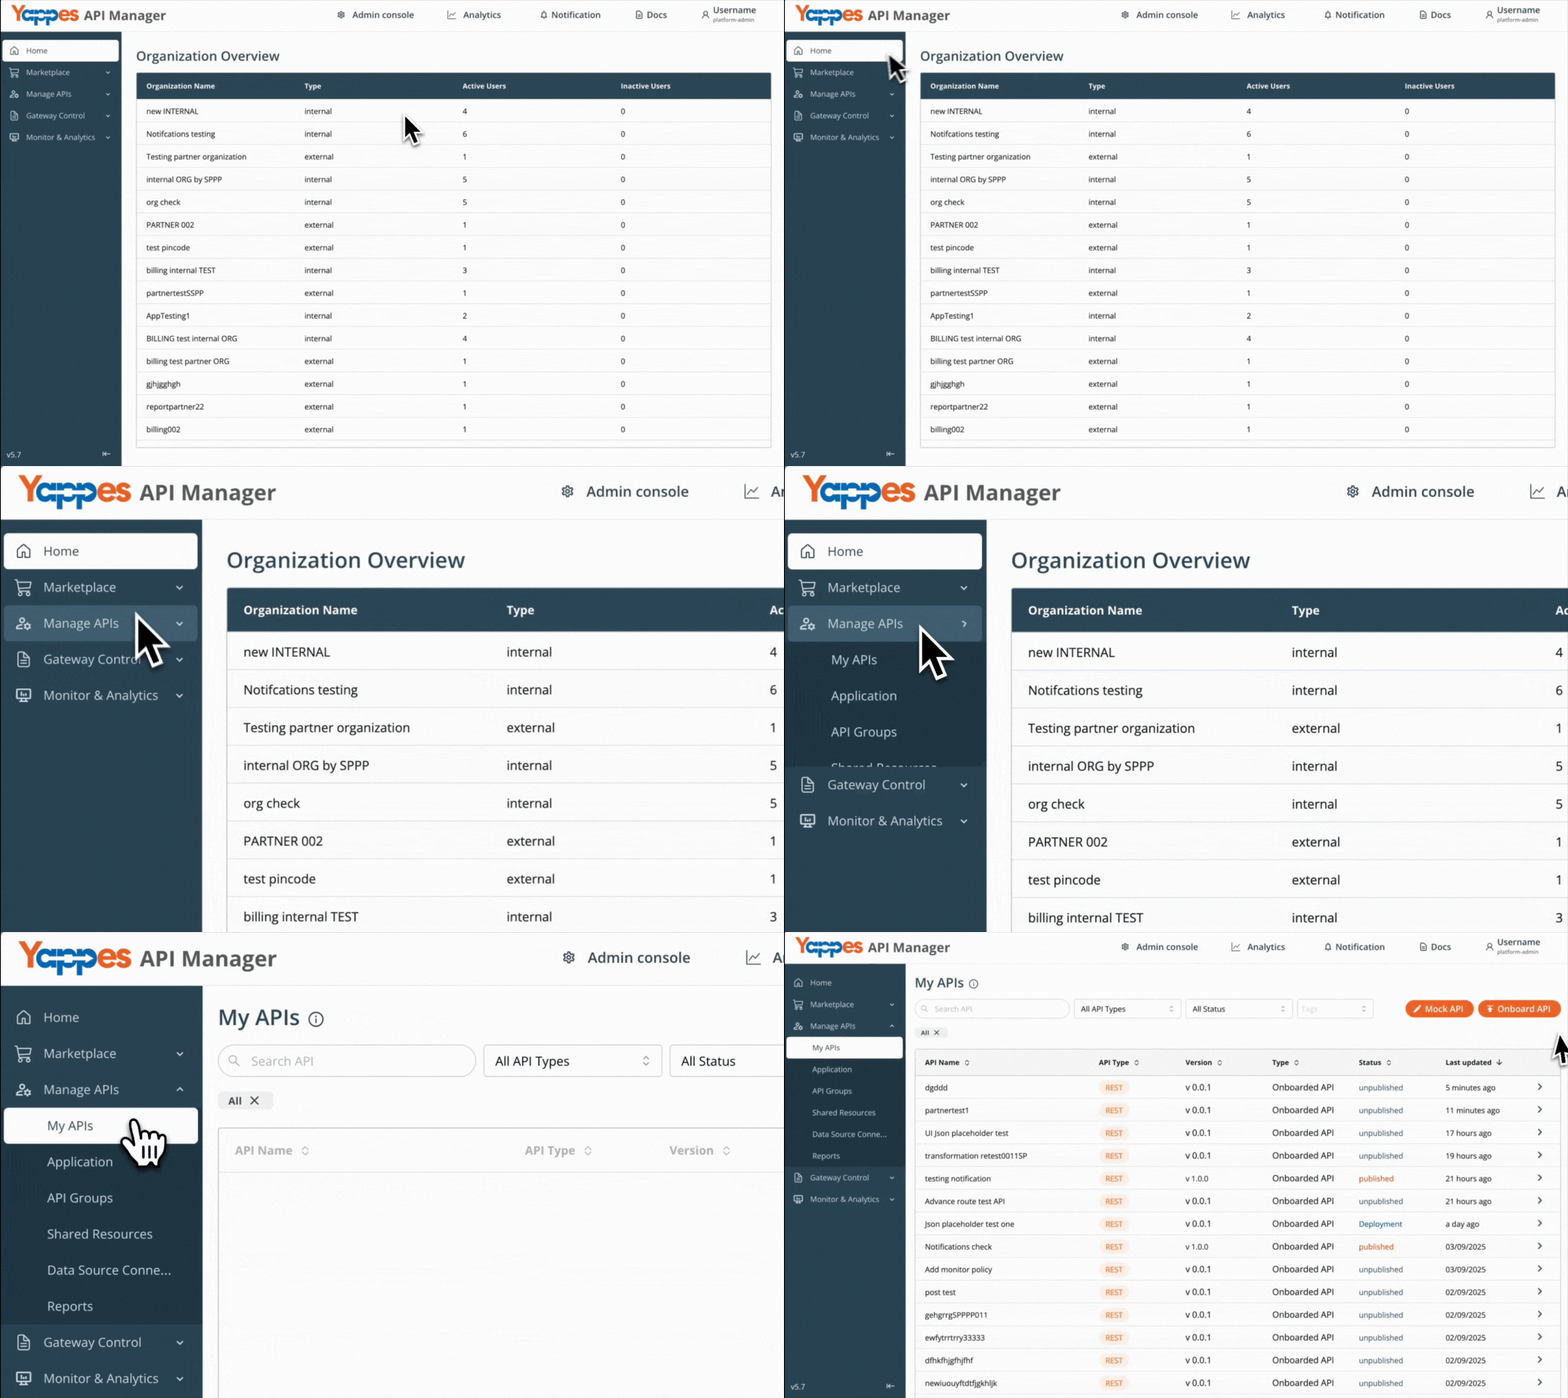
Step 2: Initiate API Onboarding
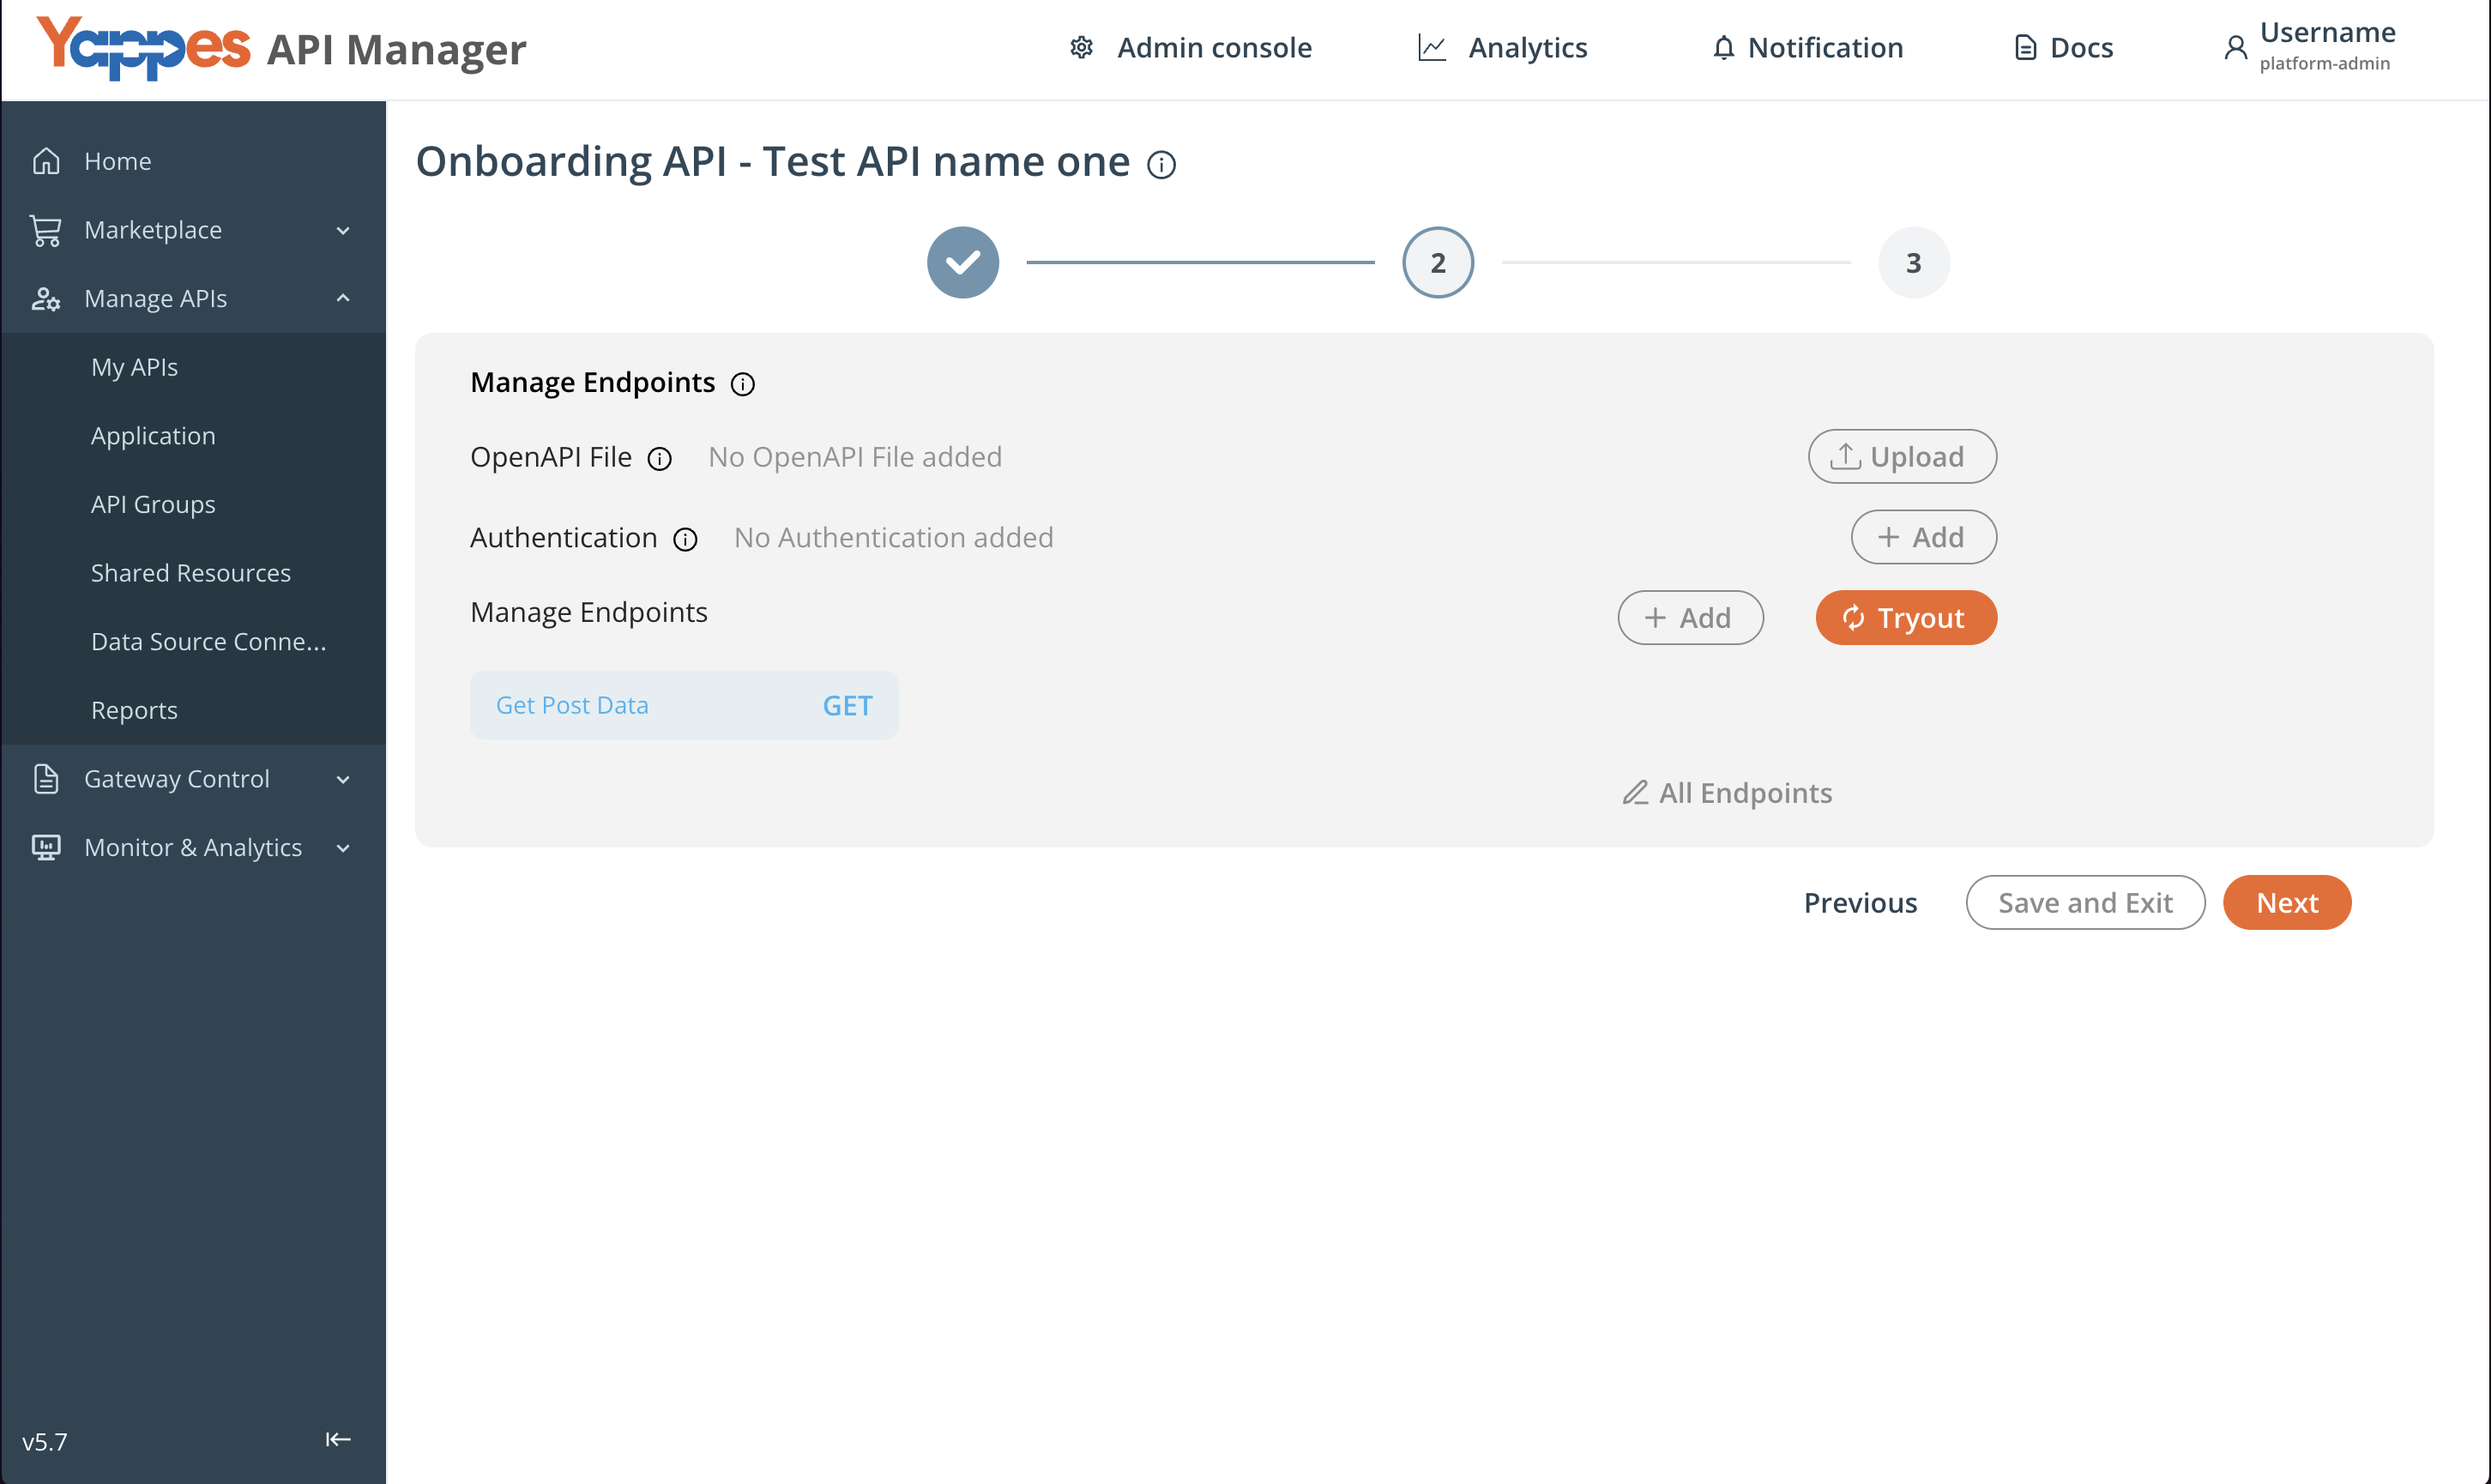
- Onboard from My APIs using the guide for your API type.
Step 3: Select Endpoint for attaching Verify Headers
- Click on your newly created endpoint (e.g.,
get Post Data). - The endpoint details panel will open.
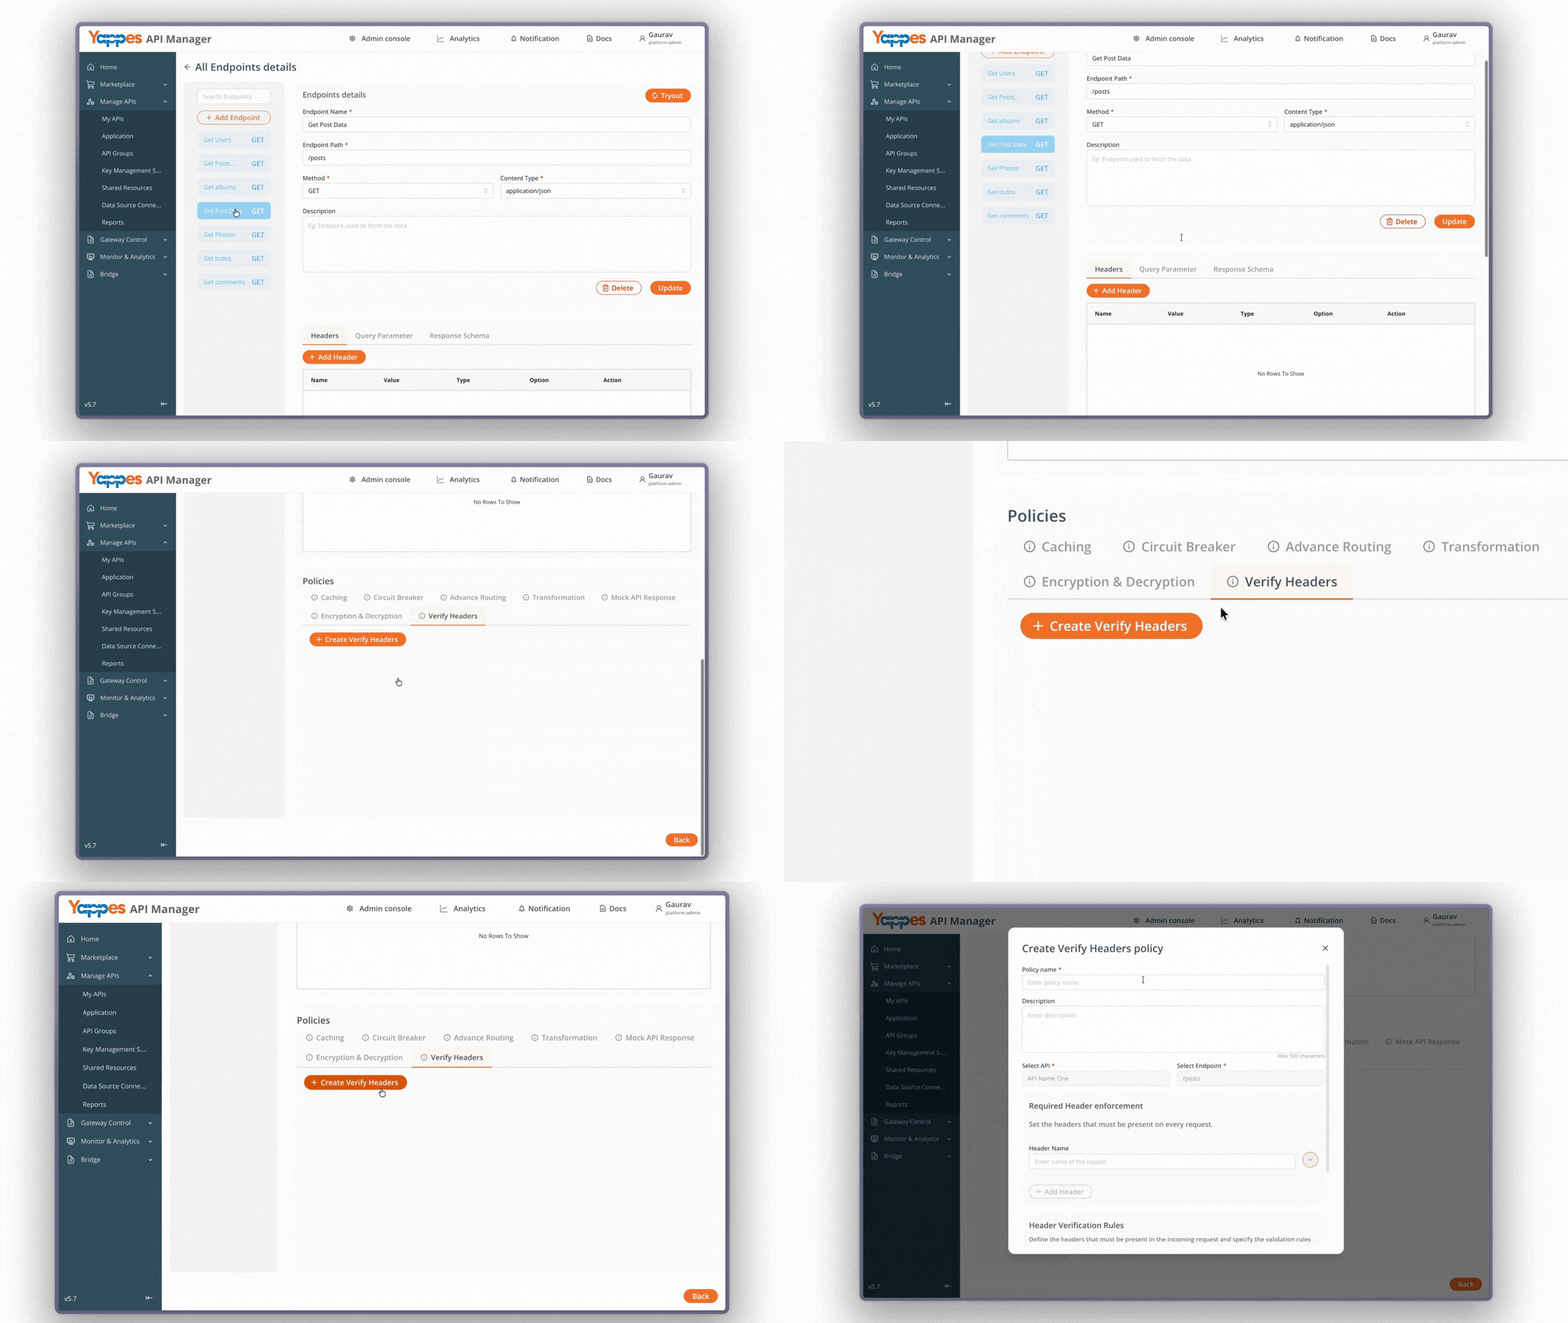
Step 4: Access Verify Headers Policy
- Click
Create Verify Headersto open the policy configuration panel. - The Verify Headers dialog will appear.
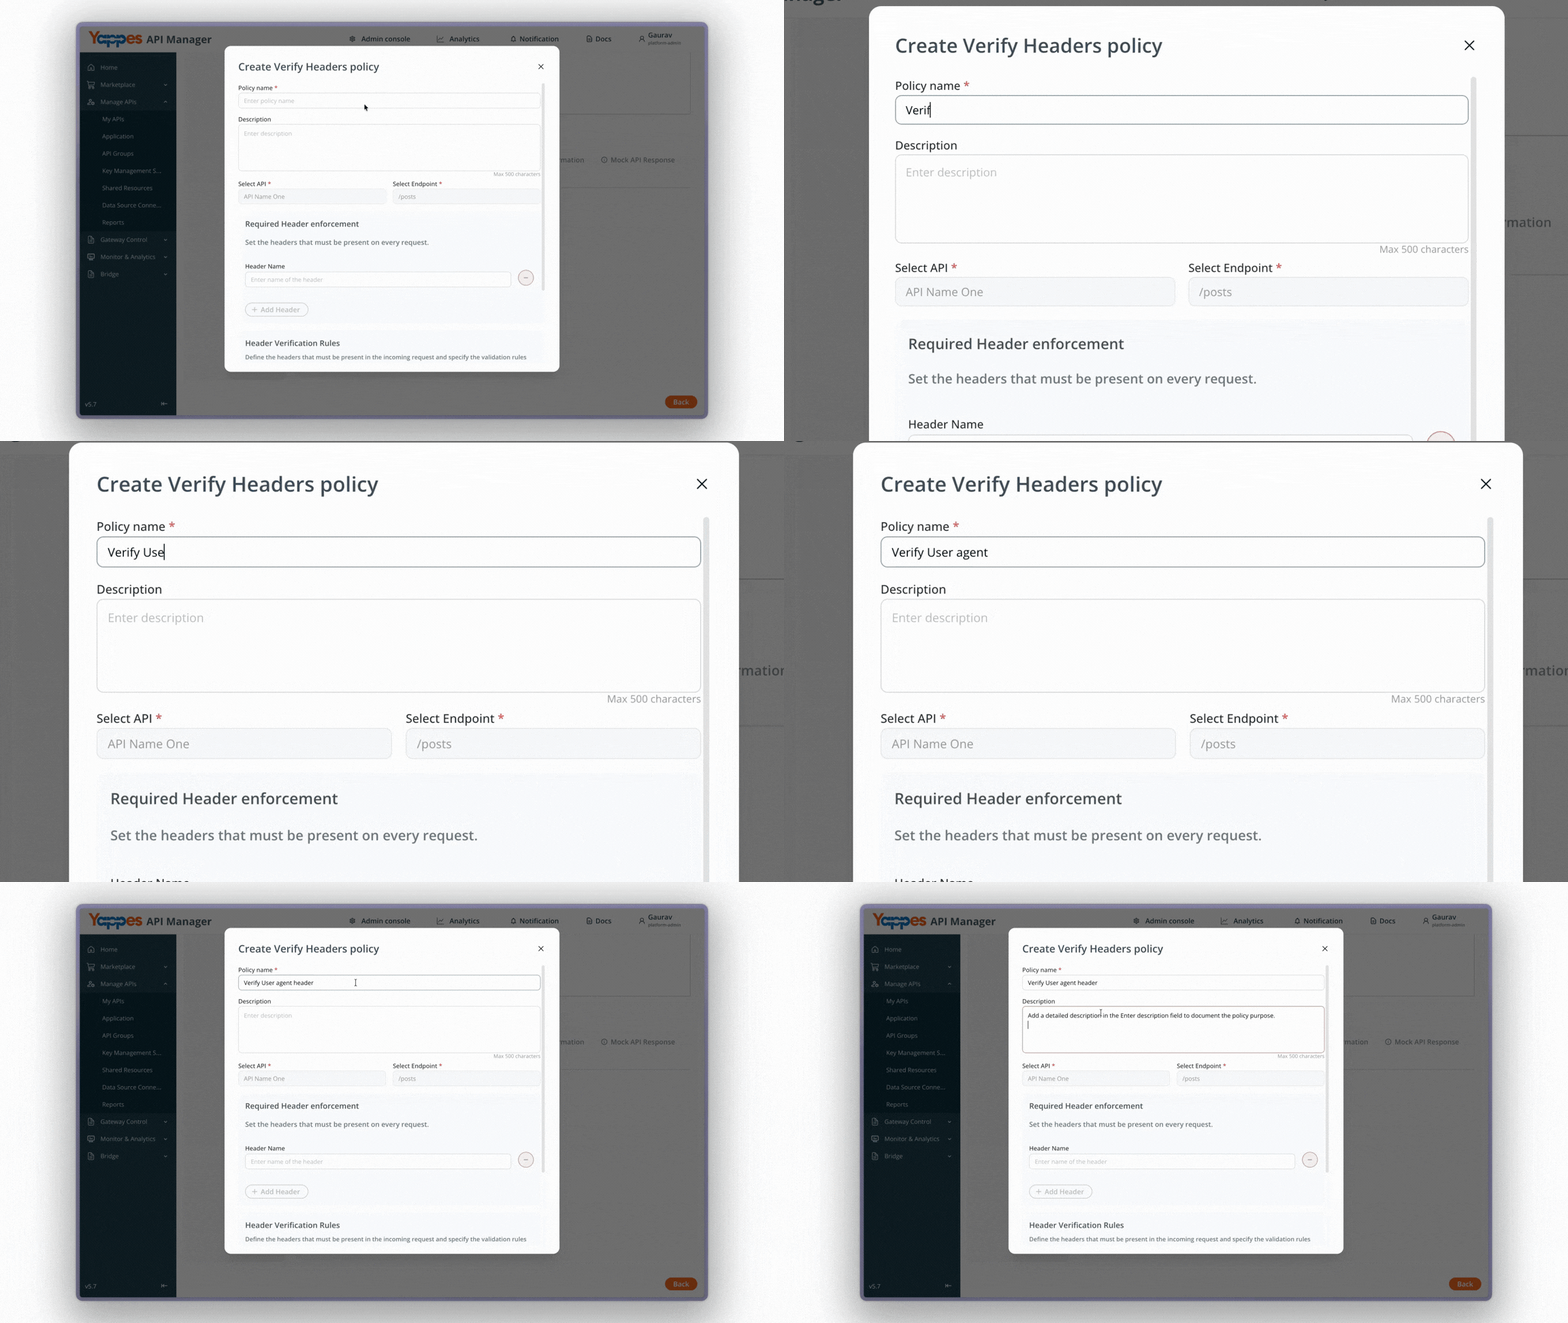
Step 5: Create the Verify Headers Policy
- Enter a descriptive name in the
Policy Namefield (e.g.,Verify User Agent Header). - Add a detailed
descriptionin the Enter description field to document the policy purpose.
Step 6: Add Required Headers
Under Required Header Enforcement, perform the following steps:
- Locate the
Header Namefield. - Enter the first required header name.
Example:
Name - Click
Add Header. - Enter another required header.
Example:
Age
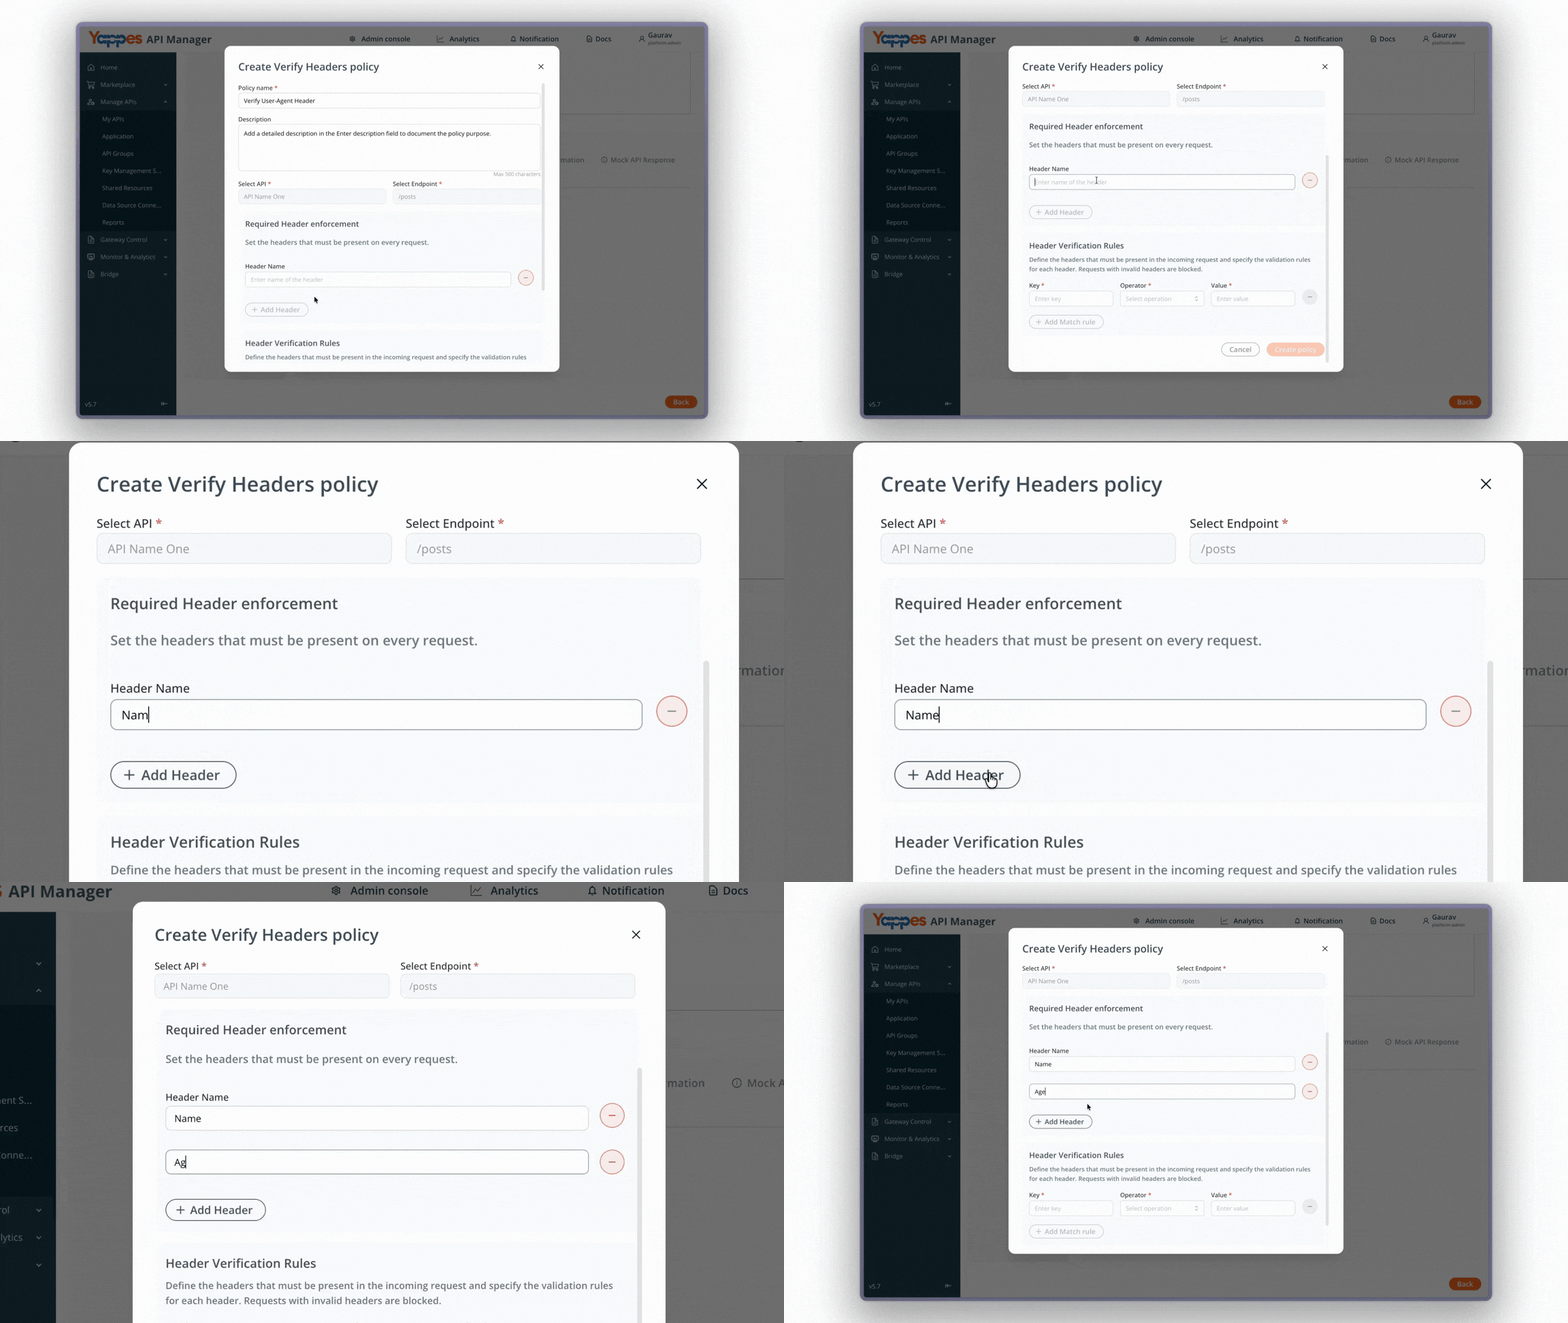
Step 7: Configure the First Header Verification Rule
Under Header Verification Rules, the first rule row is available by default.
- In the
Keyfield, enter the header name. Example:first_name - In the
Operatorfield, selectEquals. - In the
Valuefield, enter the expected value. Example:david
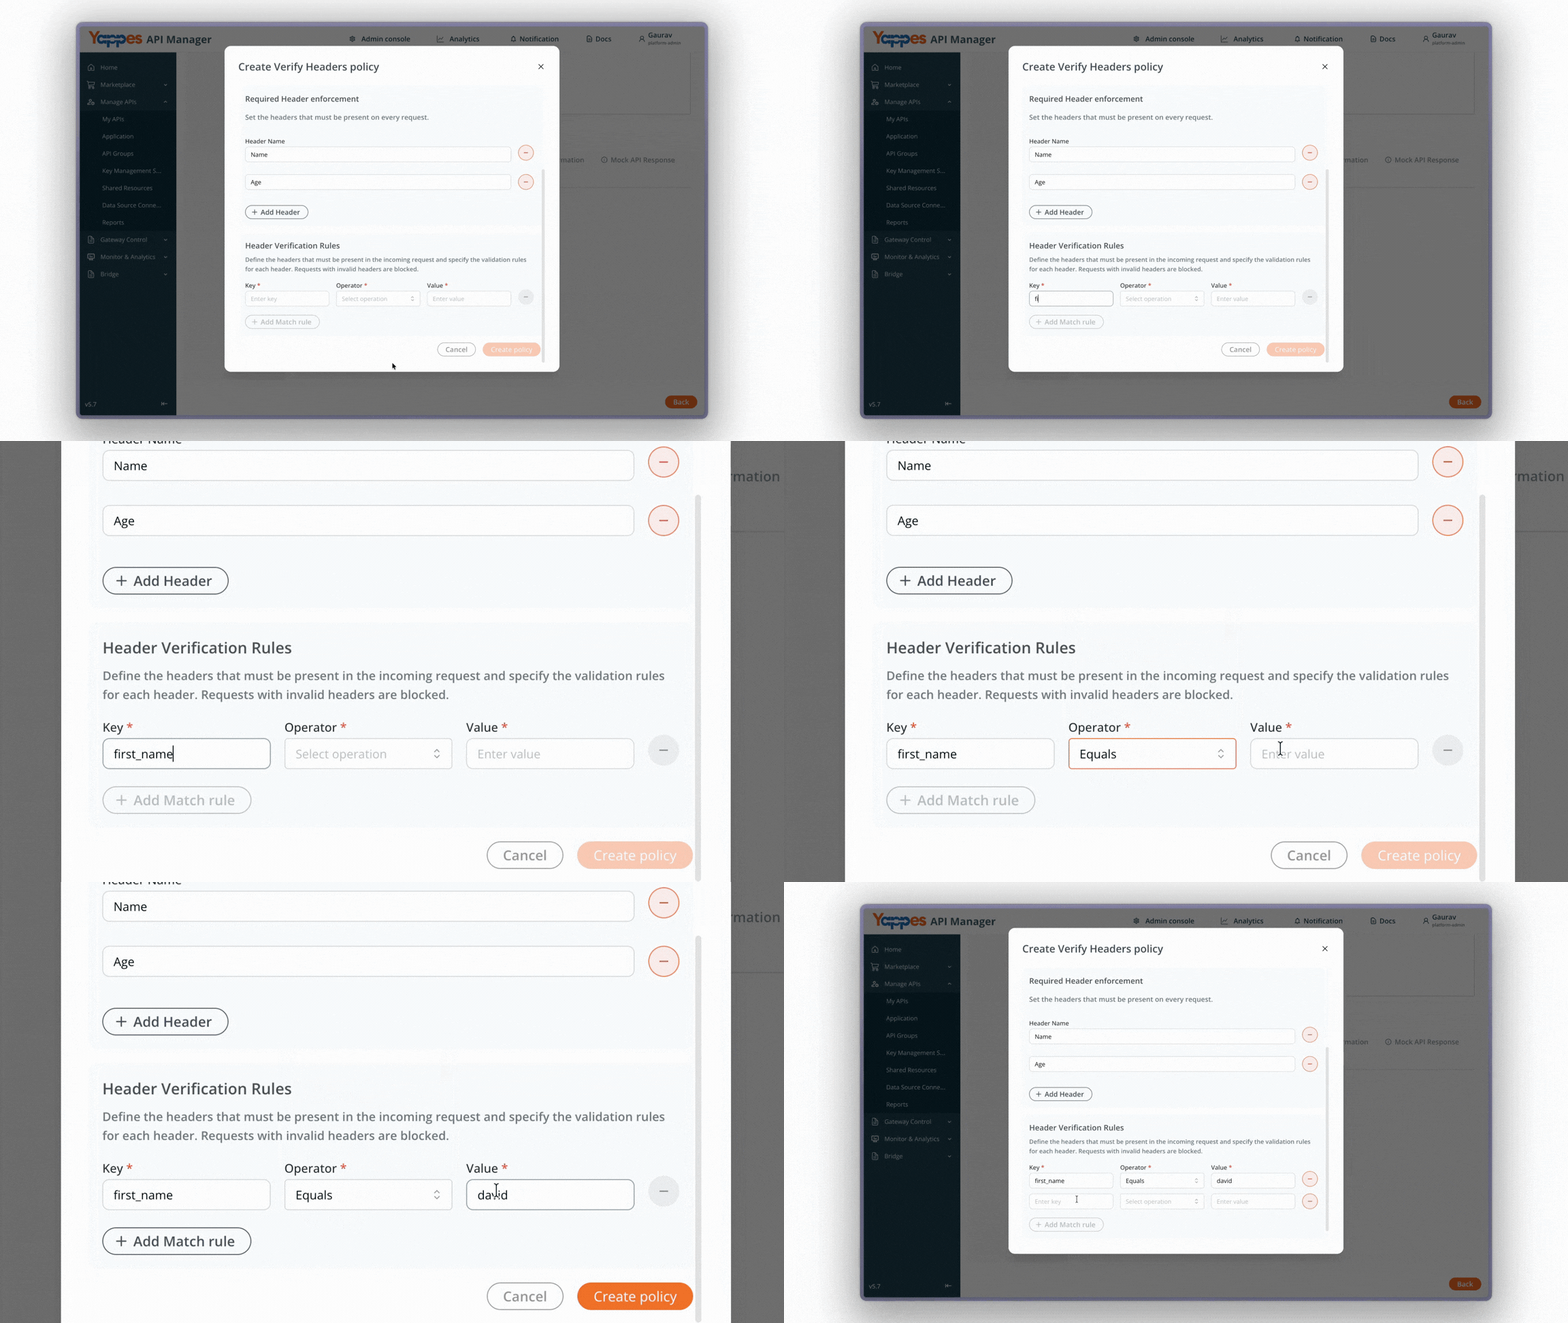
Step 8: Add Additional Header Verification Rules (Optional)
To add more verification rules:
- Click
Add Match Rule. - In the new rule row, enter the header name.
Example:
browser - Select the appropriate operator.
Example:
Includes - Enter the expected value.
Example:chrome
Repeat these steps to add more header verification rules as needed.
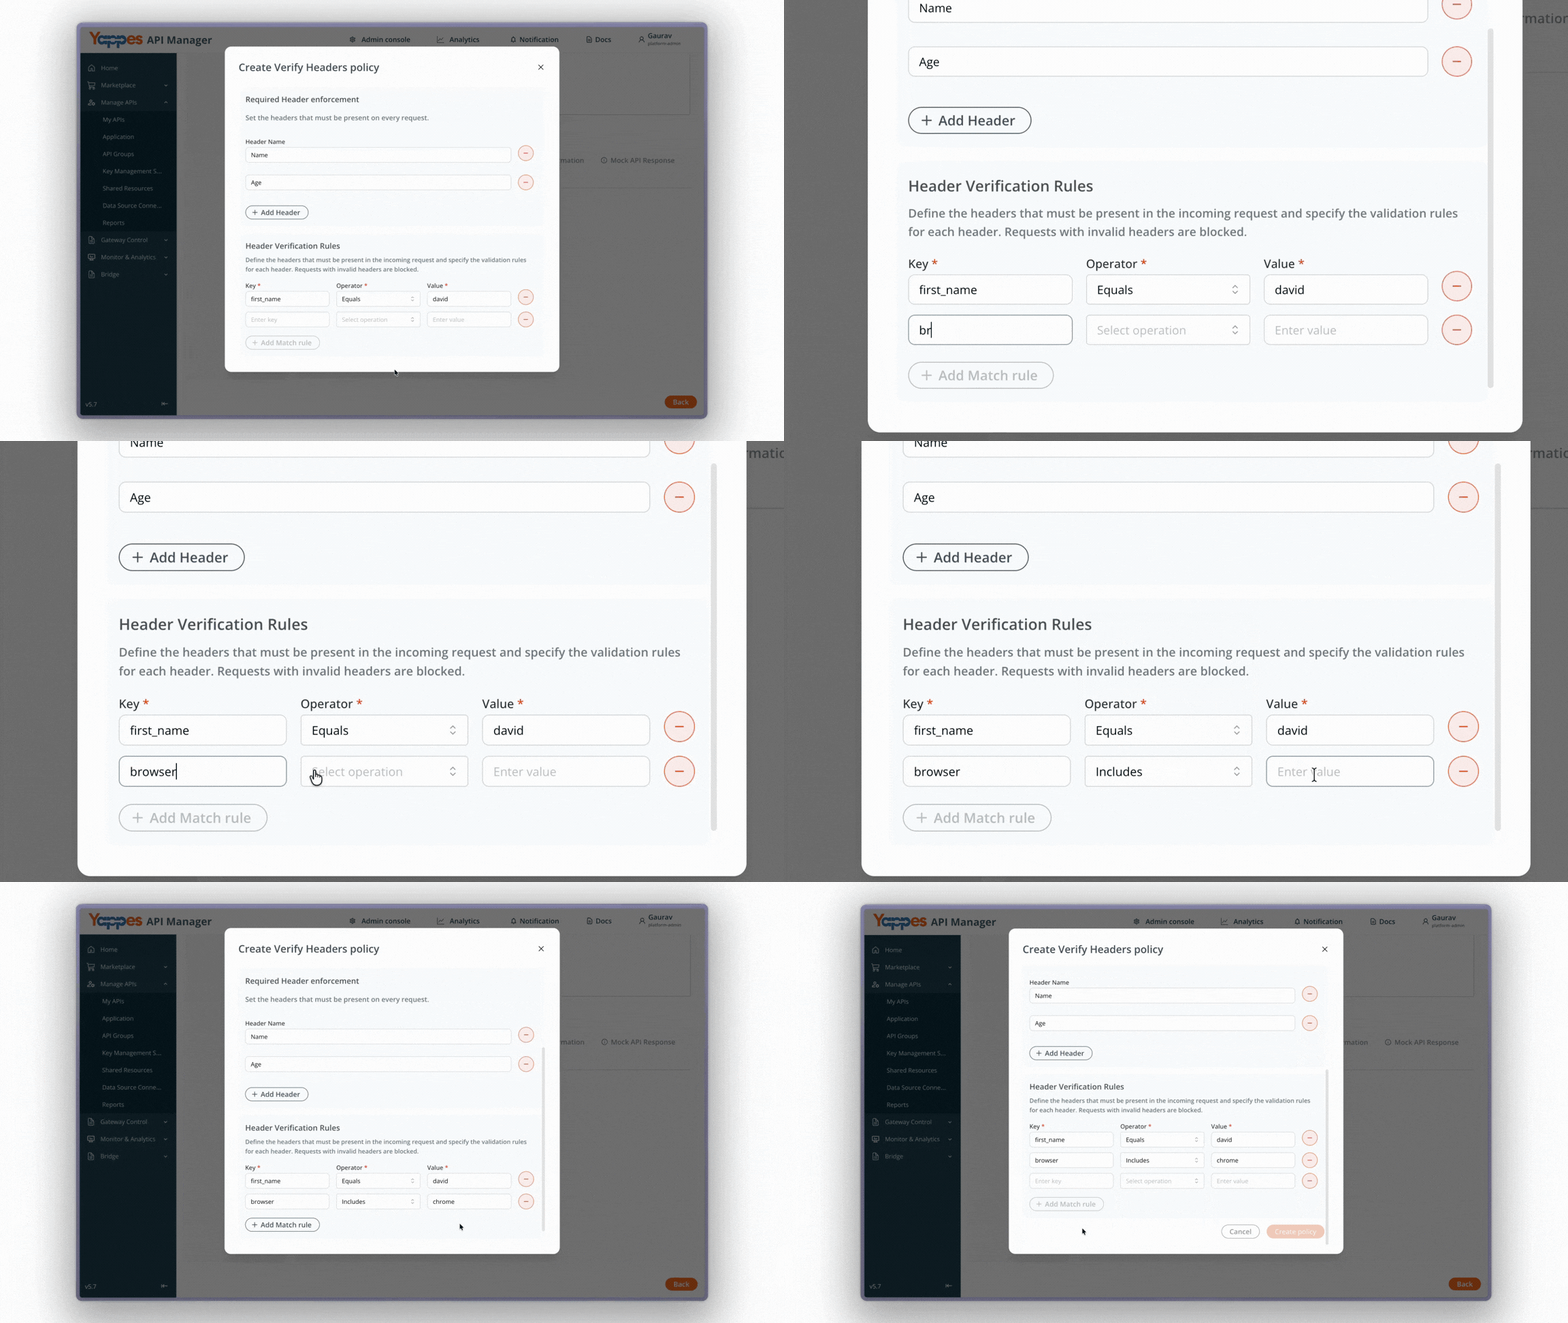
Step 9: Create the Policy
- Review all configured headers and verification rules.
- Click
Create Policy.
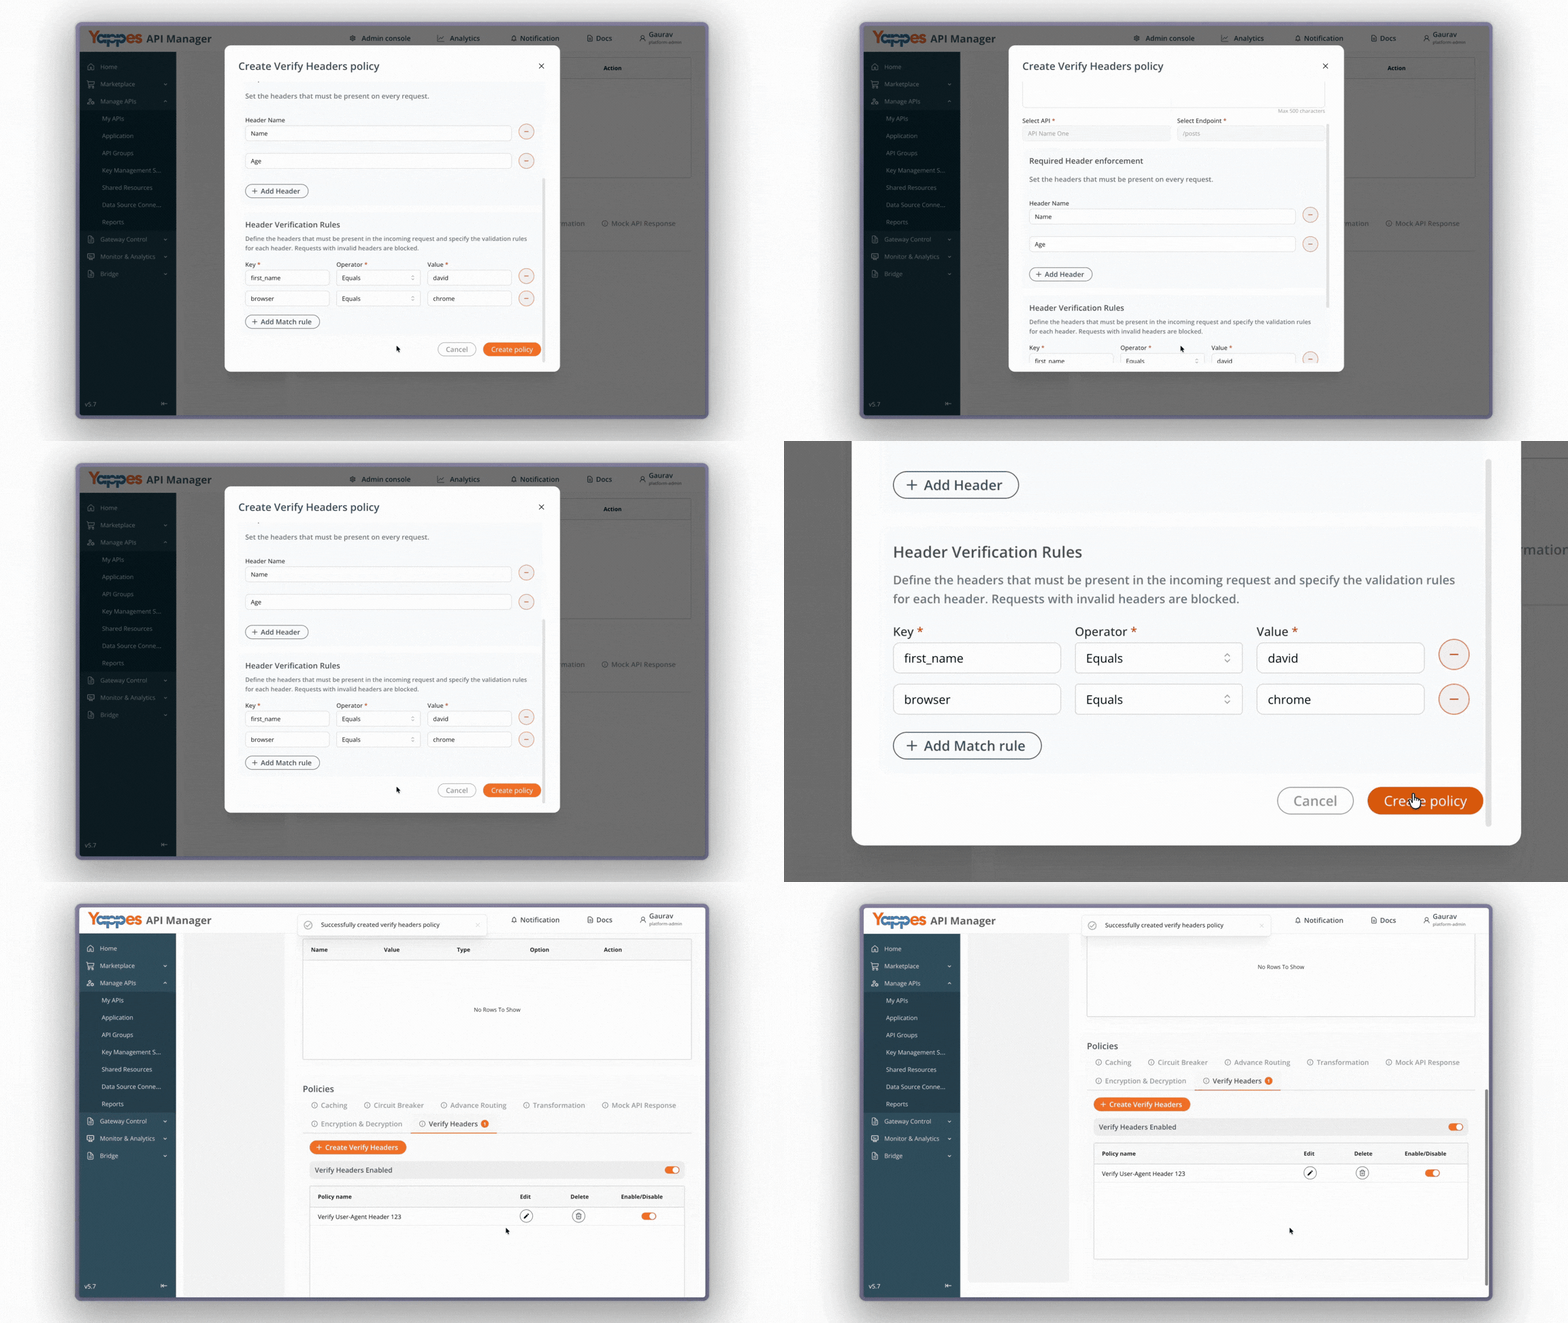
Success
The Verify Headers policy is successfully created.
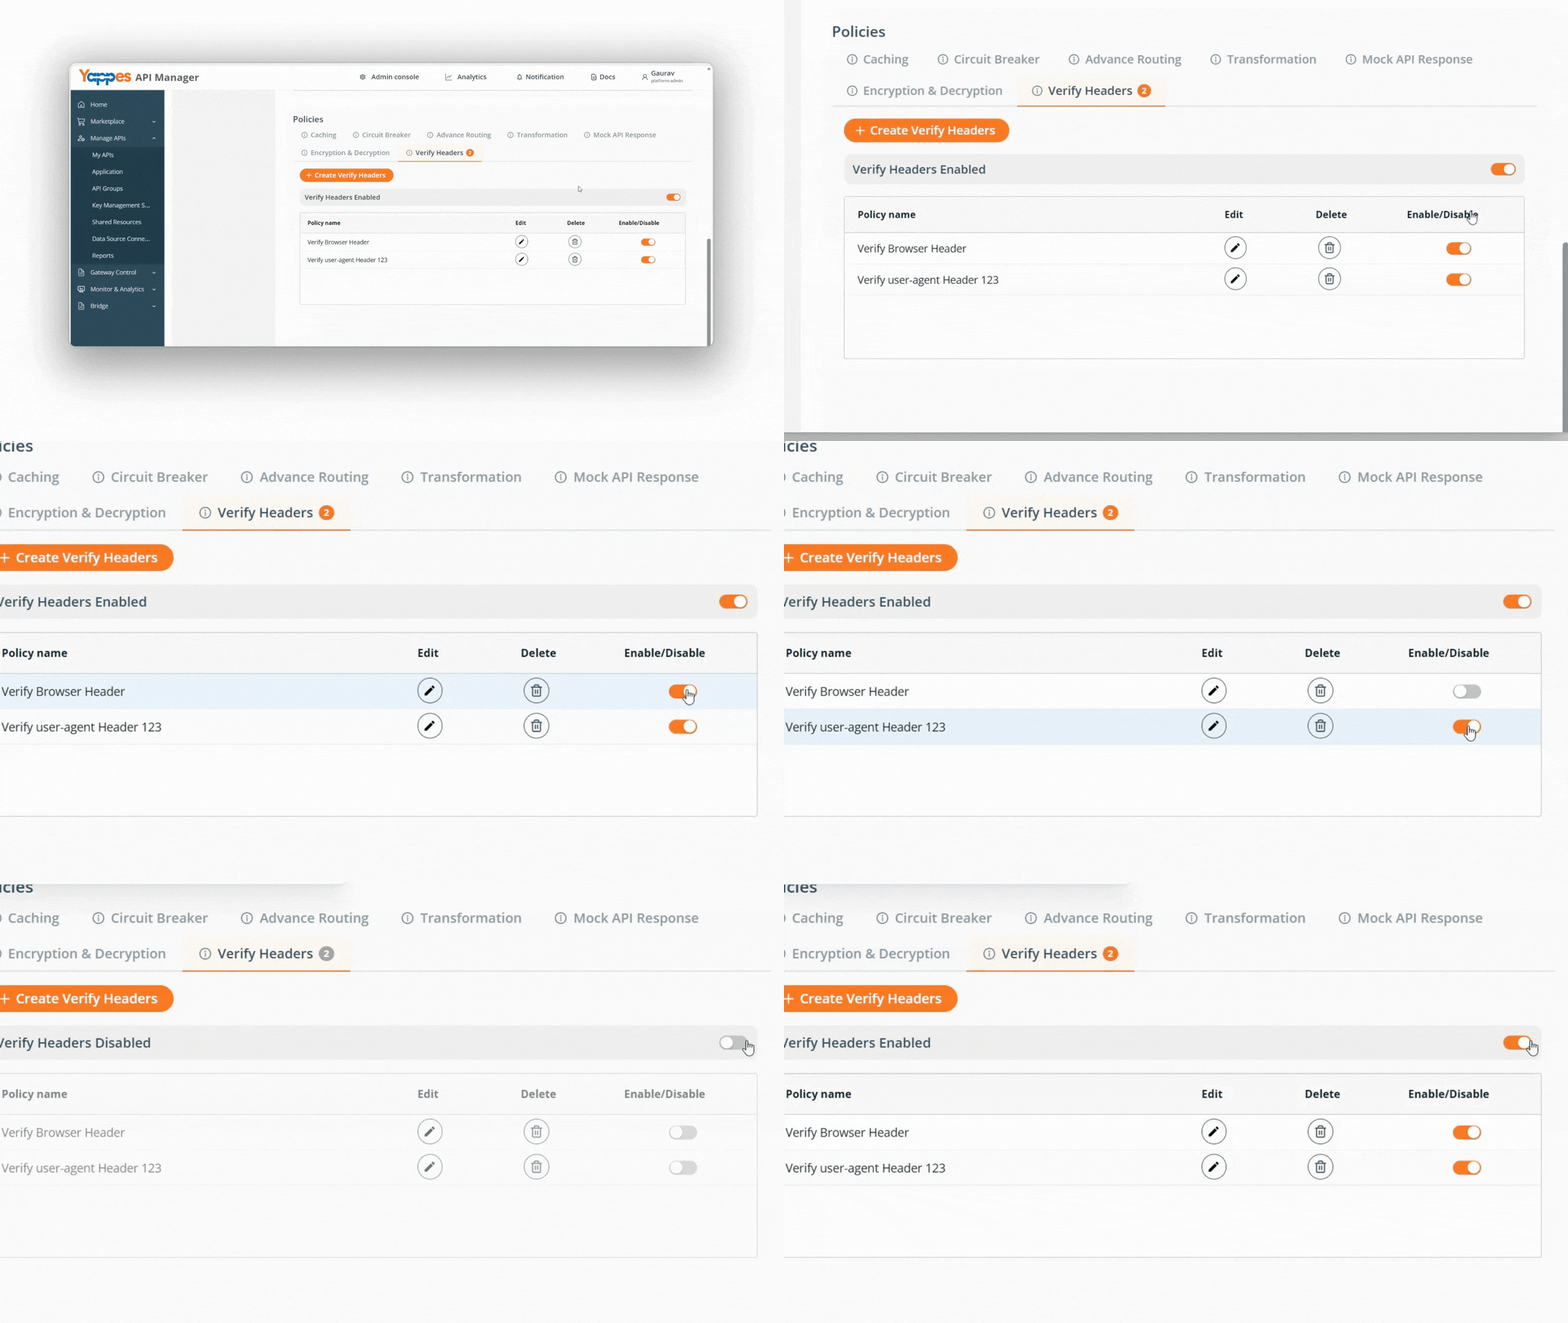
Step 10: Activate the Policy
After creating the Verify Headers policy, activate it as follows:
- Locate the newly created
Verify Headerspolicy in the policy list. - Use the toggle switch to enable or disable the policy.
You can manage policy activation in the following ways:
Global toggle: Enable or disable all Verify Headers policies at once.Individual toggle: Enable or disable a specific policy independently.
Info
Newly created Verify Headers policies are enabled by default.
Method 2: Creating Verify Headers from Gateway Policy Page
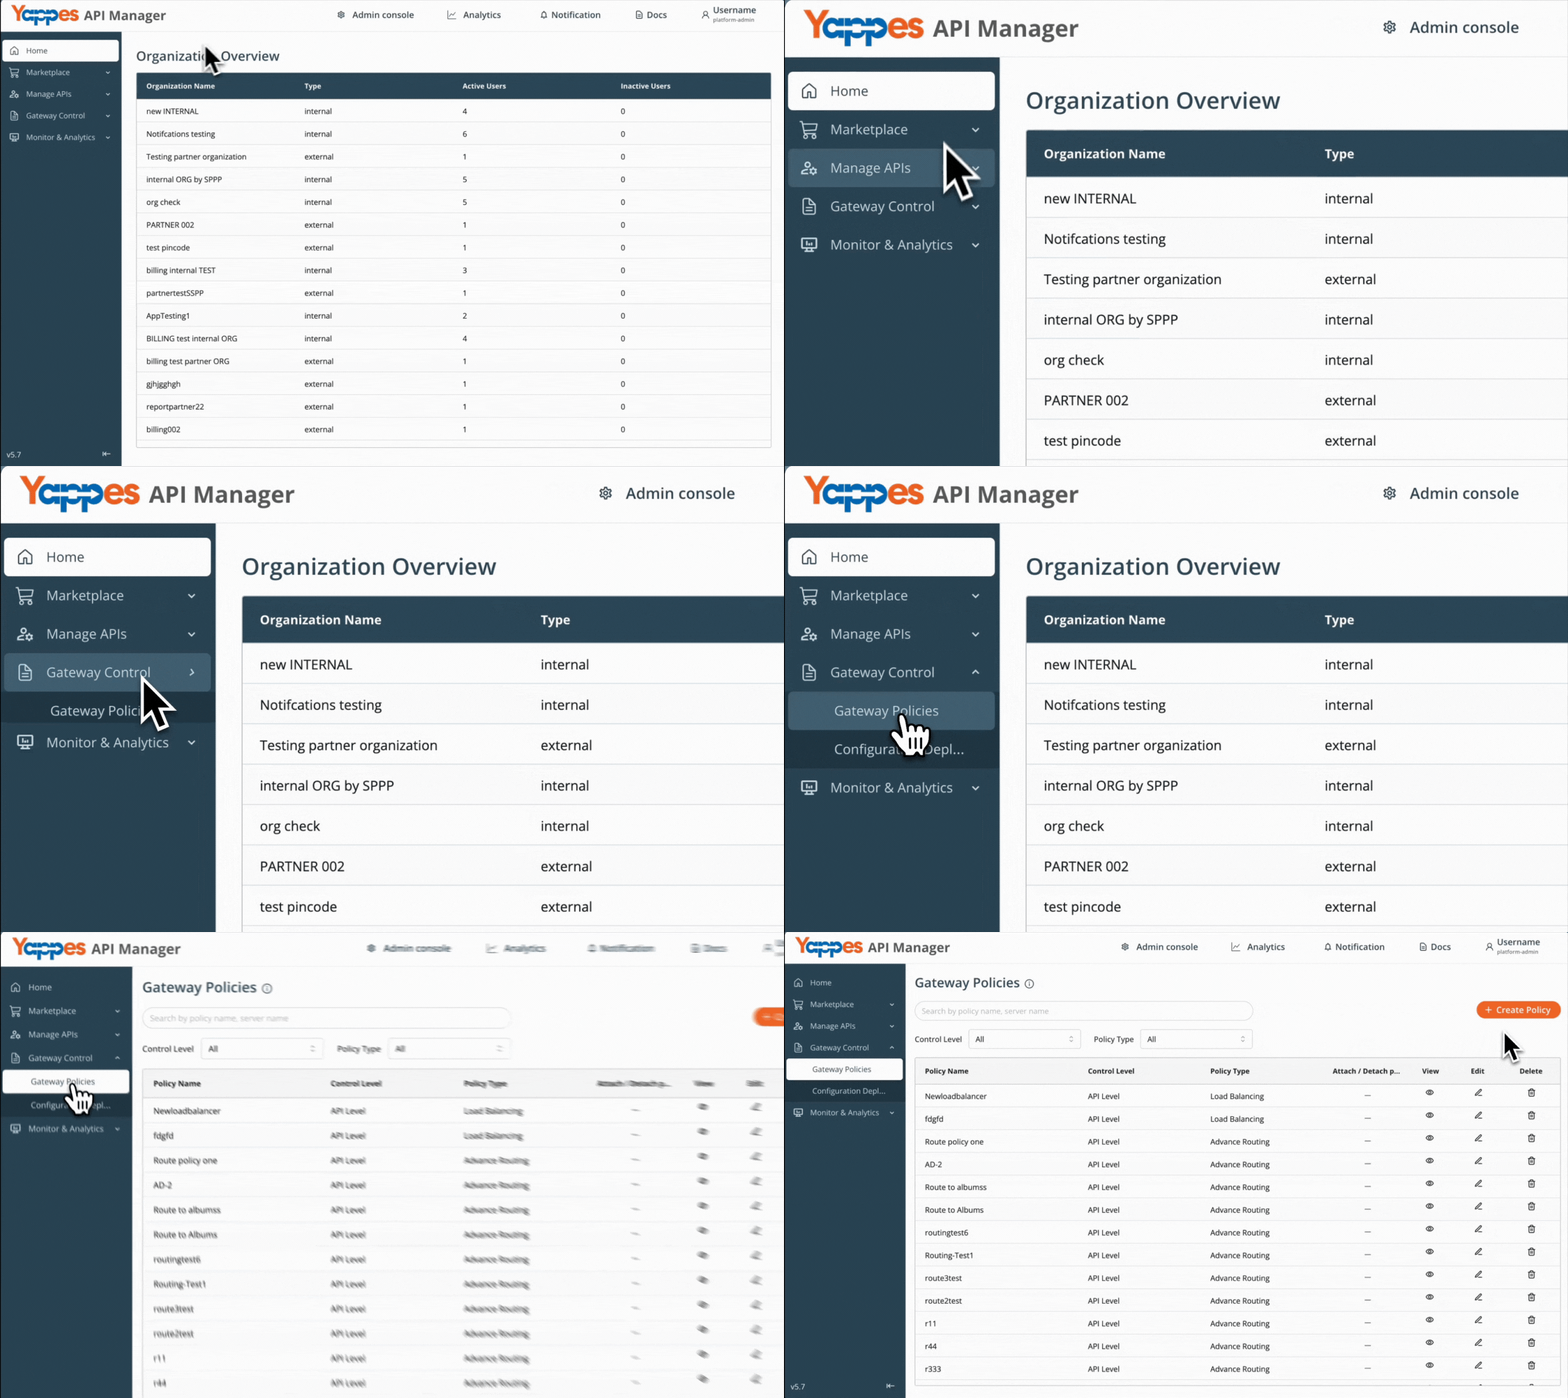
Step 1: Navigate to Gateway Policies
- Locate
Gateway Control → Gateway Policiesin the main navigation menu. - The policies management interface will display.
Step 2: Initialize New Policy Creation
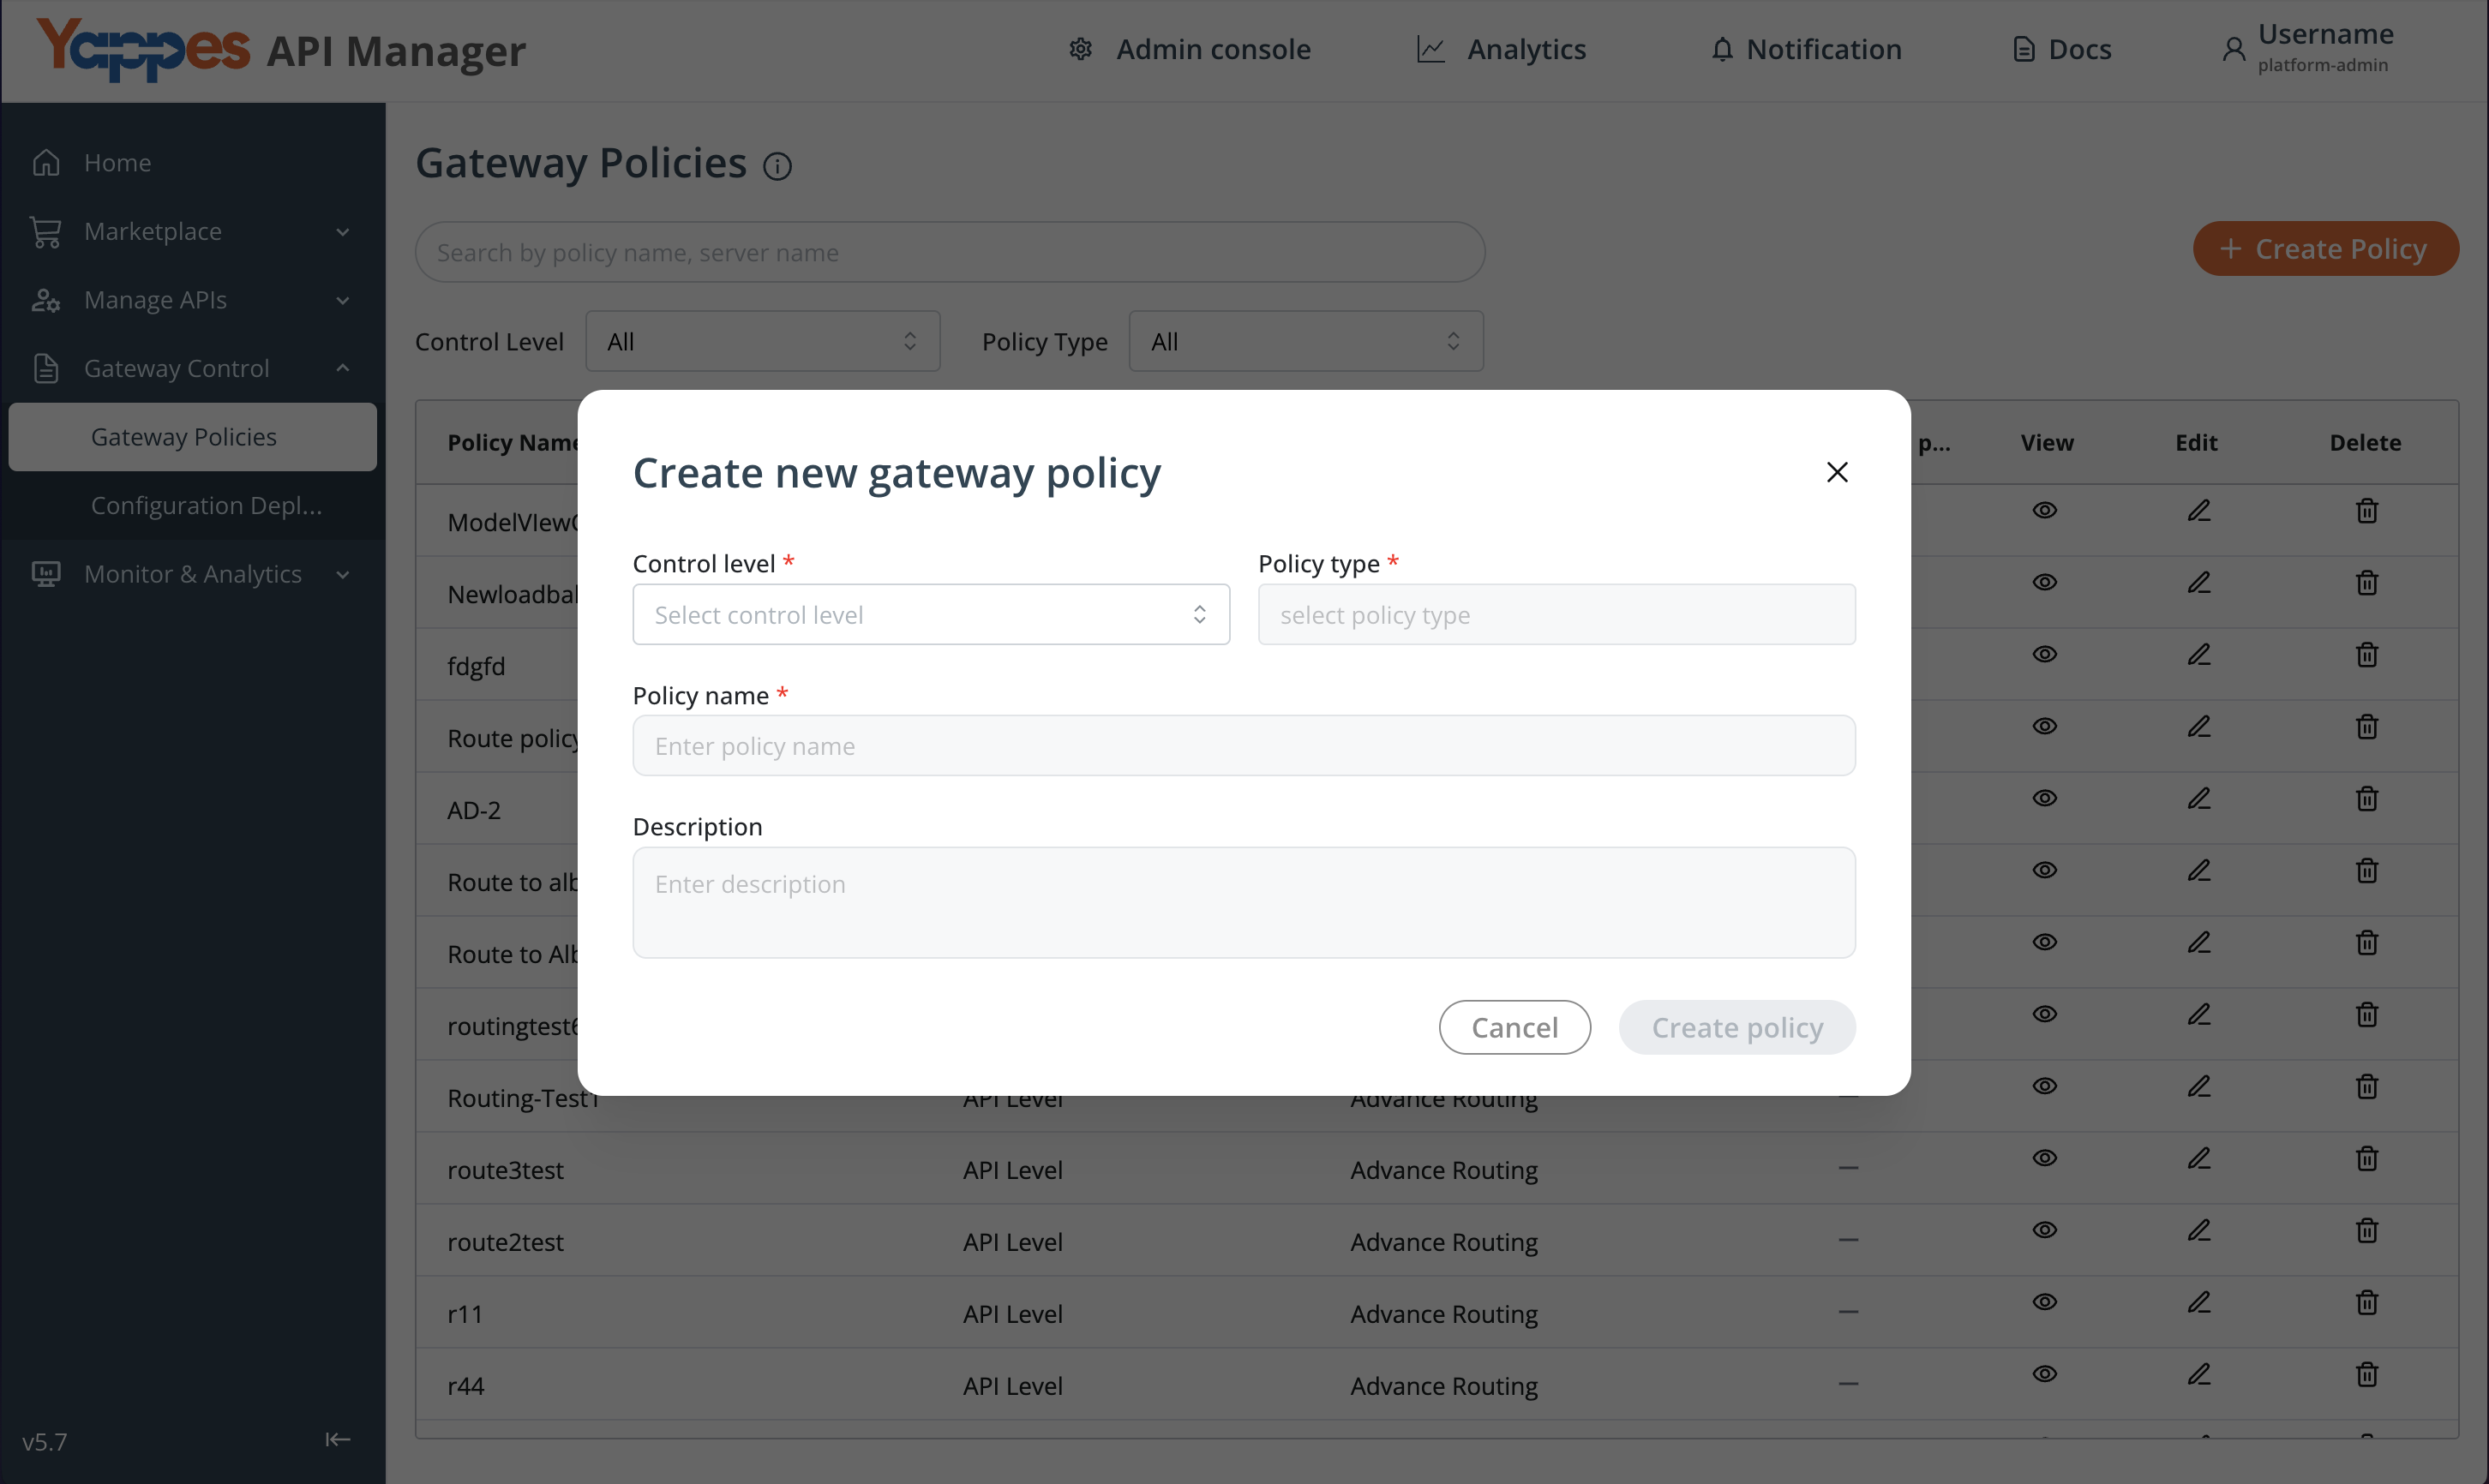
- Click the
+ Create Policybutton. - The policy creation modal will open.
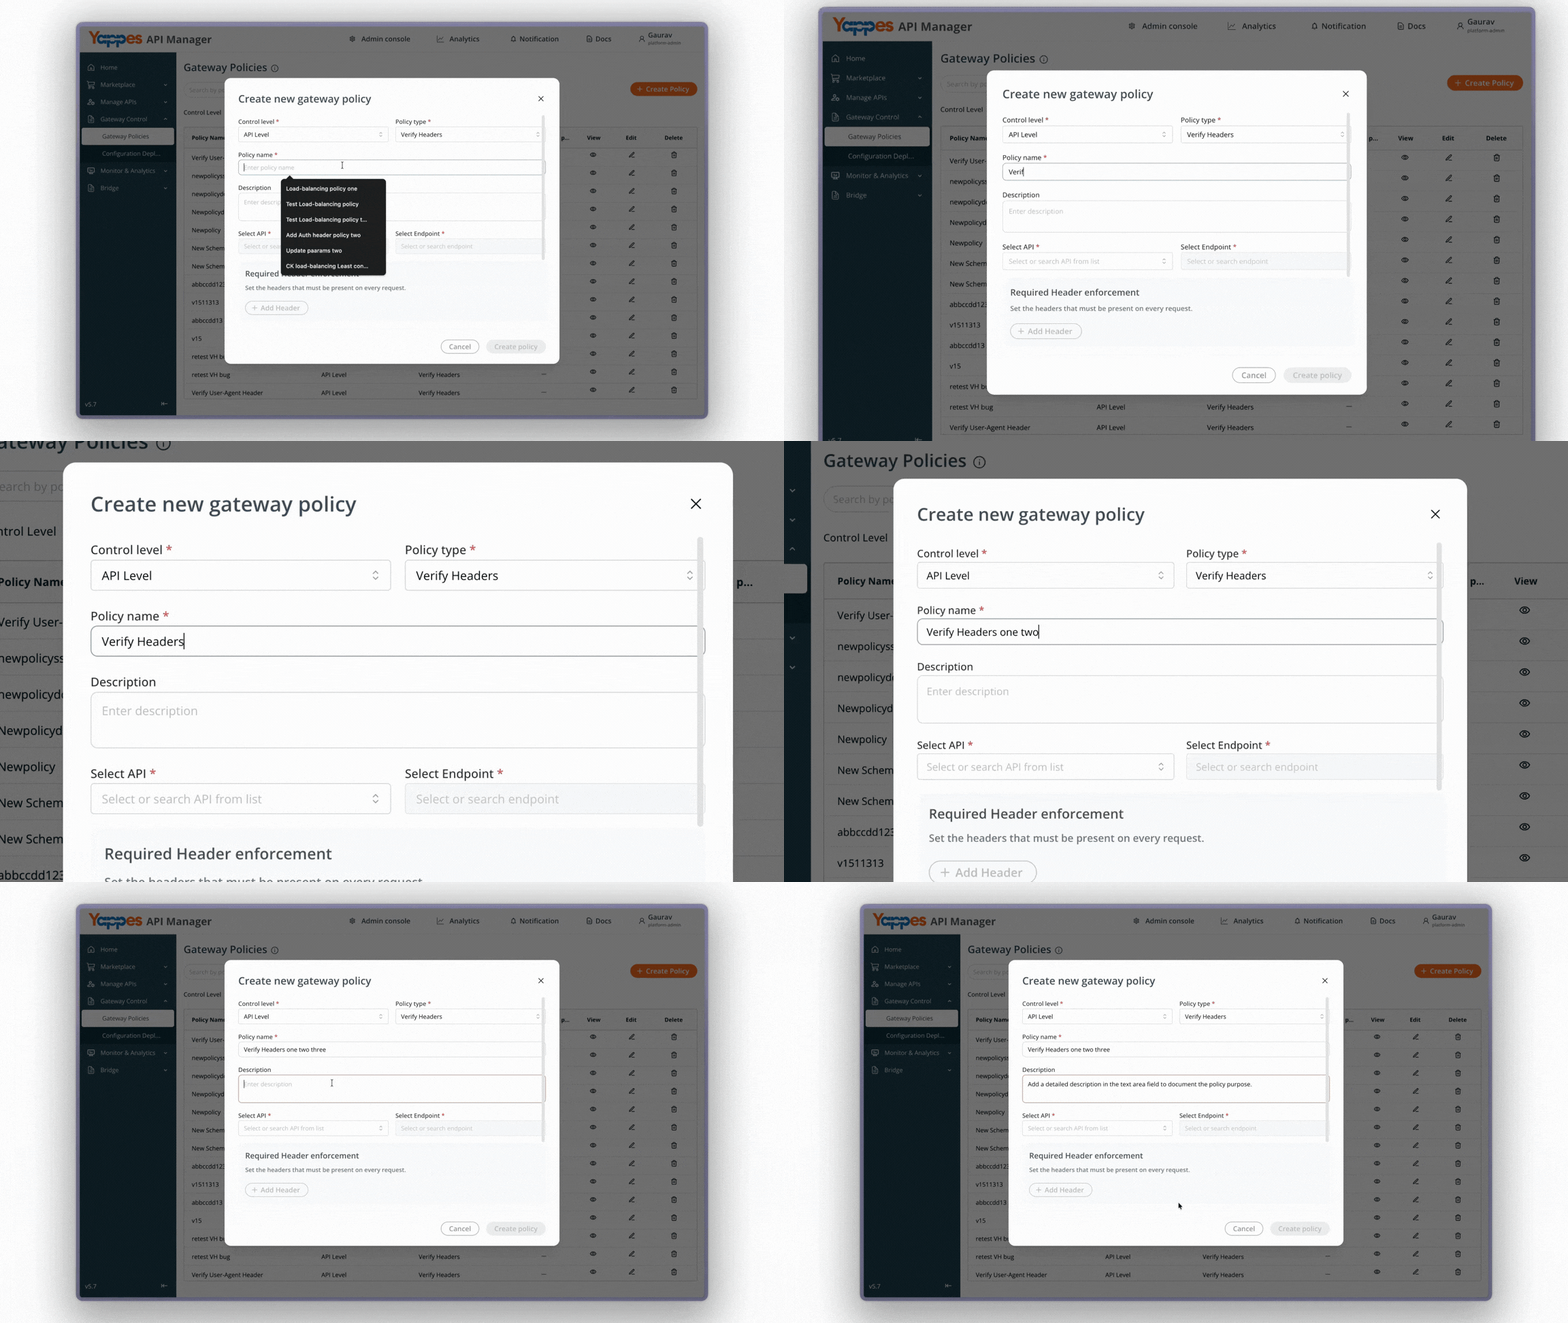
Step 3: Configure Policy Settings
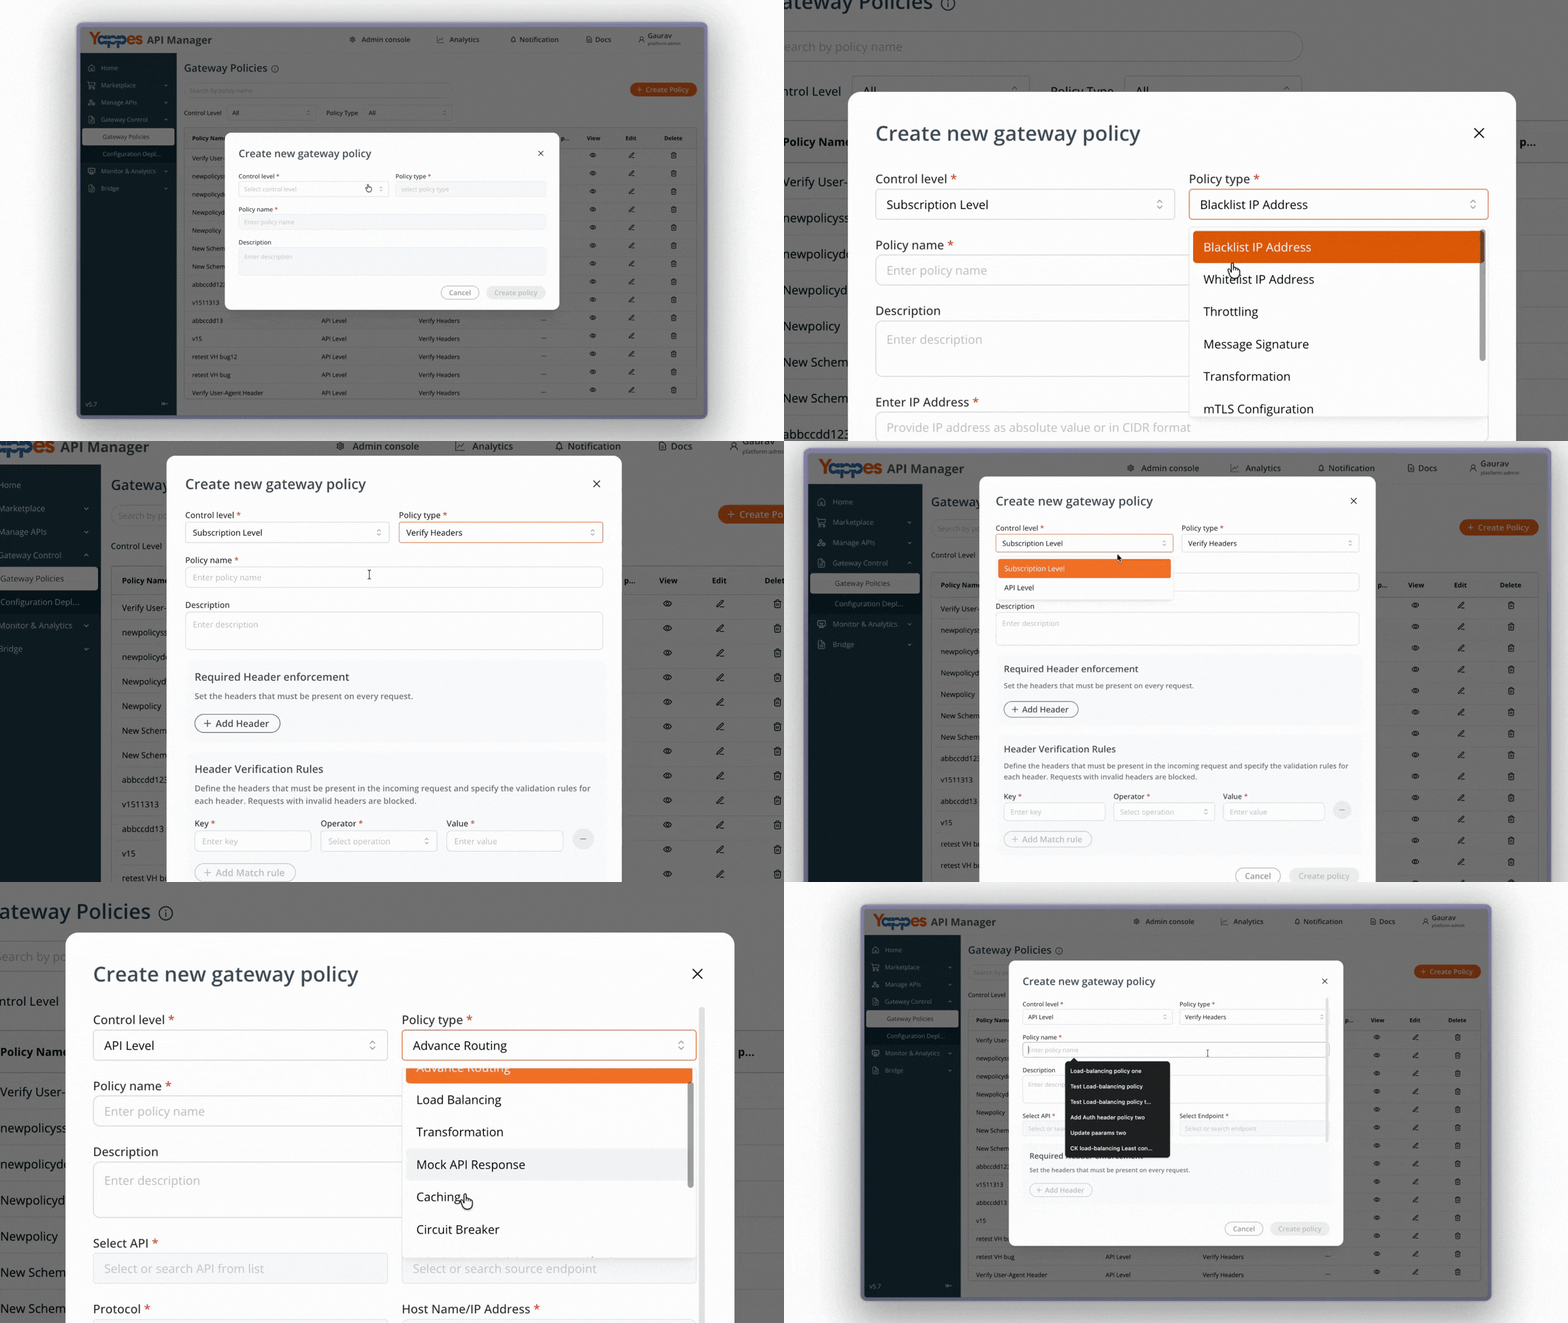
- Select the appropriate
Control Levelbased on where the policy is required: Subscription Level– Select this option if the policy needs to be created at the subscription scope.API Level– Select this option if the policy needs to be created for a specific API and endpoint.- In the
Policy Typedropdown, selectVerify Headers. - These settings define the policy’s scope and behavior.
Step 4: Define Policy Details
- Enter a unique
Policy Namefor identification. - Add a detailed description in the text area field to document the policy purpose.
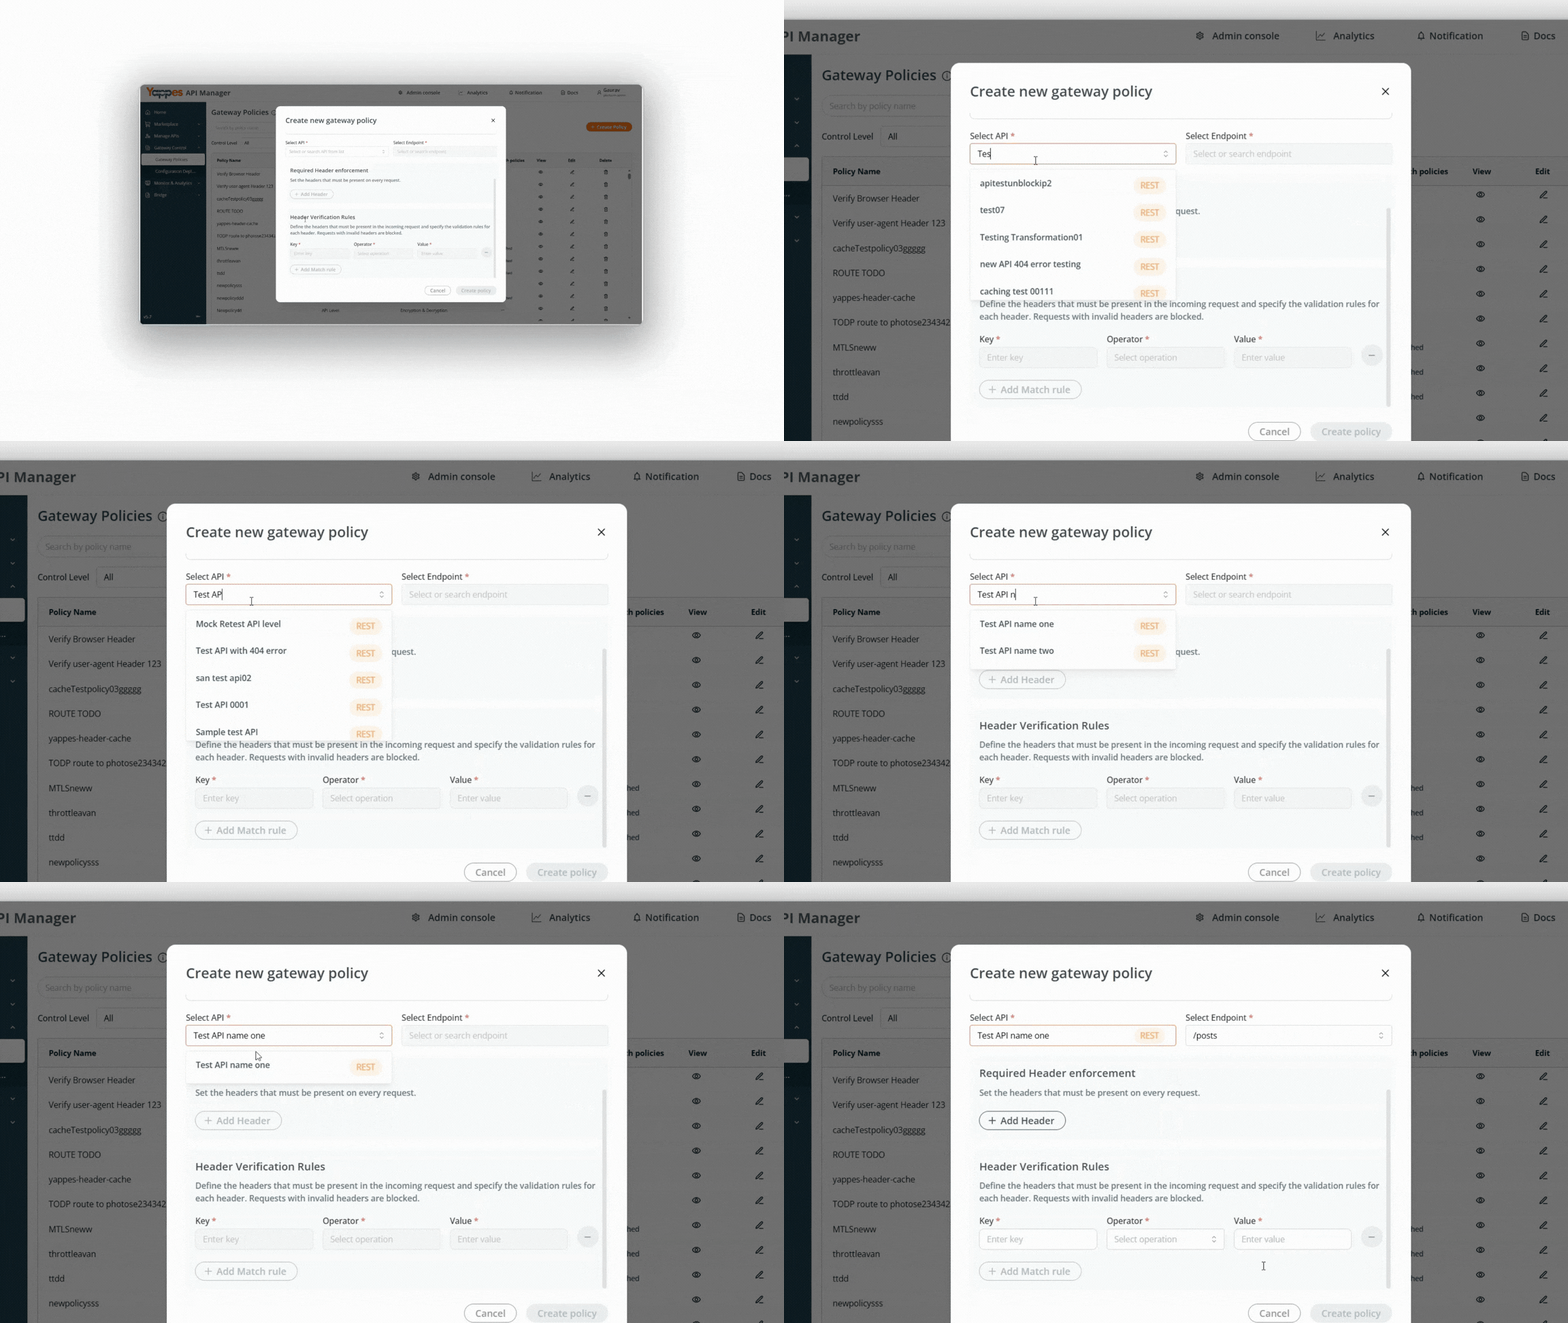
Step 5: Select API and Endpoint (API Level Only)
- If
Control Levelis set toAPI Level: - Select the required
APIfrom theSelect APIdropdown. -
Select the corresponding
Endpointfrom theSelect Endpointdropdown. -
If
Control Levelis set toSubscription Level: -
No API or endpoint selection is required.
-
Proceed to configure the header rules.
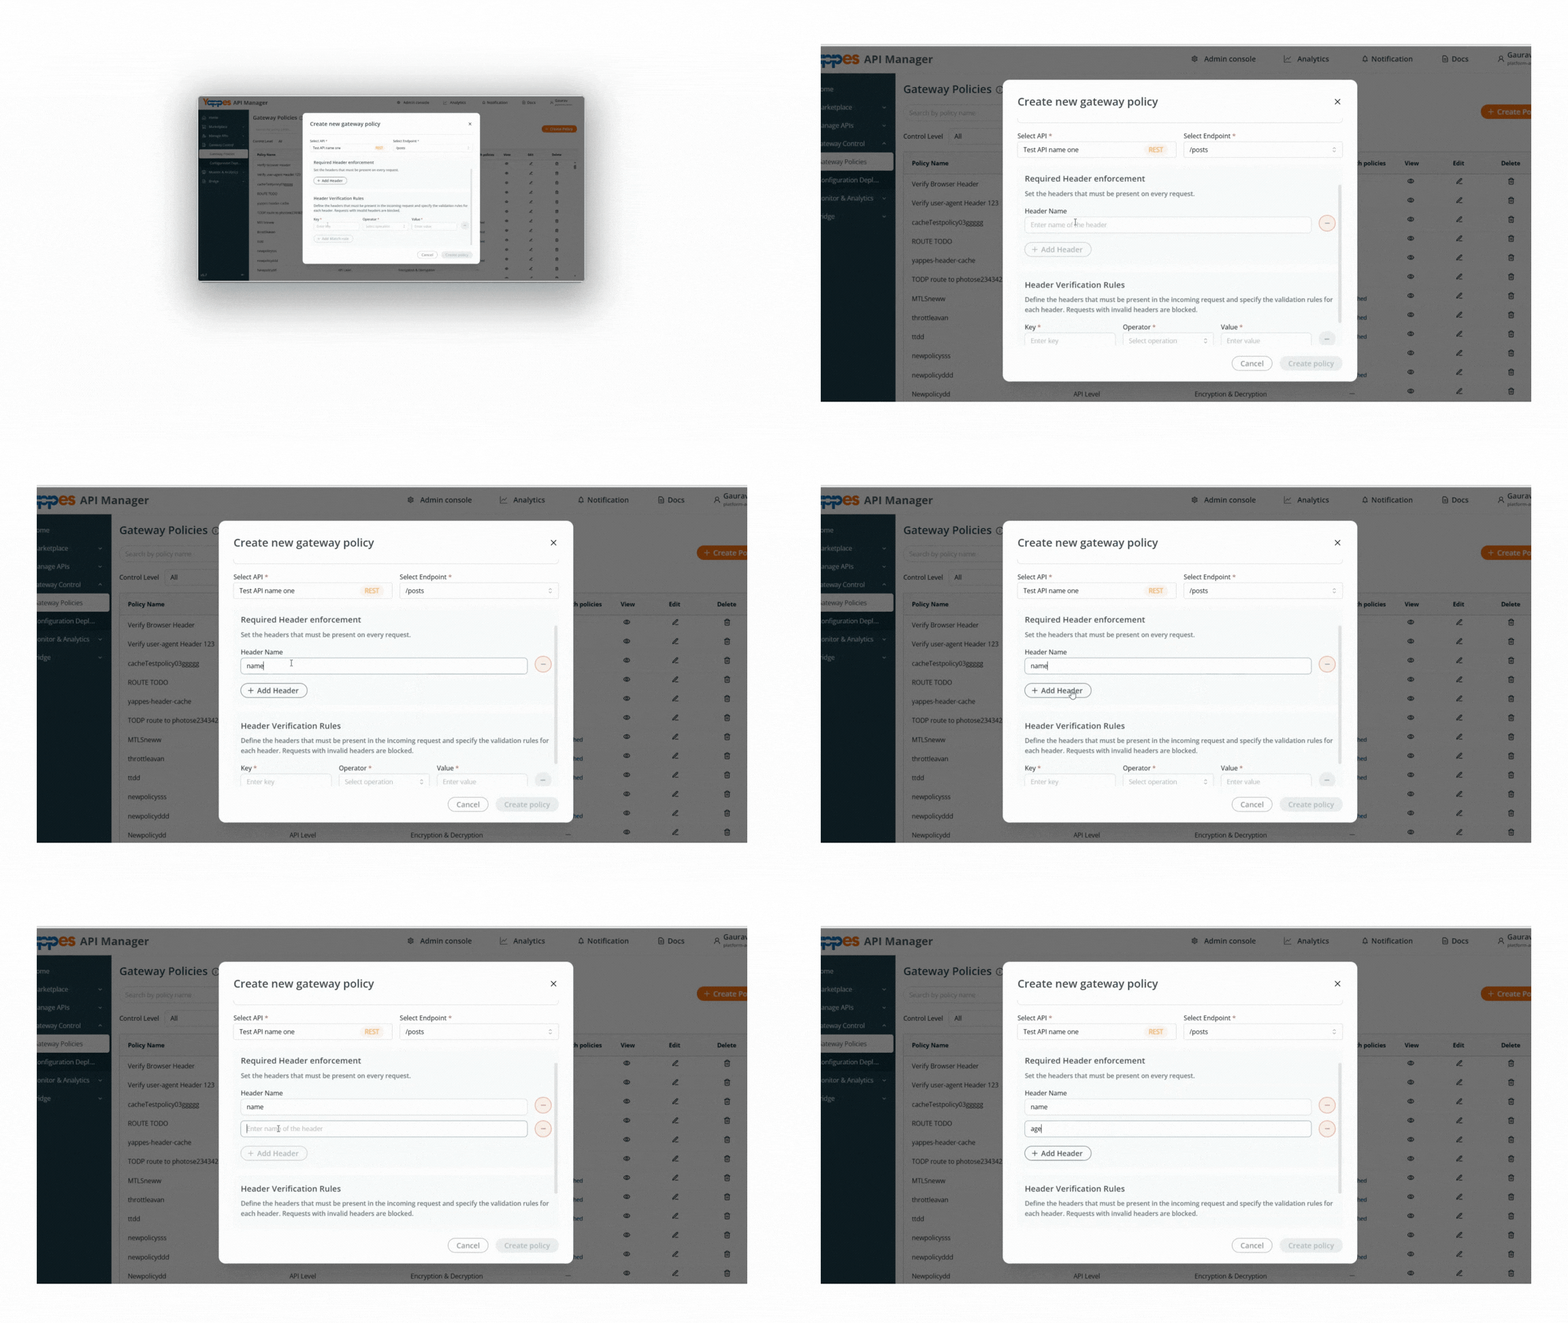
Step 6: Add Required Headers
Under Required Header Enforcement, perform the following steps:
- Locate the
Header Namefield. - Click
Add Header. - Enter the first required header name.
Example:
name - Enter another required header.
Example:age
Step 7: Configure the First Header Verification Rule
Under Header Verification Rules, the first rule row is available by default.
- In the
Keyfield, enter the header name. Example:first_name - In the
Operatorfield, selectEquals. - In the
Valuefield, enter the expected value. Example:David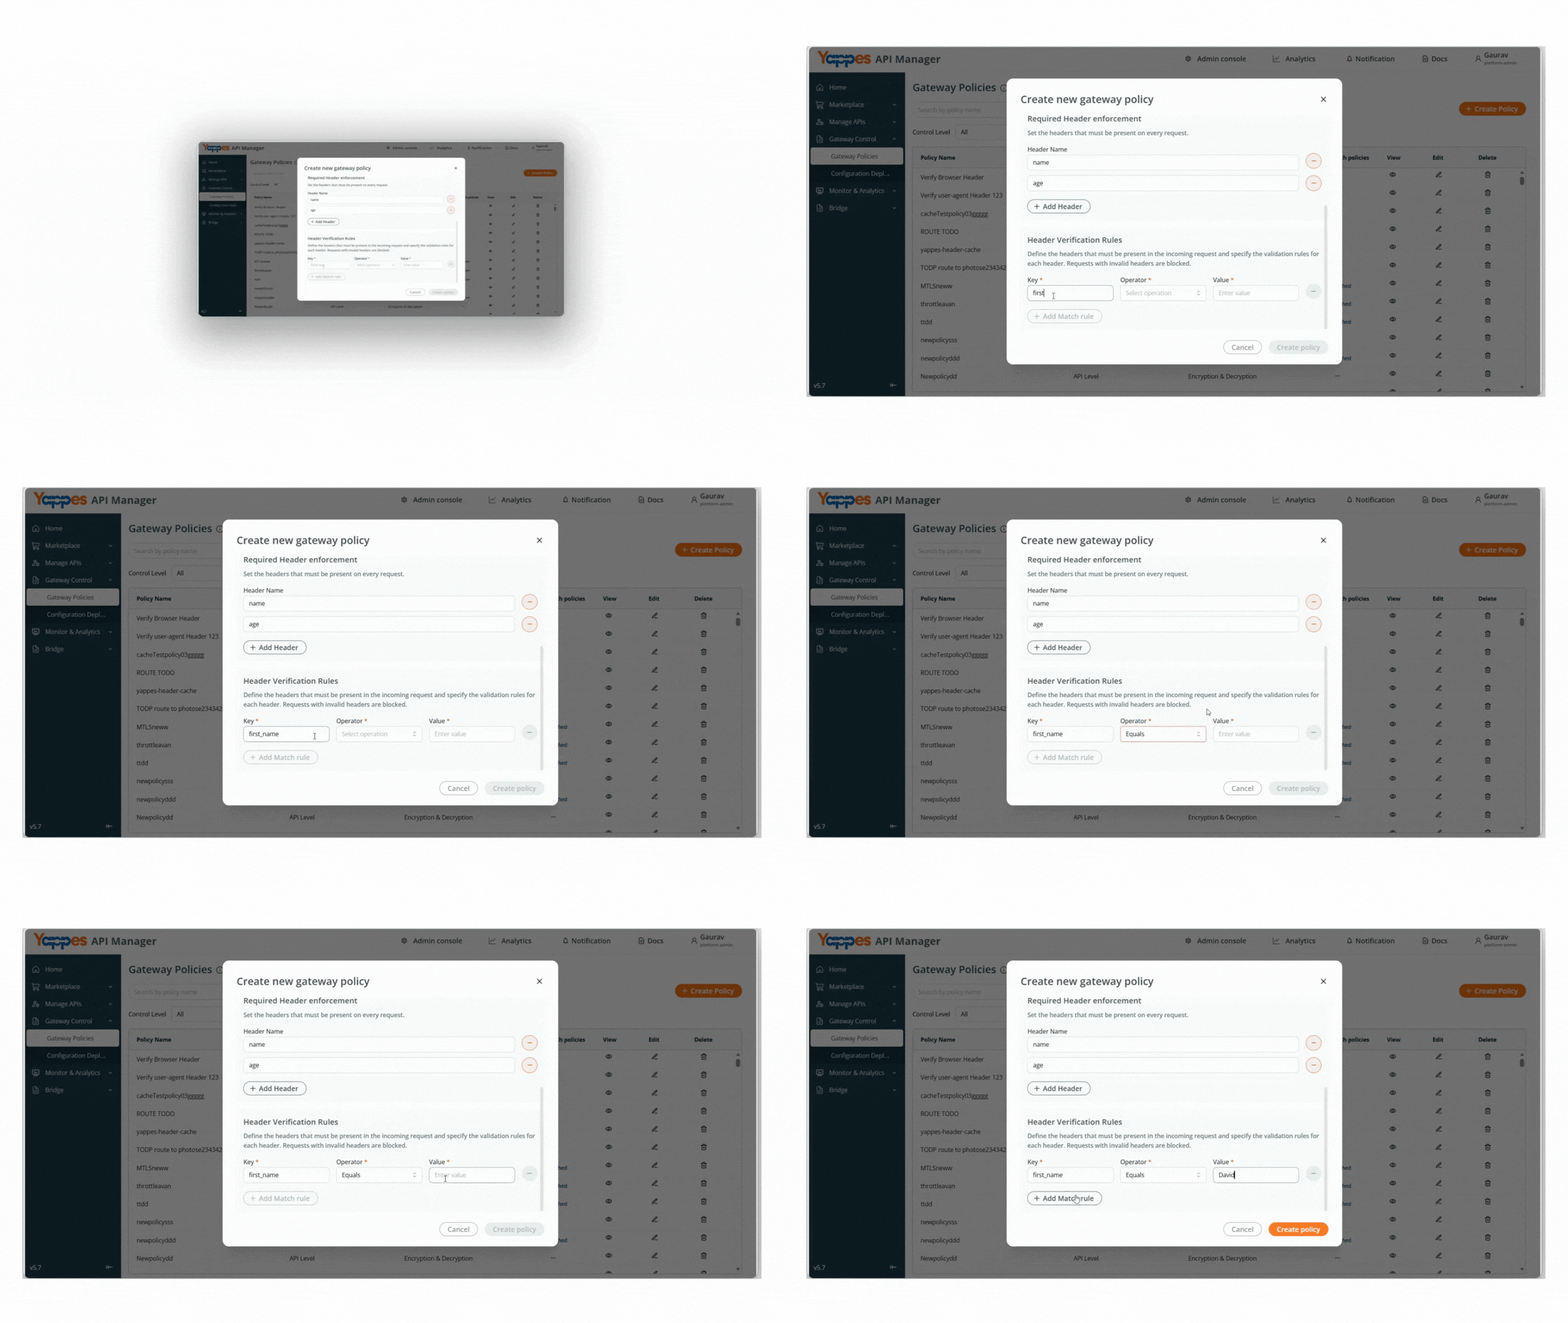
Step 8: Add Additional Header Verification Rules (Optional)
To add more verification rules:
- Click
Add Match Rule - In the new rule row, enter the header name
Example:browser - Select the appropriate operator
Example:Includes - Enter the expected value
Example:Chrome
Repeat these steps to add more header verification rules as needed.
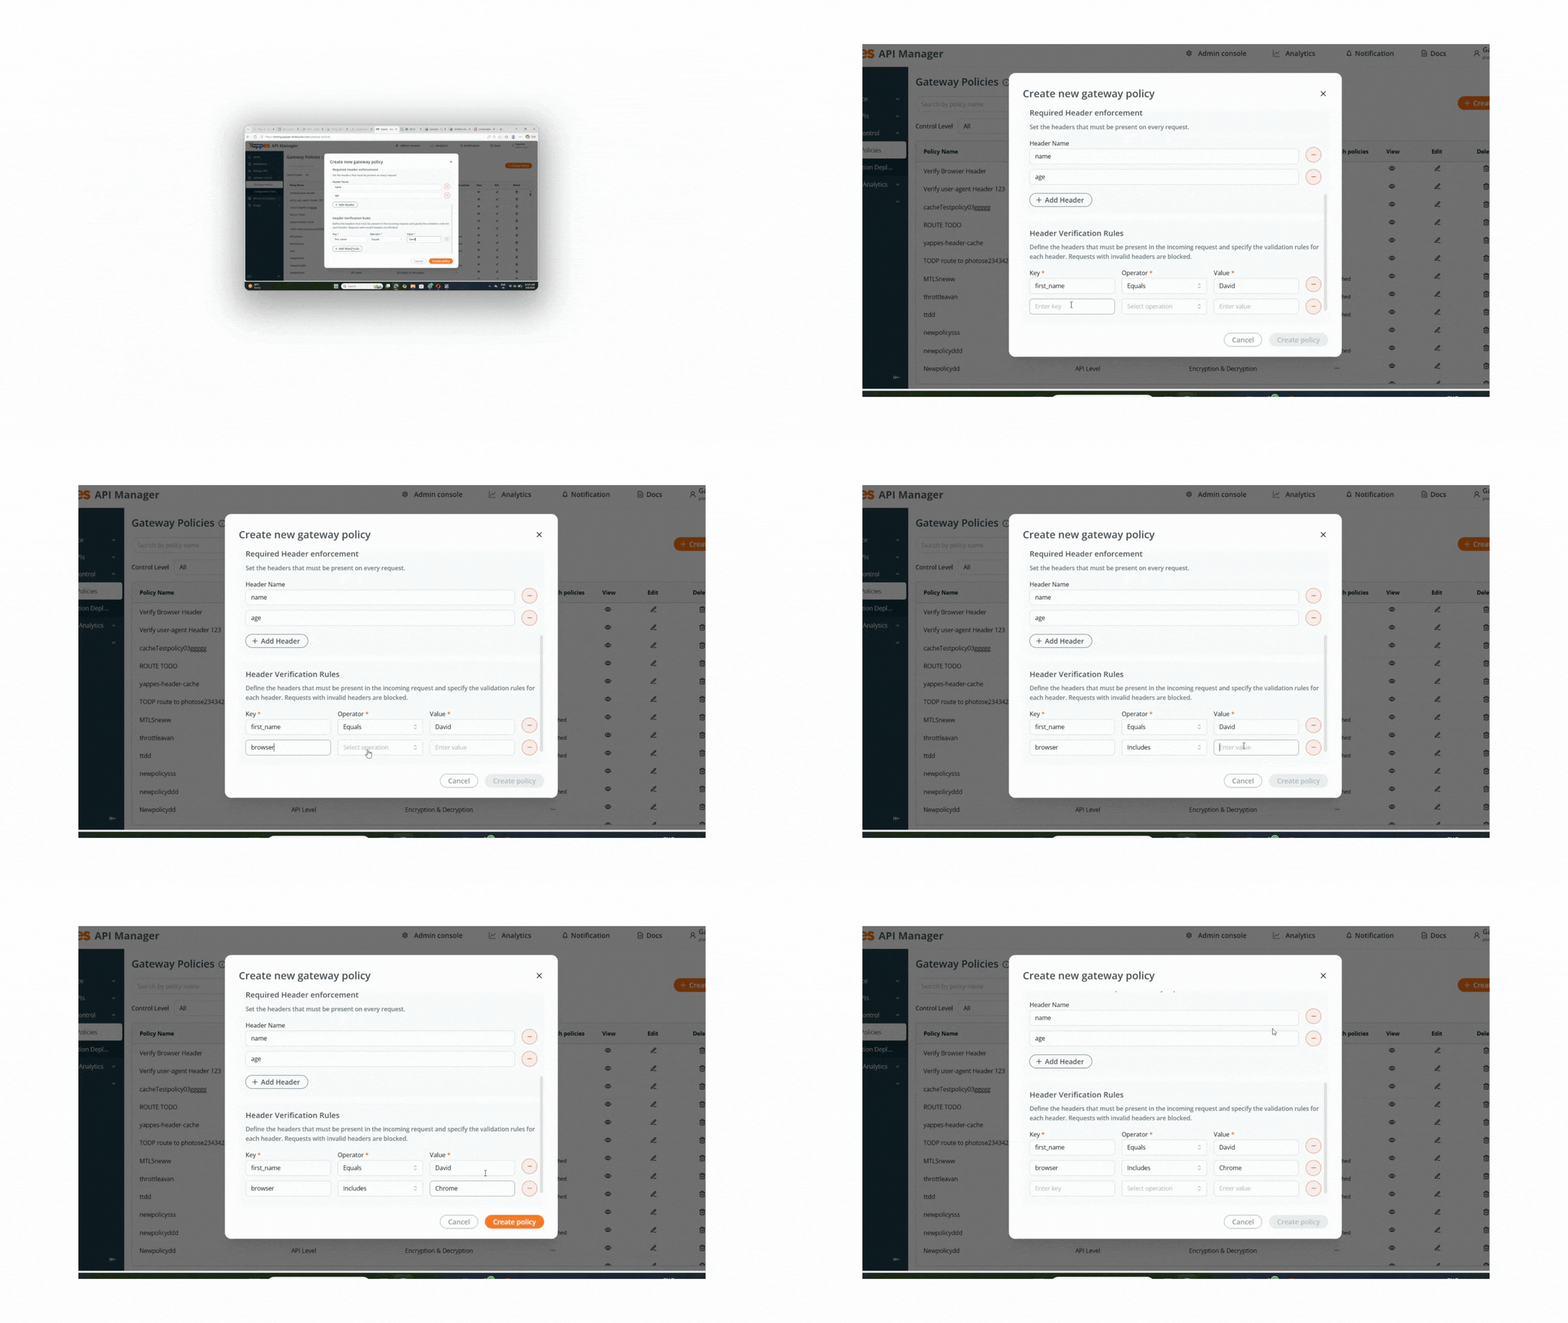
Step 9: Create the Policy
- Review all configured headers and verification rules.
- Click
Create Policy.
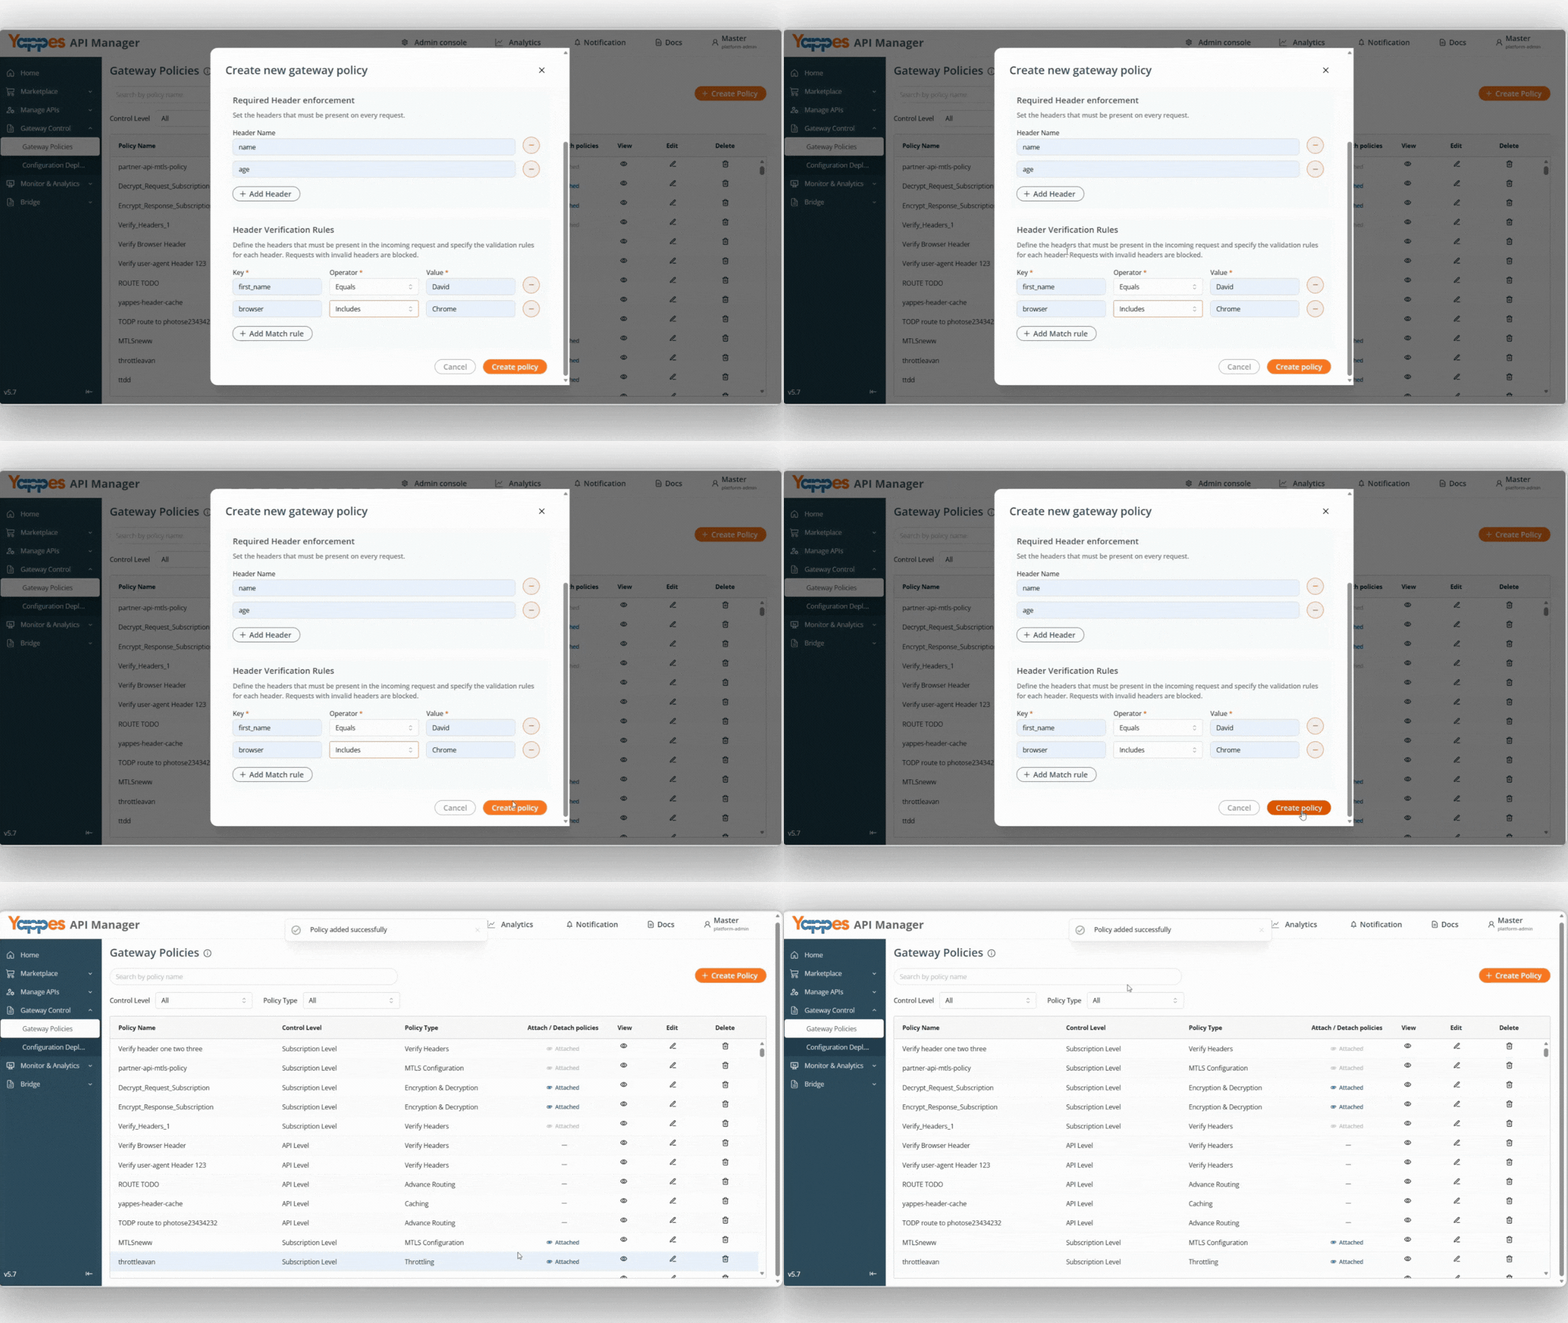
Success
The Verify Headers policy is successfully created.
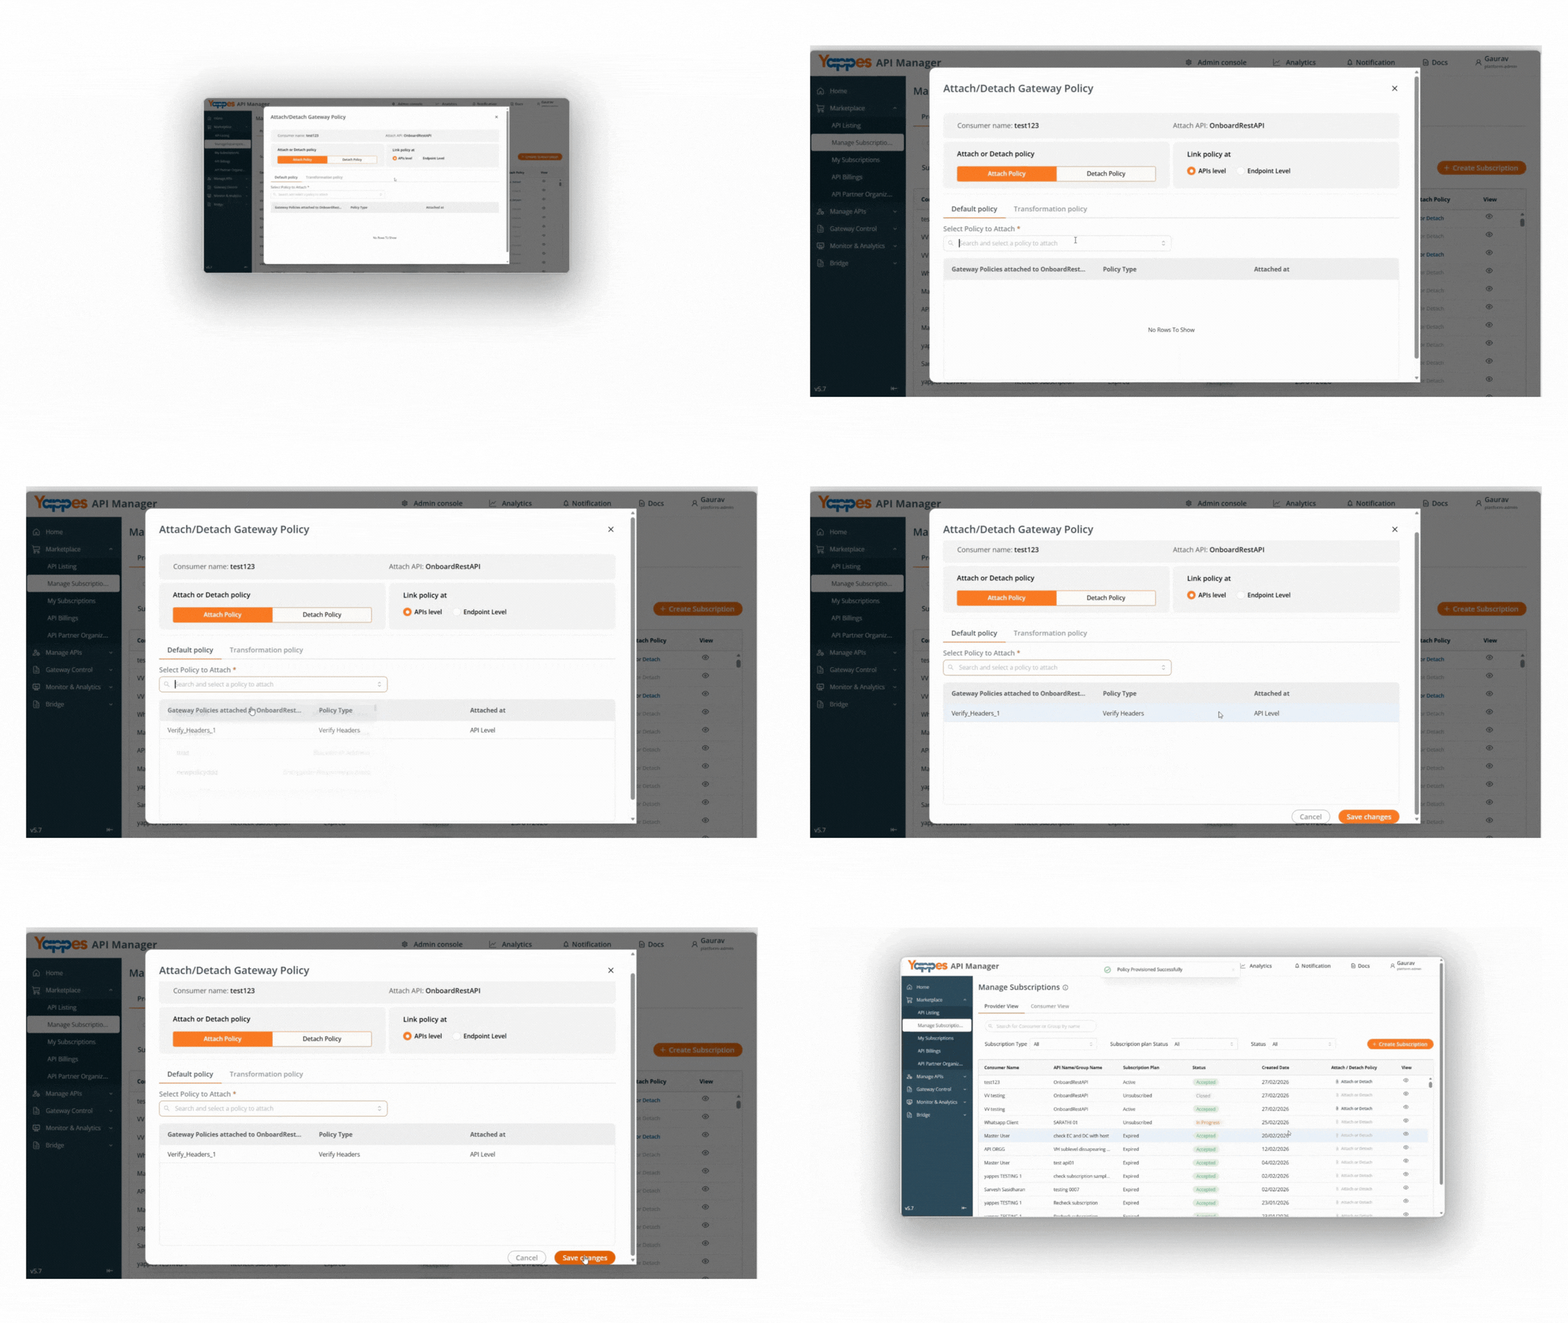
Attaching Verify Headers Policy to Subscriptions
Step 1: Navigate to Manage Subscriptions
- From the main menu, click on
Manage Subscriptions. - The
Manage Subscriptionspage will display a list of all API subscriptions. - Locate the subscription(s) where you want to apply the
Verify Headerspolicy.
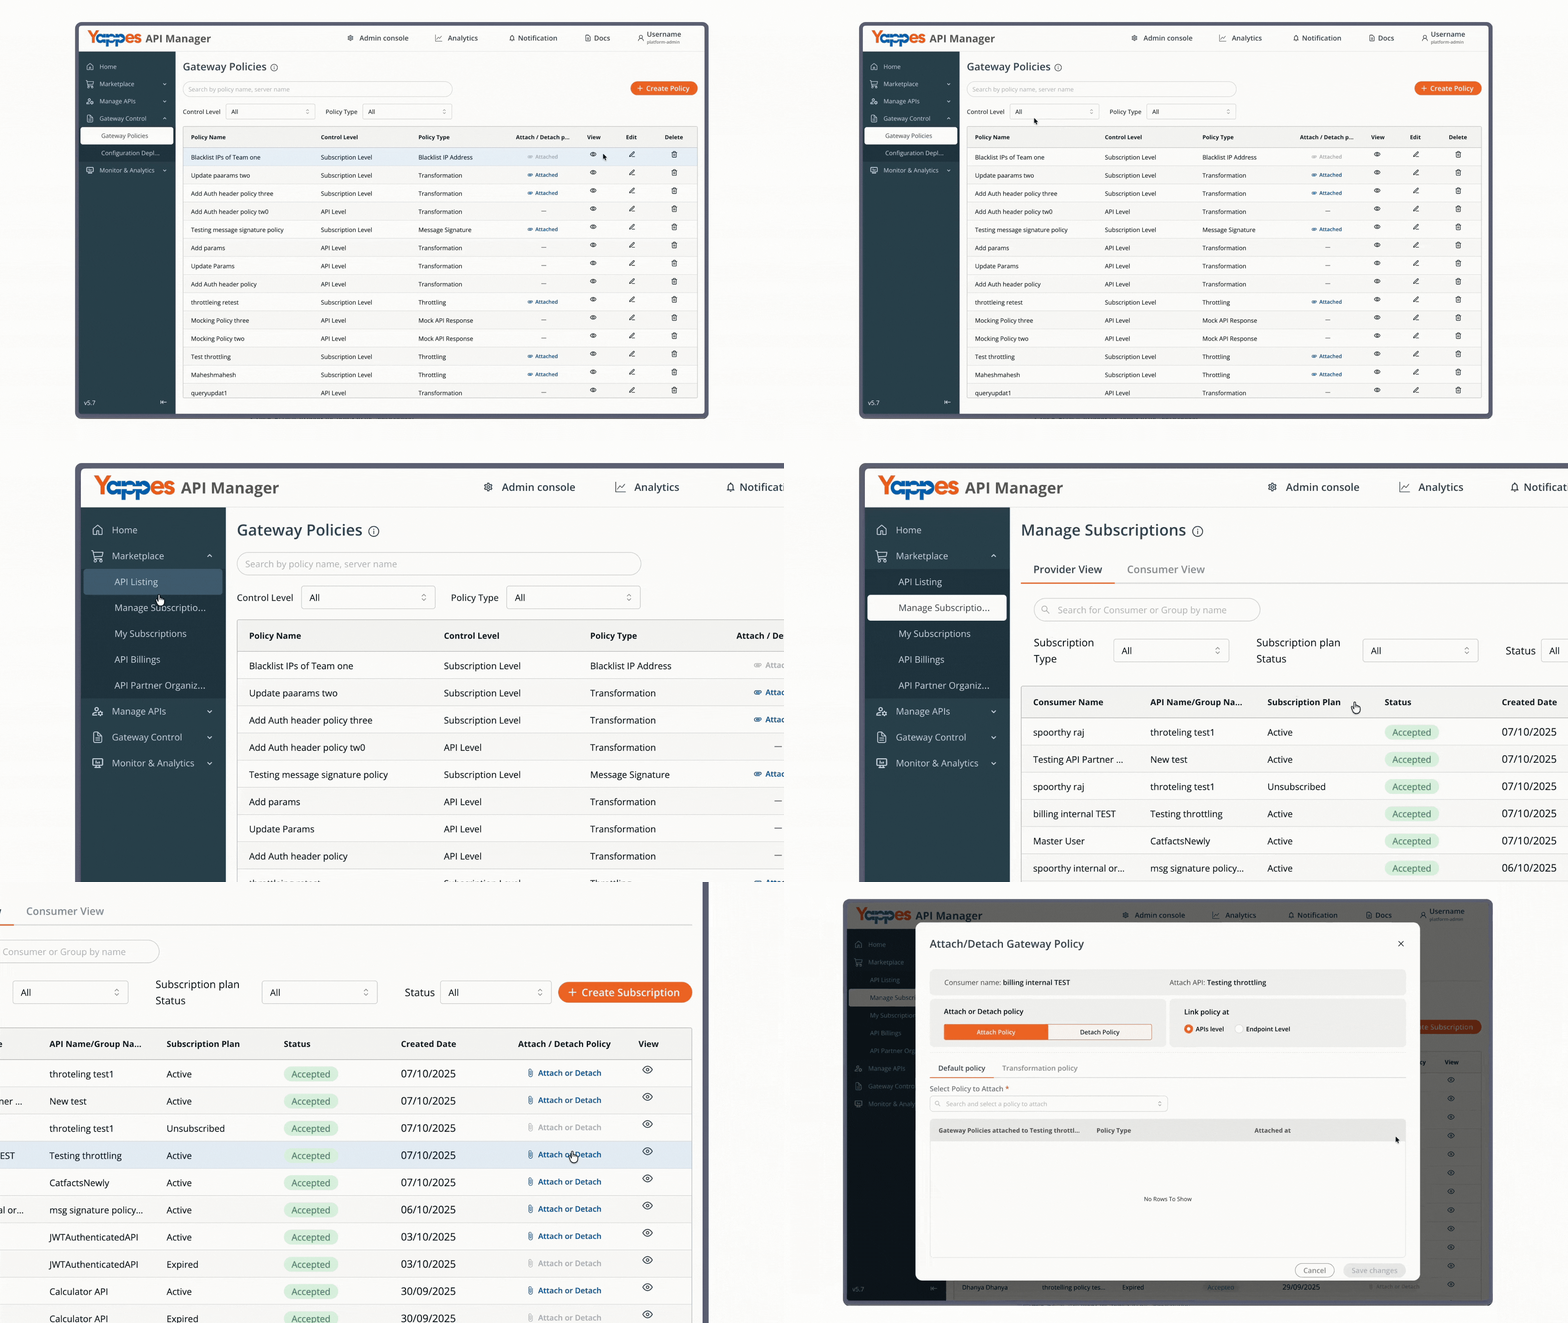
Step 2: Attach the Policy to Subscriptions
- Click the
Attach or Detachbutton for the relevant subscription. - The policy attachment dialog will open.
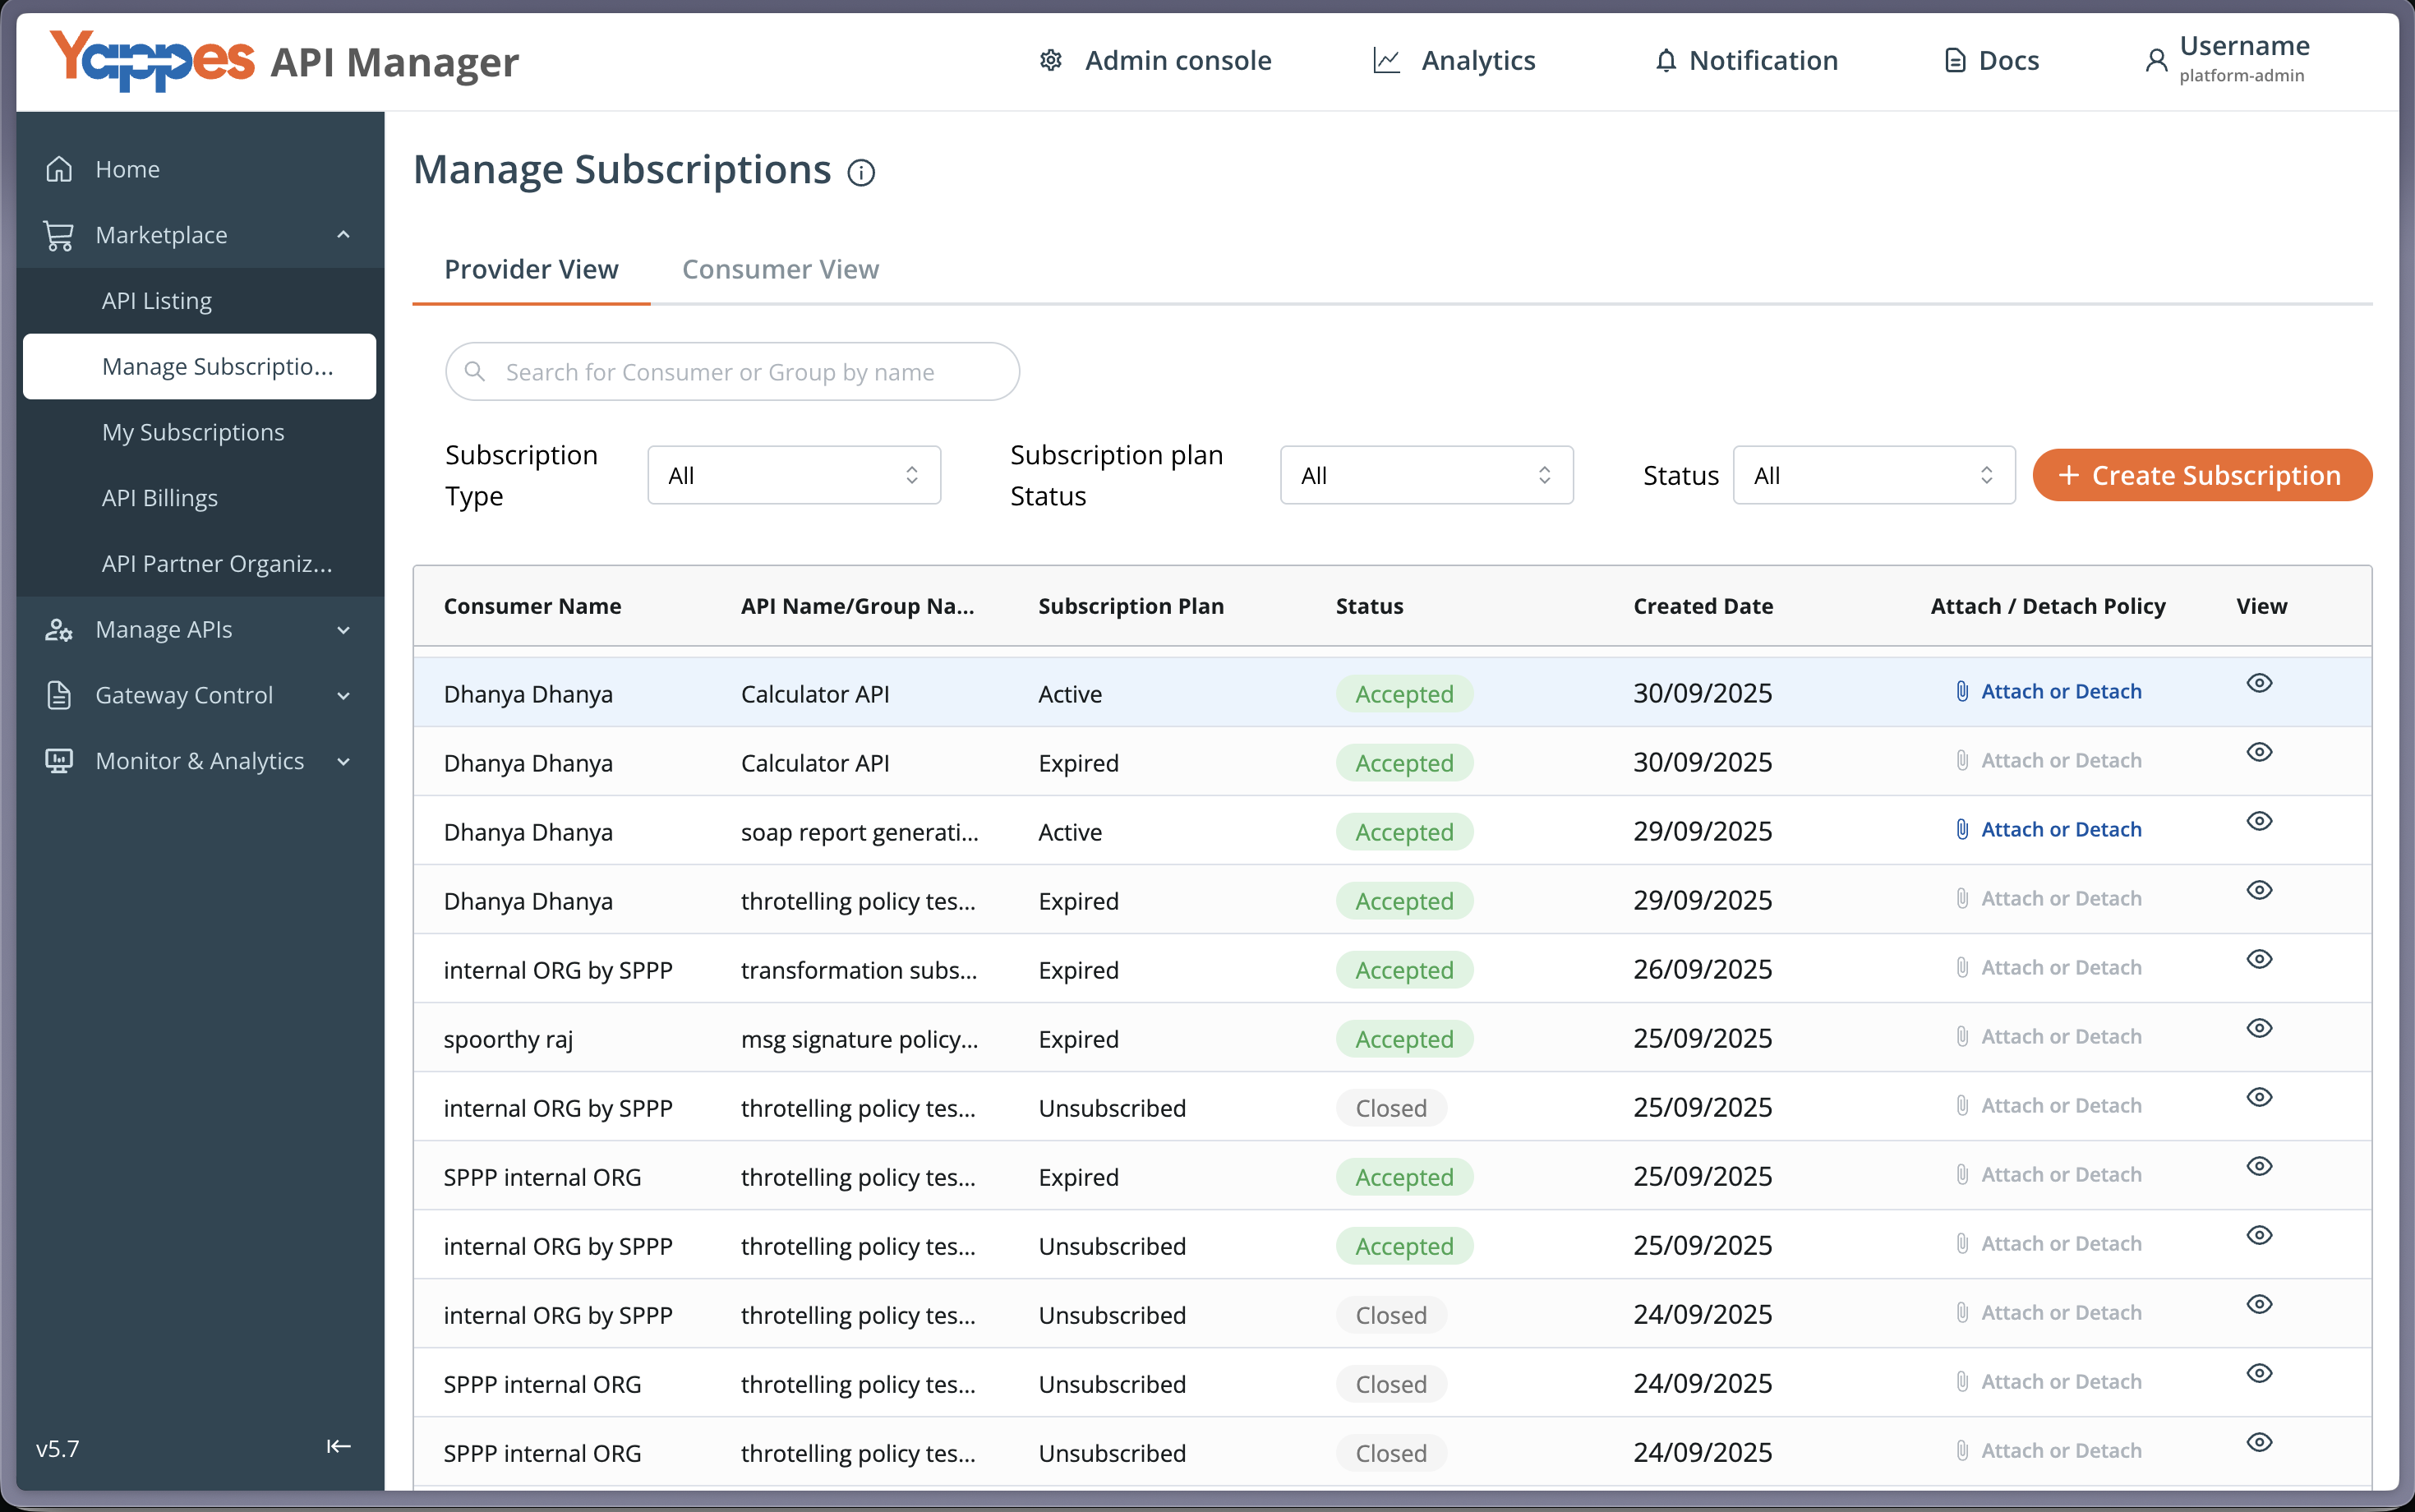
Step 3: Select and Attach the Policy
- In the
Select Policy to Attachdropdown field, choose your newly createdVerify Headerspolicy (e.g.,Verify_Headers_1). - Choose the attachment level:
API Level:Applies Verify Headers to all endpoints of the selected API.Endpoint Level:Applies Verify Headers to specific endpoints only.- Click
Save Changesto apply the policy to the subscription.
Understanding the Interface
Verify Headers Configuration Screen
| Field | Description | Required |
|---|---|---|
| Policy Name | Identifies the policy | ✅ |
| Description | Explains the policy purpose | ❌ |
| Required Headers | Headers that must exist | ✅ |
| Verification Rules | Header value validation logic | ✅ |
| Status Toggle | Enables or disables the policy | ✅ |
Supported Content Types
Verify Headers supports the following request content types:
application/jsonapplication/xmlapplication/x-www-form-urlencoded
Header Validation Logic
- Operators such as Equals and Includes define match behavior.
- All configured rules must pass for the request to be allowed.
Header Operator Behavior
| Operator | Description | Example |
|---|---|---|
| Equals | Exact match required | browser = Chrome |
| Not Equals | Value must not match the specified value | browser != Firefox |
| Includes | Partial match allowed | browser includes Chrome |
| Regex | Matches value using a regular expression | browser matches ^Chrome.* |
What Happens If Validation Fails
If a request does not meet policy rules:
- The request is blocked at the gateway.
- Backend services are not invoked.
- An HTTP error response is returned.
Common Failure Reasons
- Required header missing
- Header value mismatch
- Operator condition fails
Example API Requests
Valid Request
curl -X GET \
  -H "name: John" \
  -H "age: 30" \
  -H "browser: Chrome" \
  https://api.example.com/v1/resource
Invalid Request (Blocked)
curl -X GET \
  -H "name: John" \
  https://api.example.com/v1/resource
Blocked: Missing required header age
Policy Evaluation Order
Subscription-levelpolicies are evaluated first.- Verify Headers validation occurs before request forwarding.
- If validation fails, no further policies are executed.
Verification and Testing
- Send a request with all required headers → ✅ Allowed
- Remove or change a header → ❌ Blocked
Troubleshooting
| Issue | Cause | Resolution |
|---|---|---|
| Request blocked | Missing header | Add required header |
| Validation failed | Value mismatch | Check operator and value |
| Policy not applied | Disabled policy | Enable the policy |
| Unexpected failures | Case mismatch | Use lowercase headers |
Best Practices
| Aspect | Recommendation |
|---|---|
| Header Documentation | Document all headers in the API details page |
| Naming Consistency | Always use lowercase headers |
| Rule Simplicity | Avoid complex validation logic |
| Testing | Test in sandbox before production |
| Change Management | Notify consumers before updates |
Impact of Policy Changes
- Existing clients may fail if header rules change.
- Always test policy updates before production rollout.
❓ Frequently Asked Questions
Is Verify Headers case-sensitive?
Yes. Header names and values are evaluated exactly as configured.
Can multiple Verify Headers policies be active?
Yes. All active policies must pass validation.
Does this affect backend performance?
No. Validation occurs at the gateway level.
Pro Tip
Use Verify Headers to enforce request standards at the gateway level.
This prevents invalid requests from reaching backend services and helps catch integration issues early.