Message Signature - Yappes Platform Guide
Overview
The Yappes Message Signature allows you to implement cryptographic request validation for your APIs so you can ensure data integrity and prevent tampering during transmission.
This security feature creates a unique digital fingerprint for each API request by combining the request URL, headers, query parameters, and payload into a cryptographically signed signature using SHA256 encryption.
By implementing Message Signature at the subscription level, you gain enterprise-grade protection against man-in-the-middle attacks and request tampering. The feature seamlessly integrates with your existing API workflows, validating each request at the gateway level before processing. This ensures that only authenticated, unmodified requests reach your backend services, providing peace of mind for sensitive data transactions and regulatory compliance requirements.
The Message Signature policy can be created once and attached to any subscription, making it scalable across your API ecosystem. It supports multiple content types including JSON, XML, and form-encoded data, this feature adapts to diverse API architectures while maintaining consistent security standards.
Prerequisites
Before implementing Message Signature on the Yappes platform, ensure you have:
Required Access and Permissions
- Active Yappes platform account with API Manager access
- Subscription-level policy creation permissions
- Access to the Gateway Control section
- Valid subscription with API access
Technical Requirements
- Access to private keys via Marketplace → My Subscriptions
- Ability to modify API request headers
- Client-side capability to implement SHA256 hashing
- Support for one of the following content types:
application/jsonapplication/xmlapplication/x-www-form-urlencoded
Custom error and message
For error scenarios, you can override the default HTTP status code, error code, and message. See Custom Error and Message.
Step-by-Step Implementation
Method 1: Creating the Message Signature Policy
Step 1: Navigate to Gateway Policies
- Locate
Gateway Control → Gateway Policiesin the main navigation menu - The policies management interface will display
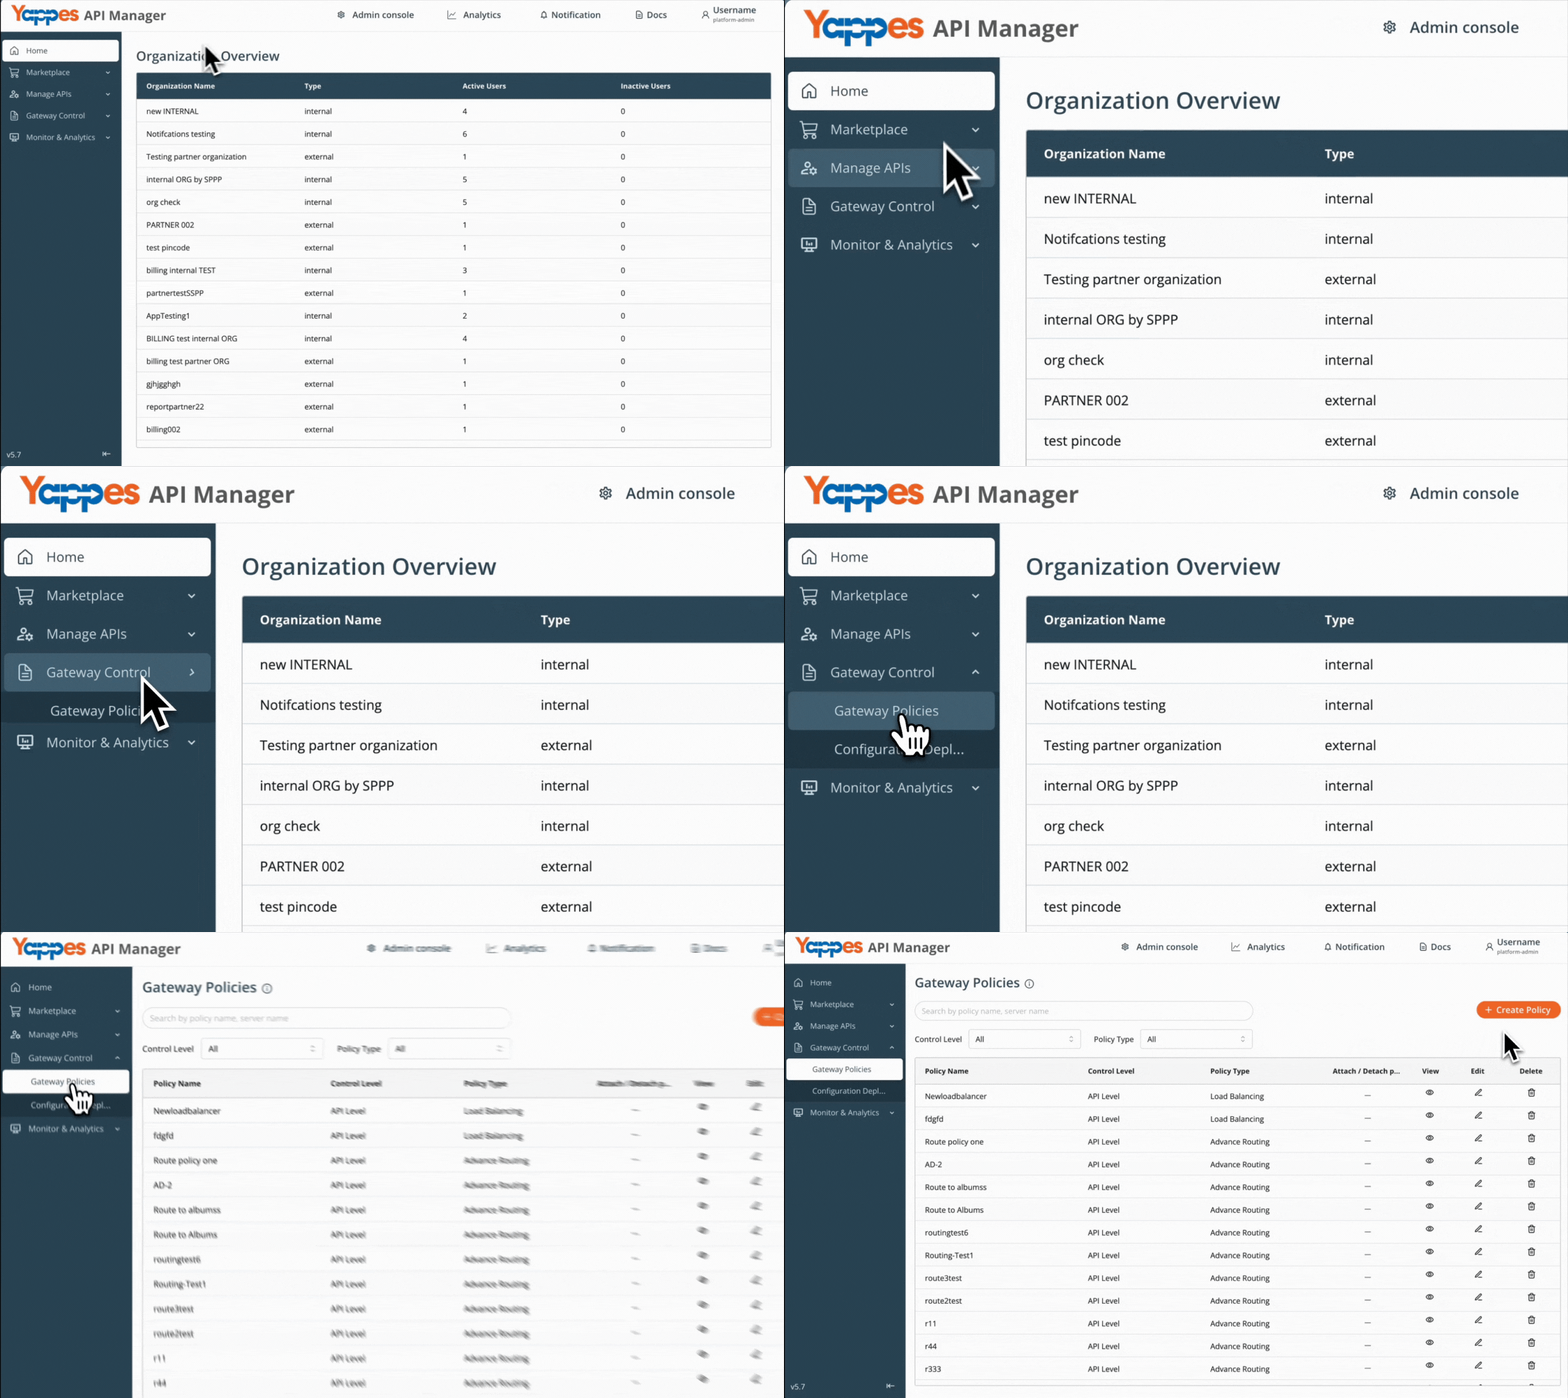
Step 2: Initialize New Policy Creation
- Click
+ Create Policybutton - The policy creation modal will open
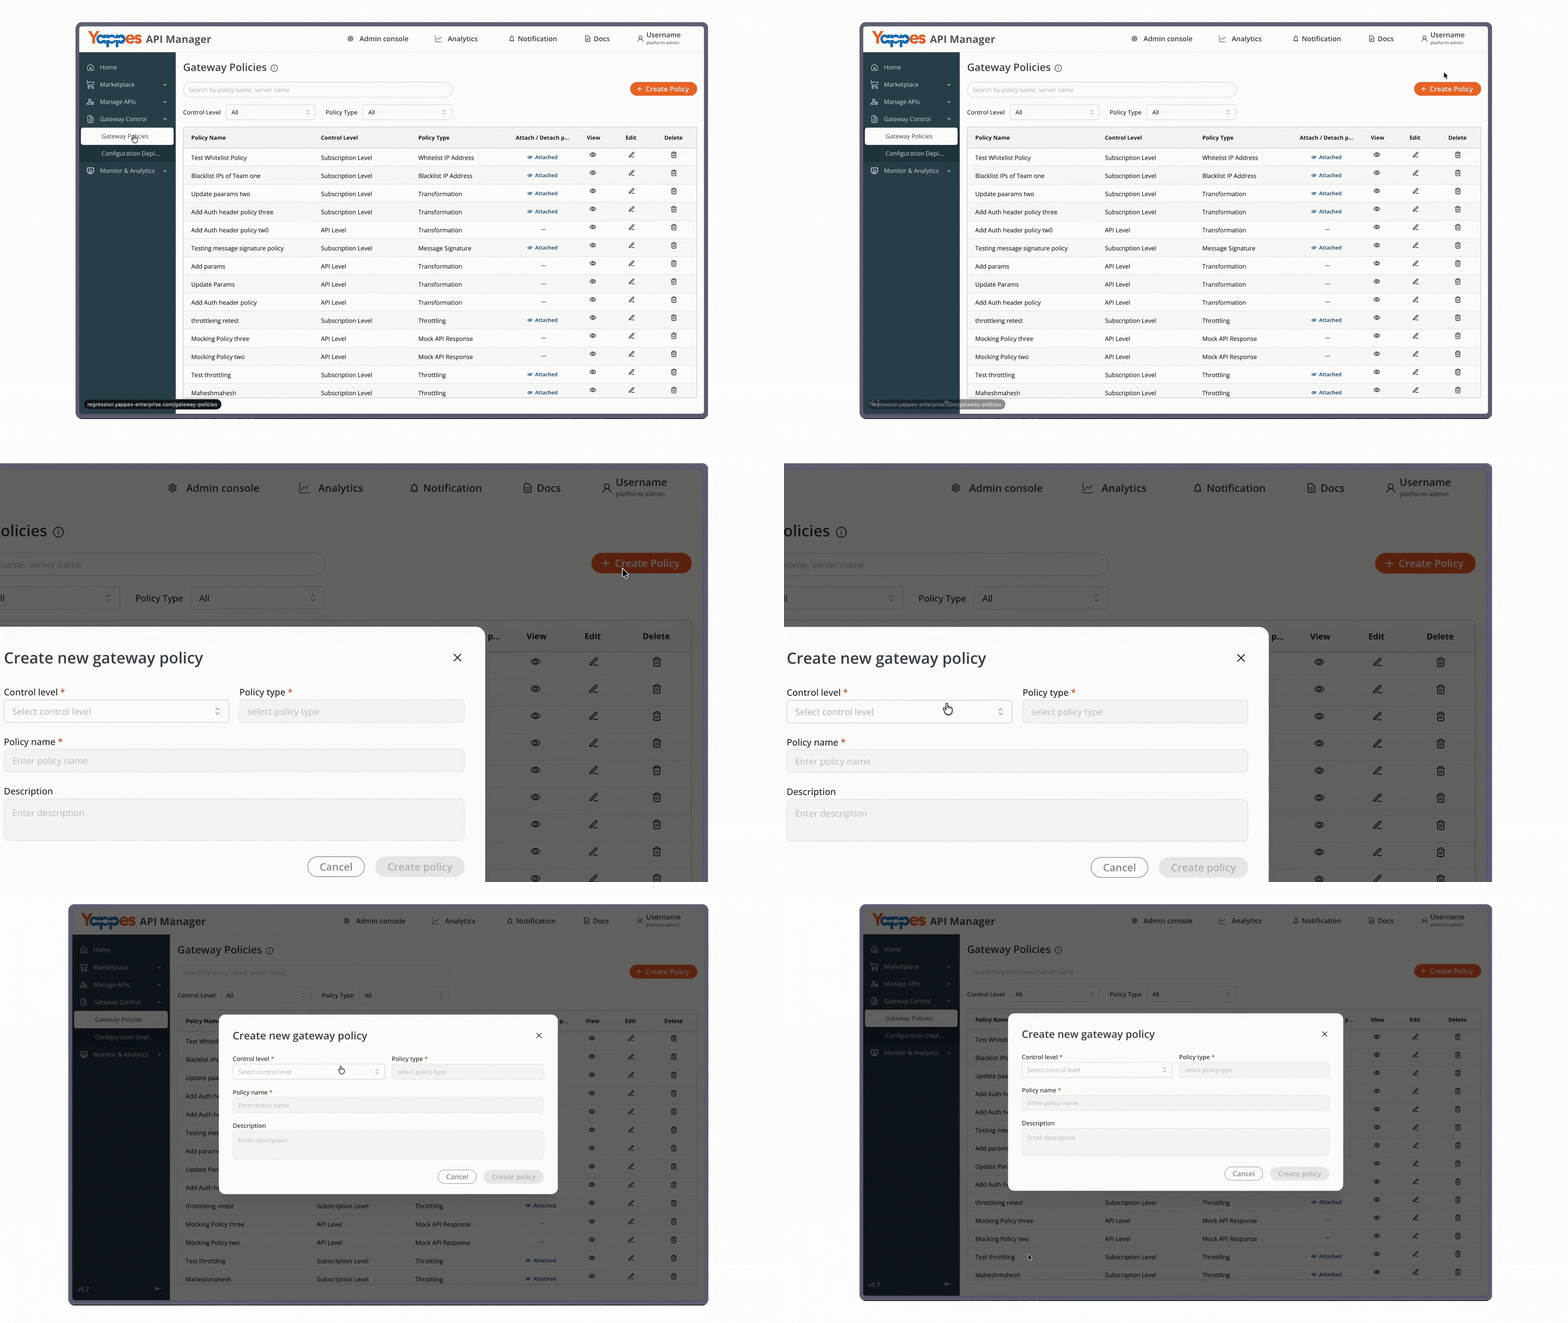
Step 3: Configure Policy Settings
-
Set the
Control LeveltoSubscription Level -
In the
Policy Typedropdown, selectMessage Signature -
These settings determine the policy scope and functionality
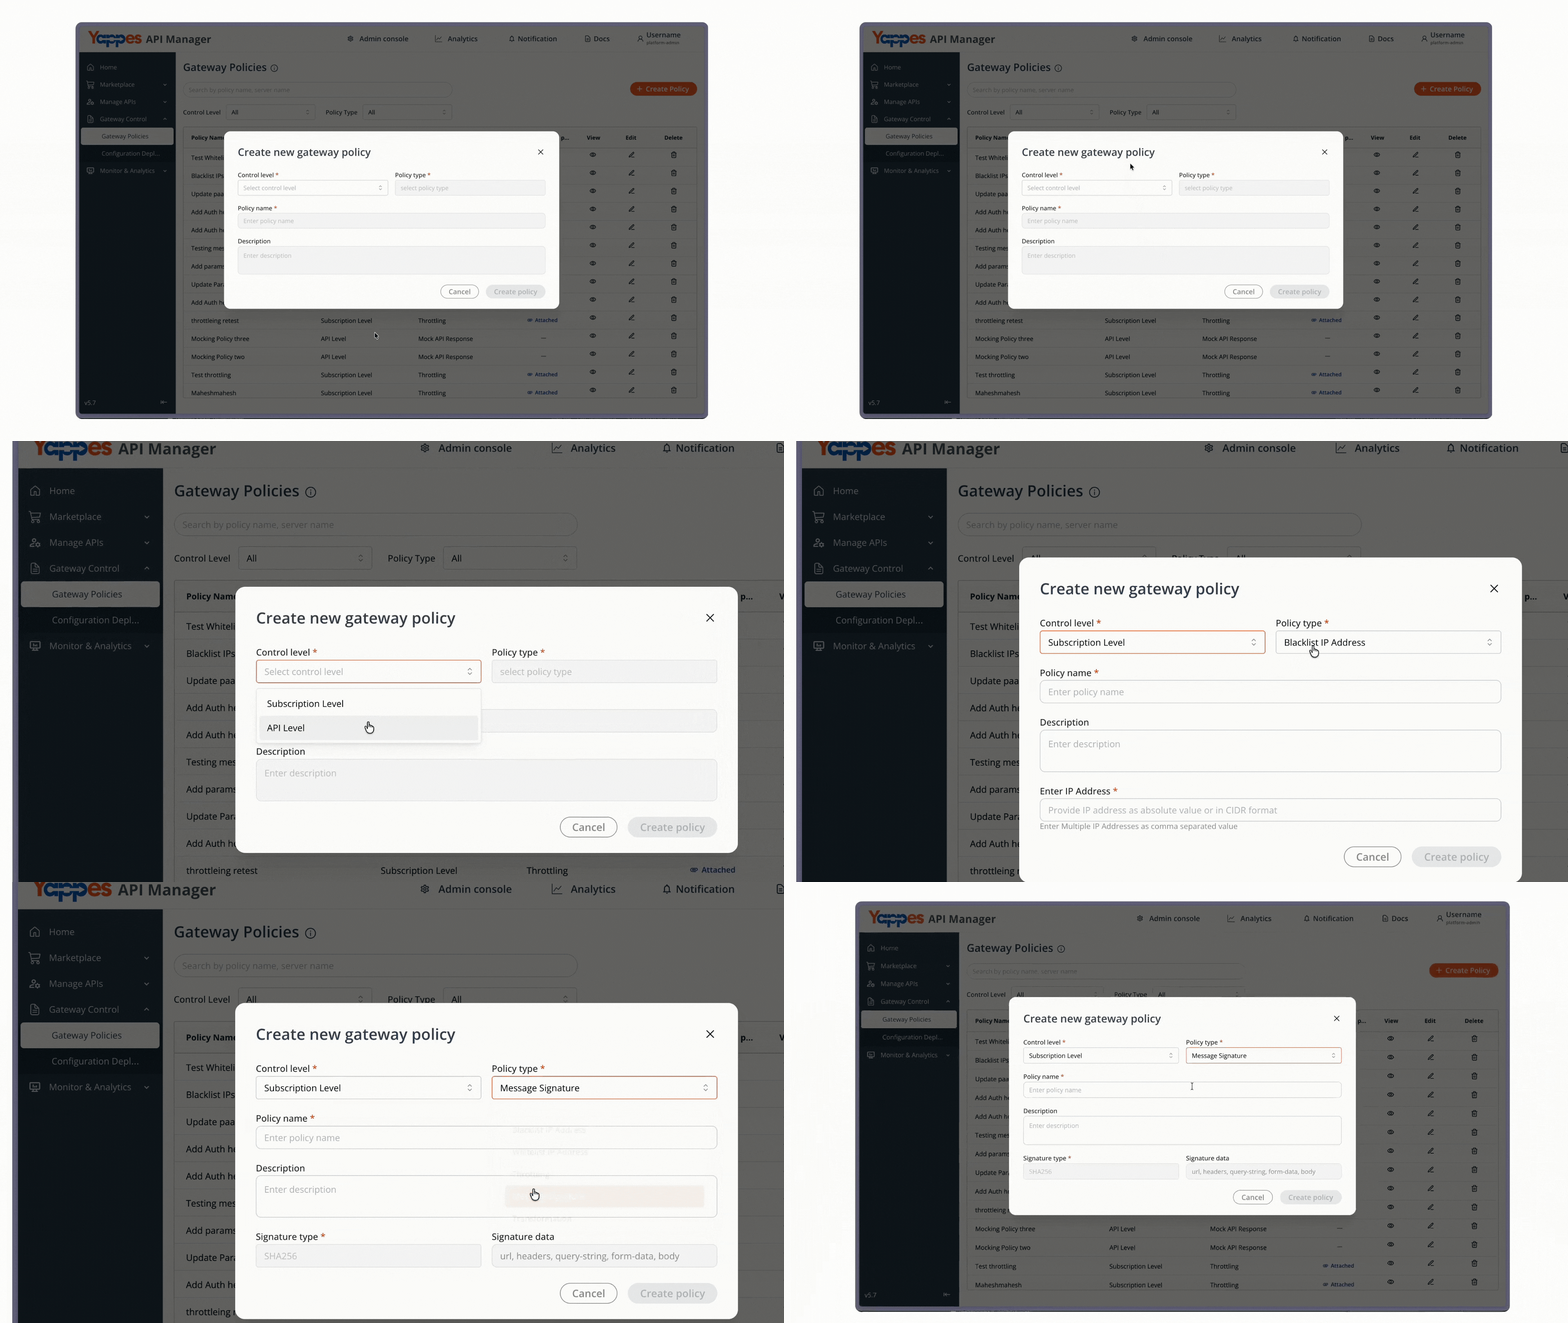
Step 4: Define Policy Details
-
Enter a unique
Policy Namefor identification -
Add a comprehensive Description of the policy purpose
-
Configure the required headers for signature validation
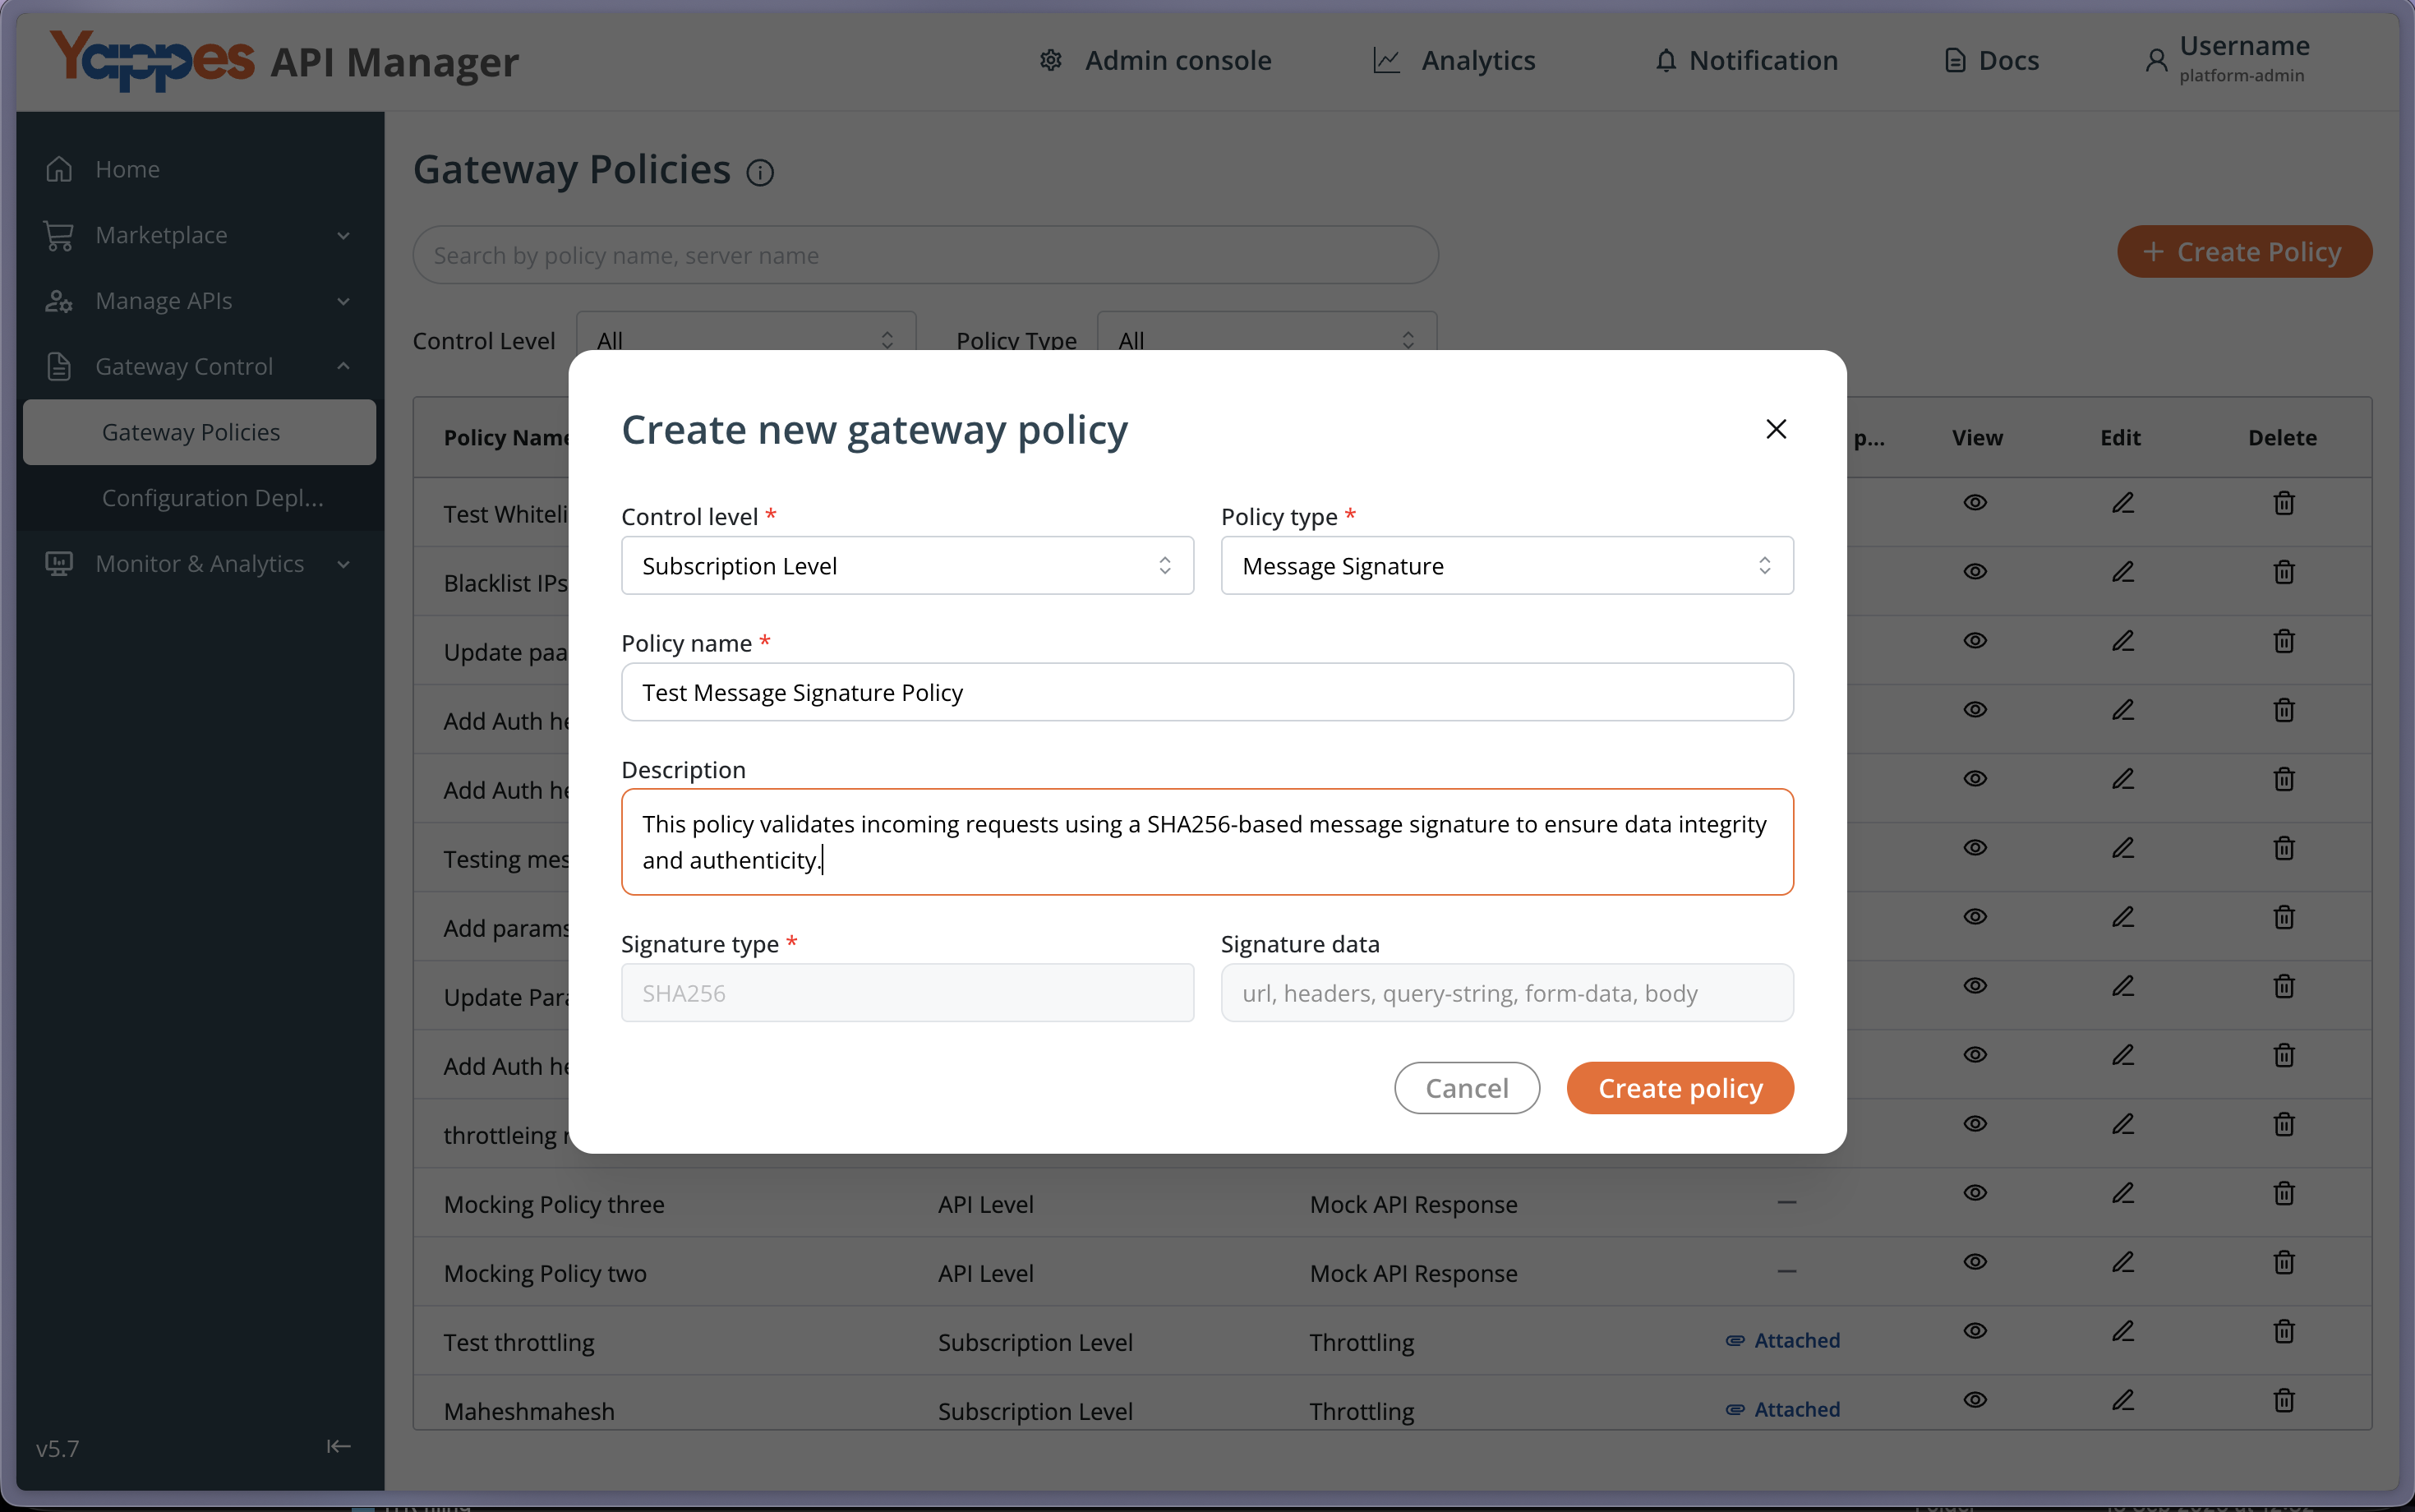
Step 5: Configure Signature type and data.
-
Signature typewill be prefilled with default valueSHA256. -
Signature datawill be prefilled withurl, headers, query-string, form-data, body. -
These fields are disabled.
Step 6: Navigate to Manage Subscriptions
- Go to
Marketplace → Manage Subscriptionin the main navigation menu. . - Active subscriptions will display in the manage subscription interface.
- Select
Attach or Detachfrom subscription list.
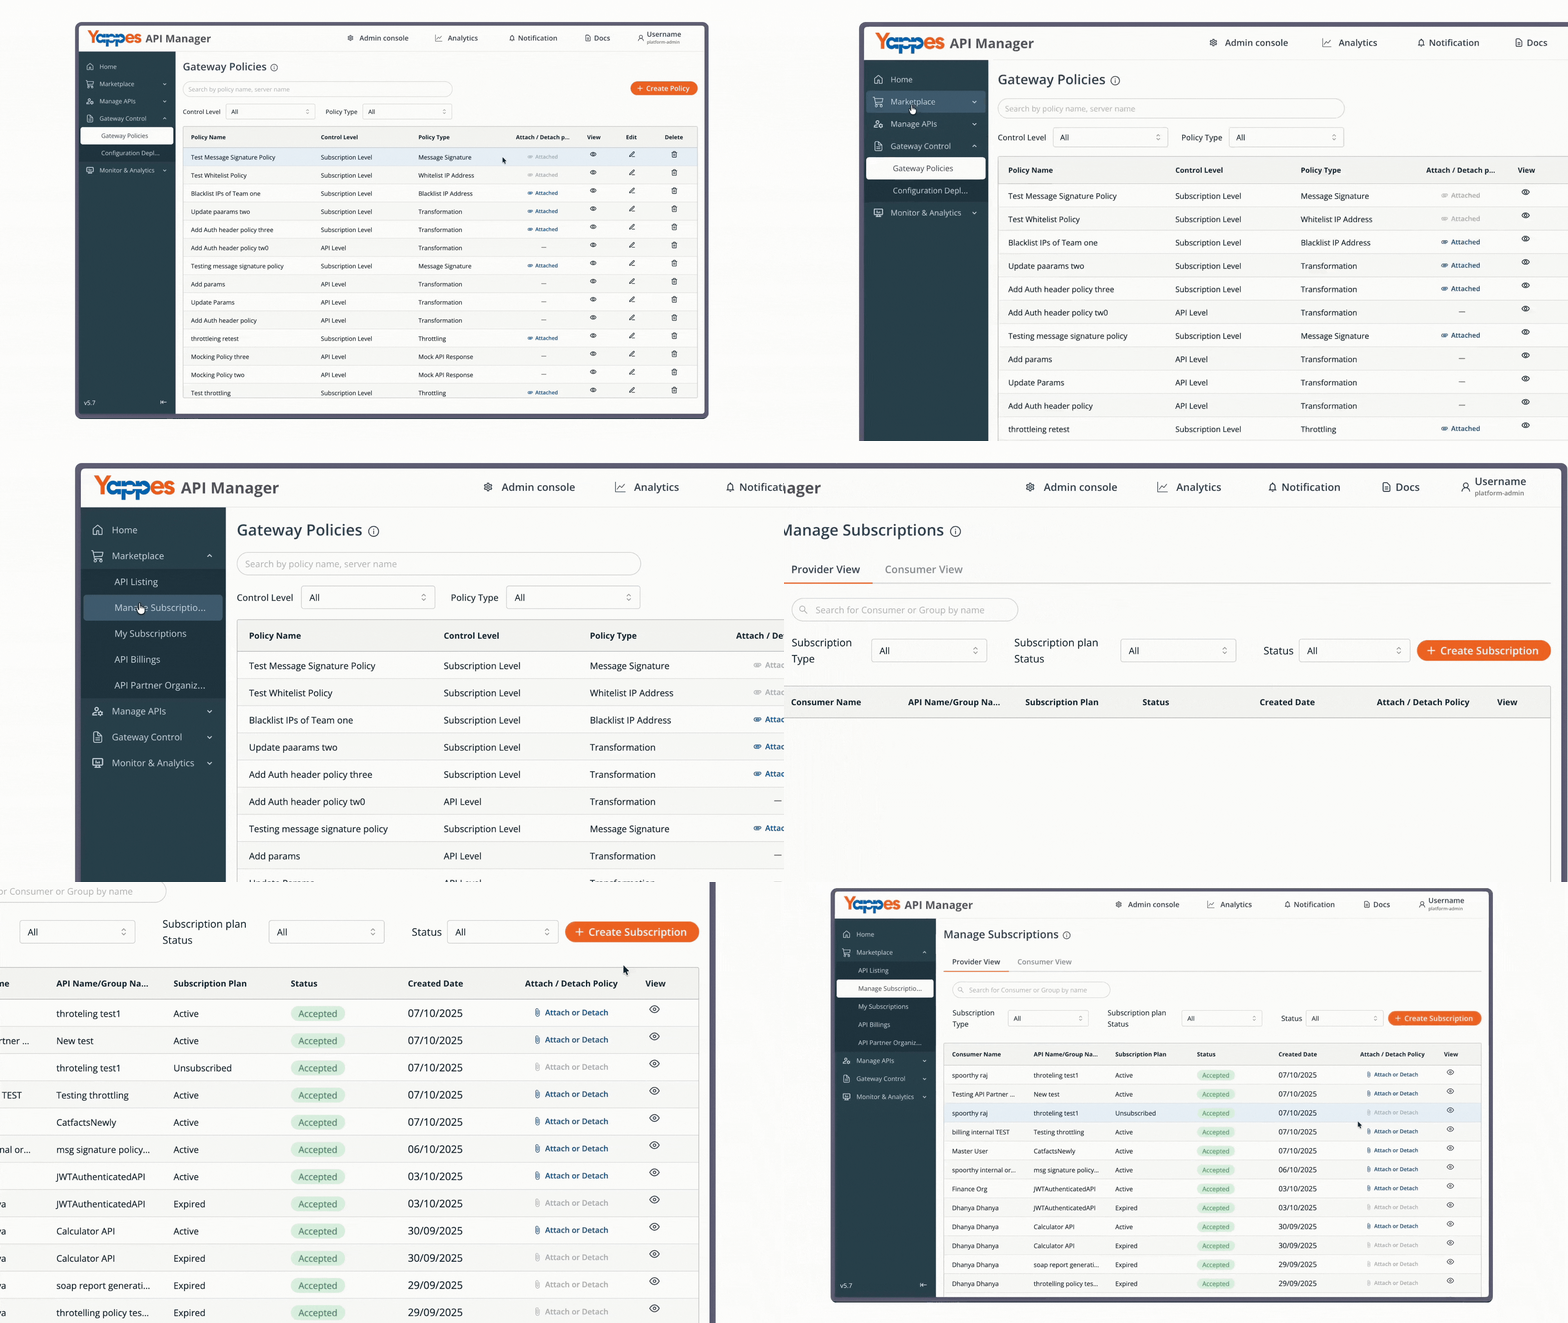
Step 7: Select Message Signature policy to attach to subscription
- Select
Message Signaturepolicy from theSelect Policy to Attachdropdown. - Only one Message Signature can be attached to subscrption.
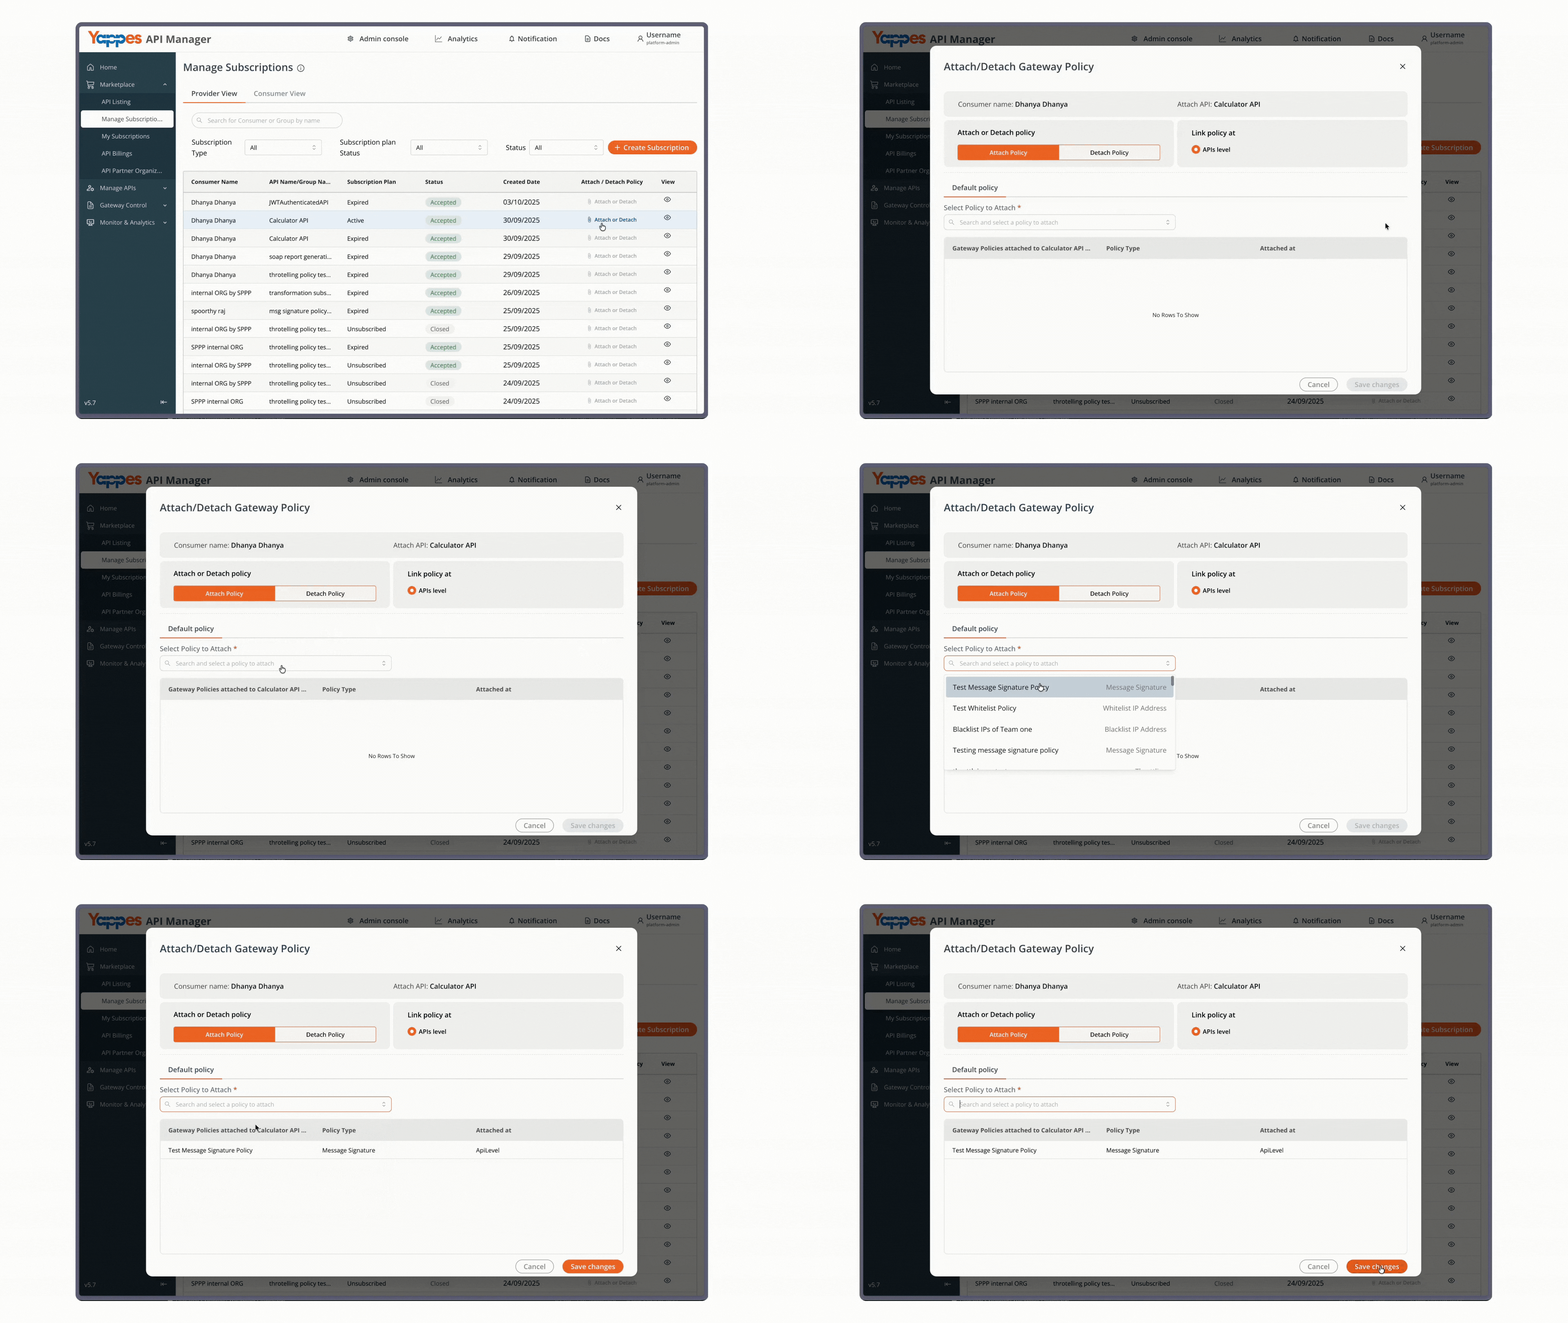
Step 8: Save and Attach the Policy
- Click
Save changesto save the configuration - Wait for confirmation message
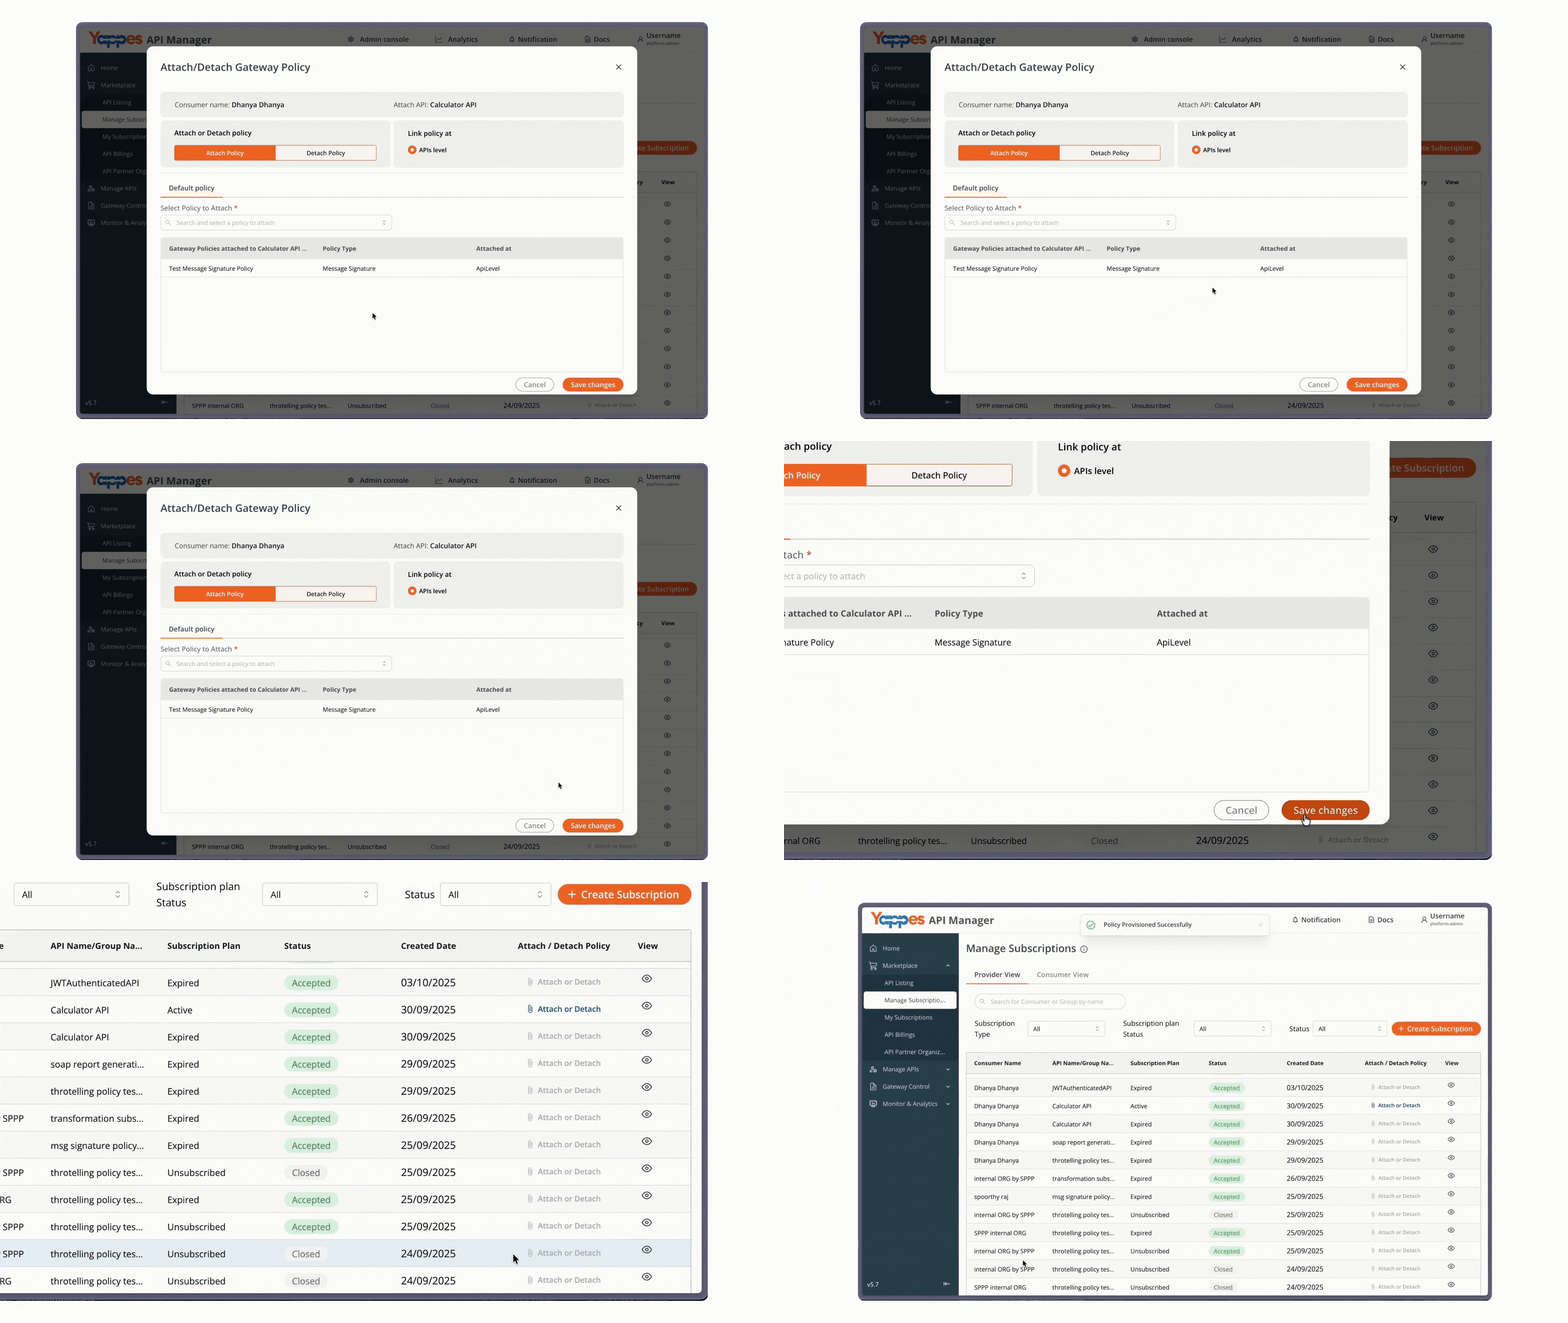
Step 9: Navigate to Manage Subscriptions
- Go to
Marketplace → My Subscriptionsin the main navigation menu. . - Active subscriptions will display in the manage subscription interface.
Step 10: Retrieve Your Private Key
- Select your active subscription
- Click
Keystab - Copy your
Private Keyfor signature generation
Step 11: Prepare Request Components
// Request Components Example
const requestData = {
  url: "http://bankapi.apizone001.sandbox.yappes.local:98/deposit/money",
  headers: {
    "header1": "value1",
    "header2": "value2",
    "x-accept-version": "v0.2.0",
    "x-yappes-key": "350d3cd8fc438342cd2fc4c28be6a5862c6c6db729897369b39b28617377e13f",
    "x-yappes-subkey": "95e35d2c04350d97642b06c15c731215a5175f40b162c9f682b479b495b77f97"
  },
  queryParams: {
    "qs1": "v1",
    "qs2": "v2"
  },
  body: {
    "reference_number": 2,
    "deposite": 5000.1,
    "withdraw": 0,
    "current_balance": 5000.1
  }
};
Step 12: Sort Headers Alphabetically
const sortedHeaders = Object.keys(requestData.headers)
  .sort()
  .reduce((sorted, key) => {
    sorted[key] = requestData.headers[key];
    return sorted;
  }, {});
Step 13: Create Concatenated String
// Concatenation format
finalString = URL + headerString + queryParamsString + formDataString;

// Example result
"http://bankapi.apizone001.sandbox.yappes.local:98/deposit/money,
 header1:value1,
 header2:value2,
 qs1:v1,
 qs2:v2,
 reference_number:2,
 deposite:5000.1,
 withdraw:0,
 current_balance:5000.1"
Step 14: Generate the Signature
const crypto = require('crypto');

// Private key from subscription
const privateKey = "your-private-key-here";

// Generate signature
const signature = crypto
  .createHmac('sha256', privateKey)
  .update(finalString)
  .digest('hex');
Step 15: Add Signature to Request
curl -i -v \
 -H "header1: value1" \
 -H "header2: value2" \
 -H "Content-Type: application/json" \
 -H "X-Yappes-Subkey:95e35d2c04350d97642b06c15c731215a5175f40b162c9f682b479b495b77f97" \
 -H "X-ACCEPT-VERSION: v0.2.0" \
 -H "X-Yappes-Key:350d3cd8fc438342cd2fc4c28be6a5862c6c6db729897369b39b28617377e13f" \
 -H "x-yappes-signature: [generated-signature-here]" \
 -X POST \
 -d '{"reference_number":2,"deposite":5000.1,"withdraw":0,"current_balance":5000.1}' \
 "http://bankapi.apizone001.sandbox.yappes.local:98/deposit/money?qs1=v1&qs2=v2"
Understanding the Interface
Policy Configuration
| Interface Element | Purpose | Required |
|---|---|---|
| Control Level | Defines policy scope (Subscription Level) | Yes |
| Policy Name | Unique identifier for the policy | Yes |
| Description | Explains policy purpose and usage | Optional |
| Header Config | Lists headers included in signature | Yes |
| Algorithm | SHA256 (default & only option) | Yes |
Subscription Keys
| Section | Description | Access Path |
|---|---|---|
| Private Keys | Key for signature generation | Marketplace → My Subscriptions → Keys |
| Public Keys | Used for verification (gateway-side) | Auto-managed by Yappes |
| Key Rotation | Option to regenerate keys if compromised | Keys → Regenerate |
Configuration and Settings
Header Rules
- Headers must be in lowercase.
- Sorted alphabetically.
- Both custom and standard Yappes headers included.
- Example:
header1,header2
Standard Yappes Headers (automatically included):
- x-yappes-key
- x-yappes-subkey
- x-accept-version
- x-yappes-env
Supported Content Types
application/jsonapplication/xmlapplication/x-www-form-urlencoded
Signature Algorithm
- SHA256 (mandatory)
- HMAC-based generation
- Hexadecimal digest output
Best Practices
- Header Documentation: Document all headers in API details page.
- Key Management: Store private keys securely, never commit to version control.
- Testing: Validate in sandbox before production.
- Error Handling: Implement retry logic for validation failures.
Verification and Testing
Step 1: Verify Policy Attachment
- Ensure policy is Active under subscription settings.
- Confirm it is attached to the correct endpoints.
Step 2: Test Signature Generation
// Test script for signature verification
const testSignature = () => {
  const testData = { url: "your-api-url", headers: {}, query: {}, body: {} };
  const signature = generateSignature(testData);
  console.log("Generated Signature:", signature);

  if (signature.length === 64 && /^[a-f0-9]+$/.test(signature)) {
    console.log("Signature format valid");
  } else {
    console.log("Invalid signature format");
  }
};
Step 3: Gateway Validation Check
- ✅ Request passes without errors.
- ✅ Response returns expected data.
- ✅ No signature validation errors in logs.
Troubleshooting
Debugging Checklist
- Correct private key retrieved.
- Headers sorted alphabetically.
- All headers documented.
- Concatenation format correct.
- SHA256 algorithm used.
- Signature added as
x-yappes-signature.
Gateway Validation Process
- Header Check: Plugin verifies presence of signature.
- Signature Recreation: Gateway regenerates signature.
- Comparison: Checks match.
- Decision: Request allowed or rejected.
Common Issues
| Issue | Error Message | Solution |
|---|---|---|
| Missing Signature Header | "x-yappes-signature not found" |
Add signature header to request |
| Invalid Signature | "Signature validation failed" |
Verify header order & concatenation |
| Header Case Mismatch | "Header validation error" |
Convert headers to lowercase |
| Wrong Algorithm | "Unsupported signature algorithm" |
Use SHA256 only |
| Expired Key | "Invalid subscription key" |
Check validity in My Subscriptions |